
Managing analytics data
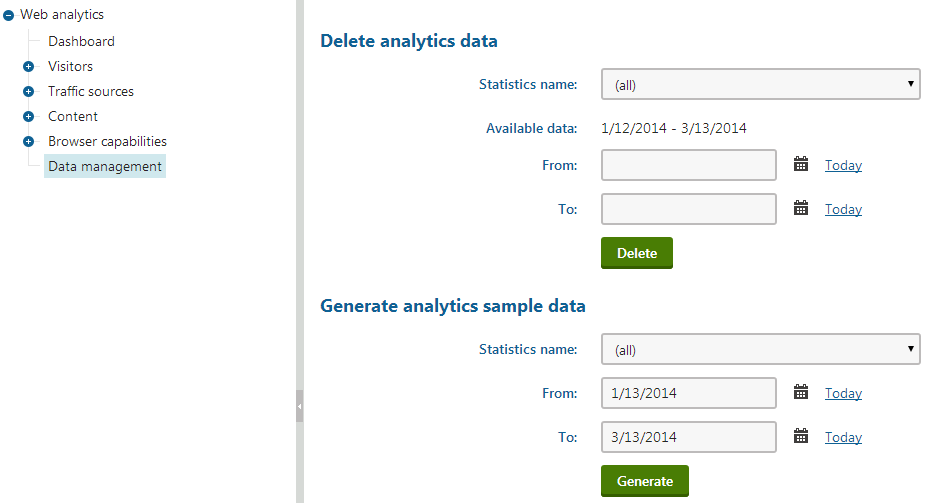
You can manually manage the data that stores how many hits were logged for individual web analytics statistics. Open the Web analytics application and select Data management in the tree menu.
Data security
Performing the actions available in this section permanently modifies the analytics records of the website. Only use them if you are sure that doing so will not delete or overwrite valuable statistical data.
For security reasons, the actions can only be performed by users who have the Manage data permission for the Web analytics module.
By default, the Data management UI element is only available for users with the Global administrator privilege level.
Deleting analytics data
When running a site with web analytics enabled, the amount of data that is stored may grow quite large over time, particularly when tracking many types of events or on high‑traffic websites.
- Open the Web analytics application and select Data management.
- Choose which statistic’s data to delete through the Statistic name selector.
- Select the (all) option to clear all analytics data.
- (Optional) Fill in dates into the From and To field to delete only hits that were logged during a specific time range.
- Leaving the time interval empty deletes all data for the selected statistic.
- Click Delete.
Generating sample analytics data
You can generate random sample data for web analytics statistics. This simulates hits measured over the specified time period. You can select the specific statistic and time interval. The purpose of this function is to allow testing or evaluation of the web analytics and the various types of statistics. It would otherwise take a certain amount of time and traffic to naturally log a realistic amount of data for a website.
Note
The data generation process is a highly resource‑intensive operation, since it must create a very large amount of records in multiple database tables.
For this reason, you need to set a reasonably short time interval to prevent time-out issues. This depends on the performance of the server used to host the site, but it is recommended to avoid generating more than six months of data in a single operation.
Setting up automatic data cleanup
You can configure the system to automatically delete old web analytics data that is no longer needed. The deletion is performed by the Remove analytics data global scheduled task. By default, this task is disabled to prevent unwanted deletion of data.
To enable automatic data removal for web analytics:
- Open the Scheduled tasks application.
- Select (global) in the Site selector.
- Edit () the Remove analytics data scheduled task.
- Configure how often the system runs the task using the scheduling options (Period, Start time, Every, Between, Days).
- Specify how old data must be before the task is allowed to remove it.
- Type a number into the Task data field. This number indicates age in days, so the default value of 720 sets the task to delete only data that is approximately two years old.
- Check Task enabled.
- Click Save.
The system regularly runs the task according to the Task interval and deletes all web analytics data older than the number of days specified in the Task data field.