Creating and modifying product options
Creating product options
Each product option in the Kentico E-commerce Solution belongs to a product option category. To be able to use product options, you first need to create product option categories.
Creating product option categories
You can create product option categories in the Product options application.
Click New product option category.
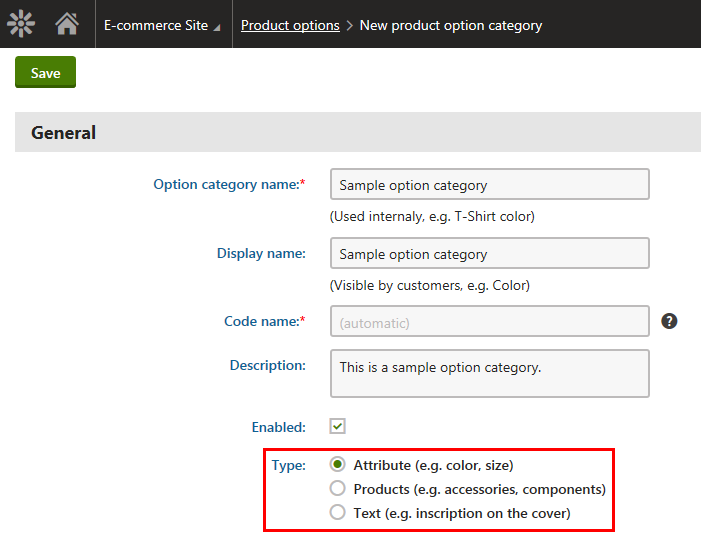
Enter category properties in the General category.
Based on your selection of the type of the category, the system displays more properties in the Options category.
- Attribute – the options represent product attributes, e.g., product’s different colors or sizes.
- Products – the options represent separate products that your customers can optionally purchase together with the main product, e.g. you can offer PCs with printers as options. Options in this category can also represent components of a product, e.g. hardware components of a configurable PC.
- Text – the options allow your customers to purchase products with optional texts. For example, you can offer books with inscriptions.
Click Save.
- The system displays the Options category.
Enter category properties in the Options category.
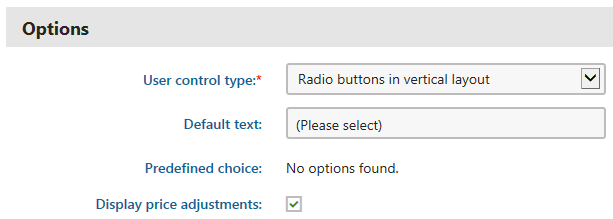
Options category available for the Attribute and Products type option categories:
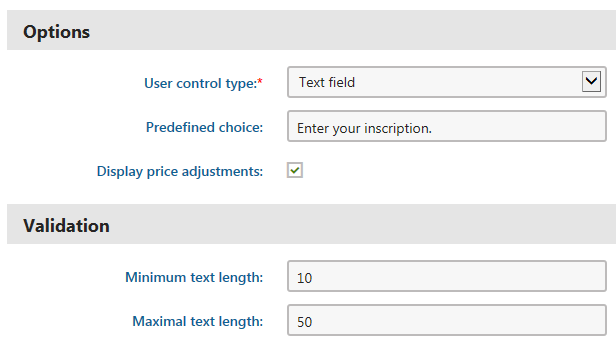
Options category available for the Text type option category:
Click Save.
The system creates an empty product option category of the selected type. You can now add product options to the category.
Creating product option categories while editing products
You can also create product option categories in the Products application while editing products on the Options -> Option categories tab.
- Click New category.
- Enter category properties (see Step 2 through Step 4 in this section).
- Click Save and close the dialog.
If you create a product option category this way, the category is automatically assigned to the respective product.
Adding product options to product option categories
You can add product options only to product option categories of the Attribute and Products types.
This is because categories of the Text type contain only one option, which the system adds automatically.
You can add new product options to existing product option categories in the Product options application.
Select a product option category and click Edit ().
Switch to the Options tab.
Perform the corresponding action:
- Click New option if you are adding a new option to a category of the Attribute type.
- Click New product if you are adding a new option to a category of the Products type.
Enter option properties.
Adding a product option to a category of the Attribute type:

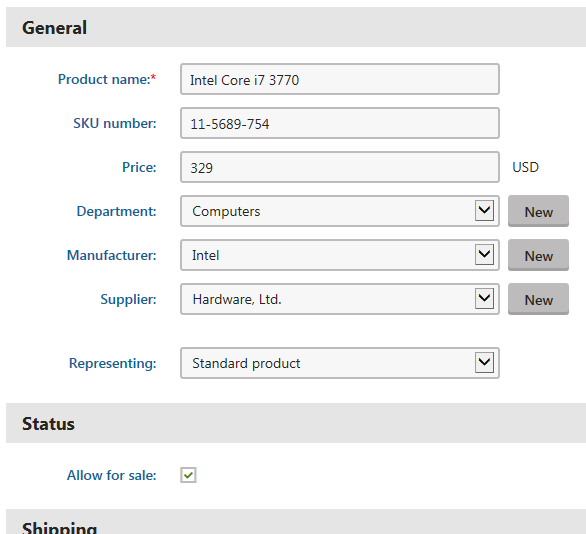
Adding a product option to a category of the Products type:
Click Save
- (Optional) Click Save and create another instead if you want to create more than one option.
The system adds product options to the given category. You can now use the options in your on-line store. For example, you can add the options to selected products, modify options’ properties, etc.
Adding product options to product option categories while editing products
You can also add product options to product option categories in the Products application while editing products on the Options -> Option categories tab.
Select a product option category and click Edit category properties().
Switch to the Options tab .
Perform the corresponding action, i.e., New option or New product.
Enter option properties (see Step 4 in this section).
Click Save and close the dialog.
- (Optional) Click Save and create another instead if you want to create more than one option.
Adding product options to products
In Kentico, you cannot add product options to your products directly. If you want to use options for your products, you must add to each product at least one (non-empty) option category. Later you can specify that the system should use for the products only selected options from the assigned categories (applies to Attribute and Products categories only). Otherwise, the system uses all options from these categories.
Adding product option categories to products
You can add product option categories to products in the Product options application.
Select a product option category and click Edit ().
Switch to the Products tab.
Click Add products to open the Select products dialog.
Select the required products.
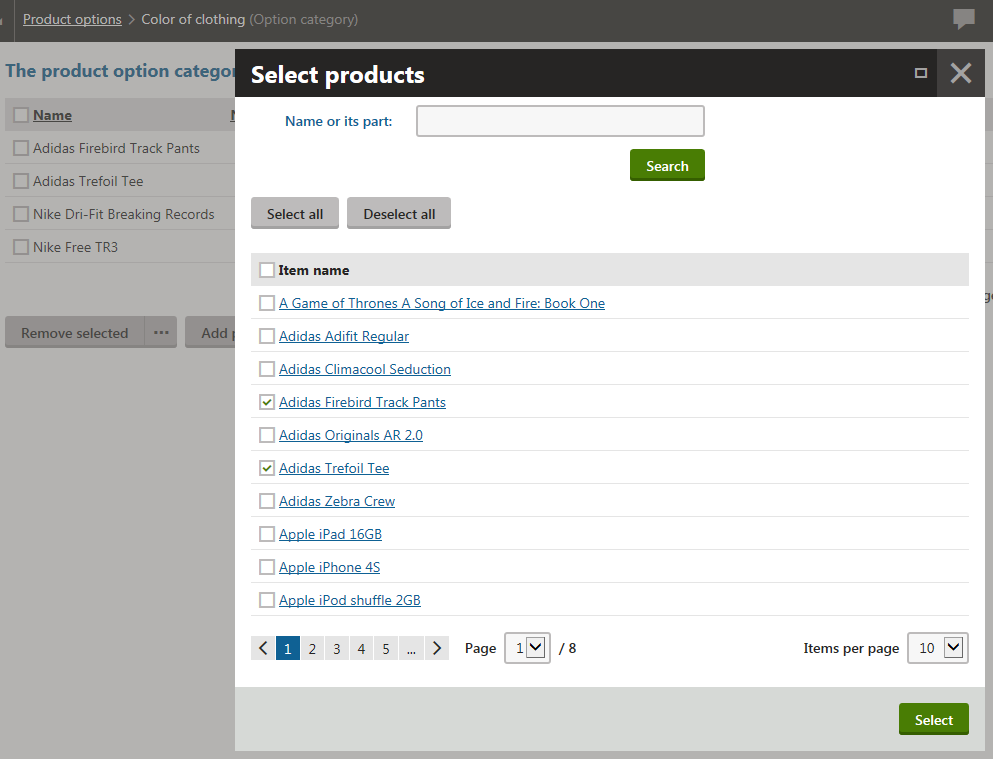
Click Select.
The system adds the current product option category to the selected products including all product options contained in the category. You can now specify which options from this category the system should use for the products.
Adding product option categories to products while editing products
You can also add product option categories to products in the Products application while editing products on the Options -> Option categories tab.
Adding product option categories to multiple products at once (while editing a product)
- Select a product option category and click Edit category properties().
- Switch to the Products tab.
- Click Add products to open the Select products dialog.
- Select the required products.
- Click Select.
The system adds the current product option category to the selected products including all product options contained in the category.
Adding multiple product option categories to the currently edited product
- Click Add categories to open the Select product option categories dialog.
- Select the required categories.
- Click Select.
The system adds the selected product option categories to the currently edited product including all product options contained in the categories.
Adding a new product option category to the currently edited product
- Click New category.
- Enter category properties.
- Click Save and close the dialog.
The system assigns the new option category (empty) to the currently edited product. Now you need to add some options to this category.
Selecting available options for products
You can specify available options for products while editing the products in the Products application.
Select a product and click Edit ().
Switch to the Options -> Option categories tab.
Select a product option category (if available) and click Select available options ().
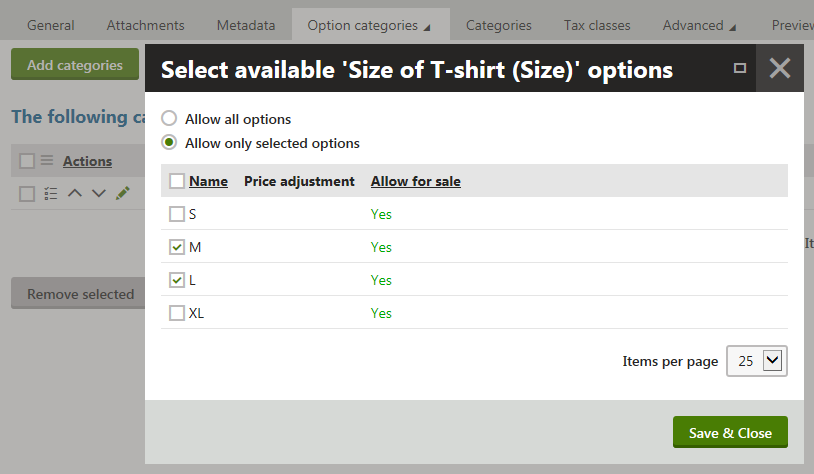
The system opens a dialog where you can specify available options for the product.
(Optional) If the system doesn’t offer any product option category for the product, you can add some by clicking Add categories.
(Optional) If the system doesn’t offer any product option category for the product, you can add a new category by clicking New category.
Select the options as required.
- Allow all options – the system offers all product’s options from the current category to the users.
- Allow only selected options – the system offers only selected products’ options from the current category to the users.
Click Save & Close.
The system now offers only those product options which were specified for the product.
Applying taxes to product options
The Kentico E-commerce Solution allows you to specify which taxes should apply to product options that belong to product option categories of the Products type.
Product options from other category types (Attribute and Text) use tax classes assigned to the main products.
This means the options use tax classes assigned to the products with which you offer them.
You can add taxes to product options in the Product options application.
Select a product option category of the Products type and click Edit ().
Switch to the Options tab.
Select a product option and click Edit ().
Switch to the Tax classes tab.
Click Add tax classes to open the Select tax class dialog.
Select the required tax classes.
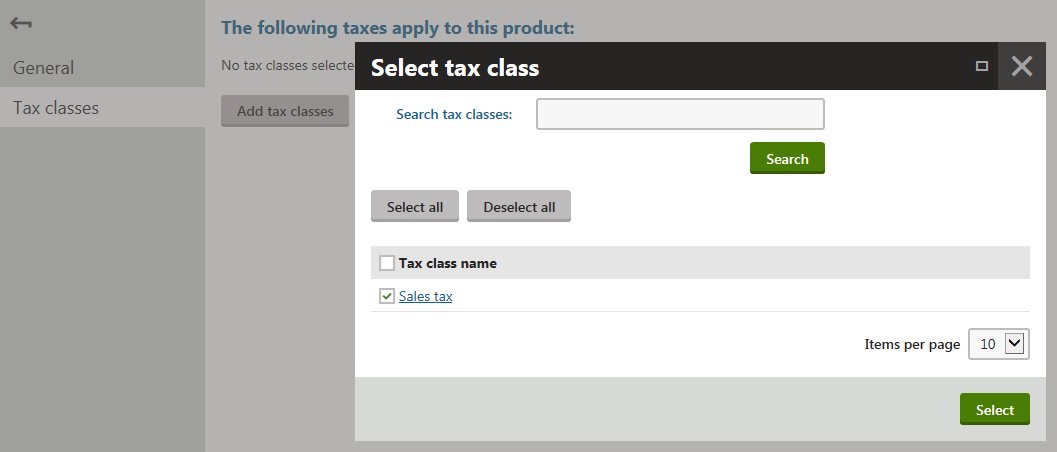
Click Select.
The system adds the taxes to the product option. When your customers purchase products with this option, the system applies to the option the selected taxes.
Applying taxes to product options while editing products
You can also apply taxes to product options in the Products application while editing products on the Options -> Option categories tab.
- Select a product option category of the Products type and click Edit ().
- Switch to the Options tab.
- Select a product option and click Edit ().
- Switch to the Tax classes tab.
- Click Add tax classes to open the Select tax class dialog.
- Select the required tax classes.
- Click Select.
Modifying product options
You can modify product options in the Product options application.
Select the product option category that contains the option you want to modify and click Edit ().
- The system opens the category’s General tab where you can modify option category properties.
Switch to the Options tab.
Select a product option and click Edit ().
Modify product option properties as required.
Click Save.
You can now use the product option (product option category) with its updated settings.
You can also modify product options in the Products application while editing products on the Options -> Option categories tab.
Reference – Product option category properties
|
General |
|
|
Option category name |
The name of the product option category used internally, i.e., available in various parts of the system’s administration interface. The option category name allows your on-line store administrators to use a more descriptive name than the one displayed to the customers on the live site, e.g., Color of shoes. |
|
Display name |
The name of the product option category displayed to your customers on the live site. The display name is supposed to be less descriptive than the option category name because the customers can see this name in the context of a given product, e.g., Color. |
|
Code name |
The string identifier of the product option category object used by developers in the code. Unless there is a reason to set a particular value, you can leave the default (automatic) option, and the system generates an appropriate code name. |
|
Description |
To make the product option category easier to use and maintain, you can add a description of the product option category, for example, an explanation about the scenarios for which the category is intended. |
|
Enabled |
Indicates if the product option category is enabled in the system. Product option categories that are not enabled cannot be assigned to any products. |
|
Type |
Set the type of the product option category. The system offers the following types:
Based on the selection of the type of the product option category, the system displays more properties in the Options category (Attribute, Products) or in the Configuration category (Text). You cannot change the type of the product option category if the options that the category contains:
|
The following properties are available for the Attribute type and Products type option categories:
Options |
|
|
User control type |
Specify the type of selector for options in this product option category. The system offers the following selection types:
|
|
Default text |
Specify a prompt text, e.g. (Please select), displayed in the product option selector when your customers open a page offering the respective product options. For example, your customers can order an operating system as an option for a configurable PC. When the customers open a page with the details of this product, the respective selector displays (Please select), while the system expects further customer input. This field is displayed only when you select Drop-down list in User control type. To ensure correct functionality, you must use the default record text as the value of the Predefined choice property. Otherwise, the system may not display the prompt text as the product option selector’s default value. |
|
Predefined choice |
Specify which options the system selects by default when the customer opens a page offering the respective product options. Only the Check box selection type allows you to pre-select more than one option. If the Display price adjustment field is selected, the system displays the options together with respective price adjustments (if defined), e.g. (+ $29.99). The + and - characters indicate if the adjustment represents an additional charge to or reduction of the price of the main product. |
|
Display price adjustment |
If selected, the price for product options is displayed to the user. For example, the price adjustment for a selected product option is displayed to your customers on the live site while viewing the details of a product. (The product must be offered together with the given product option.) Specifying price adjustment for product options is optional. This means that no price may be displayed for some product options even if this field is selected. |
The following properties are available for the Text type option category:
Options |
|
|
User control type |
Specify the type of input field that your customers use to enter the text. The system offers a simple text input field, and a multi-line text input field. |
|
Predefined choice |
Specify a prompt text, e.g. (Enter your text), displayed in the text input field when your customers open a page offering the respective product option. For example, your customers can order an engraving as an option for a watch. When the customers open a page with the details of this product, the system displays (Enter your text) in the respective text input field, while waiting for further customer input. If the Display price adjustment field is selected, the system displays the option together with the respective price adjustment (if defined), e.g. (+ $9.99). The + and - characters indicate if the adjustment represents an additional charge to or reduction of the price of the main product. |
|
Display price adjustment |
If selected, the price for product options is displayed to the user. For example, the price adjustment for a given product option is displayed to your customers on the live site while viewing the details of a product. (The product must be offered together with the given product option.) Specifying price adjustment for product options is optional. This means that no price may be displayed for some product options even if this property is selected. |
|
Validation |
|
|
Minimum text length |
Specify the minimum length of the text that your customers must enter. |
|
Maximal text length |
Specify the maximum length of the text that your customers can enter. |
Reference – Product option properties
The system offers product options of the following types:
Attribute – such product options represent attributes of the main product. For example, its different colors, sizes, etc.
|
Option name |
The name of the product option that is displayed to your customers on the live site and to the users in the administration interface. |
|
Price adjustment |
Specify the price adjustment for the product option, e.g. + 9.99 USD. The + and - characters indicate if the adjustment represents is an additional charge to the price or a price reduction. Unlike product price, attribute product option price can have a negative value. This is because this price is an amount that is either added to or subtracted from the price of the main product. |
|
Allow for sale |
Specify if the product option should be allowed for sale in your on-line store, i.e., whether store administrators can offer it together with selected products. |
Products – such product options represent separate products. This means that for these options you can define product-related properties (SKU number, Manufacturer, etc.) and keep corresponding stock records.
The system offers Standard product, E-product and Membership product representations as product options. The Standard product properties are shared while E-products and Memberships have also their special properties.
- Standard product – standard products typically represent product articles and services. The system offers the following properties for all product representations:
General |
|
|
Product name |
The name of the product (product option) that is displayed to your customers on the live site and to the users in the administration interface. |
|
SKU number |
Specify the product number (serial number or SKU number). You can use this number, for example, in your accounting records. |
|
Price |
Specify the price adjustment for the product (product option) in the main currency, e.g., 9.99 USD. |
|
Department |
Specify a department for the product (product option). You can add a new department directly, without the need to navigate to the dedicated Departments section:
Now you can use the department for this product (product option), same as for any other product that you offer in your on-line store. |
|
Manufacturer |
Specify the product (product option) manufacturer. You can add a new manufacturer directly, without the need to navigate to the dedicated Manufacturers section:
Now you can use the manufacturer for this product (product option), same as for any other product that you offer in your on-line store. |
|
Supplier |
Specify the supplier of the product (product option). You can add a new supplier directly, without the need to navigate to the dedicated Suppliers section:
Now you can use the supplier for this product (product option), same as for any other product that you offer in your on-line store. |
|
Representing |
Specify a representation of the product (product option). You can choose from three different representations: The system offers as product options a standard product representation, i.e., Standard product, and two specialized types derived from this general type, i.e., Membership and E-product. |
Custom properties |
|
|
In this category you can edit product’s (product option’s) custom properties that you added in Modules -> Edit () E-commerce -> Classes -> Edit () SKU -> Fields. If there is no such custom property defined in the system, the category is unavailable. |
|
Status |
|
|
Allow for sale |
Indicates if the product (product option) is allowed for sale in your on-line store, i.e., whether your store administrators can offer it together with selected products. |
Shipping |
|
|
Needs shipping |
Indicates if the product (product option) requires shipping from your on-line store warehouse to an address specified by the customer. Memberships and e-products don’t require shipping. |
|
Package weight |
Specify package weight in units of your choice. |
|
Package height |
Specify package height in units of your choice. |
|
Package width |
Specify package width in units of your choice. |
|
Package depth |
Specify package depth in units of your choice. |
Inventory |
|
|
Track inventory |
Determine whether the system should track product (product option) inventory. If so, the system can offer the users inventory-related information such as the number of available product (product option) items or quantity at which the product (product option) needs to be reordered. You can also specify whether your customers can purchase the product (product option) only if it is available in stock. |
|
Sell only if items available |
Indicates if your customers can purchase only quantity of the product (product option) that is in stock (selected). If you wish to use this property, the Track inventory property must be allowed. |
|
Available items |
Indicates the number of product (product option) items available in stock. If you wish to use this property, the Track inventory property must be allowed. |
|
Reorder at |
Indicates at which quantity on-line store administrators should reorder the product (product option). Available only if the Track inventory property is allowed. The system informs you about products (product options) that you should reorder in the Inventory report (in Store reports -> Products -> Inventory). You can also configure the Products widget (in Store overview) to display this information. |
|
Min items in one order |
Specify the minimum number of product (product option) items in one order. |
|
Max items in one order |
Specify the maximum number of product (product option) items in one order. |
AnalyticsThe category is not available if you are adding a new global product (product option). |
|
|
Conversion name |
Select a conversion logged when a customer purchases, i.e., orders, the product (product option).
|
|
Conversion value |
Enter a numerical value that the system records for the specified conversion on purchasing the product (product option). The values are cumulative, i.e., when a conversion hit is logged, the specified value is added to the total sum previously recorded for the given conversion. You may insert a macro expression into this field to dynamically retrieve a value from the current site context. For example: {%ShoppingCartItem.UnitTotalPrice%}. This sample macro allows the conversion to log the price of the given product as its value. The advantage of a macro is that it retrieves the price dynamically, including tax and any potential discounts applied by the given customer. |
- Membership – such product options are sets of roles. You can use memberships to allow the customers access to paid premium content and other restricted website sections, or to allow them to perform actions that are not available for ordinary website users.
Membership |
|
|
Membership group |
Membership defined in the Membership application. Your customers get this membership if they purchase the product (product option). |
|
Membership validity |
Indicates how long the membership is valid after the purchase. You can set the validity either for a limited period (Days, Weeks, Months, Years, Until a given date) or for an unlimited period. To set membership validity for an unlimited period of time, choose Until and leave the text box below empty. |
- E-product -- e-products are electronic files that your customers can download after the purchase.
E-product |
|
|
Files validity |
Indicates how long your customers can download the files after the purchase. You can set the validity either for a limited period (Days, Weeks, Months, Years, Until a given date) or for an unlimited period. To set e-product validity for an unlimited period of time, choose Until and leave the text box below empty. |
|
Files |
Here you can upload files that will make up the e-product. After uploading a file (by clicking New attachment and opening the required file), the system displays the name and size of the file, and allows you to perform the following actions:
You can upload only files with allowed extensions, as defined in the Upload extensions property in Settings -> System -> Files -> Security. |
Text – such product options represent inscriptions, labels, etc. For example, inscriptions in books, labels on cell phone covers, etc.
|
Option name |
The name of the product option that is displayed to your customers on the live site and to the users in the administration interface. |
|
Price adjustment |
Specify the price adjustment for the product option, e.g. + 9.99 USD. The + and - characters indicate if the adjustment represents is an additional charge to the price or a price reduction. Unlike product price, text product option price can have a negative value. This is because this price is an amount that is either added to or subtracted from the price of the main product. |