Assigning permissions to media libraries
Please note
Due to the ASP.NET architecture a site restart occurs when:
a media library is deleted
a group containing a media library is deleted
one of the following actions is performed when editing a library in the Media libraries application or on the live site:
folder is deleted
folder is renamed
folder is moved
large number of files is deleted (100 by default, this can be set in the <system.web> section of your web.config by the following key: <compilation debug=“true” numRecompilesBeforeAppRestart=“100”>)
It is recommended that you allow performing of these actions only to system administrators or to the lowest possible number of users. The recommended practice is for the site administrators to pre-define the folder structure of the libraries when they are created and not to allow users to further modify it.
This topic guides you through an example of setting media library permissions for a specific role. The example uses users that are available on the sample Corporate site. Learn more about how you create new sample sites from templates. You can also use the users already available on your site or create new users.
Creating a role to manage media libraries
If you already have a role for managing your media libraries, then proceed to Setting media library application permissions.
Open the Roles application.
Click New role.
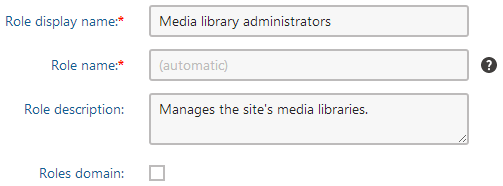
Fill in the Role display name and Role description fields.

Save the role.
The General tab of the role that you just created opens.
Assigning a user to the media library administrators role
- Switch to the Users tab.
- Click on Add users. The Select users dialog opens.
- Turn on the check-box next to the users that you want to assign to the role.
- Save & Close the dialog.
Now that you created the role and assigned it users, you can set its permissions.

Setting Media libraries application permissions
- Open the Permissions application.
- In the Site drop-down list, select Corporate site.
- In the first Permissions for drop-down list choose Module and Media libraries in the second.
- Grant the Read permission to the CMS Community administrators role.
- Grant the Read and Manage permissions to the Media library administrators role.
The Read permission allows to access the Media libraries application and view properties of available media libraries. In addition, users assigned to the two roles can do the following:
- CMS Community administrators role: users can, based on the configuration of media library permissions, work with files and folders in media libraries.
- Media library administrators role: users can create, edit, and delete media libraries in the Media libraries application.
Setting media library permissions
On the Security tab of each media library, you can assign permissions for particular actions. This can be useful if settings for the Media library application permissions are not sufficient for your needs and you want to restrict users from performing certain actions in certain media libraries.
In this part of the example, you assign permissions to delete file and folders to the CMS Community administrators role. This way, they can, for example, delete inappropriate content. You also make sure that only Authenticated users can create new files and folders in the media library.
Open the Media libraries application.
Edit () the Media library for which you want to set the permissions.
Switch to the Security tab.
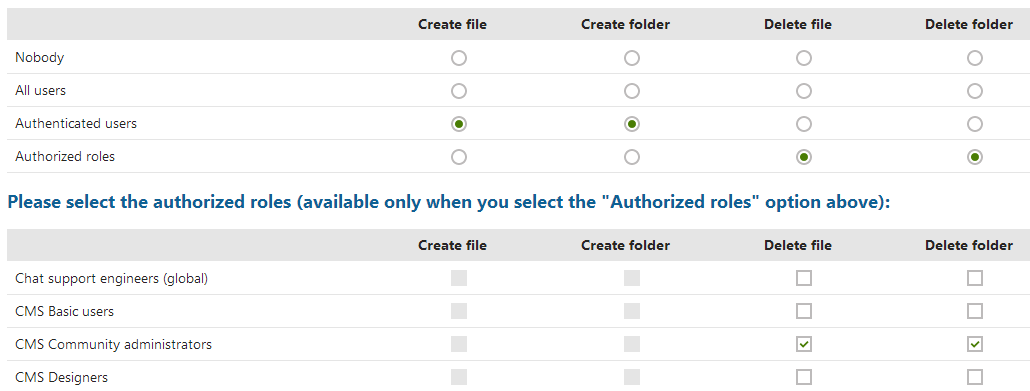
Assign the Create file and Create folder permissions to Authenticated users.
Assign the Delete file and Delete folder permissions to Authenticated roles.
In the role listing part of the grid, turn the check-box on so that CMS Community Administrators can Delete file and Delete folder.

With these settings, any authenticated users that have the Read permission for the Media libraries module can create files and folders in the media library. Users in the CMS Community administrator role can delete the files and folders in the library.
By default, Kentico doesn’t check for the See library content permission. You can change that in Settings -> Content -> Media, by selecting Check file permissions.
Setting group media library permissions
Note that groups have roles separate from the rest of the system. If you want to set group media library permissions for group roles, create a group role first, as described in Editing groups.
- Open the Groups application.
- Edit () the group in which you want to modify the media library.
- Switch to the Media libraries tab.
- Edit () the media library you want to set the permissions for.
- Switch to the Security tab.
- Assign the Create folder, Delete file and Delete folder permissions to Authenticated roles.
- In the role listing part of the grid, turn the check-box on so that Group media libraries administrator can Create folder, Delete file and Delete folder.
With these settings, any group member can create files in the media library. Users in the Group media libraries administrator role can create folders and delete the files and folders in the library.
Permissions Grid
The following table shows which permissions need to be assigned to allow users to perform particular actions. Users with the Global administrator privilege level can perform all of these actions for all general and group media libraries on the site. Group administrators can perform all of these actions for group media libraries of groups where they are group administrators.
|
Action/Permission |
File |
Folder |
||||||||
|
Read |
Manage |
Create |
Delete |
Modify |
Create |
Delete |
Modify |
See library content |
||
|
Files |
||||||||||
|
upload / import |
|
or |
|
|||||||
|
rename / change file properties |
|
or |
|
|||||||
|
delete |
|
or |
|
|||||||
|
copy |
|
or |
|
|||||||
|
move |
|
or |
|
|||||||
|
Folders |
||||||||||
|
create |
|
or |
|
|||||||
|
rename |
|
or |
|
|||||||
|
delete |
|
or |
|
|||||||
|
copy |
|
or |
|
|||||||
|
move |
|
or |
|
|||||||
|
Administration |
||||||||||
|
Access the Media library application |
|
or |
||||||||
|
Modify media library properties and content |
|
or |
||||||||
|
Live site administration |
||||||||||
|
Access the Media library application |
|
or |
||||||||
|
Modify media library properties and content |
|
or |
||||||||
|
Live site |
||||||||||
|
See and browse library content (Media gallery web part) |
|
or |
|
|||||||
|
Upload file (Media file uploader web part) |
|
or |
|
|||||||