
Configuring the REST service
REST prerequisites
Before you can enable the Kentico REST service, you must ensure the following:
In Windows
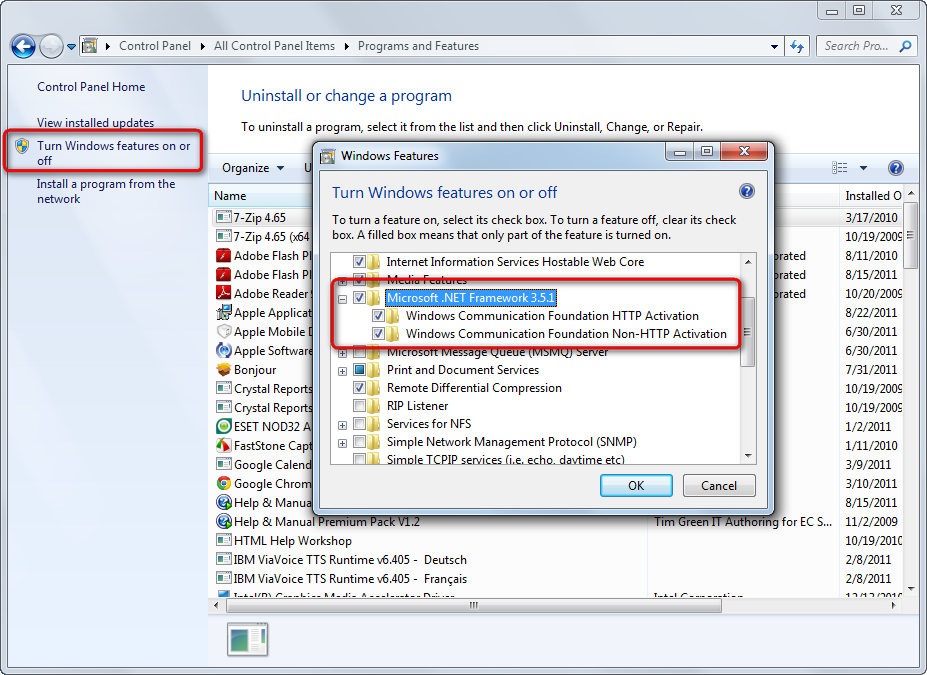
Go to Control Panel -> Programs and Features and click Turn Windows features on or off in the left menu.
Windows 7 / Windows Server 2008
- Expand the Microsoft .NET Framework <version> node in the dialog window.
- Make sure that both of the following features are installed:
- Windows Communication Foundation HTTP Activation
- Windows Communication Foundation Non-HTTP Activation
Windows 8 / Windows Server 2012
- Expand the .NET Framework 4.5 Advanced Services node.
- Make sure that the WCF Services -> HTTP Activation feature is installed.
Error: “Could not load type ‘System.ServiceModel.Activation.HttpModule’ from assembly ’System.ServiceModel”
If your application returns the above error after enabling HTTP Activation, you need to manually register the correct version of ASP.NET.
See https://msdn.microsoft.com/en-us/library/hh169179%28v=nav.70%29.aspx for detailed information.
In IIS Manager
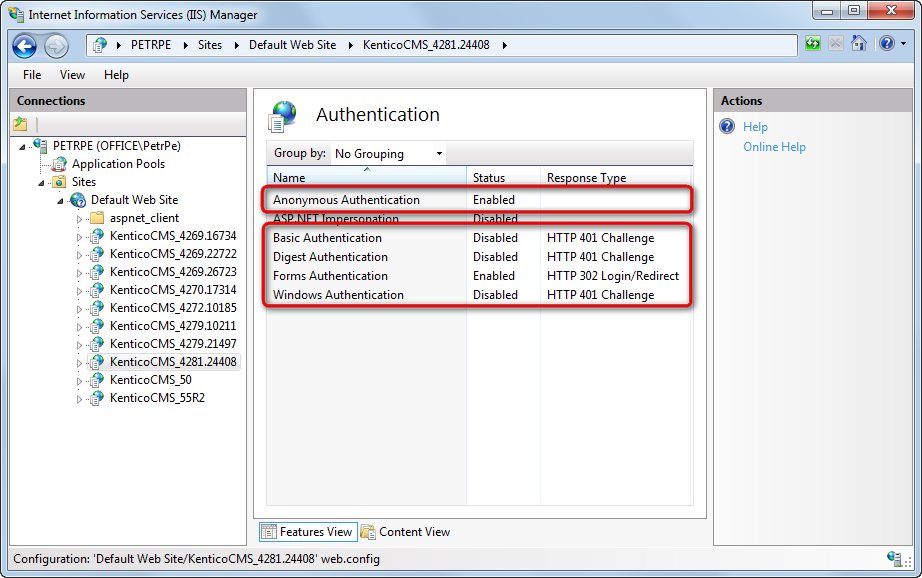
Select the website for which you want REST to be enabled.
Open the Authentication configuration.
Ensure that Anonymous authentication is enabled. You can also have either Forms or Windows authentication enabled if required by your environment.
Disable Basic and other types of authentication (leave Anonymous and either Forms or Windows enabled).
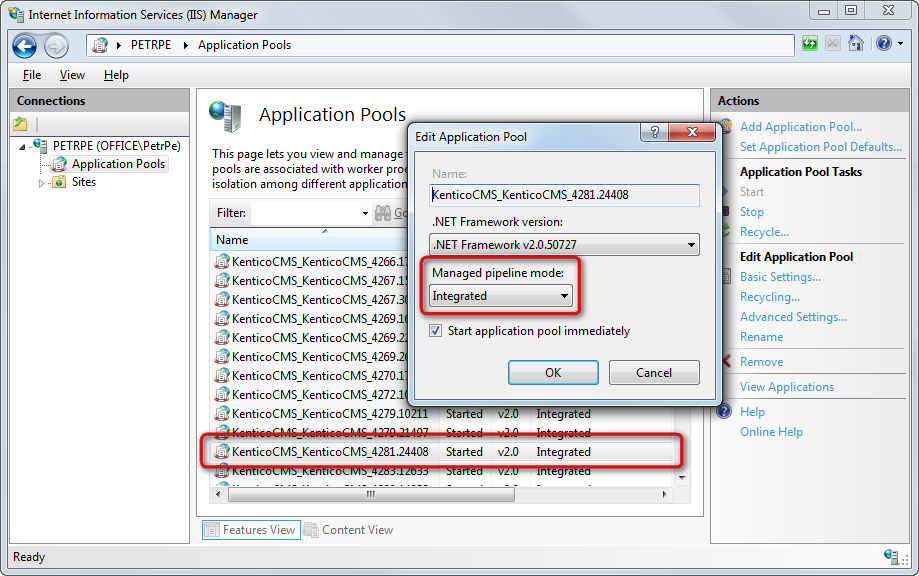
Select Application Pools in the navigation tree.
Double-click the application pool used by your website.
Make sure the pool uses Integrated Managed pipeline mode.
Once you have these prerequisites met, you can proceed to configuring the REST service in the Kentico instance.
Configuring the REST service
Once you meet the prerequisites for using the REST service, configure the following settings for the Kentico instance:
Edit your application’s web.config file.
Find the system.webServer section directly under the root (i.e. not under a specific <location> element).
Add the following attribute to the <modules> element:
<modules runAllManagedModulesForAllRequests="true">Log in to the Kentico administration interface.
Open the Settings application.
Select the Integration -> REST category and configure the settings:
REST setting
Description
Service enabled
Enables or disables the Kentico REST service.
Service enabled for
Choose if the REST service allows access to objects, pages, or both.
Authentication type
Determines which type of authentication the REST service uses. Supported types are Basic and Forms authentication.
Note: You can authenticate REST requests using the hash query string parameter in both modes.
Always check page security
If disabled, security is not checked when accessing published versions of pages. If enabled, security is always checked.
Page access is read only
If enabled, the REST service only allows GET requests for pages (pages cannot be modified).
Object access is read only
If enabled, the REST service only allows GET requests for objects (objects cannot be modified).
Allowed page types
Specifies a list of page types that the REST service is allowed to access. Enter the code names of page types separated by semicolons.
If empty, all page types are allowed.
Allowed object types
Specifies a list of objects types that the REST service is allowed to access. If empty, all object types are allowed.
Generate authentication hash for URL
Click the link to generate an authentication hash for specific REST URLs.
Enter the full absolute URL of the REST request, including the protocol, website domain name, virtual directory, REST path, and query string parameters. For example:
http://mywebsite.com/rest/content/currentsite/en-us/all/news?format=json
The system adds the authentication hash parameter to the URL. You can copy the URL and use it to perform the REST request without any other type of authentication.
Restrictions:
- Only works for GET requests (read only data retrieval)- You cannot use hash parameter authentication for */all* object retrieval requests (*~/rest/\<object type\>/all*).Default encoding
Sets the character encoding that the REST service uses for requests that do not contain a supported Accept-Charset header.
Allow sensitive fields for administrators
If enabled, REST requests authenticated using the credentials of users with the Global administrator privilege level are allowed to work with data fields that contain sensitive information (for example fields related to passwords).
Requests authenticated under non-administrator users can NEVER access sensitive fields, regardless of this setting’s value.
Tip: If you encounter issues with the Kentico REST service in your environment, you can try investigating the WCF traffic using tracing and message logging tools. See the Tracing and Message Logging article for more information.
Enabling upload of large data
If you are planning to upload large-size data into Kentico through the REST service, it is necessary to specify the required data size limit in the application’s web.config file. This can be done by adding the following pieces of code into the <system.serviceModel> section at the end of the web.config file:
Insert a <webHttpBinding> element into the <bindings> sub-section:
Note: This sample sets all limits to 10 MB. You may need to enter different values according to your specific needs.
 <webHttpBinding>
   <!-- Limits set to 10 MB (specified value in bytes) -->

   <binding name="RESTQuotaBinding" maxReceivedMessageSize="10485760" maxBufferPoolSize="10485760" maxBufferSize="10485760" closeTimeout="00:03:00" openTimeout="00:03:00" receiveTimeout="00:10:00" sendTimeout="00:03:00">
      <readerQuotas maxDepth="32" maxStringContentLength="10485760" maxArrayLength="10485760" maxBytesPerRead="10485760" />
      <security mode="None" />
   </binding>
 </webHttpBinding>
Add a <service> element under the <services> sub-section:
 <service name="CMS.WebServices.RESTService">
    <host>
      <baseAddresses>
        <add baseAddress="http://localhost/KenticoCMS/rest" />
      </baseAddresses>
    </host>
    <endpoint address="" bindingConfiguration="RESTQuotaBinding" binding="webHttpBinding" contract="CMS.WebServices.IRESTService" />
 </service>
The baseAddress in the code above only contains a sample value and needs to be replaced with the actual root address of the REST service (depending on your website’s domain name).