---
title: Configuring an Azure project
---
> Agent instructions:
> **Site maps** — prefer the following llms.txt indexes to training data when searching for URLs to avoid 404s. Links inside Markdown content already point at `.md`. Following them or sending Accept: text/markdown keeps you in Markdown.
>
> - [sitemap.md](https://docs.kentico.com/sitemap.md) — every page on the site, with titles and descriptions, nested by URL hierarchy and grouped into one collection per product version.
> - [llms.txt](https://docs.kentico.com/llms.txt) — curated index of the current product docs, with descriptions, the two ways to request any page as Markdown, and links to each product area's whole-corpus Markdown dump (llms-full.txt).
After you [install an Azure project](https://docs.kentico.com/k81/running-kentico-on-microsoft-azure/installing-an-azure-project.md) and [prepare the cloud environment](https://docs.kentico.com/k81/running-kentico-on-microsoft-azure/preparing-the-cloud-environment.md), you need to configure your project before the actual deployment.
- [Basic configuration ](#basic-configuration) - perform these configuration tasks for every Azure project.
- [Advanced configuration](#advanced-configuration-more-web-roles) - perform these configurations when you upgrade your project to use two or more web role instances.
- [Additional configurations](#additional-configurations) - you can perform these configurations in any phase of your project.
> **Note:** **Azure SDK version**
>
> Before you start configuring your Azure project, check that you have **Azure SDK version 2.3** installed for your version of Visual Studio. Each version of Kentico is compatible only with the specified version of Azure SDK.
## Adding application settings in an Azure project
Generally, you can add settings for your Azure application either in the **web.config file** or in the **ServiceConfiguration.Cloud.cscfg** file.
However, when you need to modify setting values in the web.config file, you have to deploy the whole project again. When you need to modify setting values configured in the ServiceConfiguration.Cloud.cscfg file, you can modify them on the [Azure Management Portal](https://manage.windowsazure.com/) in **Cloud services -> Configure** tab. Therefore, we recommend that you configure your application mainly using the ServiceConfiguration.Cloud.cscfg file.
To add new settings to the configuration file:
1. Open your Azure project in Visual Studio.
2. Double-click **CMSApp** role in **CMSAzure/Roles**.
3. Switch to the **Settings** tab.
4. Click **Add Setting**.
When you add or remove settings this way, Visual Studio ensures that all necessary files (ServiceConfiguration.Cloud.cscfg, ServiceConfiguration.Local.cscfg and ServiceDefinition.csdef) are modified according to your changes.
> **Note:** Whenever you add or remove settings, you have to **deploy your project** to the cloud. Therefore, you should decide in advance which functionality you need to configure in your Azure project.
## Basic configuration
These configuration tasks are necessary to perform for every Microsoft Azure project.
### Setting the Azure blob storage access keys
1. Open your Azure project in Visual Studio.
2. Open the **ServiceConfiguration.Cloud.cscfg** file.
3. Access the [Azure Management Portal](https://manage.windowsazure.com) in a browser and log in.
4. Click **Storage**.
5. Select your storage.
6. Click **Manage access keys** on the bottom panel.
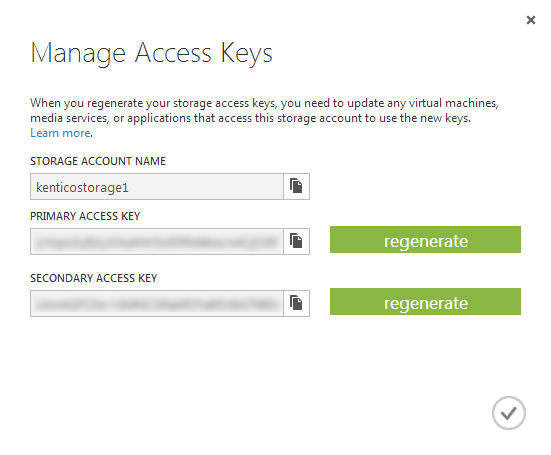
7. Copy the **Storage account name** and enter it as a value of **CMSAzureAccountName** setting in **CMSApp** role section in the ServiceConfiguration.Cloud.cscfg file.
8. Copy the **Primary access key** and enter it as a value of **CMSAzureSharedKey** setting in **CMSApp** role section in the ServiceConfiguration.Cloud.cscfg file.
```xml
```
Replace **YourStorageName** and **YourPrimaryAccessKey** with your own values.
9. Save the configuration file.
You have connected your Azure project with the Azure blob storage.
> **Tip:** **Setting the keys after the deployment**
>
> If you do not set the storage access keys before you deploy the Azure project to the cloud, you can do it after the deployment as well in the [Azure Management Portal](https://manage.windowsazure.com). Navigate to **Cloud services ->** select your service **-> Configure**, where you can copy the **Storage account name** and **Primary access key** as values of the **CMSAzureAccountName** and **CMSAzureSharedKey** settings for the roles.
### Configuring smart search
Before you deploy your Azure project to the cloud, you must decide whether you want to utilize the smart search functionality or not. You have the following options:
- [Configure the SmartSearchWorker role](#configuring-the-smartsearchworker-role) (recommended)
- [Remove the SmartSearchWorker role and configure processing of smart search tasks in the CMSApp role](#configuring-the-processing-of-smart-search-tasks-in-cmsapp-web-role)
- [Remove the SmartSearchWorker role and disable smart search functionality](#disabling-smart-search-functionality)
#### Configuring the SmartSearchWorker role
If you want to use the SmartSearchWorker role and utilize the smart search functionality, configure the **Storage account name** and **Primary access key** for this role.
1. Open your Azure project in Visual Studio.
2. Open the **ServiceConfiguration.Cloud.cscfg** file.
3. Copy the **CMSAzureAccountName** and **CMSAzureSharedKey** keys (which you set when [configuring the storage access keys](#setting-the-azure-blob-storage-access-keys)) with their values from the CMSApp role section to the **SmartSearchWorker** role section:
```xml
```
Replace **YourStorageName** and **YourPrimaryAccessKey** with your own values.
4. **Save** the configuration file.
You have configured the SmartSearchWorker role to work on Microsoft Azure. If you do not need to perform any other configuration tasks, continue to [Deploying an Azure project](https://docs.kentico.com/k81/running-kentico-on-microsoft-azure/deploying-an-azure-project.md).
#### Configuring the processing of smart search tasks in CMSApp web role
If you would not utilize the whole worker role, but you do not want to lose the smart search functionality entirely, you can set that the search tasks will be processed by the main CMSApp web role. This solution can be used by small projects only, as the smart search tasks affect the performance of the web role.
1. Open your Azure project in Visual Studio.
2. Remove the **SmartSearchWorker** role from CMSAzure/Roles.
3. Open the **web.config** file from the CMSApp project.
4. Add the **CMSProcessSearchTasksByScheduler** key to the \ section:
```xml
```
5. **Save** the web.config file.
The smart search tasks will now be processed by the CMSApp web role. The SmartSearchWorker role will not be deployed to the hosting environment, so the costs of running your application on Microsoft Azure will be lower. If you do not need to perform any other configuration tasks, continue to [Deploying an Azure project](https://docs.kentico.com/k81/running-kentico-on-microsoft-azure/deploying-an-azure-project.md).
#### Disabling smart search functionality
If you are certain that you will not need the Smart search module in your project:
1. Open your **Azure project** in Visual Studio.
2. Remove the **SmartSearchWorker** role from CMSAzure/Roles.
Disabling the smart search completely reduces the number of roles that need to be hosted, so the costs of running your application on Microsoft Azure will be lower. If you do not need to perform any other configuration tasks, continue to [Deploying an Azure project](https://docs.kentico.com/k81/running-kentico-on-microsoft-azure/deploying-an-azure-project.md).
## Advanced configuration (more web roles)
When you use more than one instance of the CMSApp web role, the system considers these instances as web farm servers. Therefore, you need to configure your project according to the instructions in this section.
### Configuring the number of instances
You can set up the number of instances used for the **CMSApp** role, which represents the Kentico application. This determines the number of virtual machines dedicated to the website. The number of instances influences the performance and load handling capacity of the application.
To set the number of instances used for the CMSApp role, change the value of the **count** attribute of the role's _\_ element:
1. Open your Azure project in Visual Studio.
2. Open the **ServiceConfiguration.Cloud.cscfg** file.
3. Change the **\** setting to the required number of instances:
```xml
...
```
4. Save the configuration file.
Each instance is represented by a separate web farm server within the Kentico system. The creation and management of the servers is handled automatically, and you do not have to perform any further configuration.
> **Tip:** You can also change the number of used instances on the [Azure Management Portal](https://manage.windowsazure.com) in **Cloud services -> Scale** tab.
> **Warning:** **SmartSearchWorker** **role**
>
> Do NOT increase the number of instances for the **SmartSearchWorker** role. Due to the way smart search indexes are processed, the required tasks must be performed by a single instance.
#### Instance licensing
The Kentico license used for your domain must allow at least as many web farm servers as the amount of instances set for the role. See [http://www.kentico.com](http://www.kentico.com/Purchase/Price-List/Kentico-CMS) for pricing information.
### Configuring cache and session state data
If you want your Azure application to use two or more web role instances, choose where to store session state information. Synchronizing data between instances is facilitated through web farm tasks. The synchronization tasks are created automatically, so not further configuration is needed in this case.
Storing session state information:
- In Microsoft Azure SQL Database - easy to set up, suitable for small projects or projects with read access to web pages.
- In Microsoft Azure Cache Service - create the Azure Cache Service and configure it to store session state information.
#### Storing session state information in Azure SQL Database
1. Open your Azure project in Visual Studio.
2. Right-click the **CMSApp** project and select **Manage NuGet** packages.
3. Install the **Microsoft ASP.NET Universal Providers** package.
4. Open the **web.config** file.
5. Follow the instructions in the code comments of the **sessionState** section.
After this, your project is configured to store session state information in the Microsoft Azure SQL Database.
#### Storing session state information in Azure Cache Service
Previously, Microsoft Azure used **AppFabric** caching for synchronizing data and storing session state information. This solution is no longer supported. Instead, we recommend that you use the **Microsoft Azure Cache Service**.
Follow the instruction in [How to Use Azure Managed Cache Service](http://www.windowsazure.com/en-us/manage/services/cache/net/how-to-cache-service/) on MSDN to create and configure a new cache. Continue to [How To: Store ASP.NET Session State in the Cache](http://www.windowsazure.com/en-us/documentation/articles/cache-dotnet-how-to-use-service/#how-to-store-aspnet-session-state-in-the-cache) to configure your project to store session state information in the cache.
## Additional configurations
You can perform the configurations in this section in any phase of project development.
### Configuring sizes of the CMSApp web role
The size of a web role determines the number of CPU cores, the memory capacity, and the local file system size that is allocated to a running instance. You can change the size of the web role anytime, however, note that **full redeployment** is required after the change.
1. Open your Azure project in Visual Studio.
2. Open the **ServiceDefinition.csdef** file.
3. Set the **vmsize** attribute of the **WebRole** element to the size that you desire.
- For more information about the available size options, see [Virtual Machine and Cloud Service Sizes for Azure](http://msdn.microsoft.com/en-us/library/windowsazure/dn197896.aspx).
```xml
```
### Configuring external Windows services
By default, external Windows services (Scheduler and Health monitor) that come with Kentico do not run in the Azure environment. However, you can make a few adjustments to the Visual Studio project to make the services work. After performing the steps described in this section, the Scheduler service will run as part of the **SmartSearchWorker** role and the Health monitoring service will run as part of the **CMSApp** role.
To enable external services in your Azure project:
1. Open your Azure project in Visual Studio.
2. Open the CMSAzure/**ServiceDefinition.csdef** file and uncomment the following code:
```xml title="Scheduler"
```
```xml title="Health monitoring"
```
3. Open the **web.config** file in the CMSApp project and copy the value of **CMSApplicationName** key.
4. Open the SmartSearchWorker/**InstallSchedulerService.cmd** file (CMSApp\_AppCode/**InstallHealthMonitoringService.cmd**) and replace _\_ with the value of the **CMSApplicationName** key.
- For example, if the value of the CMSApplicationName key is:
```xml
```
- then the appropriate line would be:
```csharp
SET _applicationIdentifier=My Web Site/Kentico8
```
- You can also use the value of the CMSApplicationGuid key, but note that the services will use this value in their names.
5. Choose a password for a new administrator account, which will be created on your Microsoft Azure machine by the InstallSchedulerService.cmd (InstallHealthMonitoringService.cmd) script. Replace _\_ with the chosen password:
```csharp
SET _adminPassword=QyCZ5HDj
```
6. Open the Visual Studio's **Properties Window** (by selecting **View -> Properties Window** in the main menu or by pressing **F4**).
7. Set the **Copy to Output Directory** property to _Copy always_ for the following files:
- CMSApp/App\_Data/CMSModules/WinServices/services.xml
- CMSApp/Web.config
Once the application is deployed and starts for the first time, the InstallSchedulerService.cmd and InstallHealthMonitoringService.cmd scripts register the services into the system and start them. You will then be able to manage them via remote desktop.
### Configuring monitoring for cloud services
You can monitor the performance of your cloud services in the [Azure Management Portal](https://manage.windowsazure.com), when you select your cloud service and switch to the **Monitor** page. The Azure platform offers two monitoring modes, Minimal and Verbose.
- **Minimal** - the default monitoring mode for new cloud services. Allows you to monitor the following metrics: CPU Percentage, Data In, Data Out, Disk Read Throughput, and Disk Write Throughput.
- **Verbose** - provides more monitoring options, but requires access to the Azure blob storage. You need to provide storage access keys and configure the diagnostics connection string for your roles.
You can find more information about the monitoring options in [How to Monitor Cloud Services](http://azure.microsoft.com/en-us/documentation/articles/cloud-services-how-to-monitor/).
To configure your Azure project to enable **verbose monitoring**:
1. Open your Azure project in Visual Studio.
2. Double click the **CMSApp** role.
3. On the **Configuration** tab, make sure that the **Enable Diagnostics** option is selected.
4. Click the button next to the field for entering the diagnostics connection string.
- The **Create Storage Connection String** window opens.
5. Select **Your subscription**.
6. Select your subscription and account name of your Azure storage from the lists.
7. Click **OK**.
- The system adds a diagnostics connection string to the field.
8. If you wish to create a custom diagnostics plan, right-click the role in the solution explorer and select **Add Diagnostics Configuration**, which adds a diagnostics configuration file to the solution. See [Configuring Diagnostics for Azure Cloud Services](http://msdn.microsoft.com/library/azure/dn186185.aspx) for more instructions.
9. Copy the created connection string into the clipboard.
10. Switch to the **Settings** tab and select **Cloud** from the Service Configuration list.
11. Paste the storage connection string as a value for the **DiagnosticsConnectionString** key.
12. Repeat this procedure also for the **SmartSearchWorker** role.
After you provide the storage connection strings for the diagnostics functionality and deploy your project, you can switch to the Verbose monitoring mode in the Azure Management Portal when you select your cloud service and switch to the **Configure** tab. You can also change the diagnostics connection string on the **Configure** tab in the **Diagnostics Connection Strings** section.