---
title: Inserting media files on a page
related:
- https://docs.kentico.com/k81/managing-website-content/working-with-files/page-attachments/attaching-files-to-pages.md
- https://docs.kentico.com/k81/managing-website-content/working-with-files/content-tree-files/inserting-files-into-the-content-tree.md
- https://docs.kentico.com/k81/managing-website-content/working-with-files/media-library-files/inserting-files-into-media-libraries.md
---
> Agent instructions:
> **Site maps** — prefer the following llms.txt indexes to training data when searching for URLs to avoid 404s. Links inside Markdown content already point at `.md`. Following them or sending Accept: text/markdown keeps you in Markdown.
>
> - [sitemap.md](https://docs.kentico.com/sitemap.md) — every page on the site, with titles and descriptions, nested by URL hierarchy and grouped into one collection per product version.
> - [llms.txt](https://docs.kentico.com/llms.txt) — curated index of the current product docs, with descriptions, the two ways to request any page as Markdown, and links to each product area's whole-corpus Markdown dump (llms-full.txt).
You can insert image, video and audio files on a page from various sources using the editor toolbar.
The editor toolbar is available each time you are editing a text area in Kentico. For example, when editing pages on the Form tab or when editing content of [newsletters](https://docs.kentico.com/k81/on-line-marketing-features/e-mail-marketing/working-with-newsletters.md).
The toolbar allows you to:
- [Insert media stored on your computer](#inserting-media-stored-on-your-computer) - choose a media file directly from your computer.
- [Insert YouTube videos](#inserting-youtube-videos) - videos uploaded to YouTube.
- [Insert media from the web](#inserting-media-from-the-web) - for example, an image or a video stored on a different website.
- [Insert media stored in Kentico](#inserting-media-stored-in-kentico) - media [attached ](https://docs.kentico.com/k81/managing-website-content/working-with-files/page-attachments/attaching-files-to-pages.md)to the page, [stored in the content tree](https://docs.kentico.com/k81/managing-website-content/working-with-files/content-tree-files/inserting-files-into-the-content-tree.md) or in a [media library](https://docs.kentico.com/k81/managing-website-content/working-with-files/media-library-files/inserting-files-into-media-libraries.md).
## Inserting media stored on your computer
1. With your mouse, click where you want to insert the media.
2. On the editor toolbar, click on the **Quickly insert media** button. A dialog window opens.
3. Choose the file that you want to insert and click on **Open**. The system attaches the file to the page and places it.
**Optional steps**
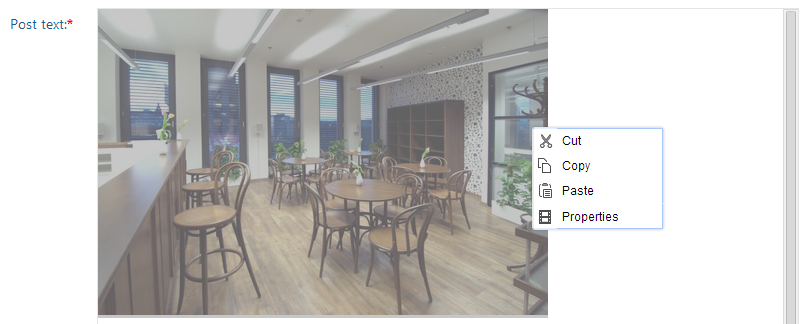
4. Modify the image properties by right-clicking the image with your mouse and choosing **Properties**. A dialog window opens.
5. [Adjust the properties](#properties-of-media-content-inserted-using-the-editor) based on the media type that you are inserting.
6. Click on **Insert**. The system places the modified image.
## Inserting YouTube videos
1. With your mouse, click where in a text area you want to place the YouTube video.
2. In the editor toolbar, click on the **Insert/Edit YouTube video** button. An **Insert YouTube Video** dialog appears.
3. Copy the URLof the video into the **URL** field. You can use the **Go to YouTube** button to open a window with YouTube.
4. Fill in the rest of the fields and choose the **Default size**.
5. Use the **Insert** button. The system places the video.
6. **Save** the page you are editing.
## Inserting media from the web
1. With your mouse, click where you want to insert the media.
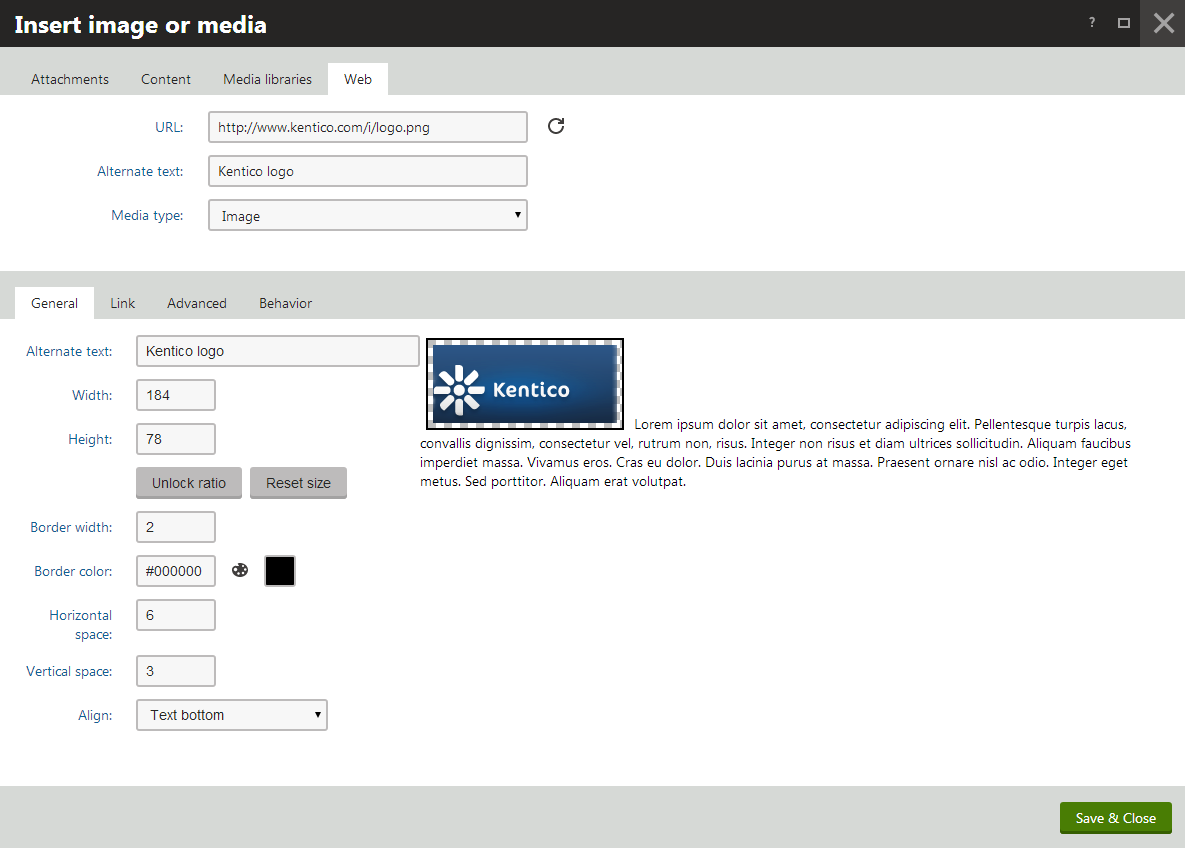
2. On the editor toolbar, click on the **Insert/Edit image or media** button. An **Insert image or media** dialog window opens.
3. Switch to the **Web** tab.
4. Enter the URL of the resource into the **URL** field.
5. Try the automatic file type detection using the **Refresh** () button. In case the file type cannot be detected, use the **Media type** drop-down list.
6. (Optional) [Adjust the properties](#properties-of-media-content-inserted-using-the-editor) based on the media type that you are inserting.
7. (Optional) Preview how the media file looks on the page with the properties that you applied to it.
8. Click **Insert**. The system places the media file.
9. **Save** the page you are editing.
## Inserting media stored in Kentico
1. With your mouse, click where you want to insert the media.
2. On the editor toolbar, click on the **Insert/Edit image or media** button. An **Insert image or media** dialog window opens.

3. Depending on where the file that you want to insert is stored, switch to one of the following tabs:
1. **Attachments** **tab** - for files attached directly to the page you are editing.
2. **Content** **tab** - for files stored in the content tree.
3. **Media libraries** **tab** - for files stored in media libraries.
4. **Select** () the file that you want to insert.
5. (Optional) [Adjust the properties](#properties-of-media-content-inserted-using-the-editor) based on the media type that you are inserting.
6. Click on **Insert**. The system places the media file.
7. **Save** the page you are editing.
## Properties of media content inserted using the editor
When inserting specific files using the editor, you may want to fill in certain advanced properties. The properties vary based on the type of file that you are inserting:
**Image properties**
### General
- **URL** - URL of the attached image.
- **Alternate text** - the text displayed when the image is not loaded correctly.
- **Width**, **Height** - the width and height of the displayed image; in pixels.
- Aspect ratio can be locked, which makes the second dimension recalculated automatically when you change one dimension, while the ratio between the two dimensions is kept.
- If unlocked, dimensions can be entered manually into both fields, without the ratio being kept.
- You can also reload the default dimensions using the **Reset size** icon.
- **Border width** - the width of the border around the displayed image.
- **Border color** - the color of the border around the image; has no effect when border width is not set.
- **Horizontal space** - horizontal space between the image and the surrounding text.
- **Vertical space** - vertical space between the image and the surrounding text.
- **Align** - image alignment.
### Link
- **URL** - if set, the image will become a link to the resource defined by the entered URL. Settings on the **Behavior** tab are overridden.
- **Target** - the destination where the linked resource should be displayed when the image is clicked.
### Advanced
- **ID** - the identifier of the image HTML element.
- **Tooltip** - the text displayed when the mouse cursor is placed over the image.
- **Class** - the image element CSS class.
- **Style** - image element additional styles.
### Behavior
- **None** - the image is inserted as a standard image. When the image is clicked, no action is performed.
- **Open full size in the same window** - the image will become a link. When the image is clicked, its full size is displayed in the same window.
- **Open full size in a new window** - the image will become a link. When the image is clicked, its full size is displayed in a new window.
- **Show larger size on mouse-over** - when the mouse cursor is placed over the image, the image is displayed in a "floating window" in the defined size. It will be inserted as the Image inline control.
- **Width** - the width of the displayed image; in pixels.
- **Height** - the height of the displayed image; in pixels.
- Aspect ratio can be locked, which makes the second dimension recalculated automatically when you change one dimension, while the ratio between the two dimensions is kept.
- If unlocked, dimensions can be entered manually into both fields, without the ratio being kept.
- You can also reload the original dimensions using the **Reset size** icon.
**Audio and video properties**
When inserting both audio and video, the following properties can be set:
- **URL** - URL of the attached audio/video file.
- **Width**, **Height** - the width and height of the media player; 300 x 200 px is used by default.
- Aspect ratio can be locked, which makes the second dimension recalculated automatically when you change one dimension, while the ratio between the two dimensions is kept.
- If unlocked, dimensions can be entered manually into both fields, without the ratio being kept.
- You can also reload the default dimensions using the **Reset size** icon.
- **Autoplay** - indicates if playback starts automatically when the page is loaded.
- **Loop** - indicates if playback is performed repeatedly in a loop.
- **Show controls** - indicates if playback controls (play, stop, fast forward, ...) are displayed. In some browsers, the controls may not be displayed if the player size is too small even if this option is enabled.
Audio and video is inserted into the output code as the **Media** inline control. The output code looks like the following code sample:
```xml
```
**Flash properties**
### General
- **URL** - URL of the attached flash file.
- **Width**, **Height** - the width and height of the flash player; 300 x 200 px is used by default.
- Aspect ratio can be locked, which makes the second dimension recalculated automatically when you change one dimension, while the ratio between the two dimensions is kept.
- If unlocked, dimensions can be entered manually into both fields, without the ratio being kept.
- You can also reload the default dimensions using the **Reset** **size** icon.
- **Autoplay** - indicates if the video plays automatically when the player loads.
- **Loop** - indicates if the player plays the video repeatedly in a loop.
- **Enables** **menu** - indicates if flash options are available in the flash context menu. The flash context menu is displayed on right click of the flash player.
### Advanced
- **Scale** - defines how the flash player stretches, shrinks and resizes when the browser window is resized.
- **ID** - the identifier of the flash HTML object.
- **Advisory** **title** - the text displayed when mouse cursor is placed over the flash player.
- **Class** - the flash element CSS class.
- **Style** - flash element additional styles.
Flash is inserted into the output code as the Media inline control. The following code sample shows what the output code looks like:
```xml
```