
Model commerce website pages
When you build commerce experiences in Xperience by Kentico, you might require a content architecture that separates reusable product data from channel-specific presentation. In this guide, you’ll learn how to model pages to display product content using the atomic content model. You’ll learn how to create scalable, multi-channel architectures that maintain a single source of truth while serving websites and microsites, headless applications, and email marketing activities.
Understanding wrapper pages in atomic content modeling
A wrapper page is a content type that references reusable content from the Content hub and adds channel-specific context like SEO metadata, URLs, and publish dates. This pattern comes from the atomic content model, which separates content into two layers: reusable core data that stays consistent across all channels, and channel-specific context that varies per website, mobile application, kiosk, or email.
Editors update product data in the Content hub once, and the changes automatically reflect on every product page and channel that references it.
We recommend using wrapper pages when you:
- Need to support multi-channel content delivery.
- Have channel-specific metadata requirements for SEO and social sharing.
- Need to manage URLs and site structure separately from content.
- Require different presentation approaches for the same content across websites, microsites, or different pages.
If you define a content model for a business that will display product data only on one website channel, but plan to expand across other digital channels, such as email, you might consider storing reusable product data as structured content. You can then design widgets and page templates that editors will use to refer to product data.
For simple, single website-channel projects with no plans for expansion, a page-based model may be sufficient and simpler to implement.
The two-layer architecture for commerce content
When you apply the wrapper page pattern to commerce, you split your product content into two distinct layers.
Layer 1 stores your reusable Product content in the Content hub. This is your single source of truth for product data, such as title, description, summary, features, benefits, product images, specifications, taxonomy, and product categories. This data remains consistent regardless of how or where you display the product.
Layer 2 contains your Product Page in the content tree of your website channel. This page references the reusable Product and adds only channel-specific metadata: SEO fields (title, description, canonical URL), Open Graph tags for social sharing, page URLs and routing, publish dates and scheduling, channel-specific hero banners or promotional images, and page-specific content, such as personalized messages or calls to action.

This separation gives you several practical advantages for commerce. You maintain a single source of truth - when you update a product description or feature list, the change automatically appears on every page and channel that references it. You can deliver the same product across multiple channels (websites, microsites, headless applications, email) without duplicating content. Your editors can adjust core product information once, rather than having to update the number of copies across different pages and channels.
In a traditional page-based content model, all product information lives in a single page content type. This works for simple, single-channel websites, but creates duplication and maintenance overhead when you need to present the same product across multiple channels.
If the content remains the same across all channels, store it in the reusable Product. If it differs by channel (website vs. mobile app vs. email), store it on the wrapper page.
To simplify the text, we’ll refer to wrapper pages as pages or product pages in the following guide, unless it’s stated otherwise.
Model the reusable Product content type
Your reusable Product content type stores the core information that defines your product across all channels. Start with essential product fields: product title, product description, product summary for listings, product taxonomy for categories and tags, and key specifications, such as dimensions, technical details, and other attributes.
If you sell a variety of products that have unique attributes, you consider creating multiple reusable product content types with shared reusable field schemas to hold common product data. For example, the Product core data schema will hold content that you want to represent this product in listings: name, description, price, thumbnail image, and category. This schema ensures every product type - whether it’s a book, a piece of clothing, or an article promoting these products - has the same baseline fields for consistent presentation.
Model modular content using linked content items
In many cases, products share the same features or bring customers similar benefits. For example, a Fast access to funds benefit, or a Travel insurance product feature can be linked to multiple banking products.
To avoid content duplication, you can create a Product Benefits content type with fields like benefit description, benefit icon or image, and target audience. Then, you can create a Product Features content type with fields for feature name, feature description, options for specialized display cases (checkbox), and feature priority.
Editors will use combined content selector in the Product content type to link multiple features and benefits.

This approach lets the team reuse components across products. When they update, for example, the benefit’s description or icon in one place, all products that reference it automatically get the update.
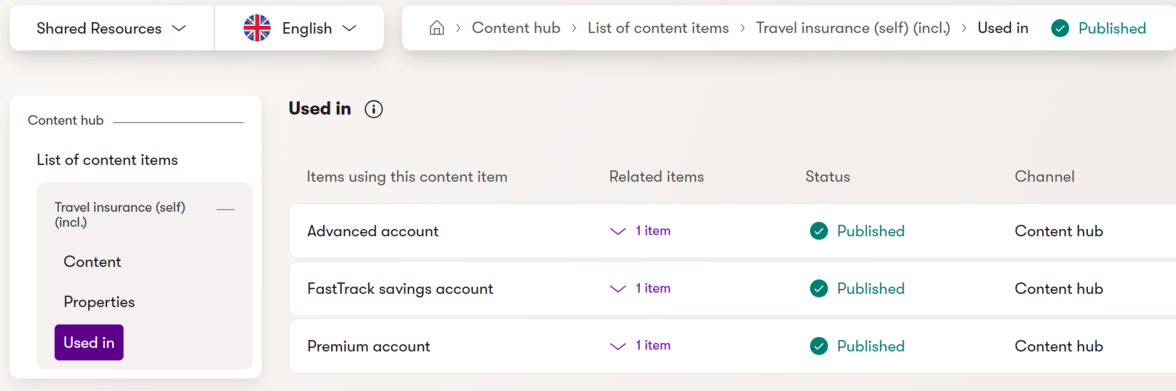
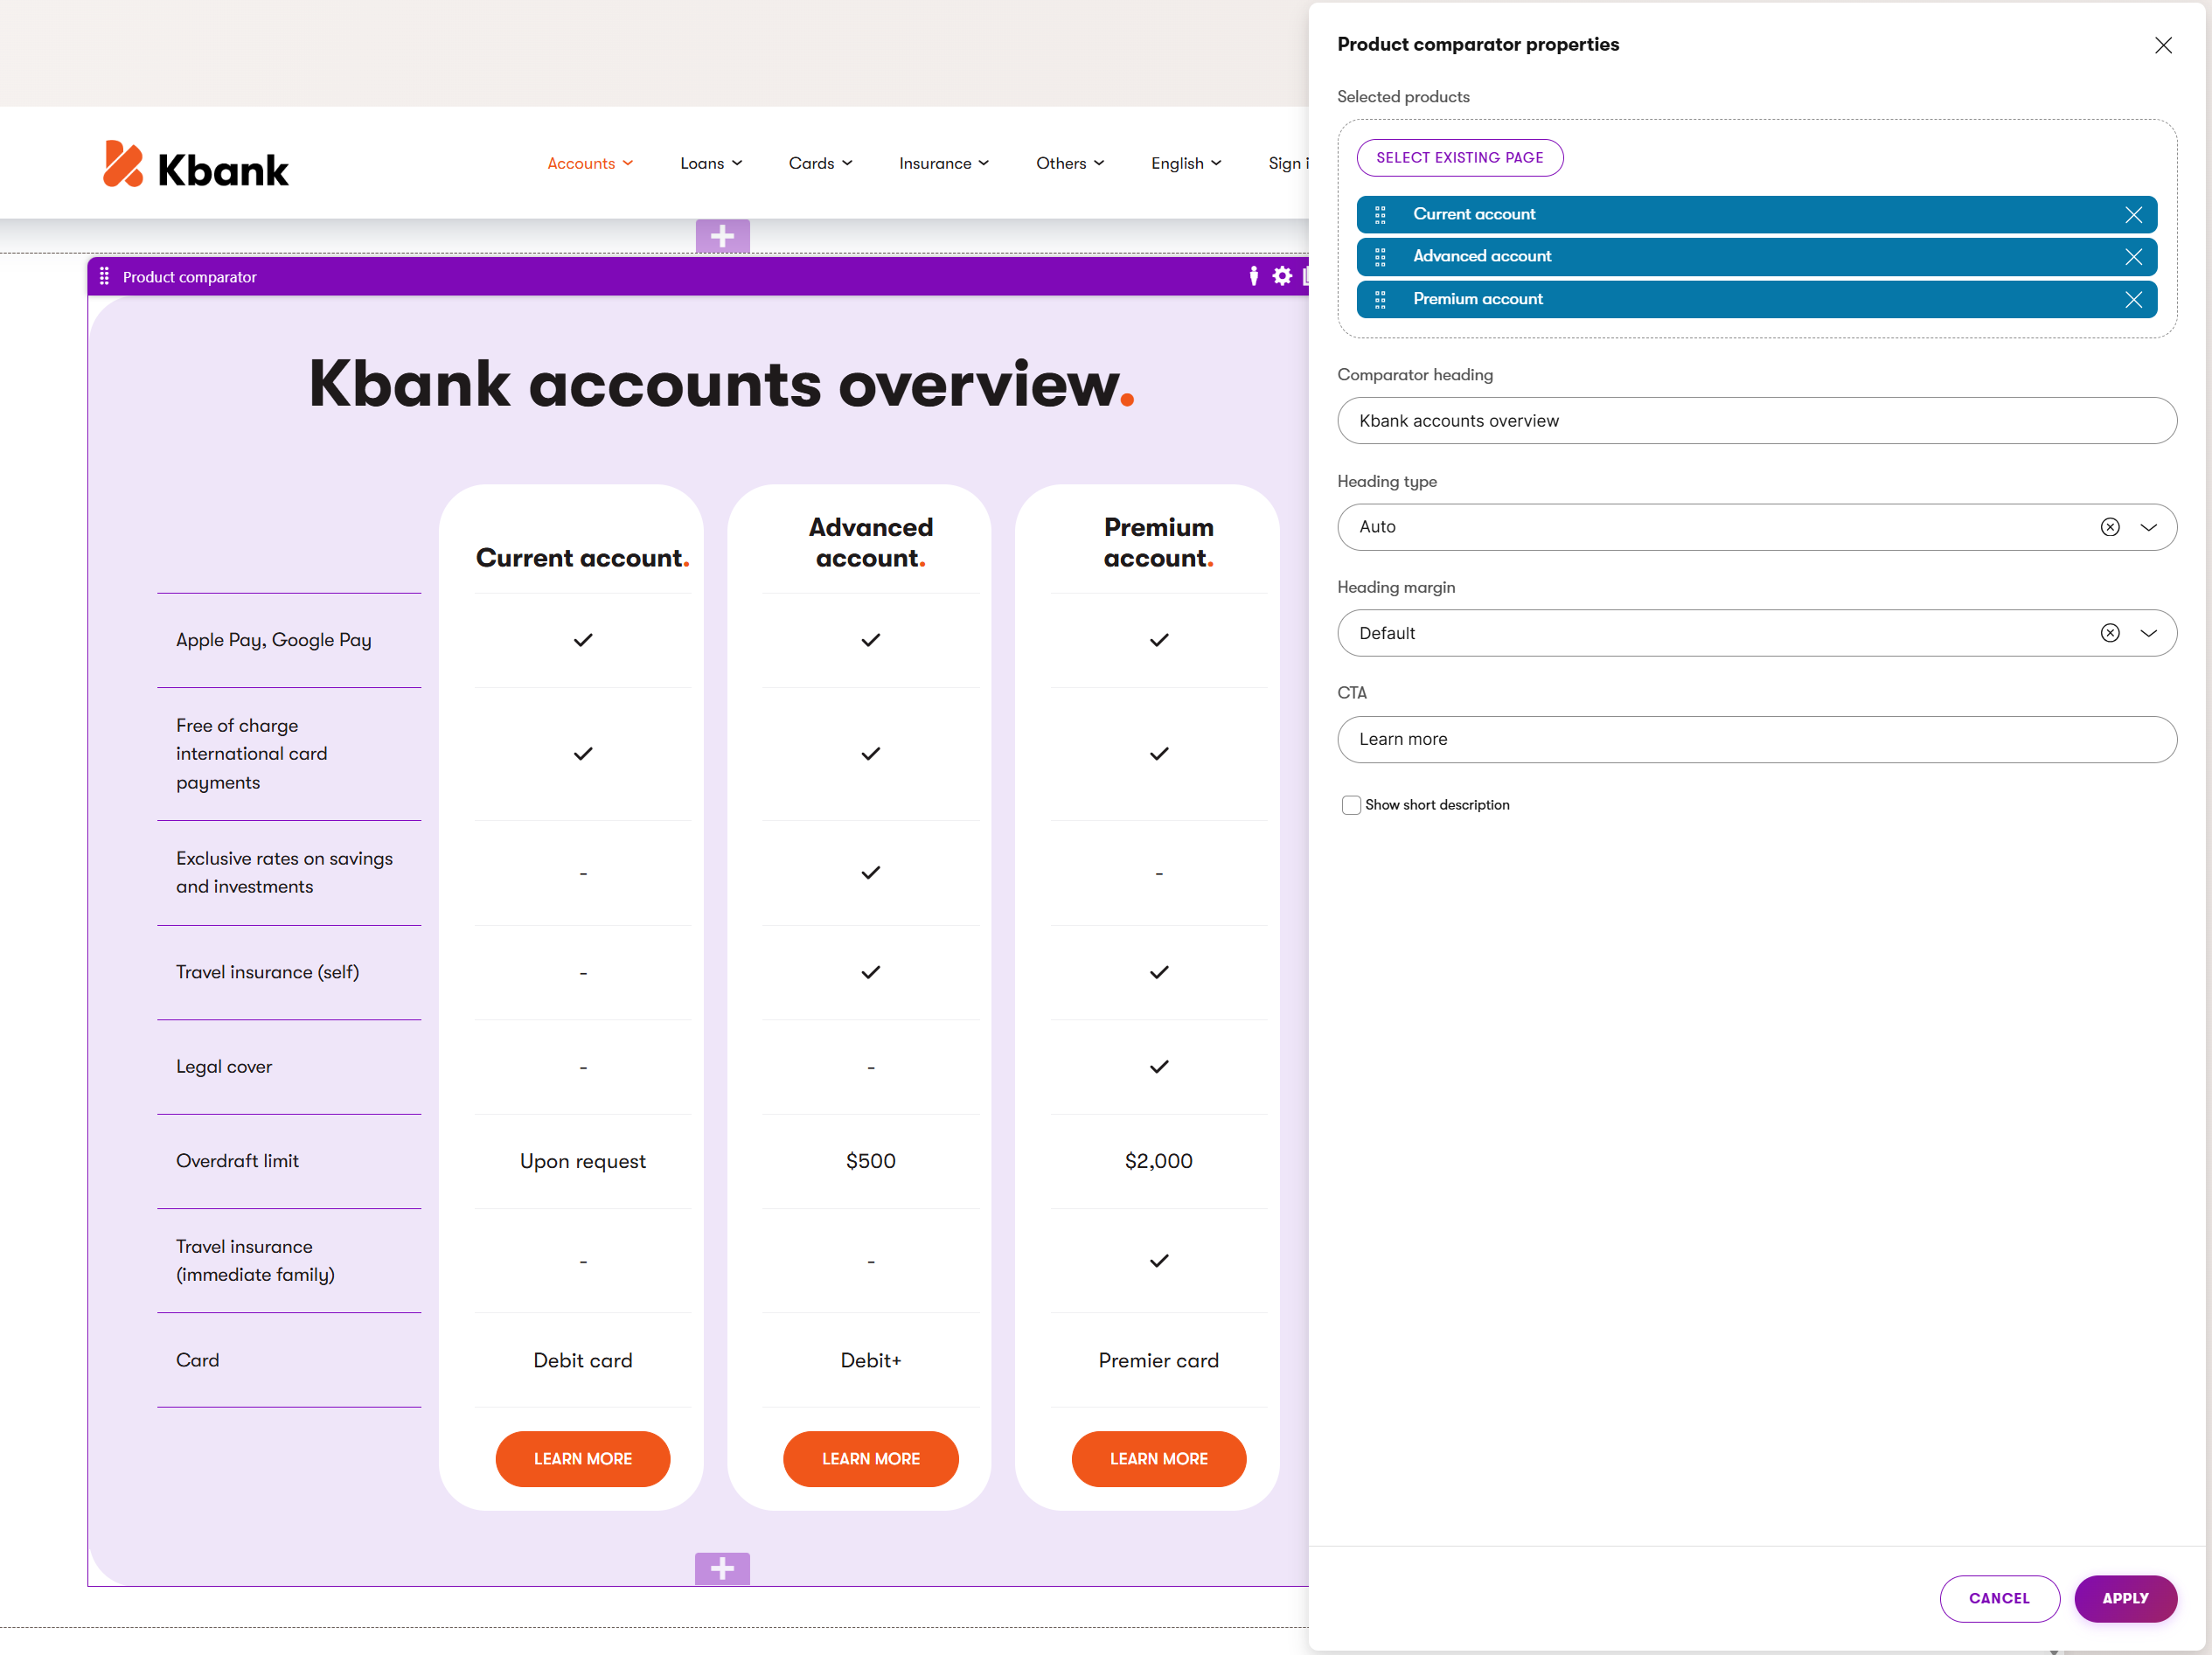
Editors can display the product data, including benefits and features, in widgets when need, as shown in the following custom Product comparator widget on the Kbank demo site.
Store product images as Media file content items with proper alt text for accessibility and SEO. Link these media files to your Product using the Combined content selector.
Find more details about modeling reusable product SKUs in a dedicated material.
Fields to avoid in your reusable Product content type:
Never store SEO metadata, Open Graph tags, page URLs, or website publish dates in your reusable Product. These fields are channel-specific and belong in your wrapper page. Storing them in the reusable Product creates confusion about which metadata applies to which channel and defeats the purpose of the two-layer architecture.
Model the Product wrapper page content type
Your Product page content type provides the browsable URL (or its vanity URLs) and channel-specific context for displaying a product on your website. The most important field in your wrapper is the Product reference. Use a content item selector configured to accept only your Product content type (or specific product variants if you support multiple product types). Set this field as required. Use a clear field label like Select Product to Display with a helpful description: Choose the reusable product this page will showcase. to guide the editors.

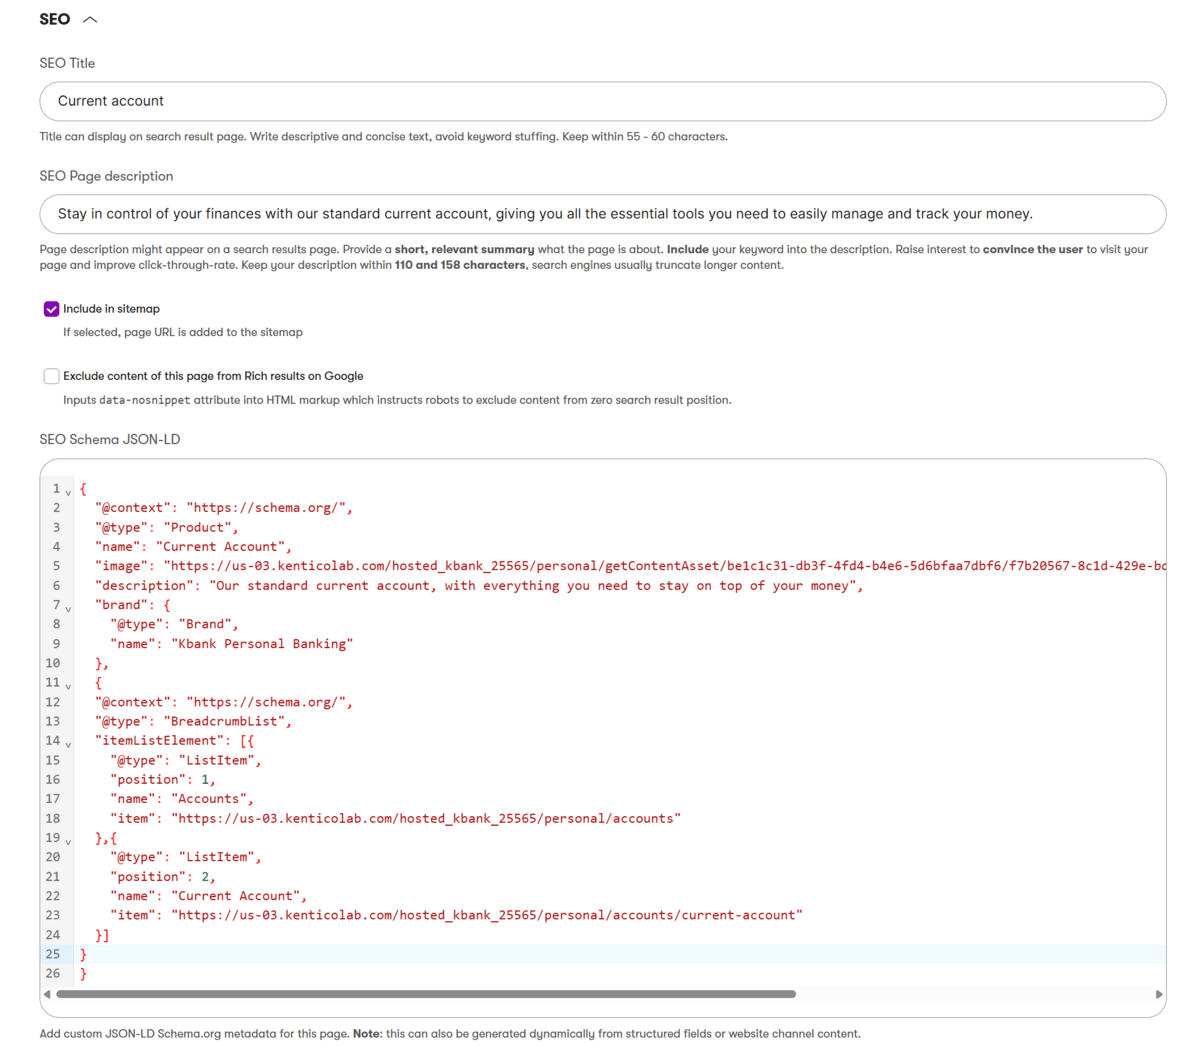
Create or reuse an SEO metadata schema for search engine optimization fields. This schema can include, for example:
- SEO title (text field to override the default title for search results),
- SEO meta description (text area for the snippet shown in search results),
- Canonical URL (to handle duplicate content across channels or pages),
- Sitemap inclusion (checkbox to control whether this URL appears in sitemap.xml),
- No-index directive (checkbox to prevent search engines from indexing this page, empty by default to make the page indexable),
- SEO structured data (structured data that developers generate into the page HTML markup)
- Other project-specific SEO fields.
Create or reuse an Open Graph metadata schema for social sharing. Review the Kbank demo site’s Open Graph reusable field schema for inspiration. At a minimum, include:
- OG title (may differ from your SEO title, optimized for social networks),
- OG description (optimized for social sharing, may differ from SEO description),
- OG image (optimized for social media dimensions, may differ from your product’s primary image),
- Platform-specific properties for Facebook or Twitter cards.
Create dedicated fields or reuse a Page publishing schema for content management. You can include fields, such as Publish date (override the default if needed), last updated date (can be system-generated or manually overridden), and author or owner assignment.
Though we recommend using Page Builder widgets to extend or customize the core product data, you might need to, in some cases, add website-specific presentation fields to your product page. Editors will use them to customize how the product appears on your website, and you need this data in a structured format. We have seen customers use fields such as the hero banner image (different from the product’s main image and specific to your website channel), featured callout texts (promotional text that appears only on this specific page), and page-specific calls to action (custom CTAs for this landing page).
Use Page Builder widgets to present product data on your wrapper pages rather than adding content fields to the Content tab. Using widgets provides editors with more flexibility, supports personalization for different audience segments, and makes the editing experience more intuitive.
Design Product listing pages
Product listing pages display collections of products. You use them for category pages (like Business Banking Products or Dog Accessories), search results or filtered views, and department-level pages like All Products. Your listing pages can include Page Builder zones to let editors personalize which products appear for different audience segments.
You have two approaches for building product listings. Approach A uses query-based listings either through page template presets with preconfigured widgets (recommended for most scenarios) or list content without the Page Builder. Approach B uses manual selection (recommended for curated collections).
Query-based listings (Approach A)
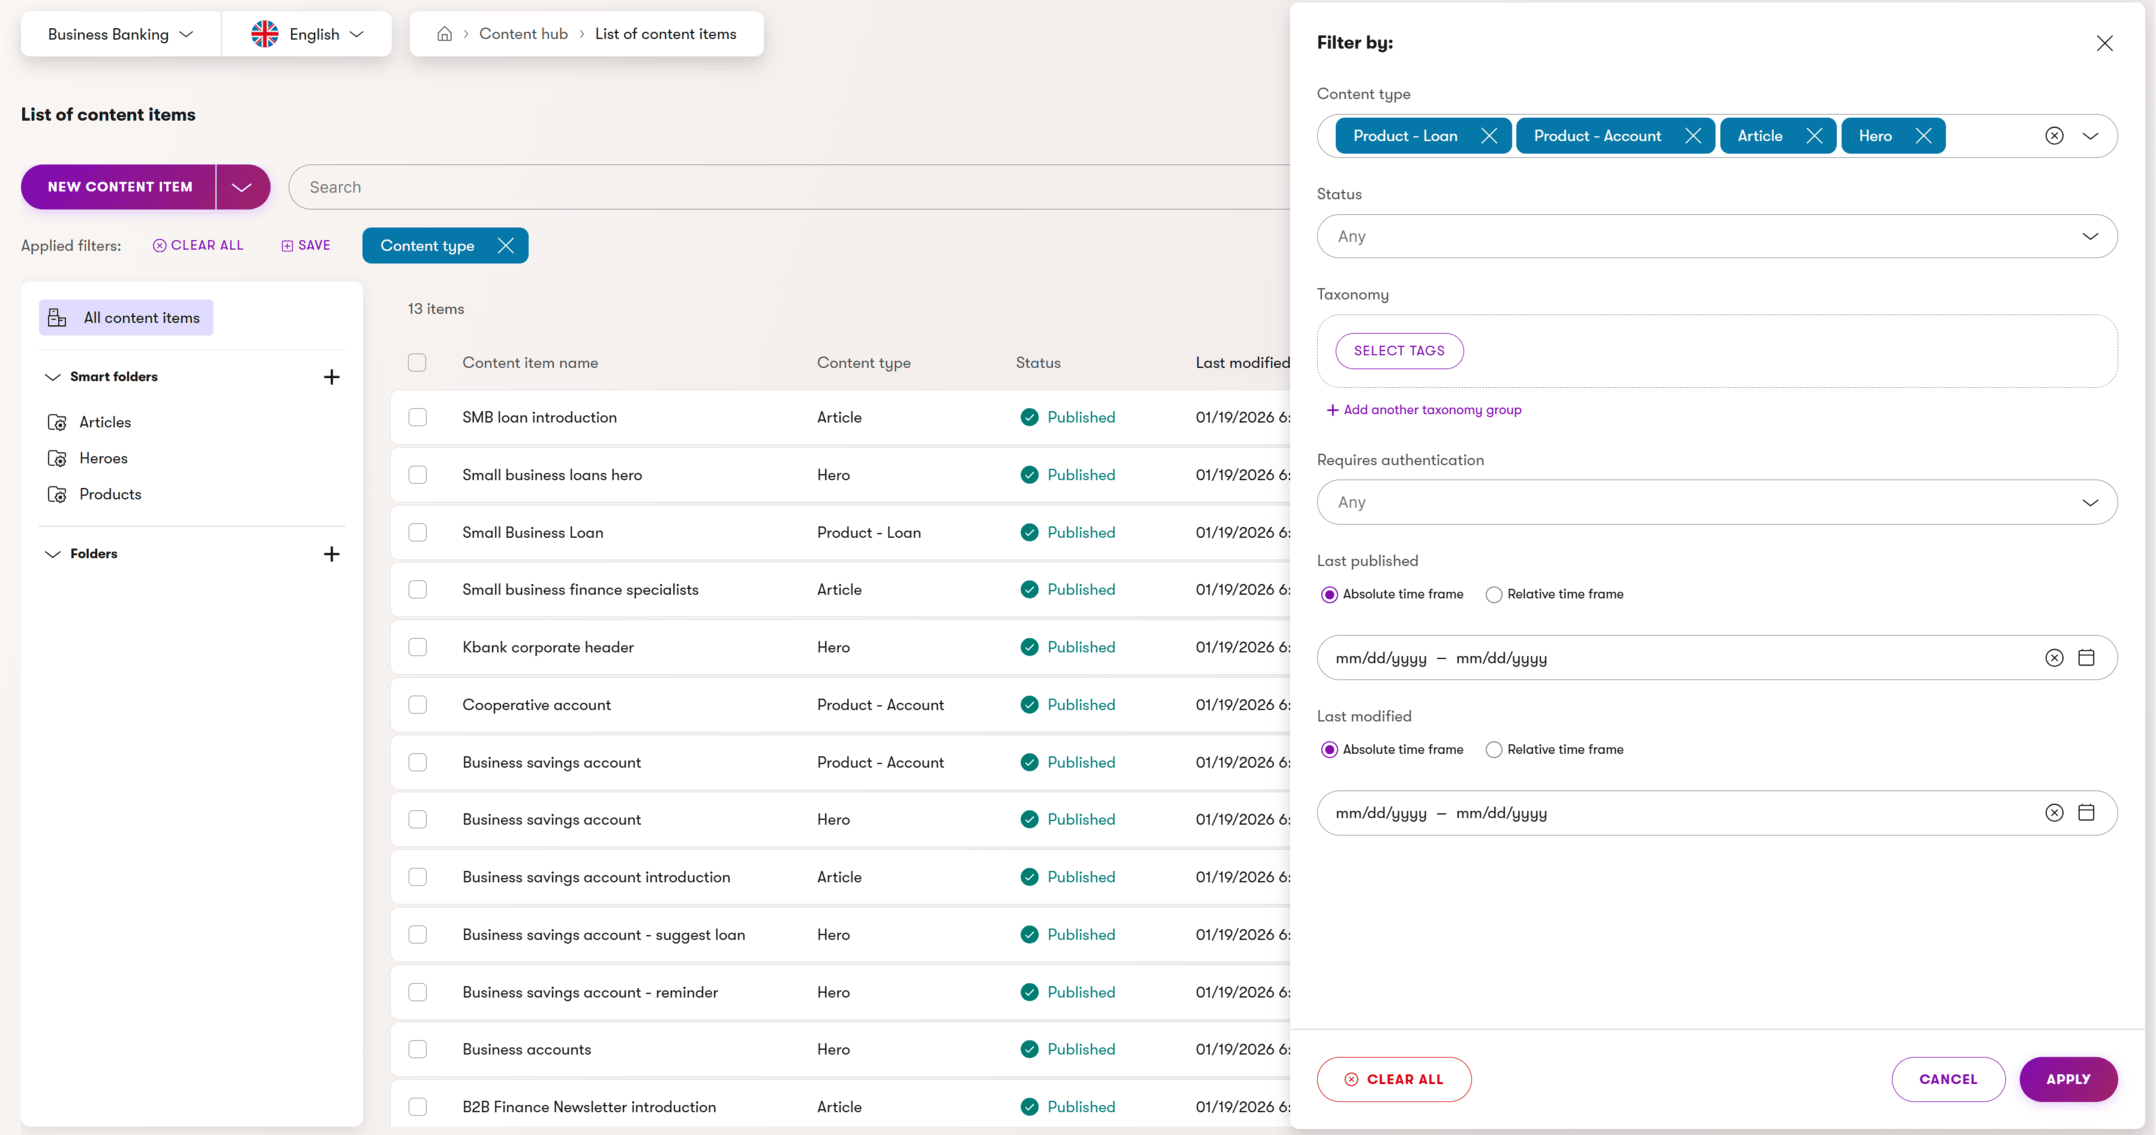
In a query-based listing, your listing page does not directly reference individual products. Instead, editors configure filters and criteria, and products are dynamically retrieved based on taxonomy assignment, tags, dedicated classification content types, or smart folder criteria in the Content hub.
This approach has clear benefits. Product listings automatically update when editors add new products that match the criteria. Your model reduces editorial maintenance by eliminating the need for editors to manually add products to every relevant listing. The approach scales well for large product catalogs.
For example, a Business Banking Products page configured to filter by the Business Banking taxonomy will automatically show all current and future products tagged with that category.
Use Page Builder with page template presets
We recommend using Page Builder to present product listings. This approach provides editors with the most flexibility and the best editing experience. Create a Product Listing Page content type with minimal structural fields, then use page template presets to automatically populate preconfigured widgets when editors create new listing pages.
Your Product Listing Page content type can include:
- Core content schema (or create individual fields) for the page’s title, description, and thumbnail
- Configuration for filtering criteria, such as a taxonomy selector to specify which categories or subcategories to display, tag filters to include or exclude specific tags, and content type filters if you want to show only certain product types.
- Channel-specific metadata: SEO metadata schema, Open Graph metadata, hero or banner content specific to this listing page.
Pagination settings (such as number of products per page), default sort order options, and other similar properties aren’t product data. They define how product data, such as individual products or products from a single category, is presented. We recommend configuring data presentation via page template properties or widget properties, rather than storing it as part of the product data within the Product Listing Page content type.
Decide where editors will control presentation settings
Editors can configure presentation options at the template level through template properties (affecting the entire page) or at the widget level through widget properties (providing more granular control per widget instance). Template-level properties work well for consistent page-wide settings, such as default sort order or the number of columns, while widget-level properties give editors the flexibility to vary presentation within the same page.
Create product listing widgets that read the filter criteria from your Product Listing Page content type and dynamically retrieve matching products. Expose key presentation options, such as display style and sort order, through your chosen properties approach. Use section properties to let editors adjust page layout elements like column count without requiring code changes if they prefer a more granular approach.
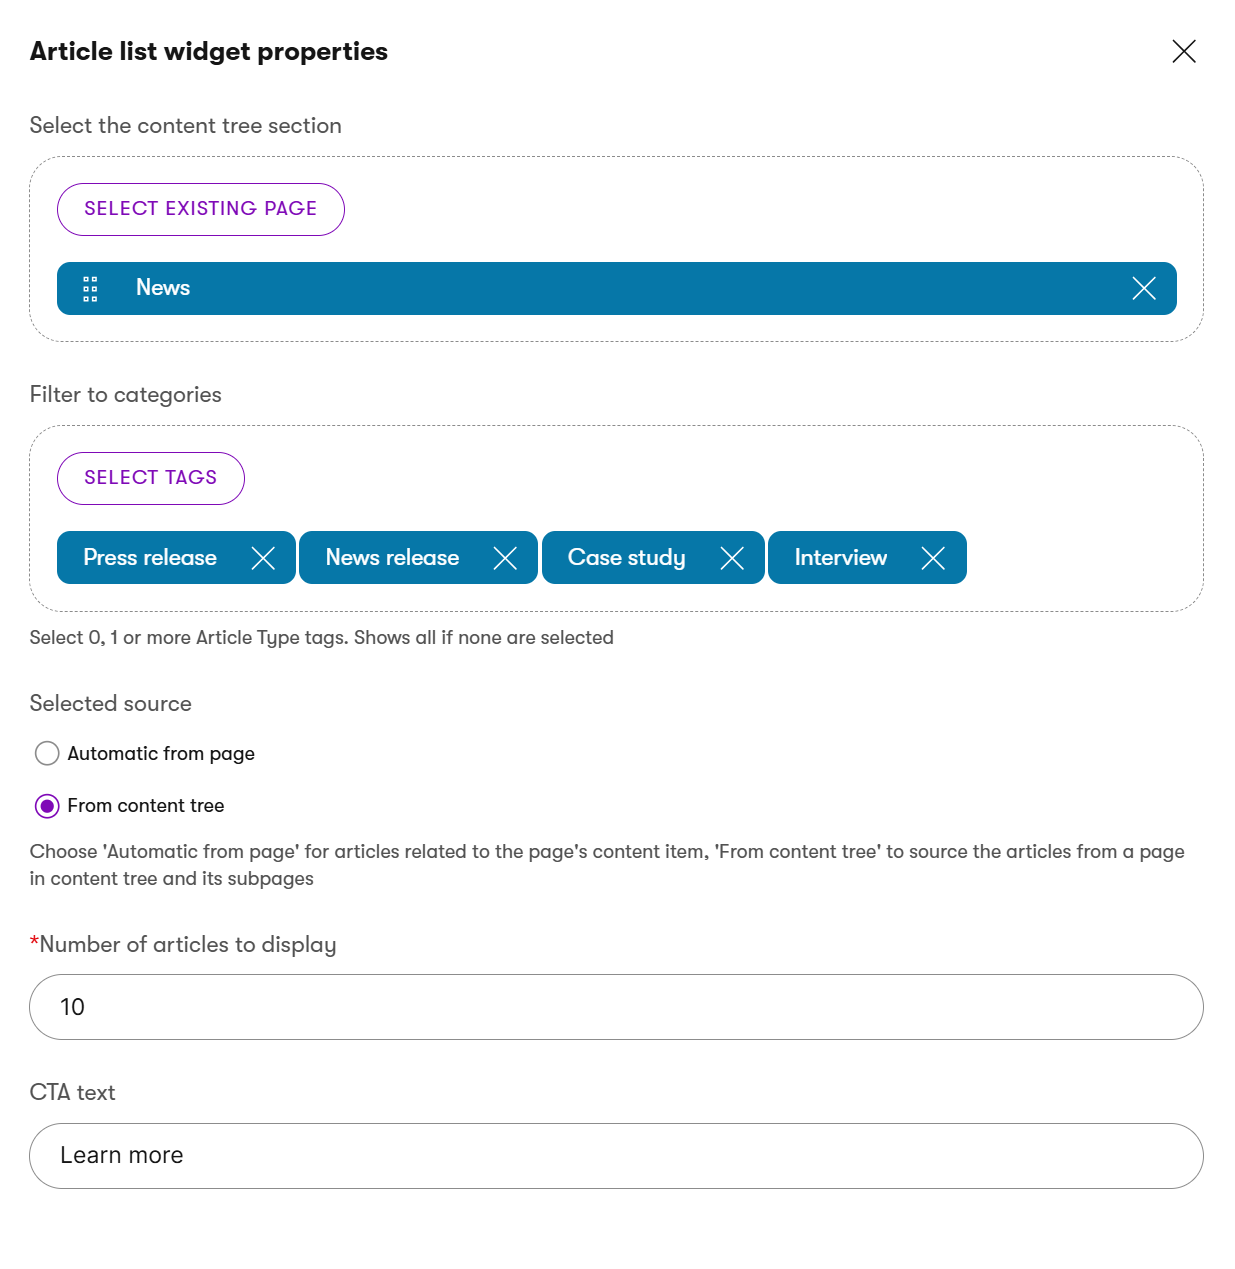
For inspiration, you can check the Articles widget on the Kbank demo site. Editors can define subpages within a specific section of the Content tree and then further filter the selected content by tags or by specifying how many articles to include. Your product listing widgets can work similarly.
When editors create a new listing page, assign an existing page template preset to automatically populate preconfigured widgets. This automation works particularly well when you create products and listing pages over API.
This approach supports widget personalization for different audience segments, allows editors to customize page layout without developer involvement, and provides the most intuitive editing experience.
If you don’t like the custom Page Builder widgets, you might want to consider adding fields on the page’s Content tab where editors configure the listing.
Embrace developer-driven page rendering
If you decide to implement product listings programmatically with developers controlling the presentation layer directly (rendering product data without Page Builder widgets), you should still include Page Builder capabilities for content personalization.
At minimum, add a Page Builder editable area through your page template properties. This allows editors to add supplementary content sections, such as:
- Personalized Featured products widgets for different audience segments
- Promotional banners or callouts specific to certain visitor types
- Cross-sell or related product sections
- Marketing content that complements the programmatic product listing
This hybrid approach gives developers full control over the core product listing logic while preserving editorial flexibility for personalization and promotional content.
Manual selection listings (Approach B)
In a manual selection listing, the product listing page directly references specific products using widgets or a content item selector configured to allow multiple product selections. Editors manually curate which products appear and control their order by dragging items in the selector.
This approach works well when editorial curation is important, especially for featured or curated collections, seasonal promotions that highlight specific products, or any scenario where you need full control over which products appear and in what order.
You can create a Universal page (or a dedicated Product listing page) content type with the same channel-specific metadata as above: SEO metadata schema, Open Graph metadata, and page-specific hero or banner content. Then define a product listing page template with properties, allowed sections, and Product widgets that editors can use to display product data on the website.
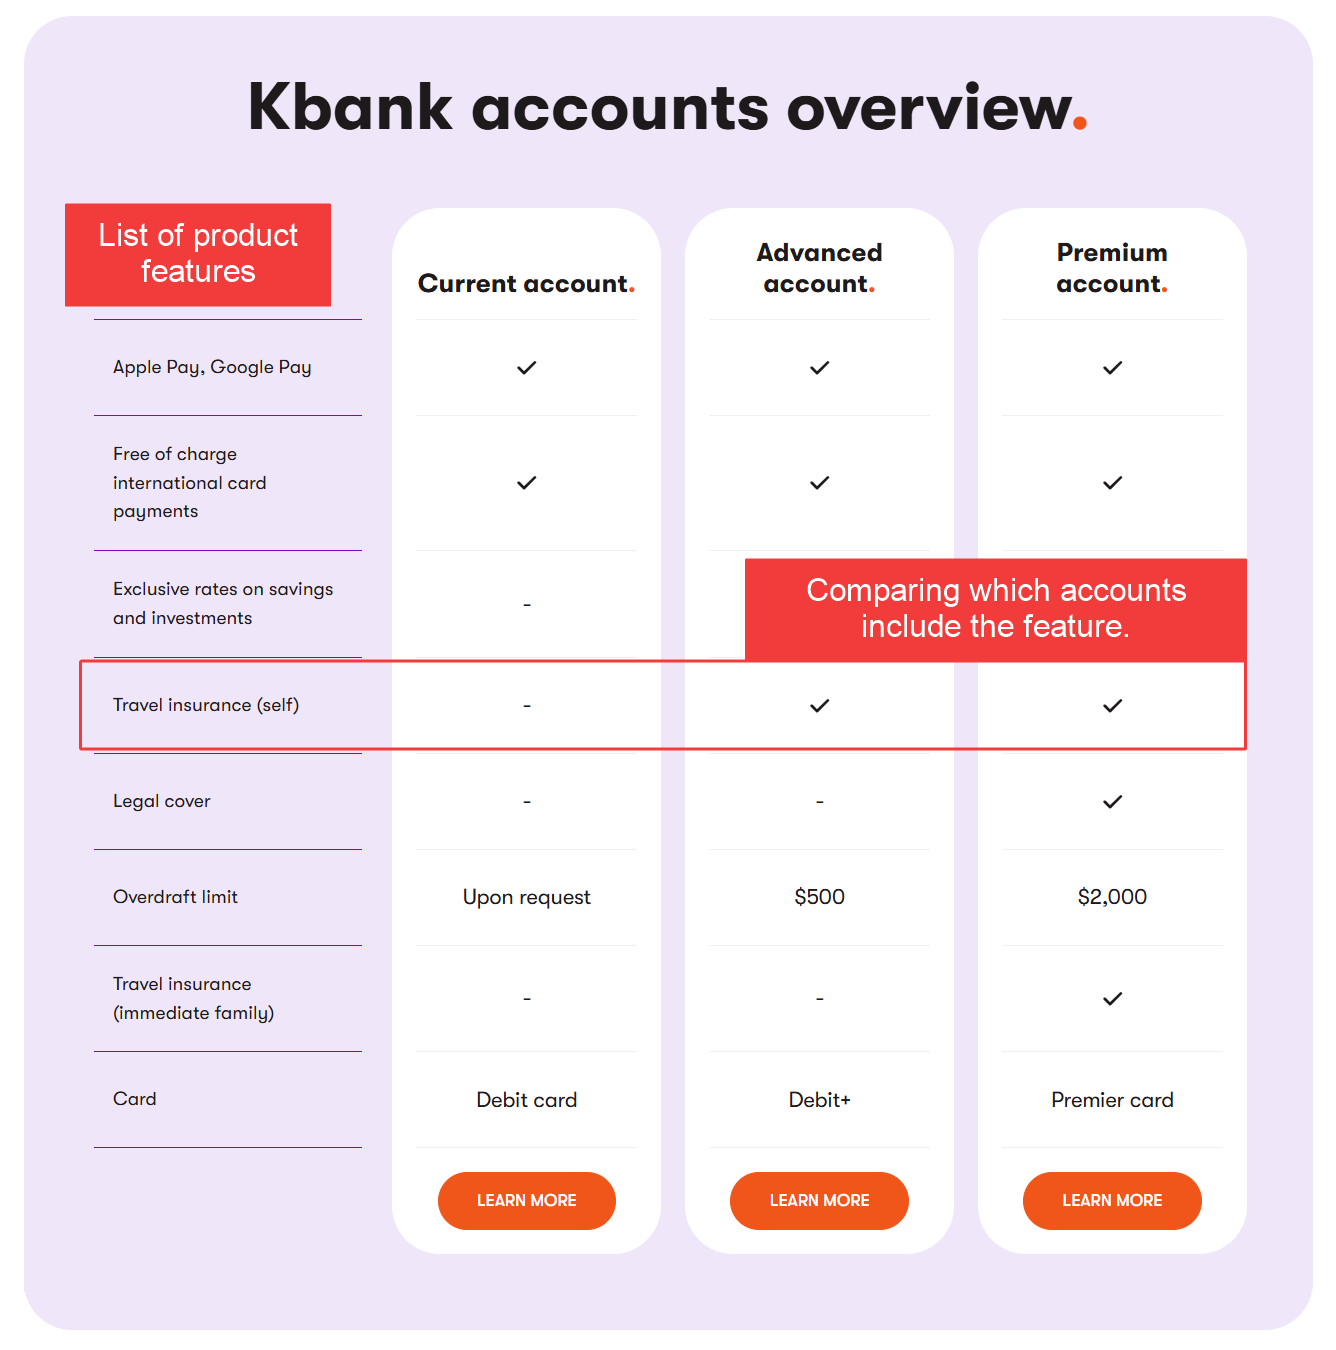
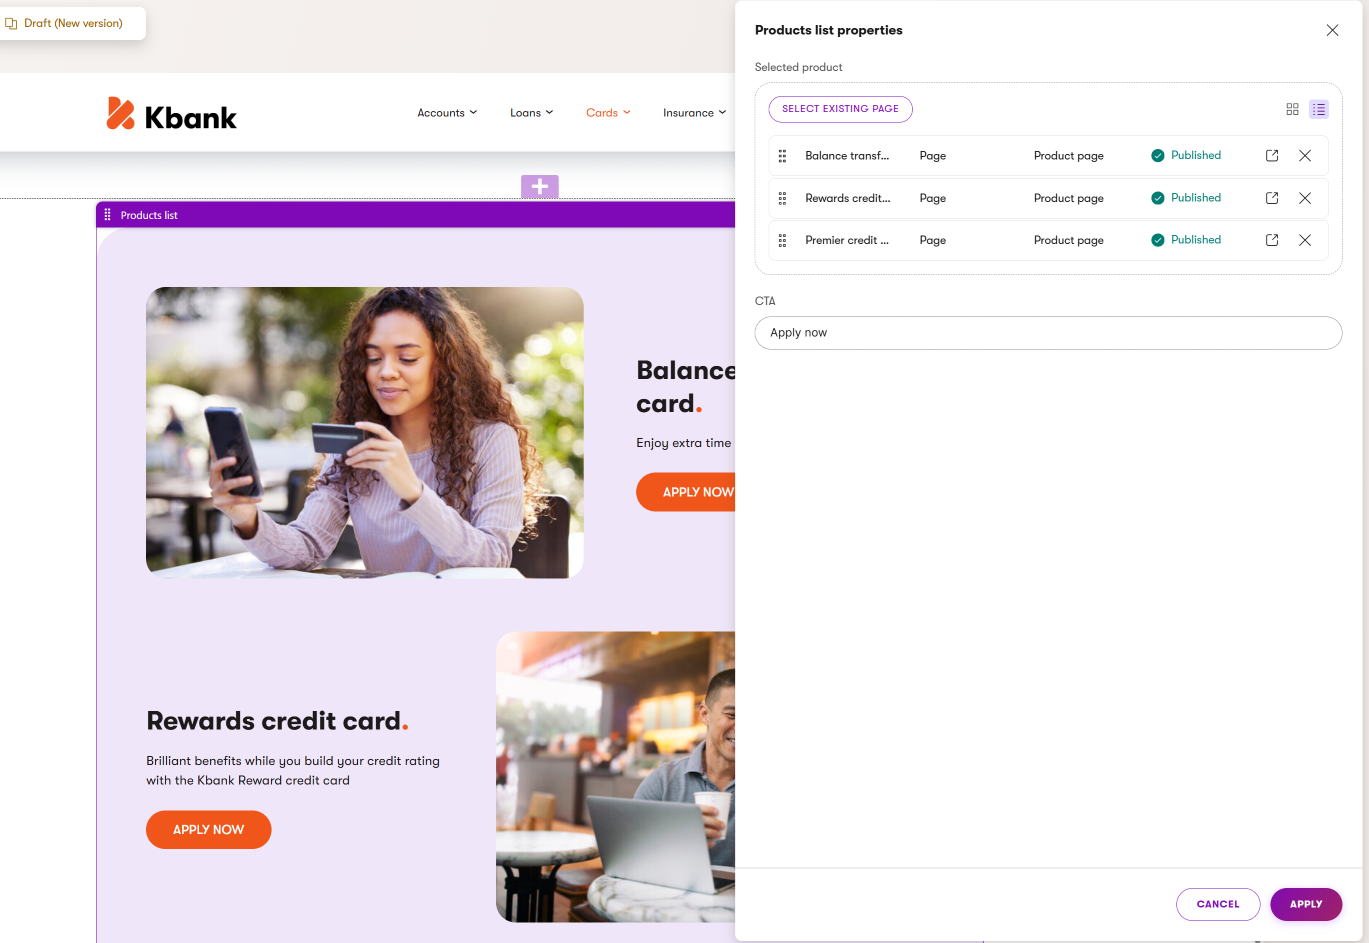
The following image shows how you can compare products that share the same modular Featured content properties. Editors select which products to compare, and developers ensure the data is properly displayed. You can use this approach to replace traditional comparisons, which were commonly defined through product comparison tables, meaning the data and features were often stored (and duplicated) within individual products.
Optionally, you can create a product listing page with a Product selection field. Besides SEO and other fields, it will include a content item selector configured for multiple products, allowing editors to manually reorder selections on the Content tab, rather than using Page Builder widgets..
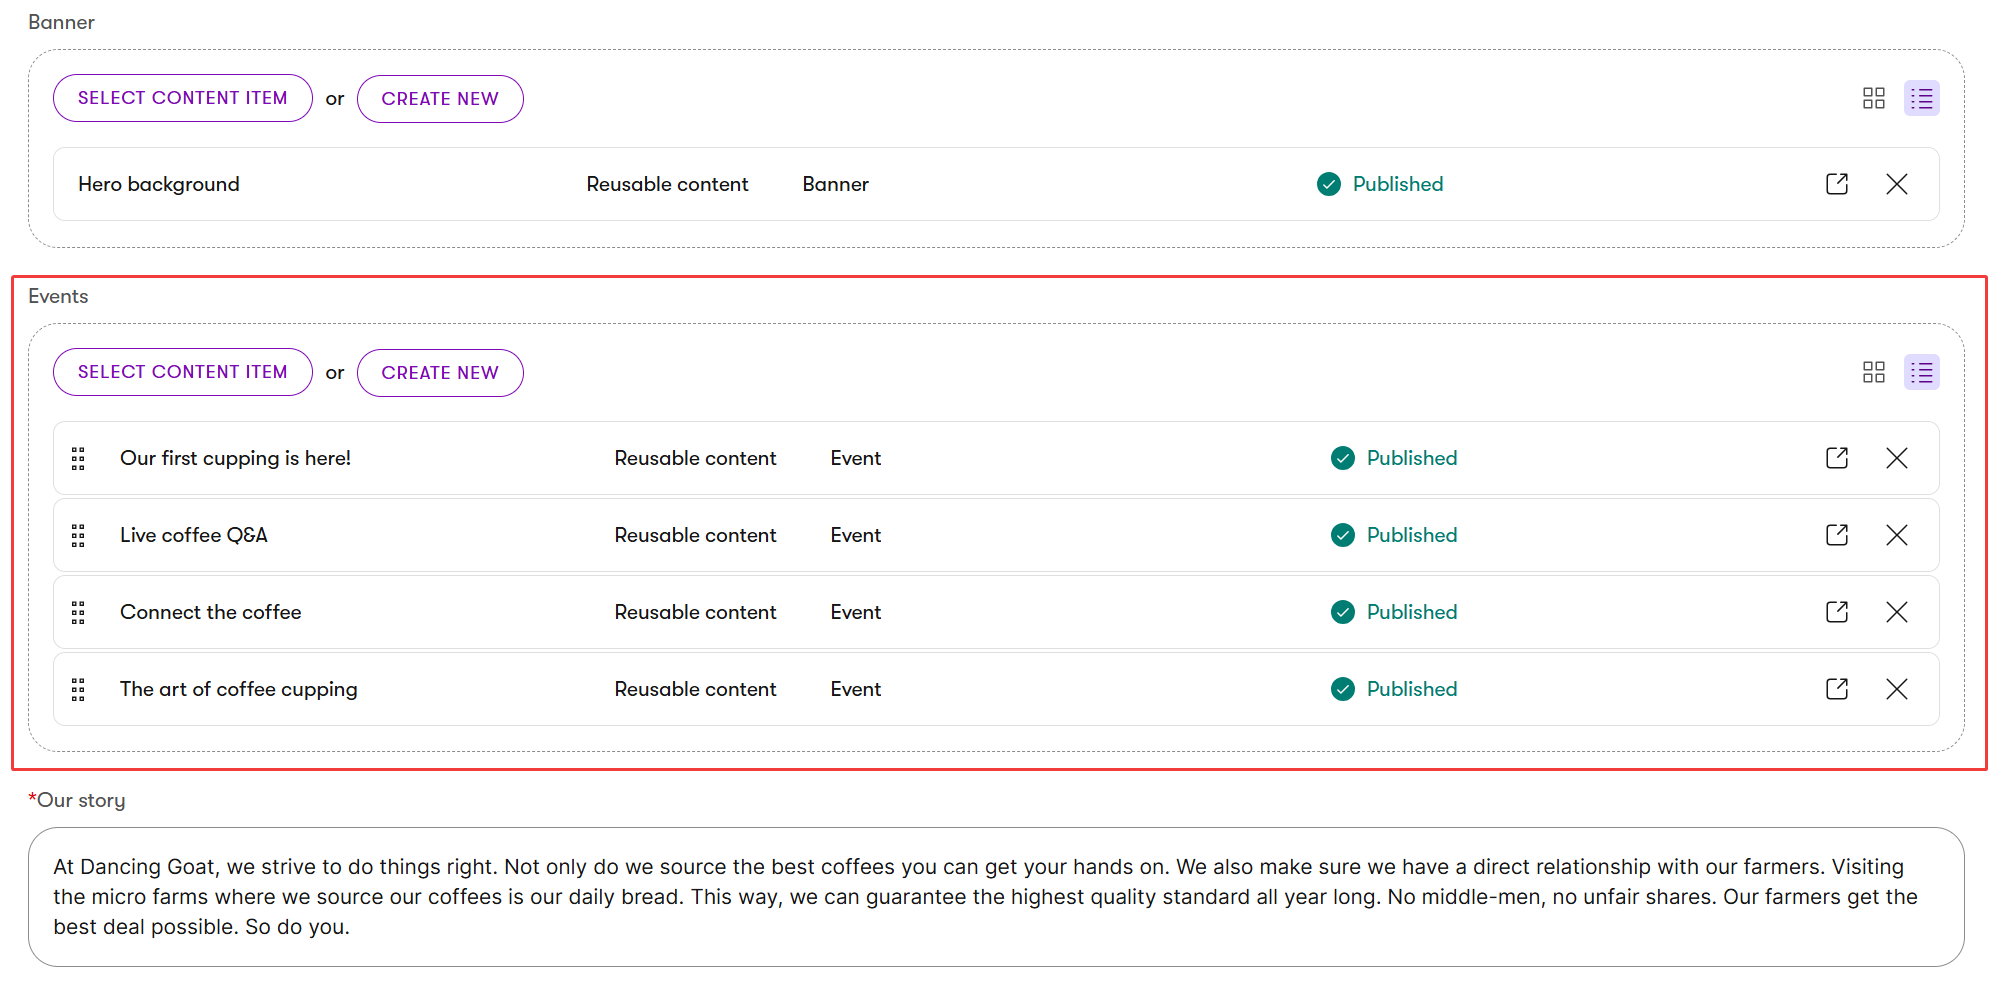
The following image shows the Dancing Goat website, where editors use the Event field to select events to be promoted on the Home page. The events can then be displayed on the website. In the Dancing Goat website’s case, only the first item is displayed. In real life, selected events (or products in your model) can be displayed through a slideshow widget, or dynamically without the editor’s intervention, based on a configuration prepared by the developers.
Choose query-based listings for large catalogs that need automatic updates. Choose manual selection for curated collections where editors need control over product order, selection, and content personalization.
Design considerations for listing pages
Consider how products will be filtered
Will you use taxonomy tags, content type fields, price ranges, or a combination? Decide whether editors need to override the automatic order or if products should always sort by date, popularity, or price. Determine whether featured products should appear first in each listing.
The following product listing allows editors to hand-pick products to display. Using widget personalization, they can easily tailor selected products to different audiences.
Plan for listing edge cases
How will you handle empty listing pages when no products match the criteria? Will you show a No products found message, display featured products as a fallback, or automatically redirect to a dedicated page?
Choose a filtering approach
When modeling a listing page, decide which filtering strategy your product listings will use. Although the visitor-facing experience may look similar, the underlying implementation differs significantly and affects your content model.
Search index-based filtering uses a search engine (such as Lucene or Azure AI Search integration) to filter products by facets included in the search index. With this approach, the search engine handles filtering logic, supports full-text search alongside faceted navigation, and performs well with large catalogs. However, you need to maintain a search index that stays synchronized with your content, and your filterable attributes must be explicitly mapped to the index. This approach is best suited for catalogs where visitors need to combine multiple filter criteria, such as price, category, rating, and availability, or when full-text search is a requirement.
Direct content filtering queries content items or pages directly based on their content type field values, taxonomy assignments, or content tree position. This approach requires no additional infrastructure beyond your Xperience instance and gives you real-time access to the latest published content without index synchronization delays. However, complex multi-facet filtering can become resource-intensive on large catalogs, and you may need to optimize carefully queries.
|
Consideration |
Search index-based |
Direct content filtering |
|
Content freshness |
Might be affected by index rebuild timing |
Immediately after publishing |
|
Performance at scale |
Optimized for large catalogs |
Best for smaller to mid-size catalogs |
|
Infrastructure |
Requires a search index |
No additional setup |
|
Multi-facet filtering |
Handles complex combinations efficiently |
Can become costly with many facets |
Your filtering strategy influences your content model. For search index-based filtering, ensure the product fields you want to filter by are structured and indexable (avoid storing filterable attributes in rich text fields). For direct content filtering, consider using taxonomy tags, dedicated classification fields in a content type, or dedicated categorization content types that support efficient querying.
Also consider whether you’ll use pagination, infinite scroll, or Load more buttons for long product lists. These decisions influence which template properties, custom Page Builder widgets, or dedicated fields on the Content tab your listing pages will require.
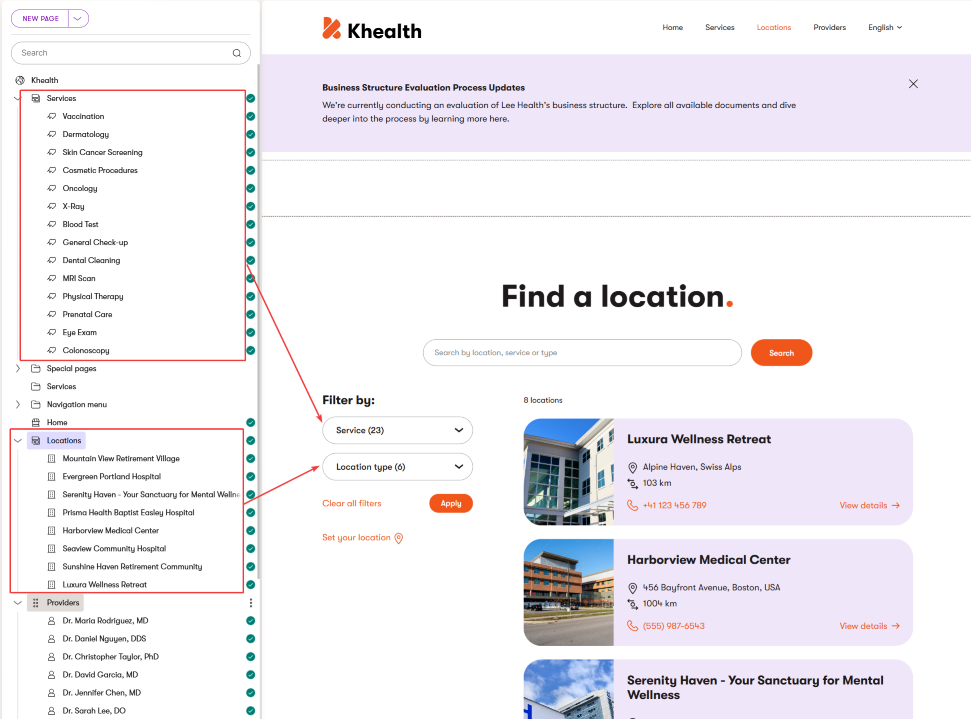
In the following image, you can see a location page from the Khealth demo site. Clients can filter out locations based on their preferences.
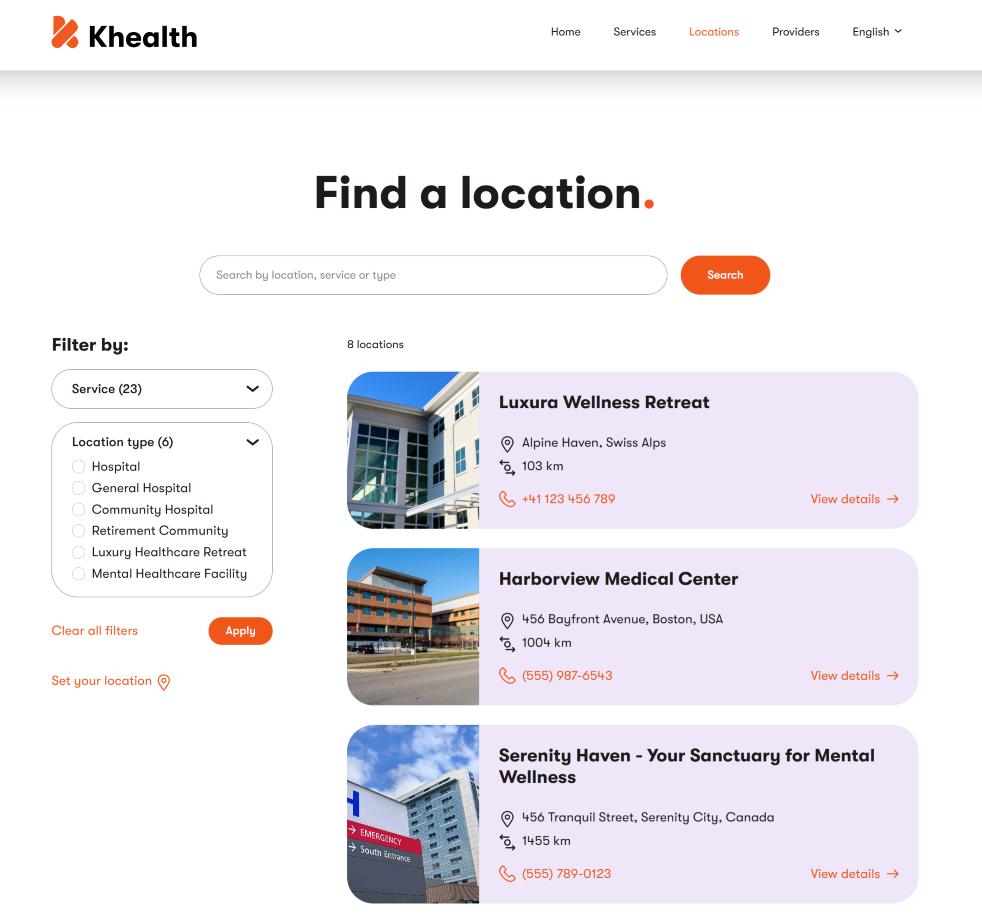
The filtering (and facets) in Khealth use the content tree structure, where individual items represent the filter options for services and locations, as shown in the following picture.
Content governance considerations
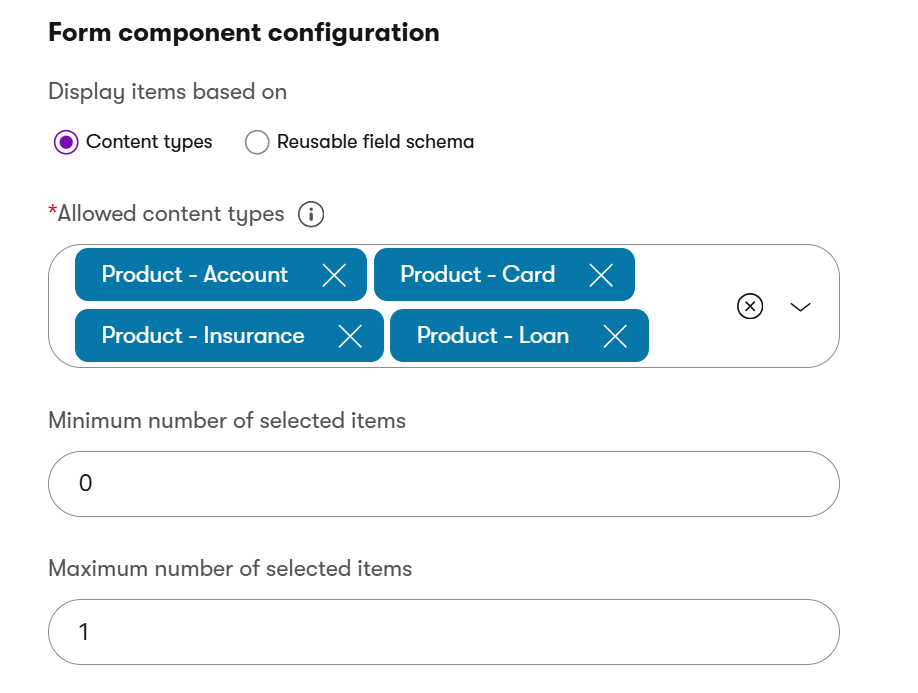
When you configure your content item selectors, limit the allowed content types to only the content types that should be referenced. For your Product page, configure the Product selector to accept only Product content types (or specific product variants). This prevents editors from accidentally selecting the wrong content type.
For example, the following image shows that Kbank’s editors can select only product-specific content types, such as Loan, Account, Card, or Insurance, into the Product page thanks to the selector’s configuration.
Provide clear guidance for editors
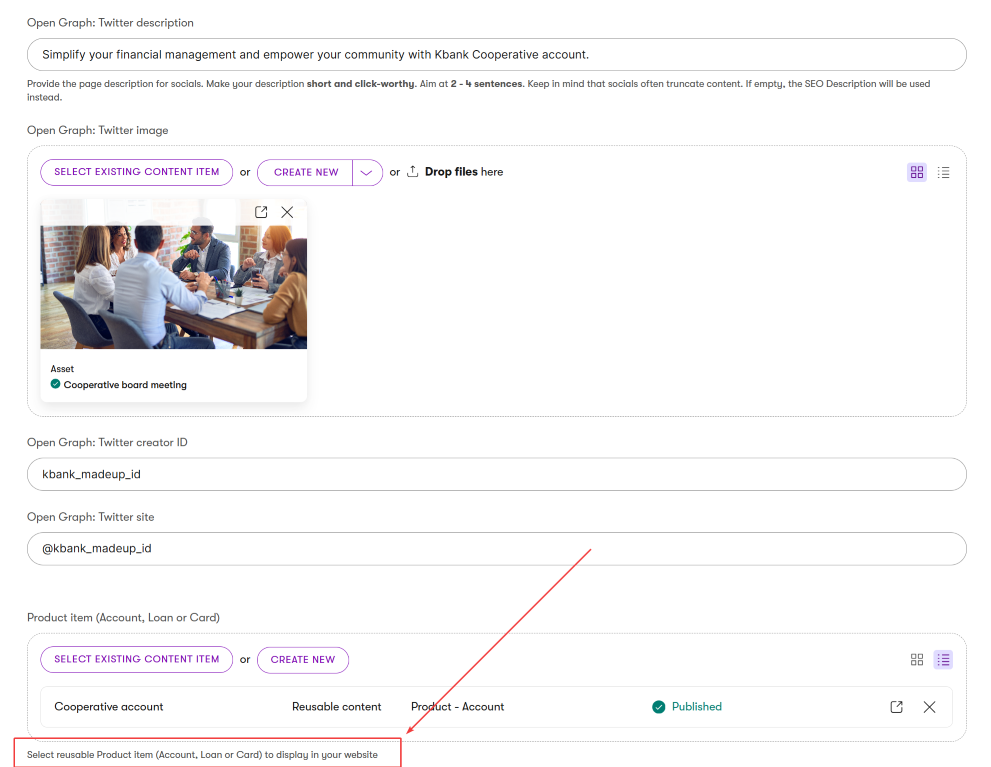
Use descriptive field captions, like Select product, rather than just Product. Add helpful descriptions below the selector, such as Choose the reusable product this page will showcase. Include explanations about the content and its format to guide proper usage in all other fields.
The following image shows the product selector on the Kbank demo site. The page selector’s additional description tells editors to Select reusable Product item (Account, Loan, or Card) to display on your website., leaving little room for doubt.
You can use the Xperience Content modeling MCP server to generate clear, editor-friendly labels and descriptions that your UX team can iterate over and improve.
Establish ownership and workflows before you start building content.
Decide who manages the reusable Product content items. Typically, this is a product team or merchandising team that owns the core product information, or data entry specialists who work closely with the product team. Decide who manages product wrapper pages. This is usually your marketing team or web content editors who control channel presentation and SEO.
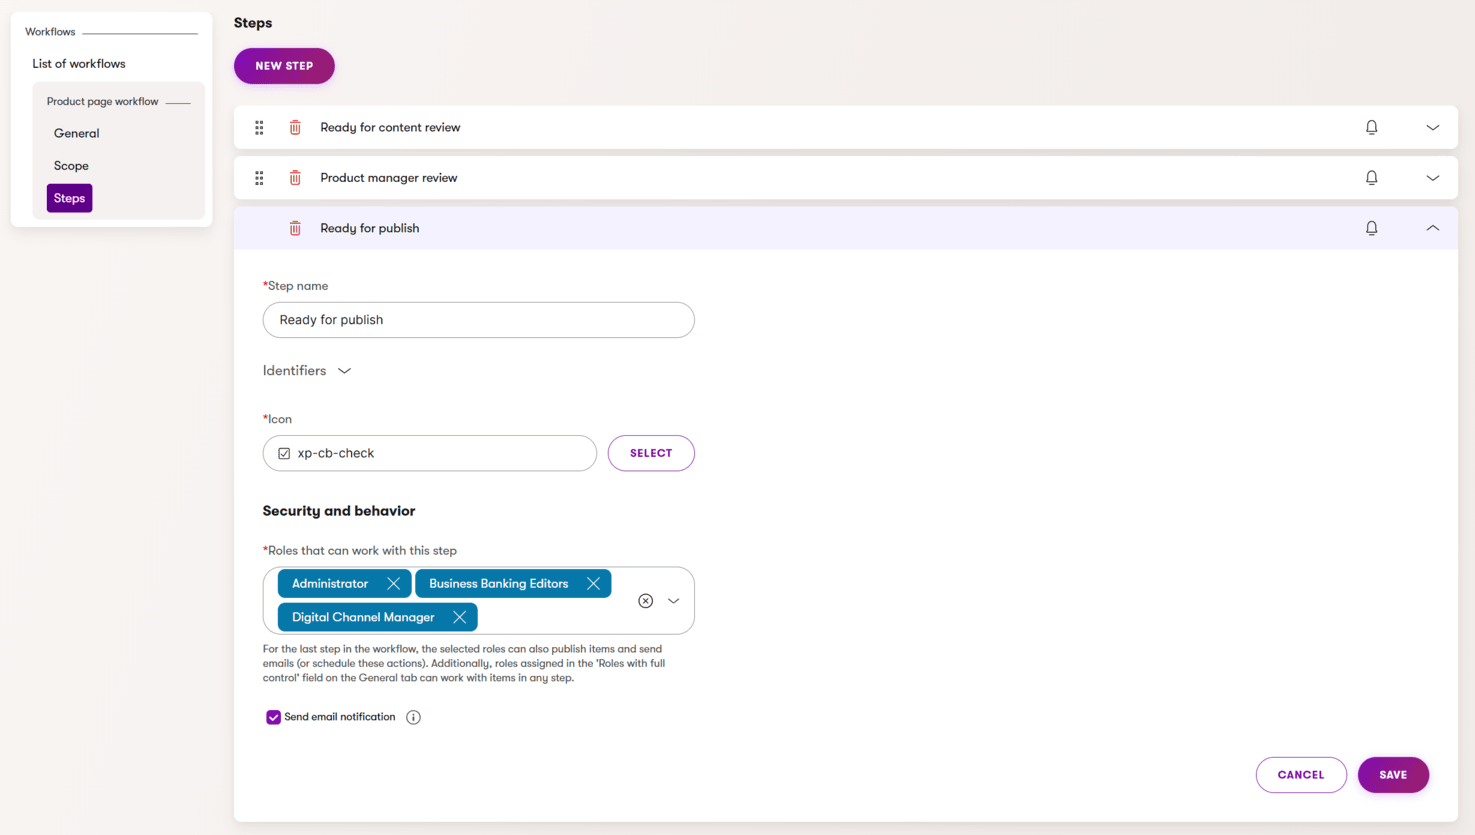
The following image shows a product page approval workflow with three steps. Different stakeholders, such as content editors, product managers, and administrators, need to approve the page content before it’s published to the live site.
Plan your permissions and access structure
Use workspaces to organize content by team or business unit. For example, you can configure role permissions for each content type so the product team can edit Products but only view website pages, and the marketing team can edit wrapper pages but only view Products. To manage access to website pages, use the page level permissions.
As shown in the following image, editors on the Business Banking team can work only with content items that target their customer persona: B2B representatives. All products, product components, and articles filtered in the Content hub view fall under their business domain.
Test your permissions structure early by having team members from different roles create sample content items. This helps you identify permission gaps or workflow issues before you roll out the model to your full content team.
Understand publishing dependencies
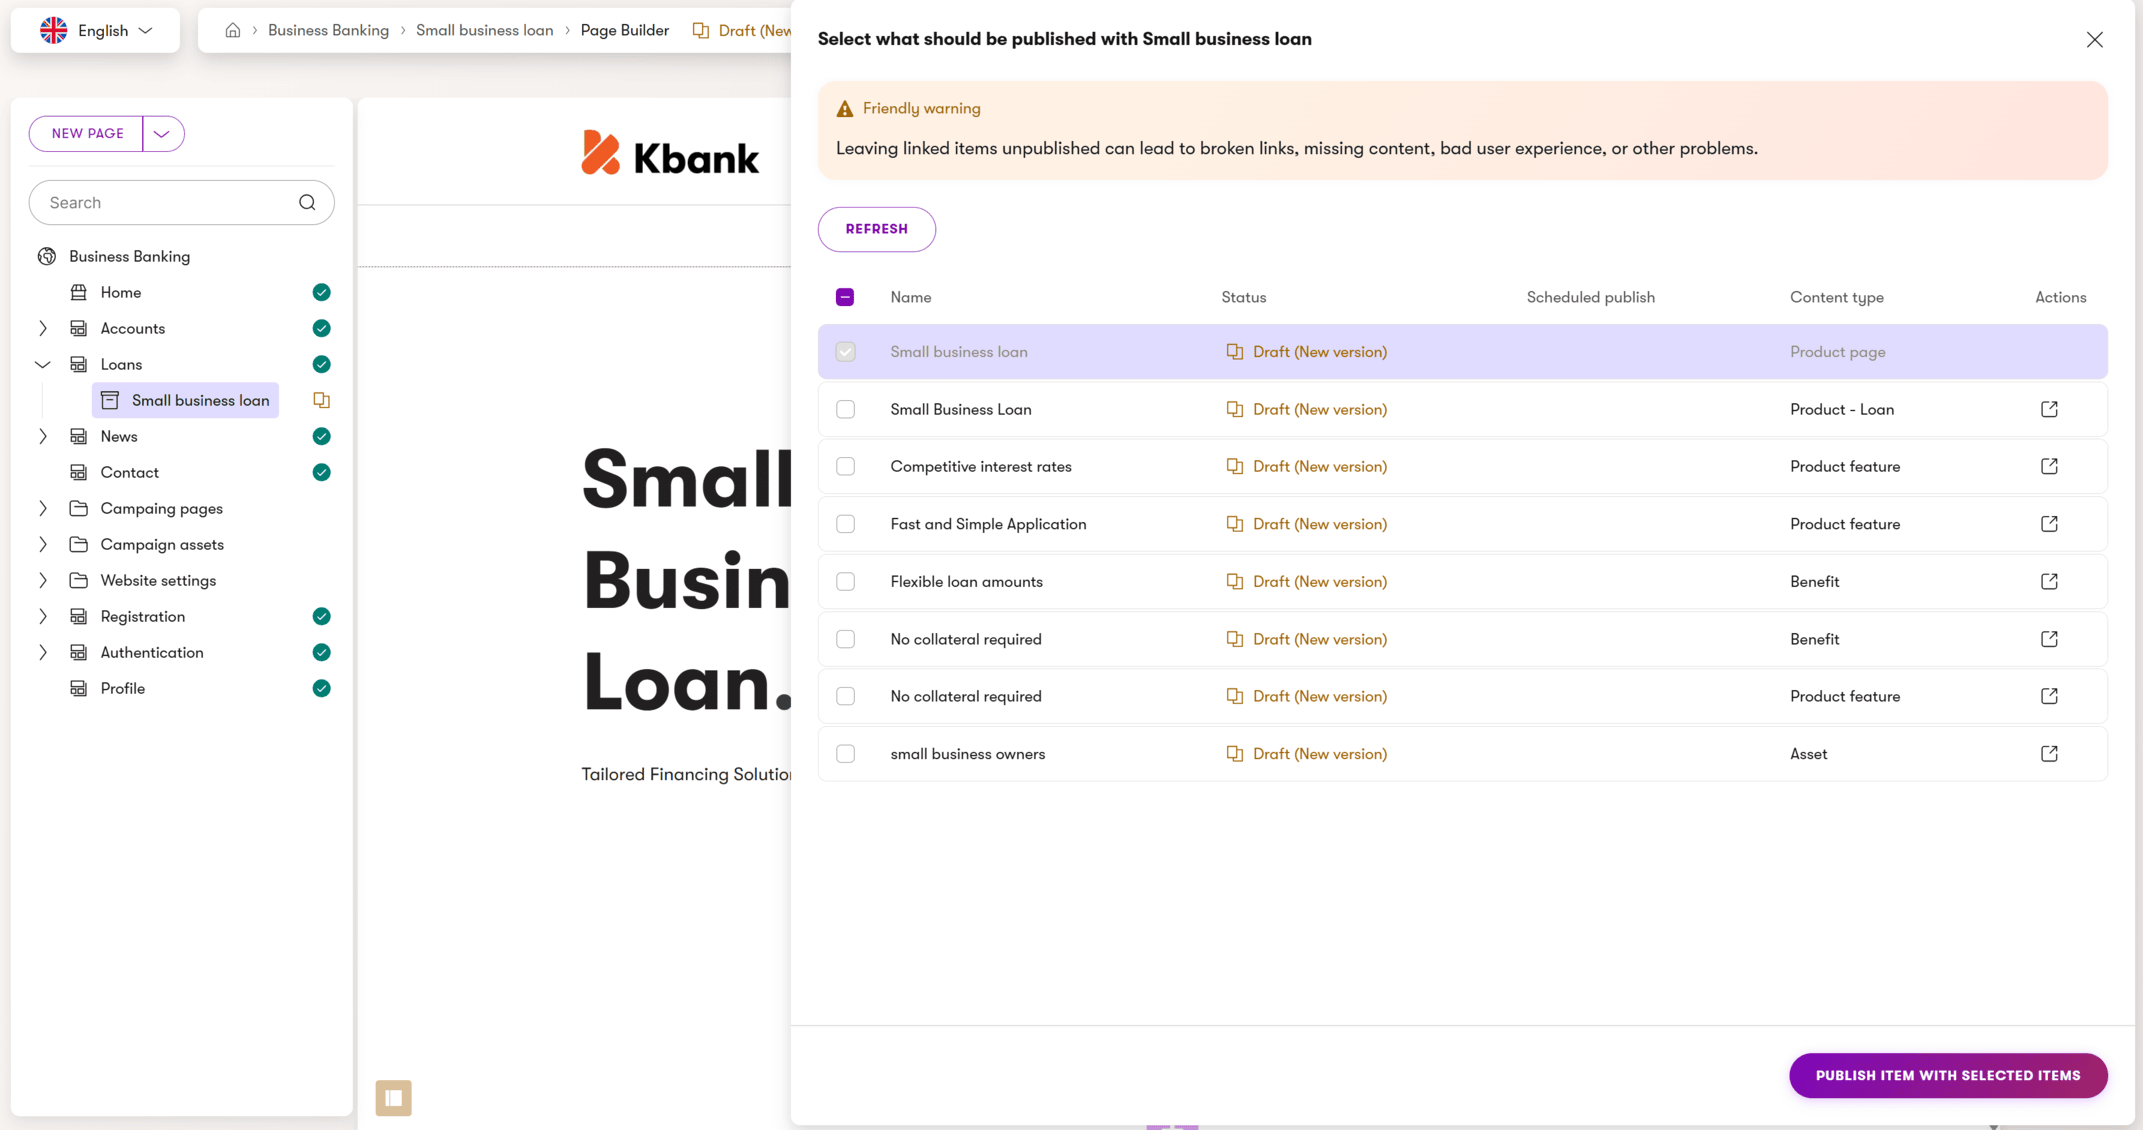
When you publish a wrapper page that references an unpublished Product, you may need cascade publishing to publish all items together. When you update a reusable Product, remember that the changes will appear on every wrapper page that references it. Establish a notification process so teams know when shared content changes.
The following image shows a product page with all the unpublished content items this page references. Xperience cascade publishing allows publishing of all related content at once.
Multilingual considerations
When working with multilingual content, you need to decide what to translate and what to keep language-neutral. You can use AIRA translations to prepare content in different languages and then hand off different parts of the wrapper page to different editor teams via workflows.
One editor team might need to validate SEO metadata (title and description) for each language to ensure search results display correctly across markets. Social media managers might need to review translated Open Graph metadata to ensure social sharing displays properly in each language. Editors might need to customize the translation of language-specific CTAs and promotional text that appear only on that channel. Additionally, a product team might want to verify the translated product data in the Content hub.
Some content typically stays language-neutral. Core product data may or may not require translation depending on your markets and products. Product specifications often remain universal across languages. Product SKUs, prices, and technical specifications usually don’t need translation unless you have market-specific products.
Use Xperience’s language fallback feature appropriately. When a linked content item doesn’t have a translation in the target language, Xperience shows a yellow border warning in the editing interface. Decide whether to use the fallback language for untranslated linked items or require full translation before publishing in each language.
Naming conventions and organization
Organize your content tree thoughtfully
Place wrapper pages in a logical site structure such as /products/[category]/[product-name]. Use folders to group related products. In the Content hub, organize products using content folders, smart folders that automatically organize items by criteria, or workspaces to separate products by business unit or team.
Establish consistent URL patterns
Use a predictable structure like /products/[category]/[product-slug] so visitors and search engines can understand your site hierarchy. Use the alternative URLs feature to handle redirects when you reorganize content. Use the canonicalization feature to indicate the primary URL when the same product appears on multiple pages or channels.
Follow clear naming conventions for content items
Establish clear naming patterns for the editor teams.
Editors need to name their products clearly and descriptively to help with discovery across the system, especially if different teams manage different presentation layers: Business Checking Account, Striped Grey T-shirt, and Professional Dog Grooming Kit.
Name product (wrapper) pages to match the product name or add channel context: Business Checking Account - Website, or just Business Checking Account. When you have product variants, include a distinguishing suffix in the content item name: Striped Grey T-shirt - S, Striped Grey T-shirt - M.
Avoid common modeling mistakes
Don’t create overly complex wrapper pages by adding too many fields, and keep your wrapper focused on channel-specific needs.
Plan for future channels from the start
Design your reusable Product content type with multi-channel delivery in mind, even if your project needs only a website today. We recommend avoiding channel-specific assumptions when modeling the core product data. This makes it easier to add mobile apps, microsites, or email campaigns later.
Never duplicate data between your reusable content and wrapper
Apply this rule: if data is universal and describes the product itself, it belongs in the reusable Product only. Developers need to ensure that the data is properly displayed across different channels.
We’ve seen a common mistake where editors added the same product description to the product and then to a product page (and to emails) using a widget. We recommend avoiding this data duplication. When editors copy some information from the Product content type to the wrapper, you’re defeating the purpose of the two-layer architecture. It creates confusion about which description is authoritative and makes content updates difficult.
Provide editors with a widget to display core product data, and introduce widget properties so editors can use the properties strategically to override or even personalize the product data when needed.
Use Page Builder to present product data
Use Page Builder widgets and templates for presenting product data on wrapper pages rather than adding presentation fields to the Content tab. Widgets provide greater flexibility, support personalization for different audience segments, and enhance the editing experience. You can create page templates with pre-configured widget zones to speed up content creation, even if you create content over API.
Establish governance rules for shared content from the start
Define clear ownership of Product vs. page content. Set up workflows and permissions before you build a large amount of content. It’s much harder to retrofit governance onto an existing content model than to build it in from the beginning.
Test the editing experience early. Have developers or solution architects create sample content items using your proposed model. If the initial workflow passes, validate that the model makes sense from the editors’ perspective. Ask editors to create a few products with real data and display this data on website pages to identify any friction in the workflow. Iterate on the page model before you roll it out to your full team.
Next steps
You’ve learned the architecture and modeling principles for commerce pages using the wrapper pattern, and you can implement it in your Xperience project.
Once your content model is in place, work with your development team to build the page templates and widgets that will present this product data on your website. As your content library grows, revisit your folder organization, workflows, and permissions to ensure your governance structure scales effectively with your expanding product catalog.