
Organize assets in Content hub
Every business works with different assets such as images, icons, infographics, videos or documents. Editors usually reuse and share these assets on websites, emails, and other digital marketing channels.
Previous Kentico versions used media libraries where editors stored their data into a folder hierarchy. Media libraries have become obsolete, and editors should store all assets into Content hub.
Unlike media libraries, Content hub doesn’t use a hierarchical system. Instead, all reusable items exist in a single flat list.
Piling all assets into Content hub without any structure may seem easy at first, but quickly becomes a problem, especially in larger editor teams. As the number of assets grows, editors will struggle to locate the correct file and waste time searching through Content hub. It can get even worse: if they don’t immediately find the image they had in mind, they might upload duplicates. This could lead to inconsistencies across channels and become a content curation nightmare.
To manage large collections of assets, you can combine workspaces that separate content across the whole Xperience application and sort assets into folders within Content hub.
The following examples in this guide are recommendations and suggestions, not a prescription. You should discuss the kinds of assets you work with and how your teams collaborate during content modeling sessions with the stakeholders and adapt the system to your project’s needs.
The exercises in this material were prepared in Kbank, our demo website environment. If you’d like to follow along, or if you simply want to know what it’s like working with Xperience by Kentico, you can request your demo site and ask for the Xperience by Kentico – Business Tutorial Kbank option.
Understand how content folders work
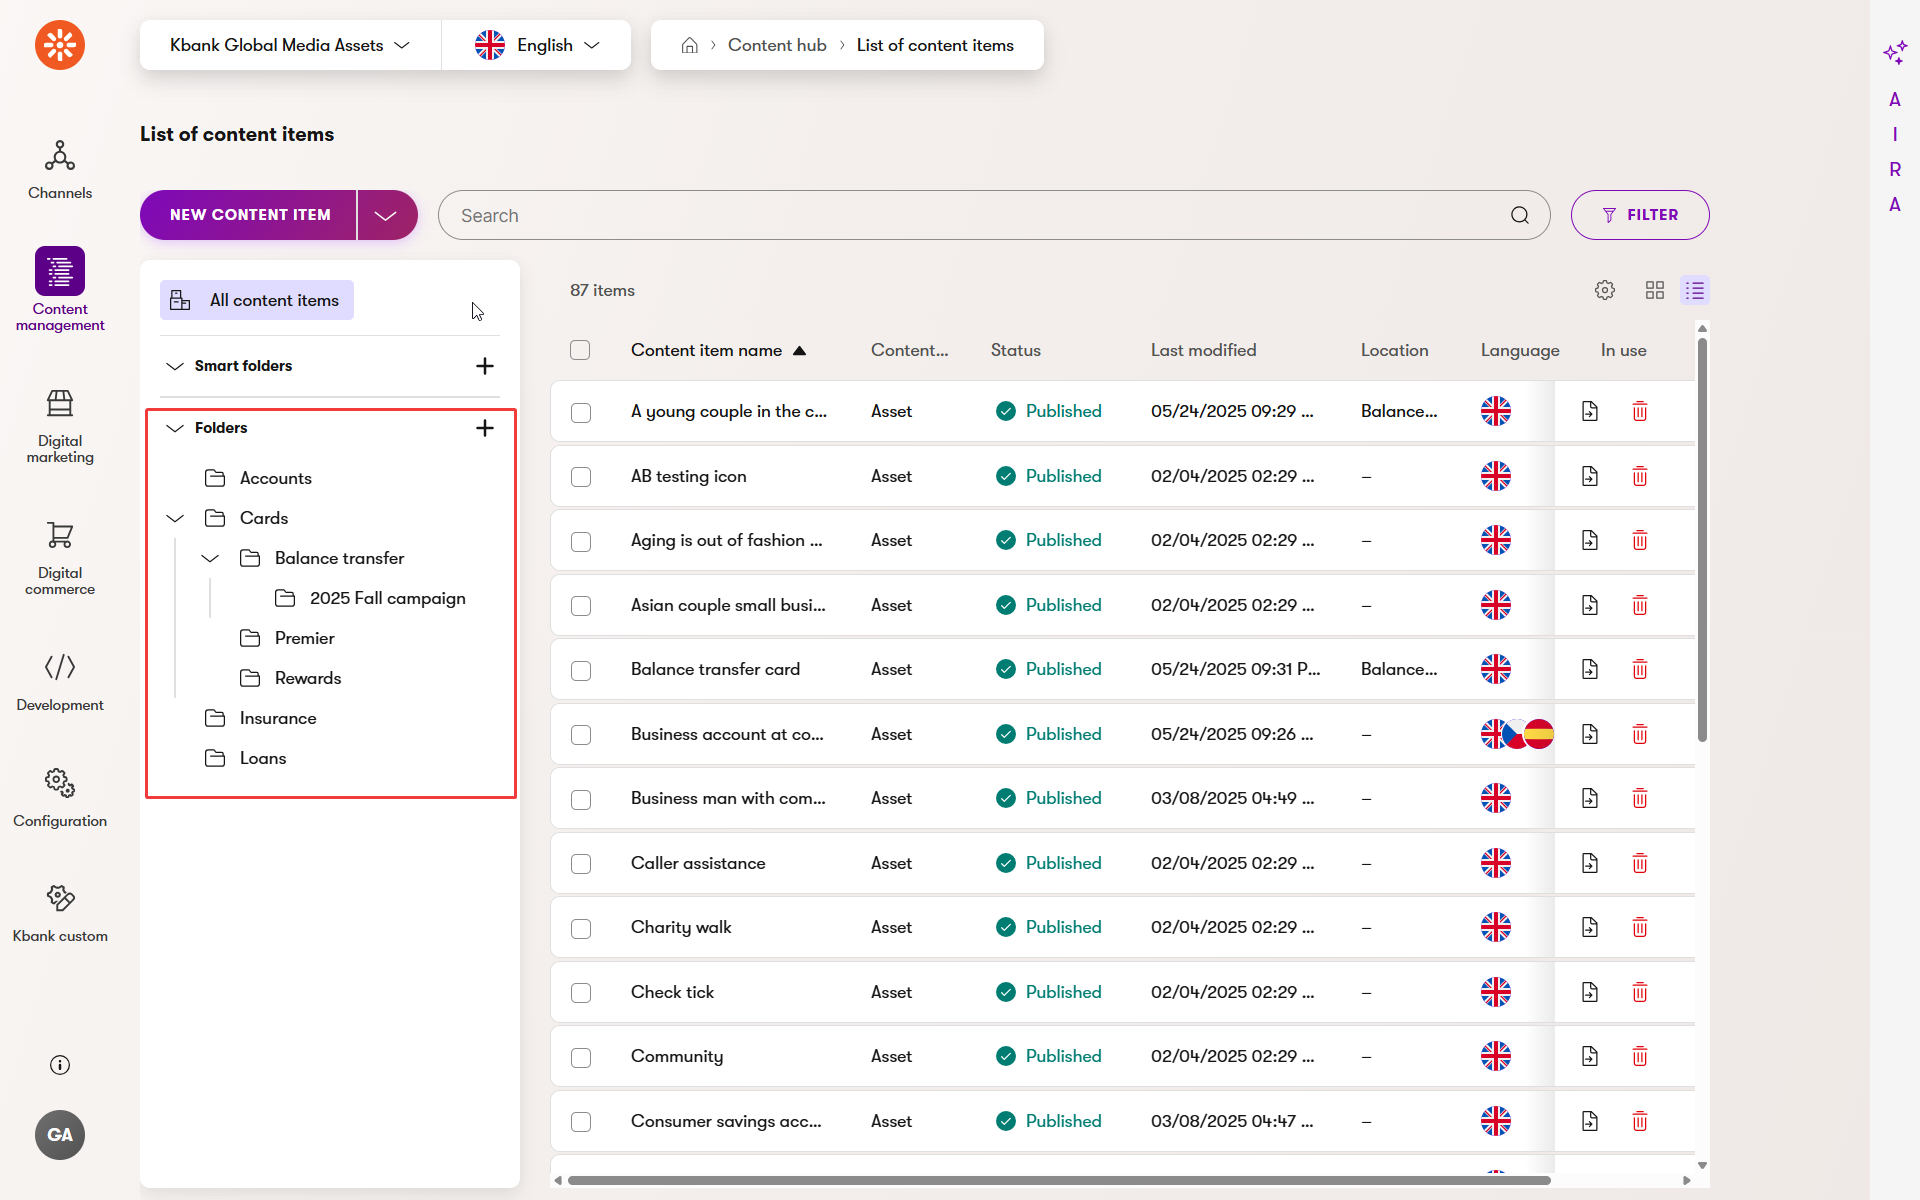
Content hub does not use a real folder hierarchy like a traditional file system. All assets represent reusable content that exists alongside other content items within a workspace in a single flat list.
Content folders are a way to group and view content items inside Content hub. Adding an item, like an image to a content folder doesn’t move it anywhere or create duplicate copies. Instead, the folder creates a filter within Content hub that helps editors find their content.
Key points to remember:
- Content folders and smart folders are like filters over items in content hub; they don’t remove the item form the Content hub.
- Assets, like other content items, stay in the same workspace, even if you place them in a folder.
- Each asset can belong to only one folder at a time.
- You can create a folder structure with parent folders and subfolders to match your needs.
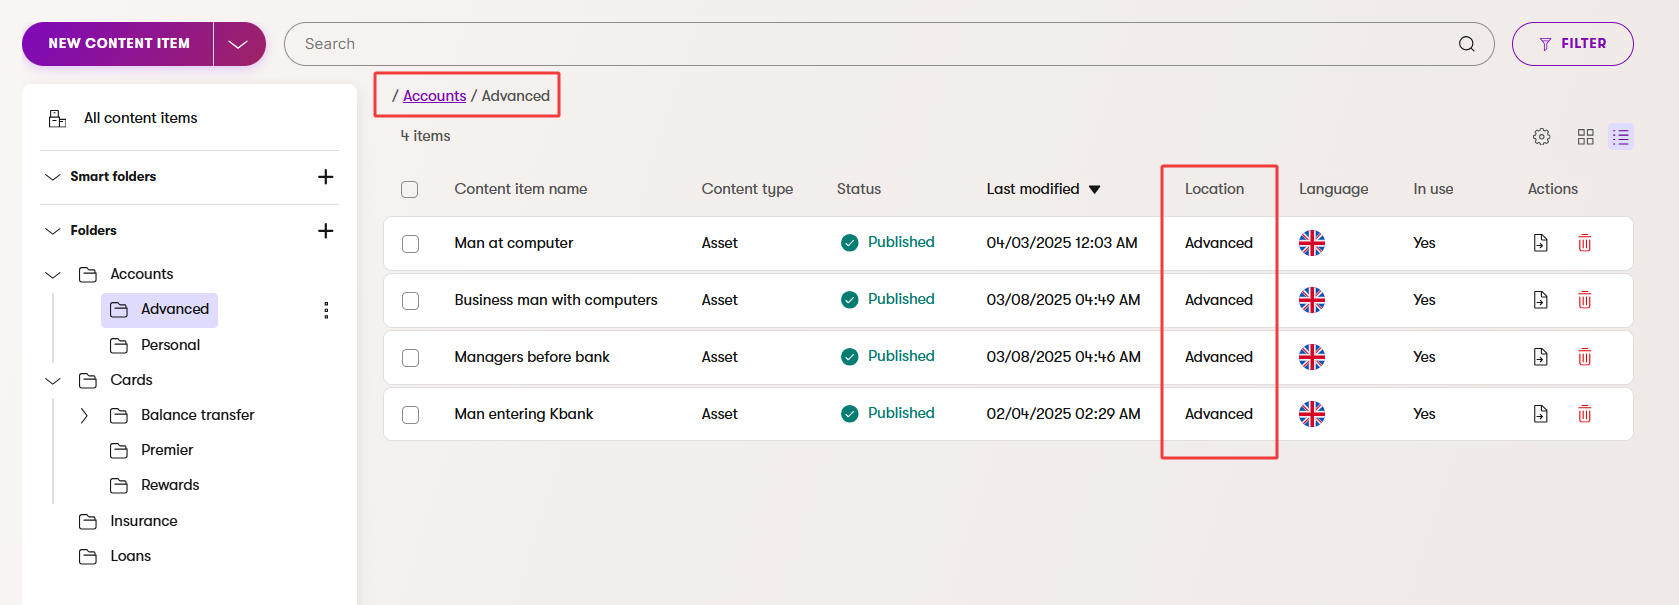
- The breadcrumb navigation at the top of the screen shows your location in the folder tree.
- The Location shows which content folder an item is assigned to.
This approach keeps navigation simple. Instead of scrolling through hundreds of assets, editors can open the correct folder and immediately see what they need.
For example, an insurance company can create folders for each product type it provides: Car insurance, Home insurance, Travel insurance, and Life insurance. When a campaign team needs graphics to promote new travel insurance, they find the approved images in the Travel insurance folder without digging through unrelated assets.
Create folder hierarchy
A good folder hierarchy helps editors find and reuse assets. It doesn’t change where assets are stored in Content hub; they always remain in the same flat workspace. Content folders help you create a logical way for your team to navigate to them.
You can create as many folders and nest them as deeply as you need.
To create folders:
- Open Content hub within the workspace where you want to organize assets.
- Create a parent folder for a major category of your assets.
- If needed, select this parent folder and create subfolders for more specific groupings.
- Repeat this process until you have a clear and simple structure.
Let’s test it out in the Kbank demo site. Kbank runs personal and business banking websites. Editors need to manage product images for both sites, as well as campaign graphics. They want to create the following structure inside their Kbank Global Media Assets workspace:
- Top-level folders:
- Accounts
- Cards
- Insurance
- Loans
- Subfolders under Cards:
- Balance transfer
- Rewards
- Premier
- Temporary subfolders for campaigns:
- Under Balance transfer, a Fall 2025 campaign subfolder to store campaign-specific banners and promotional graphics.
This structure helps editors find the right asset quickly without scrolling through unrelated files. The breadcrumb navigation shows them exactly where they are in the folder tree. Campaign teams know where to upload temporary images and can easily clean up the campaign subfolders once the promotion ends.
Keep your folder structure simple. Two to three levels of folders will suffice for most projects that keep assets alongside other content within the Content hub. Editors find complex hierarchies harder to navigate and maintain.
Move items into content folders
Once you have a folder structure, you can organize your assets into the right folders. Remember, moving items doesn’t mean creating copies of files; moving just assigns these content items to a folder so they are easier to find.
Let’s continue within the Kbank demo site.
- Ensure you are in the Kbank Global Media Assets repository.
- Select the items you want to organize: Balance transfer card and Female with credit card.
- Use the Move action above the content items and choose the Cards > Balance transfer subfolder in the folder tree.
- Use Move to confirm.
Select the Balance transfer folder to confirm that your items appear correctly. Then, open the All items view to verify that the Balance transfer card asset is still available in the workspace in Content hub and its Location has been updated.
Use workspaces to manage assets apart from other content
Media libraries kept all “files” separated from other content, which is not the case in Content hub.
Depending on how your editors feel about it, you might want to create a dedicated workspace to store all files that different teams should access. You might also need to define what editors can or cannot do with the assets.
Imagine that workspaces in Xperience are containers for content in the Content hub. Content in the Content hub always belongs to one specific workspace.
Your administrator assigns you access to the workspaces and other system parts. No matter which application you work in, whether the Content hub or a website channel, your role defines which resources you can access.
This means:
- Your role determines which workspaces you can view and edit.
- You stay within that workspace when working in Content hub.
- You can switch between workspaces whenever you need.
Depending on your role’s permissions, you’ll be allowed different operations within the workspace:
- View – Editors can use the assets in their work, but cannot change or delete them.
- Create, Update – Editors can reuse and change (update) assets.
- Delete – Editors can remove existing assets.
Your access to website channels is also based on the role (not workspace). This allows organizations to maintain independent asset management and channel editing permissions, so that teams get only the necessary access level.
From an organizational perspective, setting up a workspace to collect your company’s assets does more than group images in one place. It creates a shared space where:
- Content is organized consistently across the system.
- Permissions and access levels are applied reliably.
- Editors and teams can collaborate without stepping on each other’s work.
Let’s take a look at an example. The Kbank demo site uses three websites managed in Xperience, and a number of other channels:
- Personal banking website
- Business banking website
- Mortgages website
- Email Marketing
- Headless app
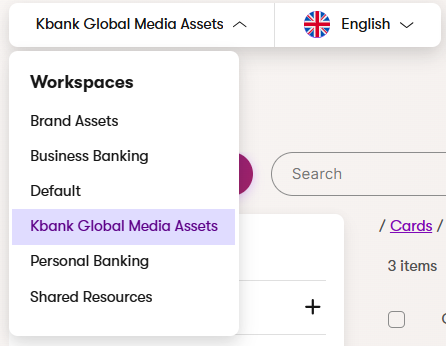
The Kbank teams organize their assets into these workspaces:
- Brand Assets workspace. This workspace contains official logos, icons, and approved images. Editors in all channels can reuse these, but only the design team can modify them.
- Kbank Global Media Assets workspace. This workspace holds images that all teams share, such as generic promotional graphics. Editors from any channel can add and update these items.
- Channel-specific workspaces. Personal banking and Business Banking website channels have their own workspace for content and assets used only on that website. Access permissions, such as page-level permissions, are limited so editors from one channel cannot accidentally change content in another website that they are not allowed to change.
This structure gives editors a consistent experience across Xperience applications while keeping each area organized and secure.
[Image: Workspace list showing Brand assets, Global media assets, and channel-specific workspaces]
Plan your workspace structure early. If your teams or projects grow, you can add new workspaces or adjust permissions without disrupting the rest of the system.
Use smart folders to organize and filter assets
Smart folders let you create dynamic groups of assets in Content hub. Unlike regular folders, which hold specific items until you move them, smart folders automatically include items that match your defined filter. As assets change, for example, when AIRA applies taxonomy tags or adds image descriptionor editors publish them, assets move in and out of the smart folder automatically.
To quickly find content you are responsible for, you can create smart folders:
- Assets tagged with Campaign 2025 to collect assets with relevant taxonomy tag.
- Images modified in the last 7 days.
- Images in Draft status waiting for review.
Unlike folders, a single asset can appear in multiple smart folders, which makes them helpful in managing different workflows without duplicating content. Because smart folders update automatically, you don’t need to remember to move items in and out. They stay accurate as the underlying assets change.
Deliver content dynamically with smart folders
For projects where developers have enabled dynamic content delivery, smart folders can also control which assets are displayed on your website channels. You can manage which assets appear live by editing the filter conditions in Content hub without needing code changes.
For example, your team could:
- Update a campaign smart folder filter to include new images; the website will automatically display them.
- Remove outdated assets from a smart folder, instantly updating what users see in the related channel.
This makes smart folders especially powerful for teams managing campaigns or time-sensitive updates, as the filtering logic stays centralized in Content hub.
Keep your assets organized with these best practices
Organizing assets in Content hub takes more than creating folders, especially in large projects. You need to create a well-structured system to help editors keep their projects maintainable. The following best practices will help you build and maintain a structure that works for everyone.
Use workspaces to manage access and scope
Workspaces are where you define who can use and edit assets. Use them to protect brand-critical assets and allow teams to share standardized resources across teams or only among themselves using dedicated workspaces. For example, limit editing rights in a Brand assets workspace to only the company’s graphic designers, but allow website editors to use those assets in their work.
Use folders for organization, not permissions
Folders are only for grouping assets to make them easier to find. They don’t control access or editing rights.
Use smart folders to filter relevant content
Smart folders let you group assets based on filters, such as tags, status, or modification dates. They update automatically as assets change, which is useful for tracking campaign materials, reviewing drafts, or managing recently uploaded files. Use them to create views over content that you are responsible for.
Publish catalogs or galleries dynamically
Developers can use the dynamic content delivery in smart folders and feed media catalogs or galleries directly to your website channels. For example, you could maintain a New products smart folder or a Featured campaign folder, and the website or app will automatically display the right assets without manual updates.
Keep folder names clear and meaningful
Choose simple, descriptive folder names so anyone can understand where to find an asset, for example, use Credit cards instead of CC2025_Materials. Clear names save time and reduce mistakes.
Avoid deep folder structures
Two or three levels of folders are enough for most projects. Complex hierarchies make navigation slower and harder to maintain, especially for new team members.
Review and clean up folders regularly
Embrace temporary folders, such as those for campaigns. At the same time, to prevent clutter, put a process in place to regularly review and clean up folders that are no longer needed.
Speed up content creation by using cloning and multi-select
This interactive demo shows a quick, practical way to reuse content you already have in Xperience, and also how to keep your folders neat and organized with less repetitive clicking.
You’ll explore how to clone an existing page in Xperience, duplicate a reusable content item from the Content hub, and then use multi-select to organize multiple items in one go.
The demo shows the three functionalities – cloning a page and an item, and multi-select – in a single workflow:
- Clone an existing campaign page (including its layout and widgets) to create a new draft page.
- Clone a reusable content item in the Content hub to create a draft copy you can edit without affecting the original.
- Use multi-select (Shift+click for range selection, Ctrl+click for individual selection) to apply bulk actions, such as moving items to a folder.
Wrap up
We recommend using Content hub to store and manage all reusable assets, from images, icons, and videos to documents and campaign graphics. If you are working in a larger team and need to limit which teams have access to which assets, organize your assets into workspaces. Group items into content folders within the workspace. Improve flexibility by introducing smart folders and creating dynamic asset collections that update automatically as items change. Speed up reusable content creation and organization by using cloning and multi-select.
A well-planned structure helps teams of any size work more efficiently, prevents duplication or accidental changes, and keeps assets consistent across websites, apps, and other channels. By combining clear workspace permissions, meaningful folder names, and smart folders for dynamic organization or delivery, your team can keep Content hub tidy and ready to support your projects as they grow.