
Manage files in Xperience
Managing your project’s files doesn’t have to be a complicated chore. In Xperience by Kentico, you can keep all your important assets in one place, making it easier to find and update them. They can also be reused whenever you need. In Xperience, you can store various file types, including images, videos, PDFs, presentations, documents, and more. All assets are stored within the Content hub, your central repository for reusable marketing content.
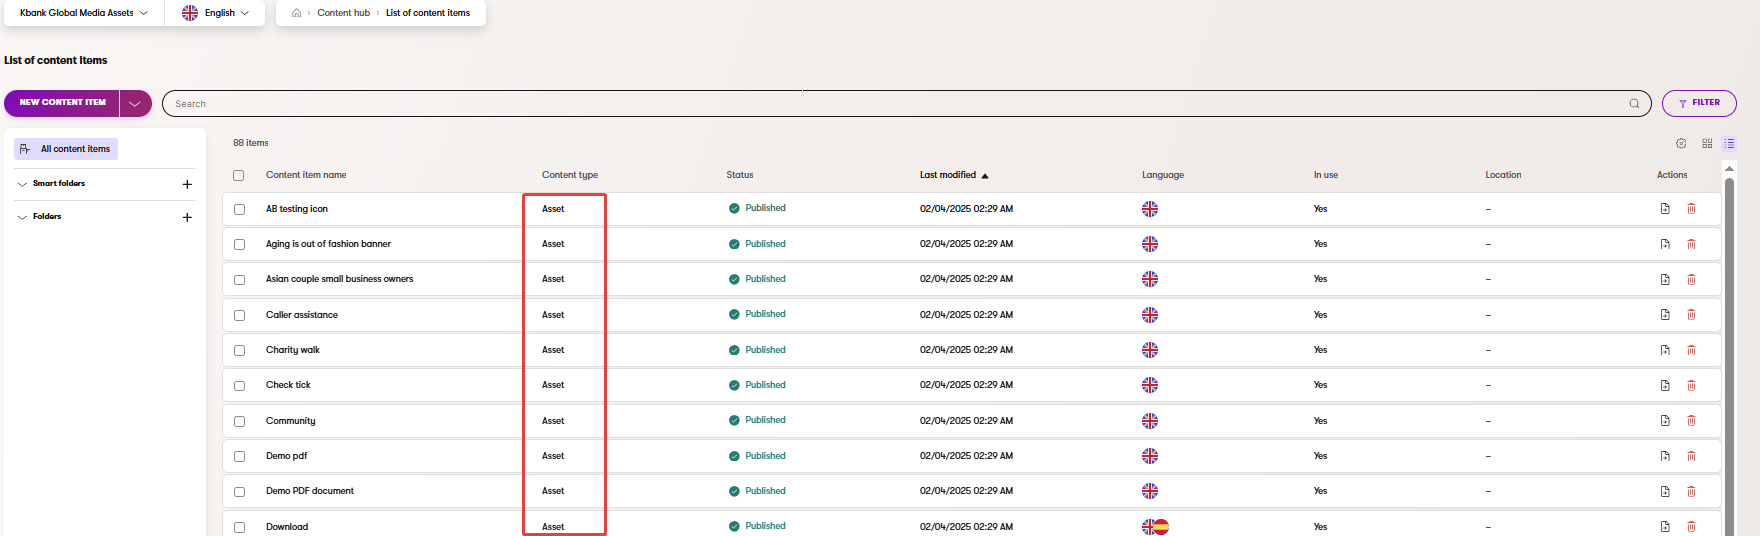
The assets in the Content hub are based on a custom content type. Depending on your project implementation, you’ll be working with Images, Media, or Assets. For example, in the Kbank demo site, you’ll work with the Asset content type.
Don’t have the demo Kbank website yet? You’ll need one to follow up on the exercises. If you don’t have your demo site set up, request the Xperience by Kentico – Business Tutorial Kbank demo site through a form at Kentico website.
We’ll show you the basics so you can easily store and manage your assets, and make your everyday marketing tasks a lot easier.
Work with assets in Content hub
Storing files in Content hub means you can reuse them in different digital marketing activities across your marketing channels. Assets in the Content hub provide you with helpful features that make managing large projects a breeze.
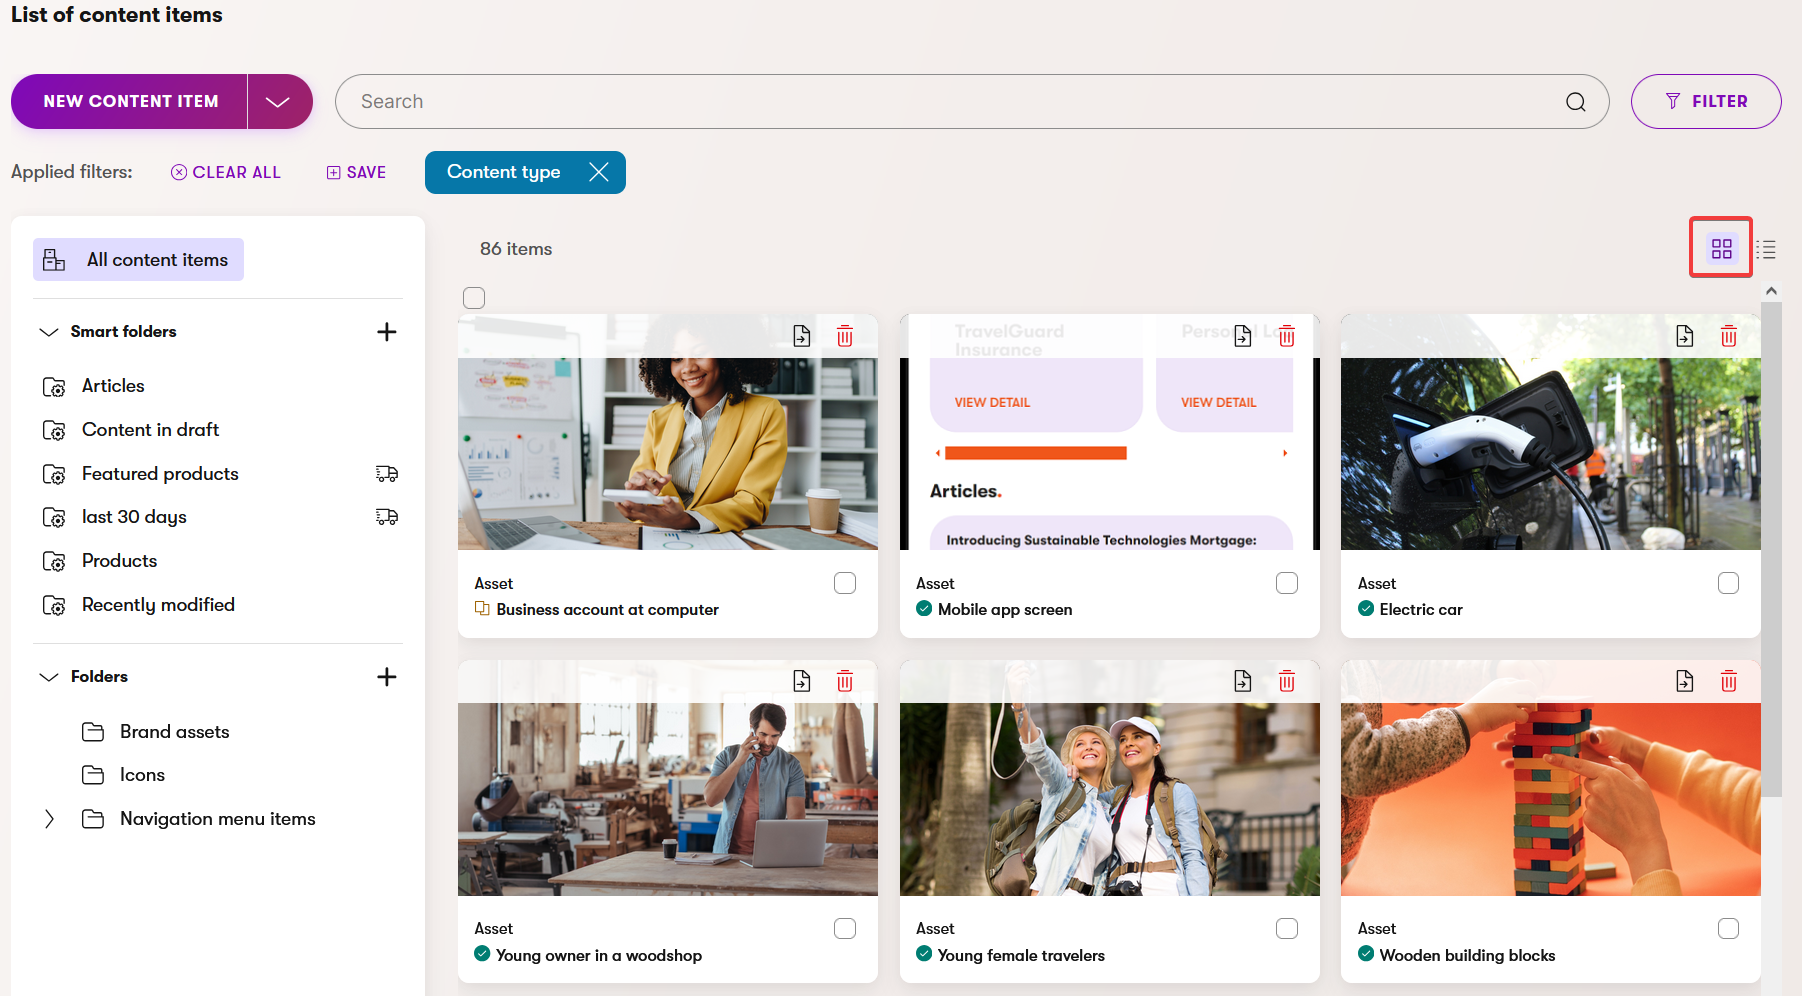
You can preview all content items with images (in Kbank based on the Asset content type) and switch between view modes to suit your current workflow.
If you need to add multiple files to the Content hub at once, use the Upload files button.
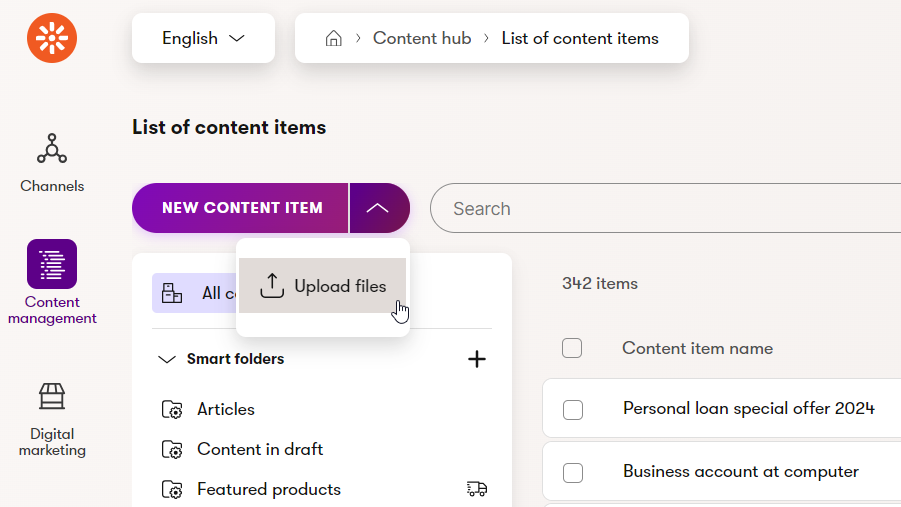
You can also upload an image directly from a widget while editing a page.

Upload assets using smart drag and drop asset upload
Besides using the Upload files button, Xperience also supports smart drag and drop asset upload, which speeds up uploading assets.
You can drag a file from your computer and drop it into supported areas of the interface. Once the file is dropped into an upload zone, Xperience uploads it and creates a new content item asset in the Content hub.
What makes the upload smart? When you drag and drop a file into Xperience, AIRA works for you in the background: it optimizes the file for fast loading, creates responsive variants for different devices and views, creates a clear image alt text for accessibility, and adds tags to categorize the image so the asset is easy to find and reuse.
Smart upload can be used in several places across Xperience. For example:
- Directly in the Content hub.
- In Page Builder widgets, such as the Image widget, or the Rich text widget.
- While creating content items such as articles.
- In the Content view of a page.
This means you can upload images directly where you are working, without first switching to the Content hub. The uploaded files are still stored as reusable assets in the Content hub.
Work with image variants and taxonomy tags
When you upload an image (whether through the Content hub or a widget), Xperience can automatically create image variants for different devices and applies taxonomy tags to help categorize the images.
Automatic image tagging works only for mass image uploads. If you upload a single image into a content item, the auto-tagging process may not be triggered, so you’ll have to assign the tags manually.
For more details on tags and taxonomy, check out our material on working with taxonomies.
The automatic taxonomy tags are generated using Azure AI services, which means results can vary. The same image may receive slightly different tags at different times, as the process is not standardized. You can, however, review and edit these tags as needed.
To ensure no unapproved data is published live, you can apply different content management workflows. You can also fully control who on your team uses the assets and how they use them through workspaces.
You can also create asset variants for different languages to ensure that your visitors receive properly localized content, and use taxonomies to categorize your images accordingly.
Note that assets in Content hub don’t support versioning. If you replace a file, only the latest version is available. To learn more, see the Content versioning page.
Xperience also provides an out-of-the-box method to restrict access to a file, meaning only logged-in visitors can view or access it.

Exercise 1: Upload and manage multiple images in Content hub
Imagine that you’re running a flash promotional push to promote a new product – Family Savings Account. The promo push will involve a whole batch of images, but uploading them one by one would be slow and a bit frustrating.
That’s why Content hub allows you to upload and prepare multiple images at the same time. With some help from AIRA, you’ll also ad the correct tags, and automatically generate image variants in different sizes. By the end, you’ll have a clean, well-organized folder of assets ready to be used across your promo push.
To follow along with the exercise, download a zipped file of 11 images we prepared for you.
Download and prepare your images
- Download the sample images ZIP from the course resources and extract it to a local folder on your device.
- Review the file names and remove duplicates if necessary to keep the library clean.
If your team has a file-naming convention, rename files to ensure consistency with internal rules.
Open Content hub and choose your target folder
- In Xperience, go to Content management and open Content hub.
- Ensure you are working in the Personal Banking workspace.
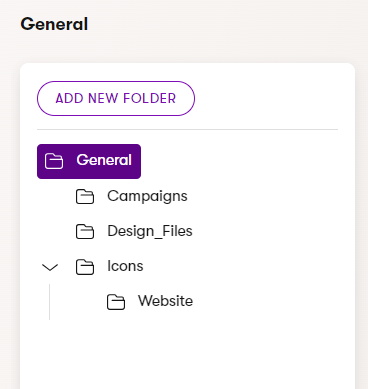
- Navigate the Folders tab and locate or create the folder where your campaign images should live.
- Let’s also create a subfolder like Family Savings Campaign to keep assets easy to find later.
- In Xperience, go to Content management and open Content hub.
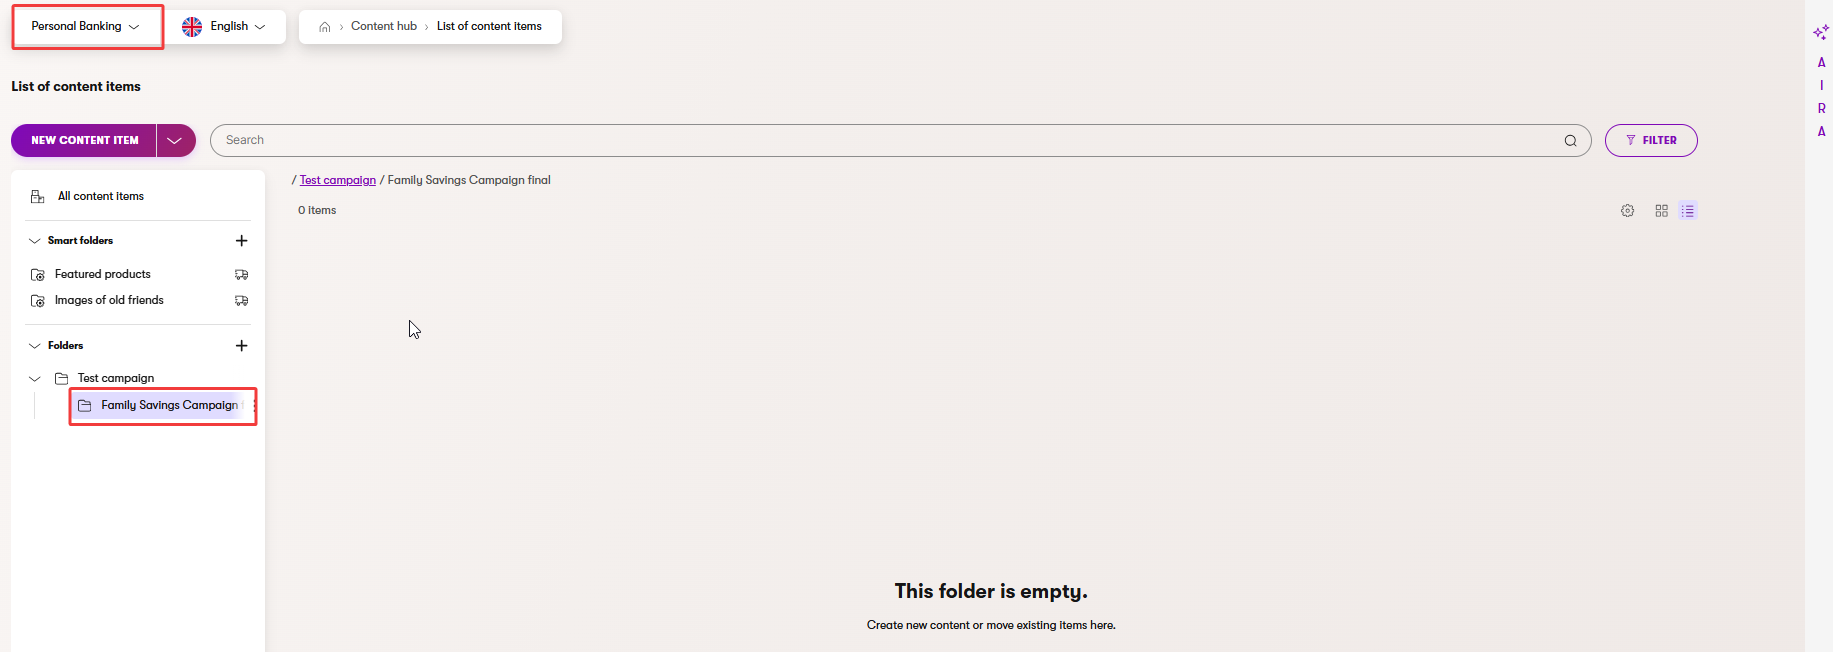
Why does it matter? A logical folder hierarchy makes browsing and permissions simpler for everyone.
Start a bulk upload
- Next to the New content item button, use the arrow to open dropdown menu and select Upload files.
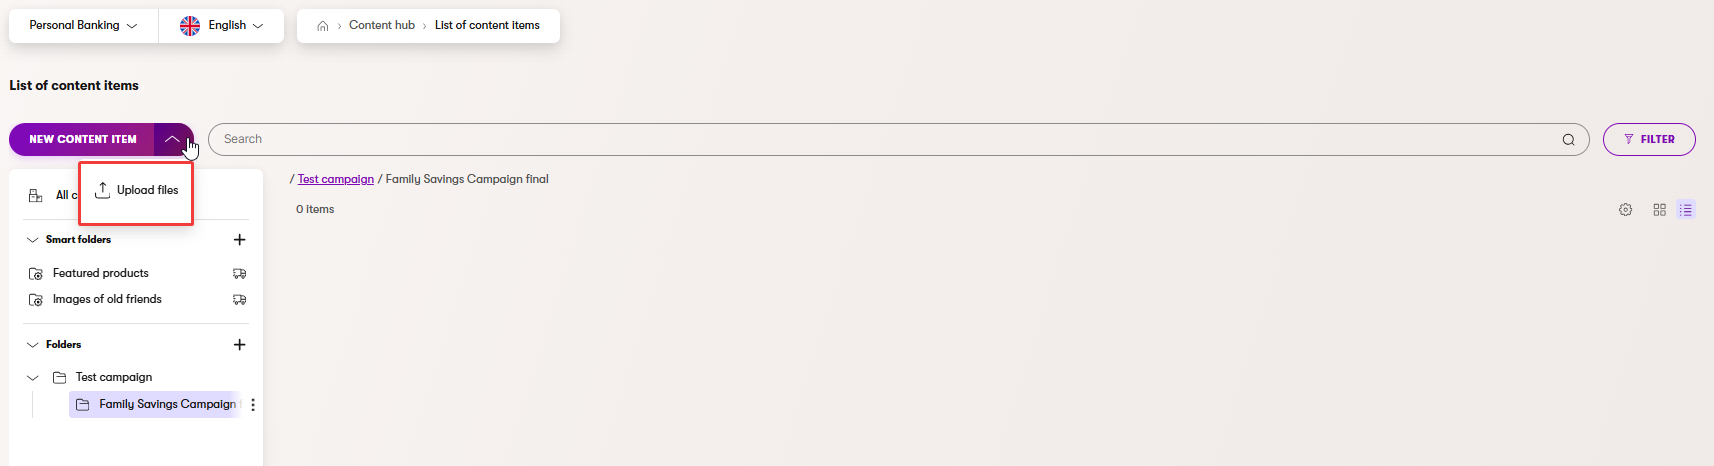
- Select the files you want to upload from your source folder in the upload dialog.
- Use Open to confirm selected files and begin the upload.
- Alternatively, you can drag and drop files directly into the Content hub, as the entire interface acts as the smart upload zone.
- Once the files are successfully uploaded, you can Close the upload dialog.
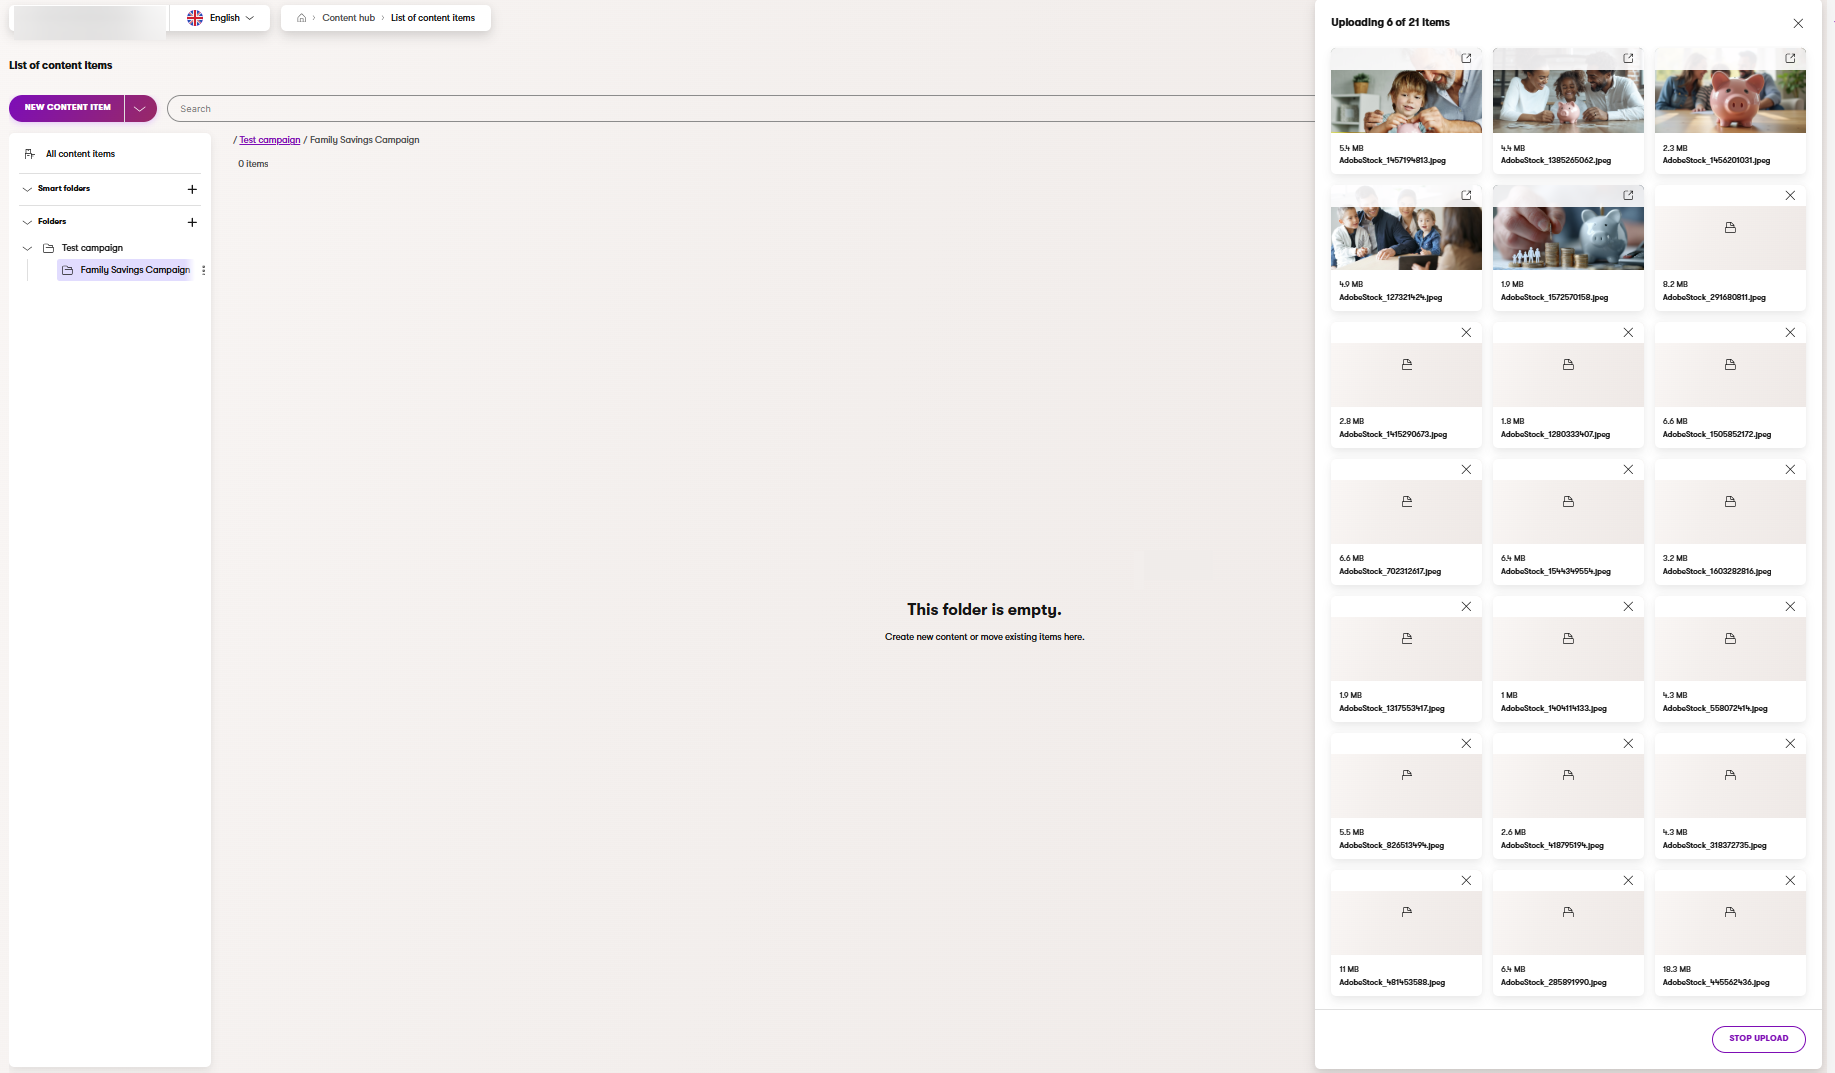
- The Assets are now in the Draft (Initial) status, and you can check them and make further adjustments before you publish the assets.
- Next to the New content item button, use the arrow to open dropdown menu and select Upload files.
During the upload, AIRA automatically tags and optimizes the images. It also generates alt text for your images. You can then start adjusting the images manually, if needed.
Check and adjust images
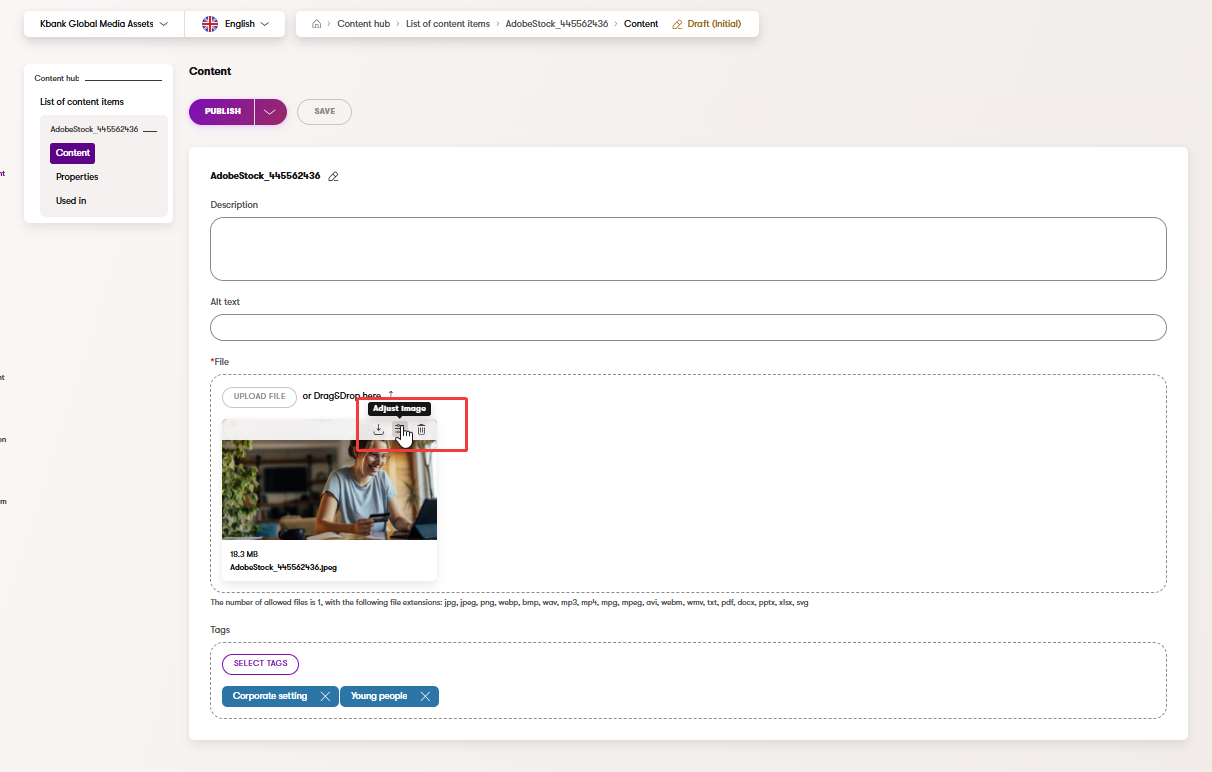
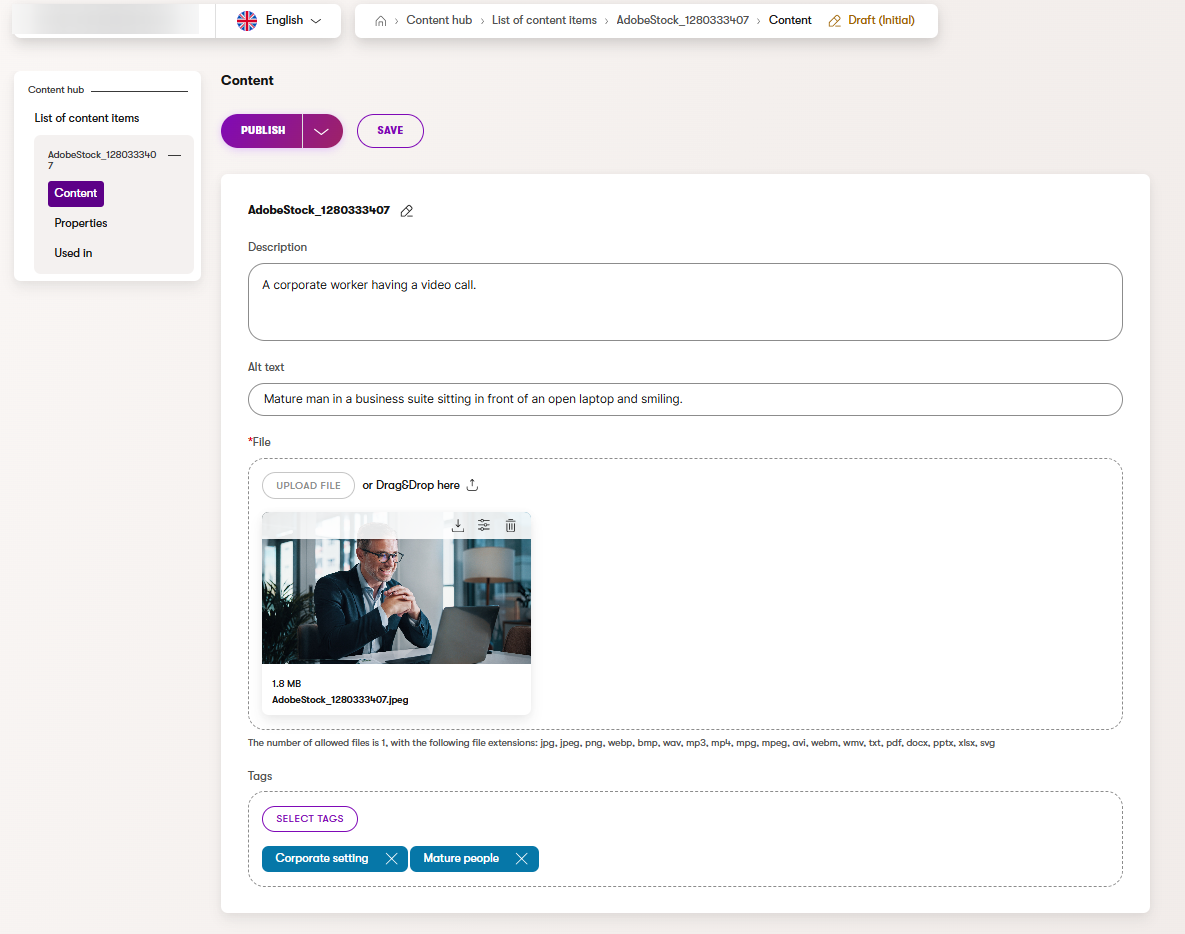
- Open the image with the original filename AdobeStock_445562436.jpeg and adjust:
- Description: Image of a smiling woman with a credit card and laptop.
- Alt text: Smiling woman holding a credit card, looking into an open laptop computer.
- Click the Adjust image icon to update the image variant.
- Primary Image changes to make:
- Image format: Change from JPEG to JPG.
- Quality: adjust the quality to Medium 80%
- Save the changes.
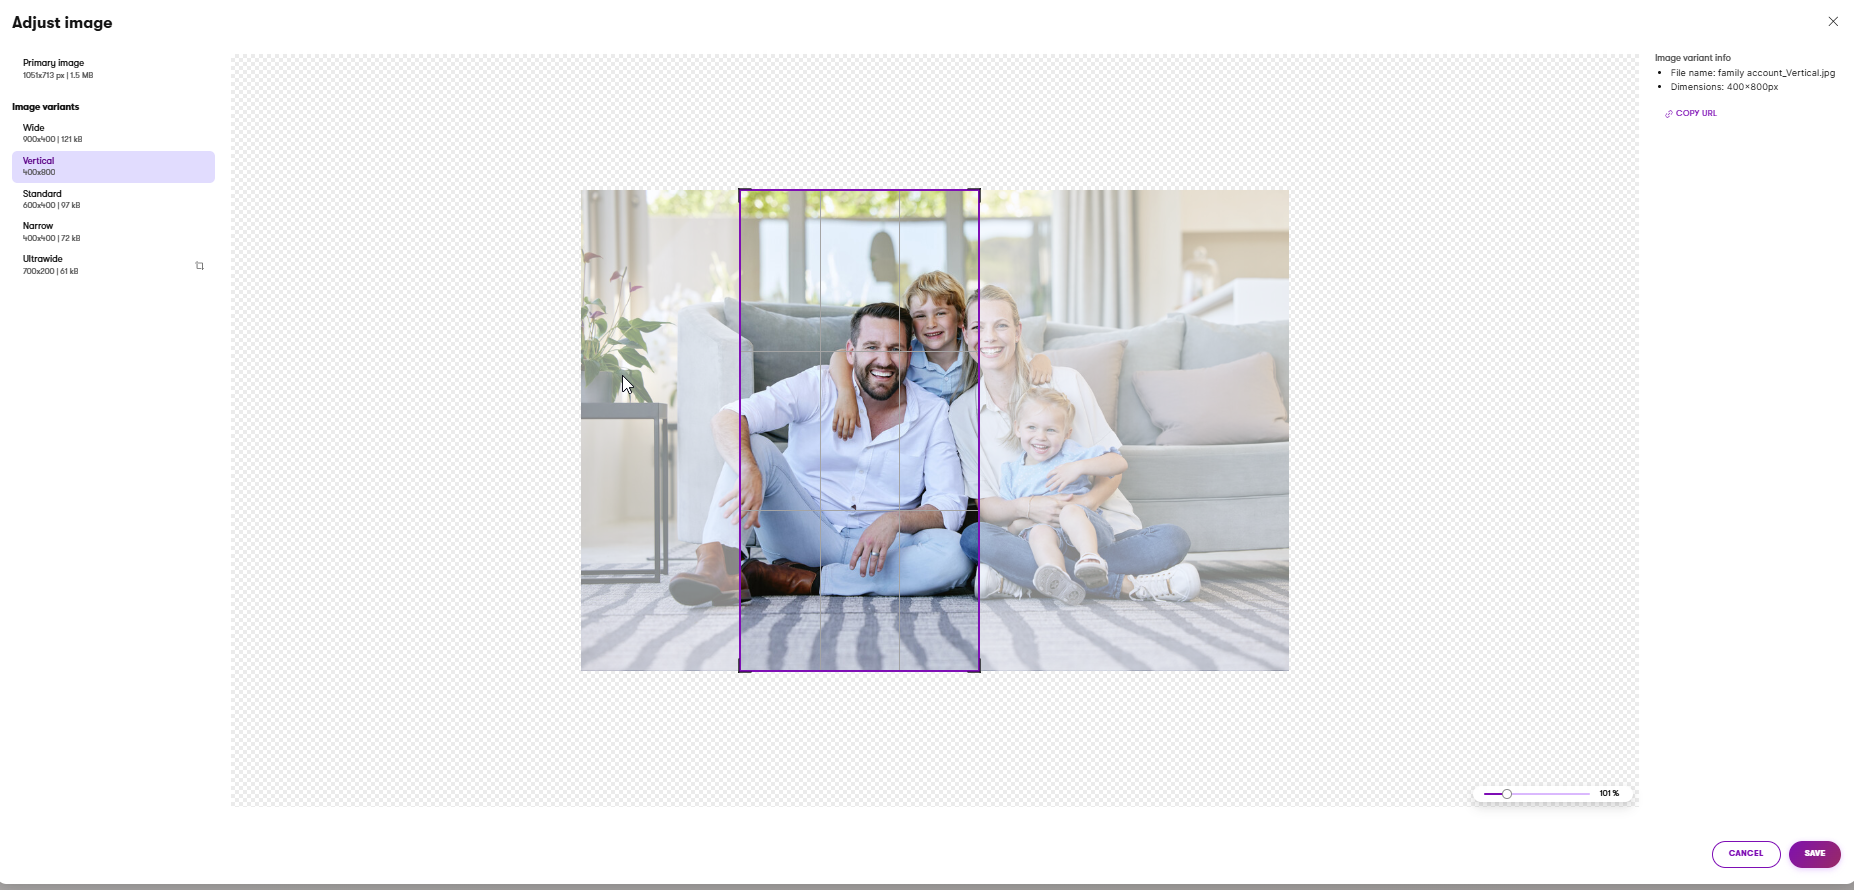
- Manually adjust the focal point of the Primary image.

- Check and adjust the crop in Image variants if needed.
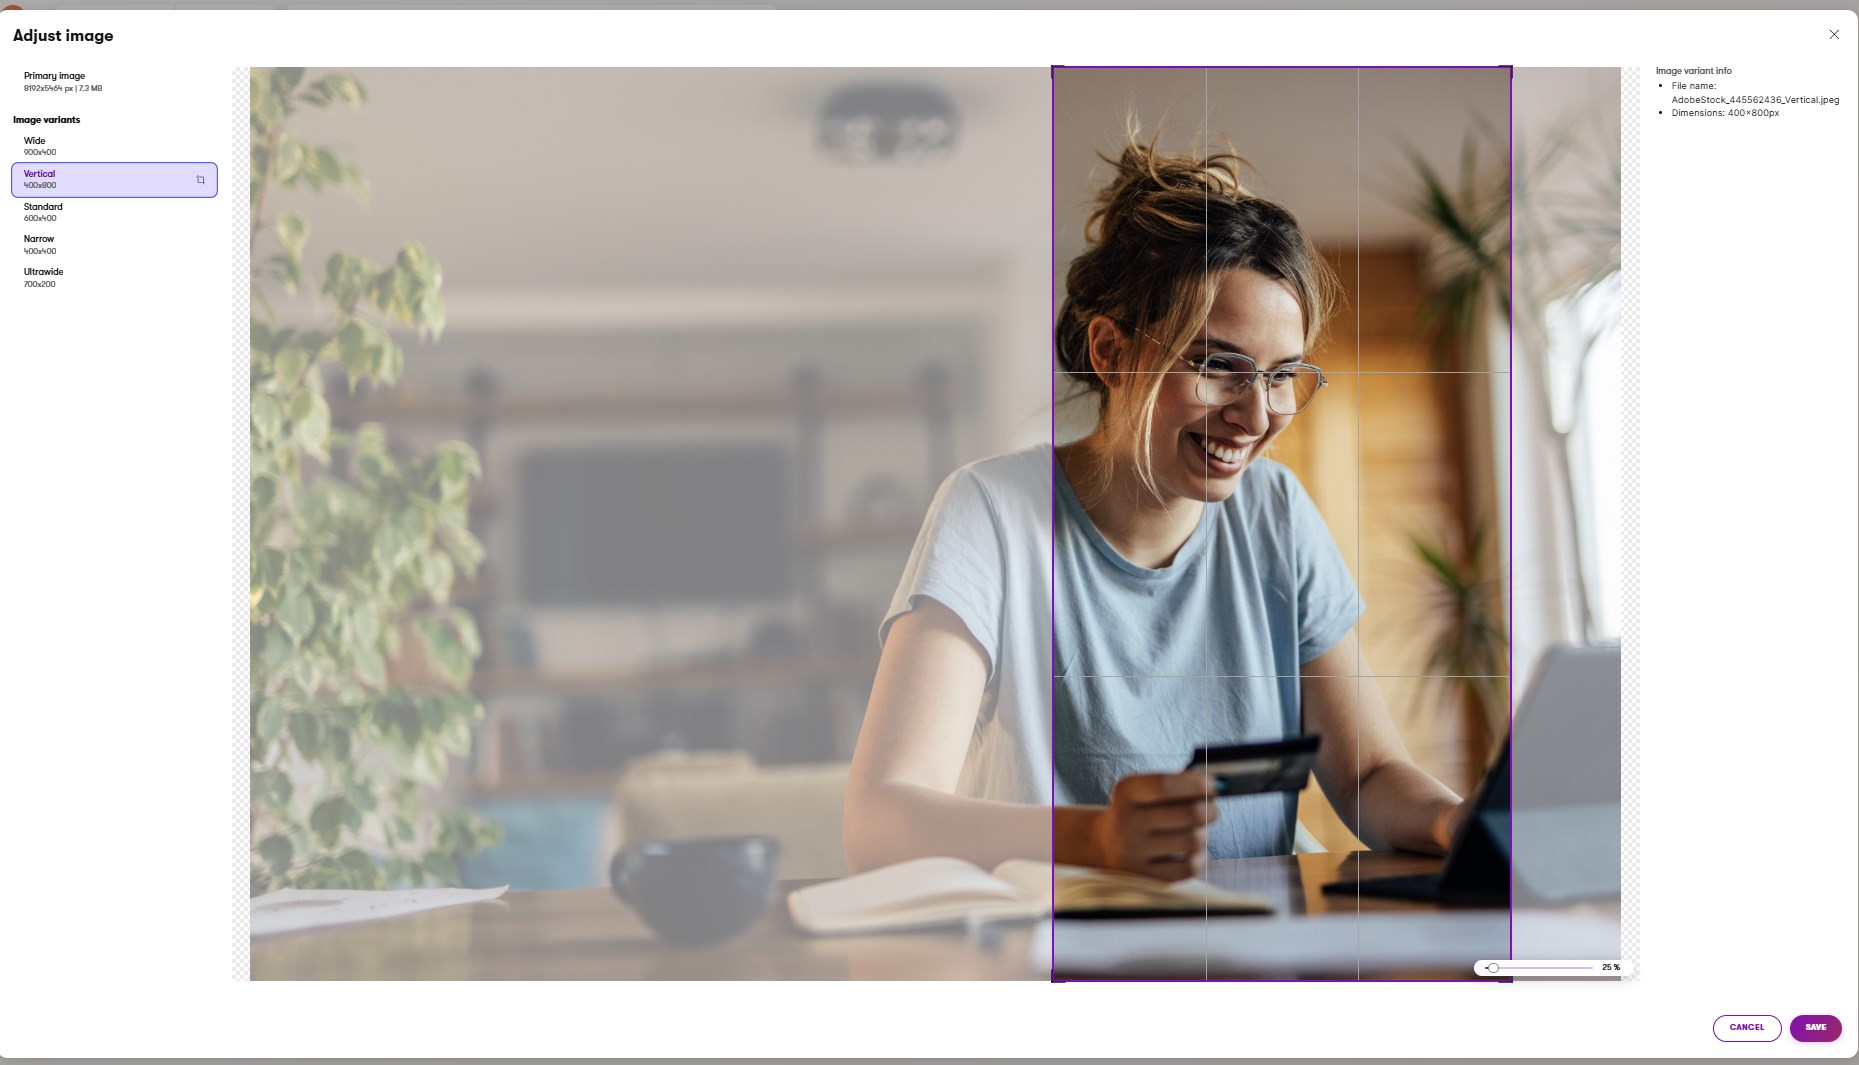
- Save your latest updates.
- Open the image with the original filename AdobeStock_445562436.jpeg and adjust:
Variant notes:
Follow any team internal rules you might have on the image quality settings or where the focal point should typically go, such as “don’t lower the quality of the image below 50%” and “keep the focal point on people’s faces.”
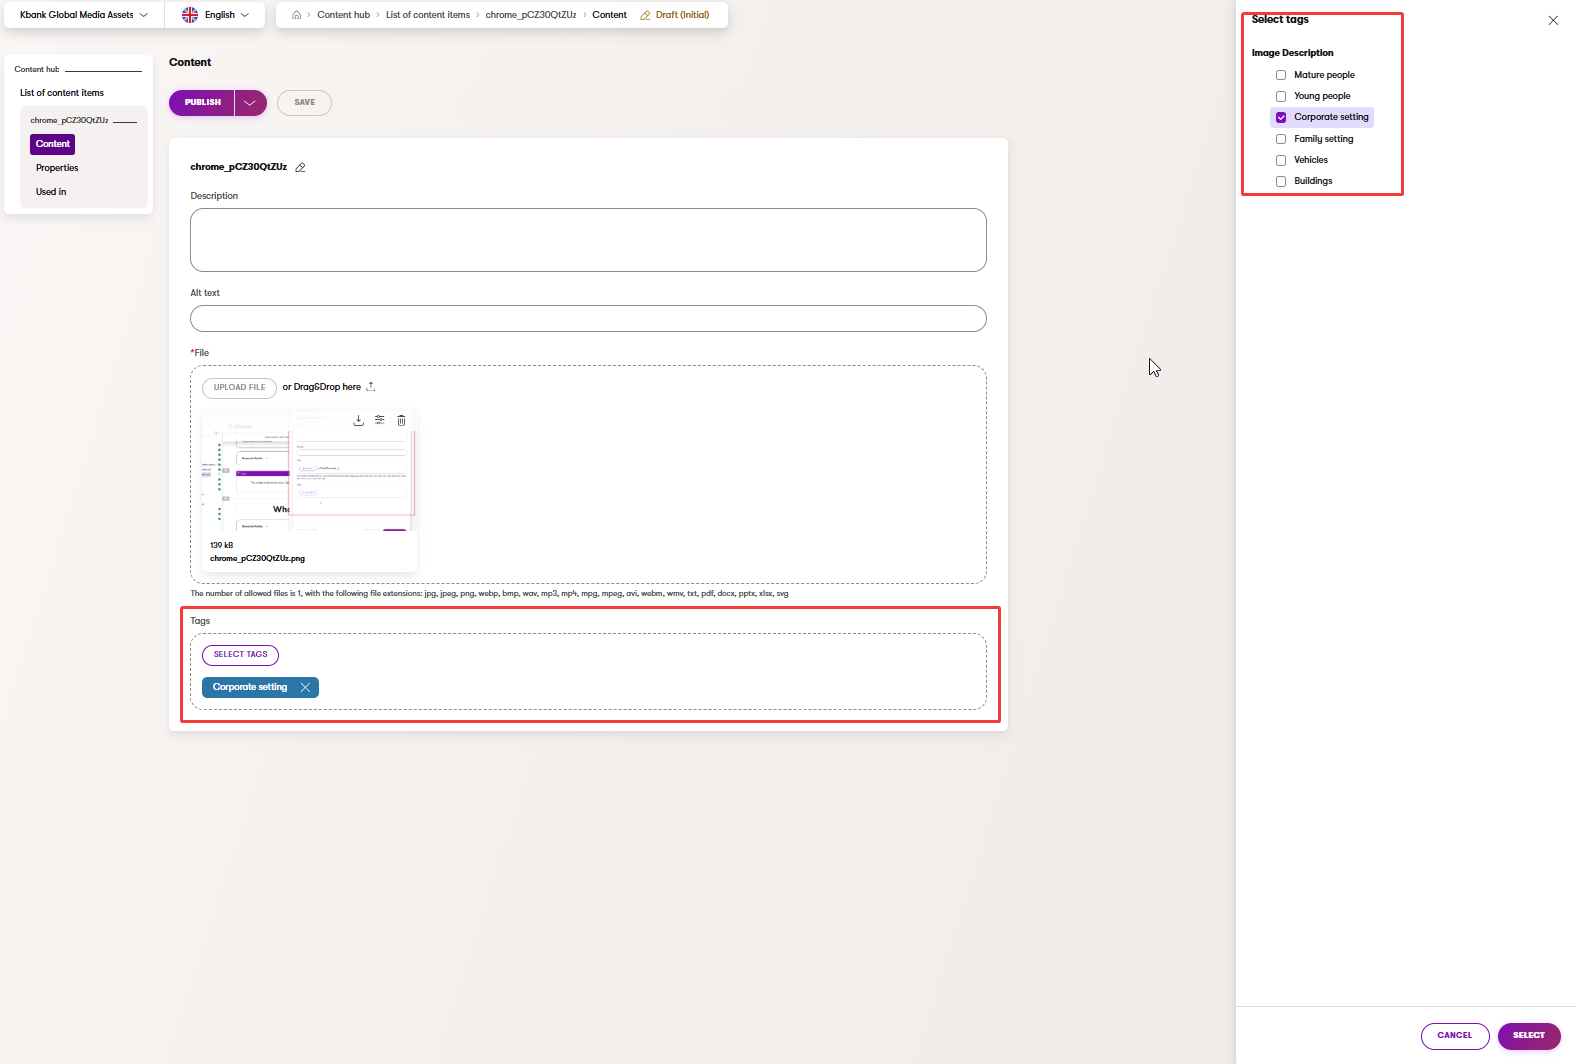
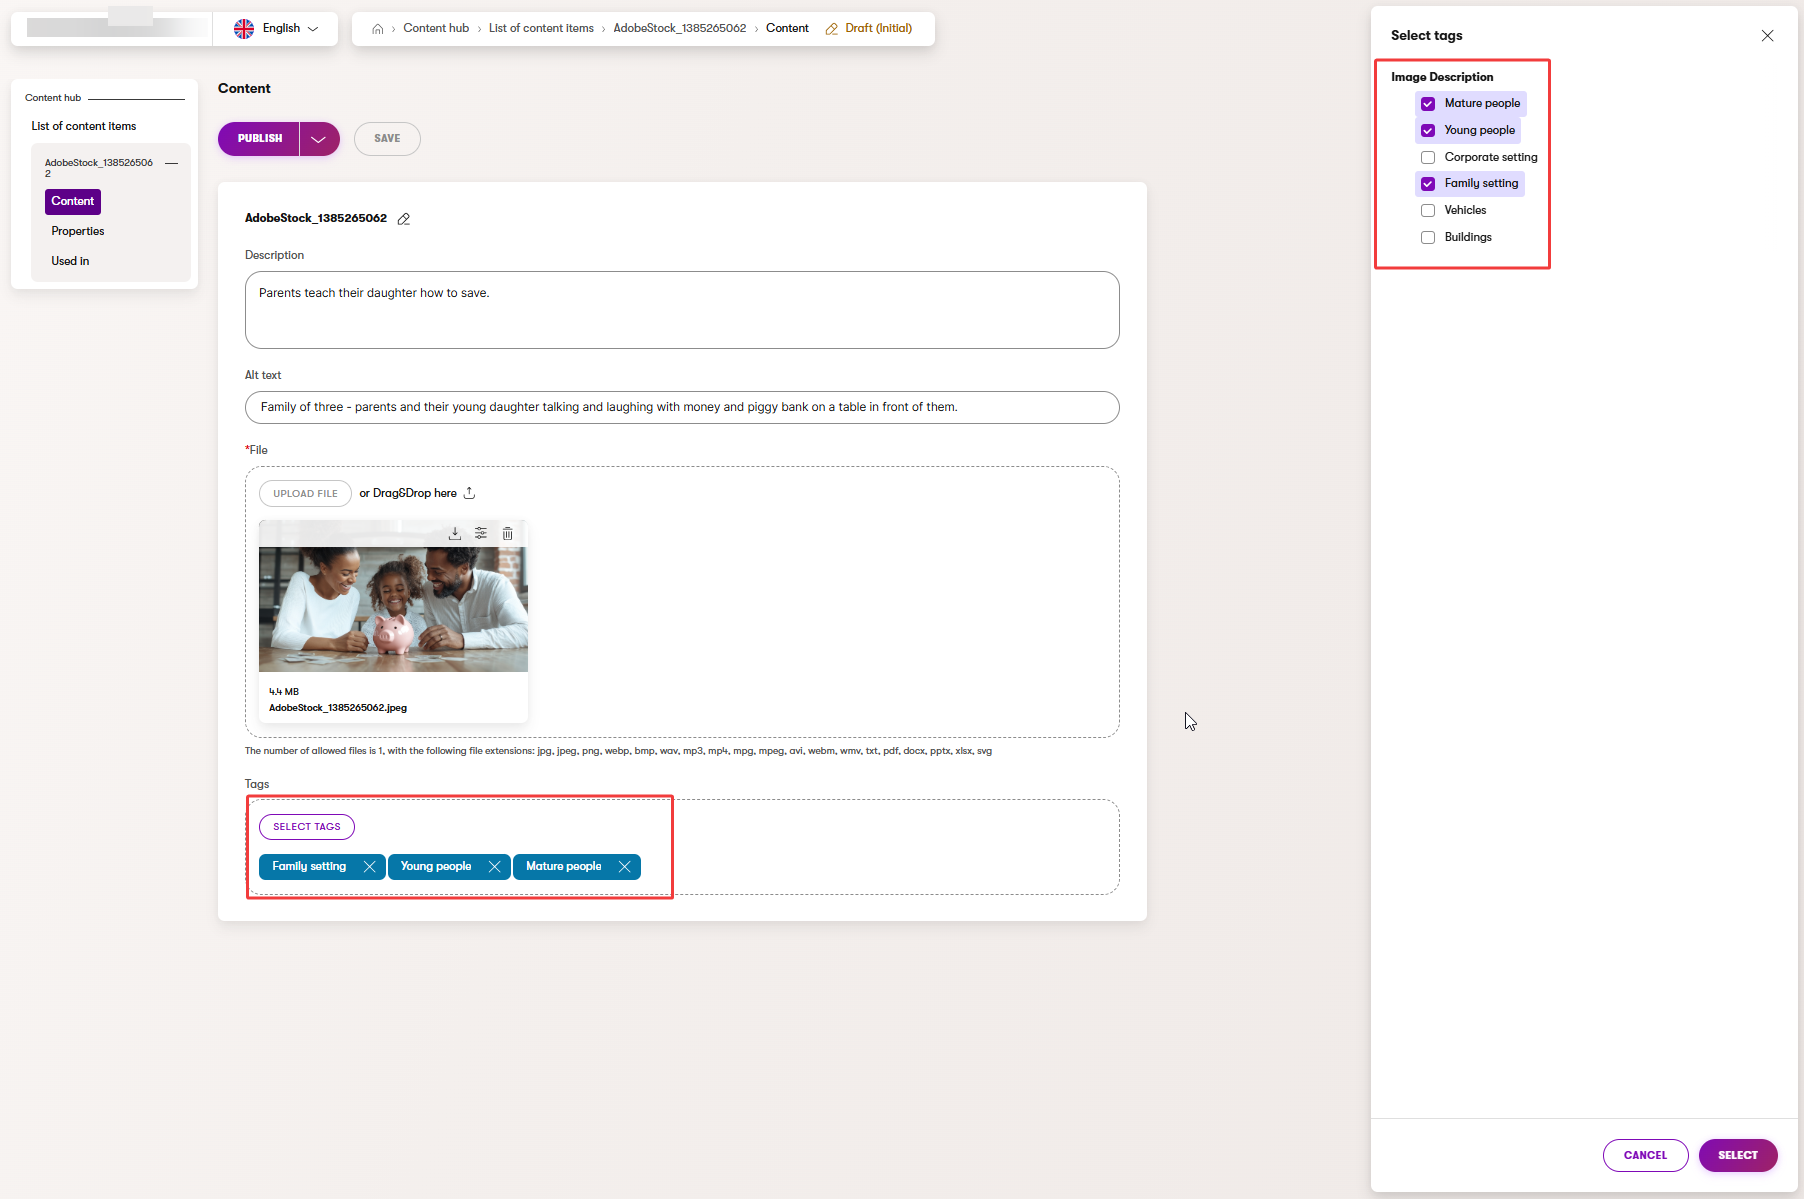
- Manually adjust predefined tags:
- Use the tag selector to add relevant tags from your project’s predefined list, such as Young people and Family setting.
- Save your changes to apply tags.
Currently, you can only choose from predefined tags configured by your developer. You cannot create new tags in the Content hub at the moment. However, it is still beneficial to follow a few best practices when it comes to tagging.
- Prefer specific tags over vague labels like misc or general.
- Reuse existing tags rather than inventing near-duplicates (for example, choose Buildings over adding a new tag House).
- Keep it focused: aim for 3 to 6 precise tags per asset to improve search accuracy.
- Follow team conventions for consistency.
Inspect another image to verify results
- Open newly uploaded image.
- Confirm it has the expected tags, and that the description and the alt text are clear.
- Make minor edits if needed, then Save.
- Open newly uploaded image.
Final tidy-up and quality check
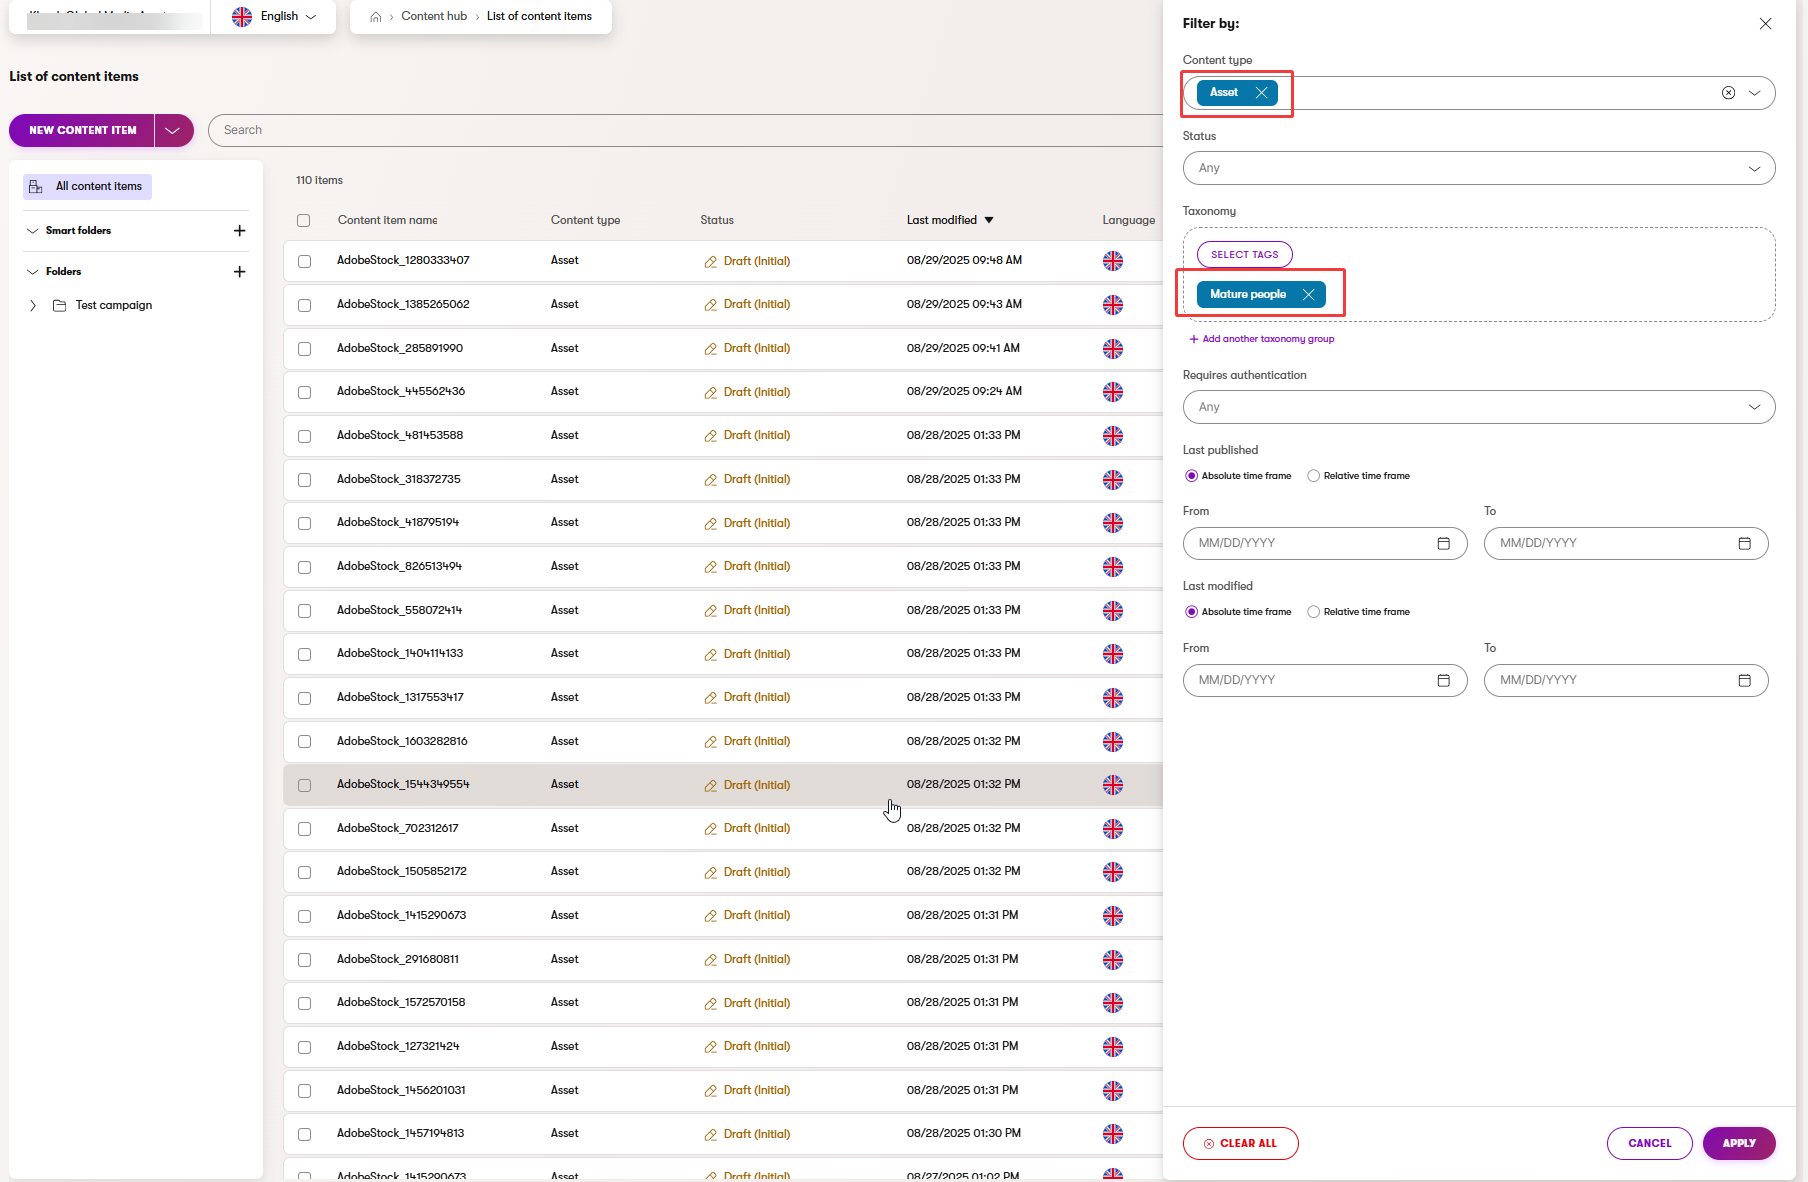
- Ensure all images reside in the correct folder with the proper naming and tags.
- Use Filters in the folder, for example, filter by Content type (Asset), or by Taxonomy tags you just applied (to confirm your tagging works as expected).
- If an image does not fit this campaign, move it to a more suitable folder, or make any last adjustments now.
- Ensure all images reside in the correct folder with the proper naming and tags.
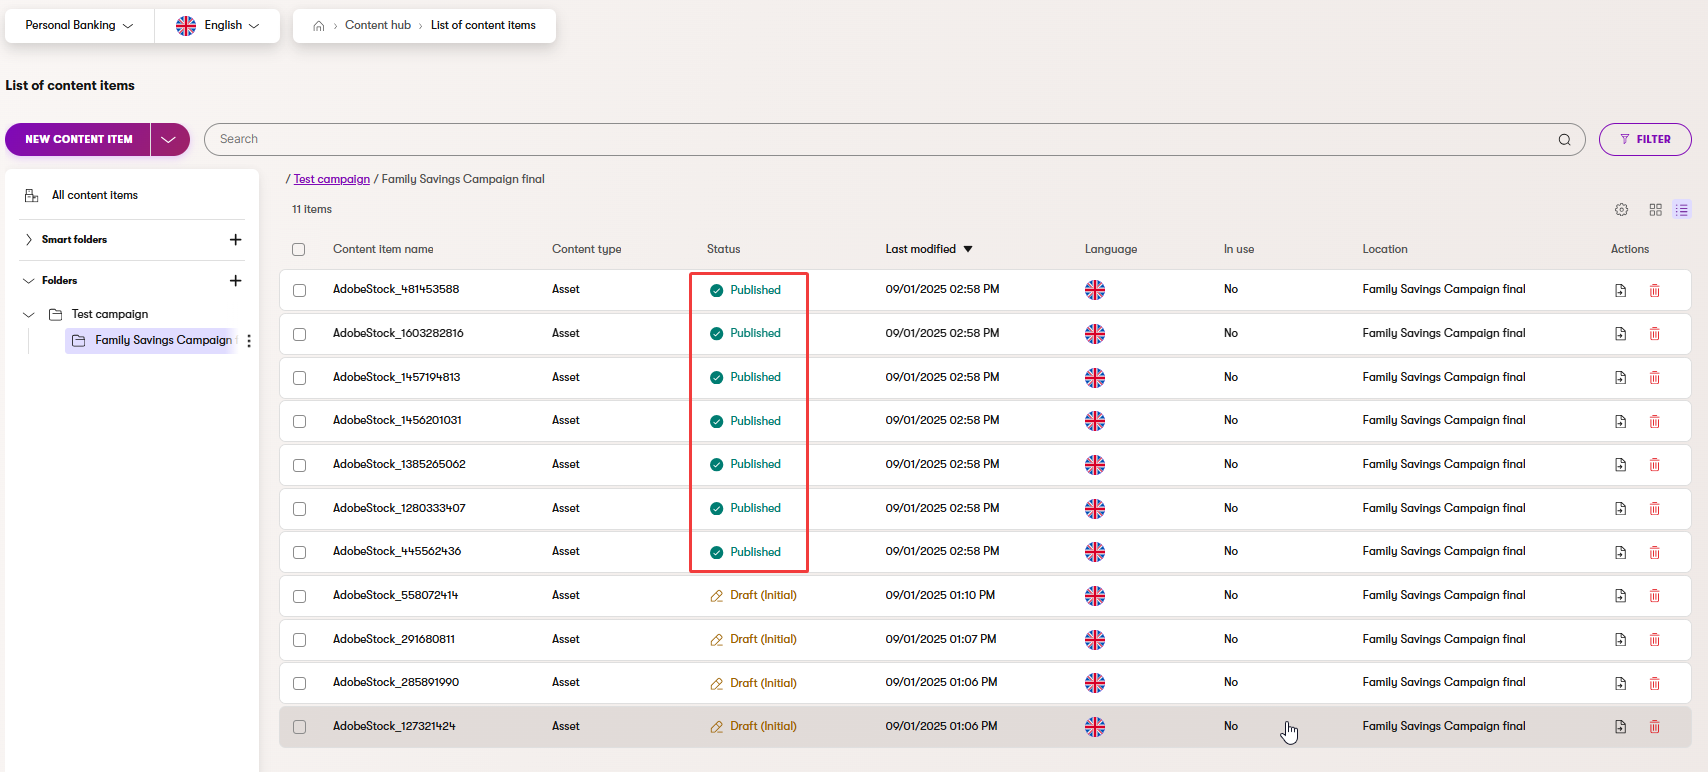
Publish your assets
- Select all assets in the folder by checking off the Content item name checkbox, or one by one if you want to select only some.
- Publish all selected items in bulk.
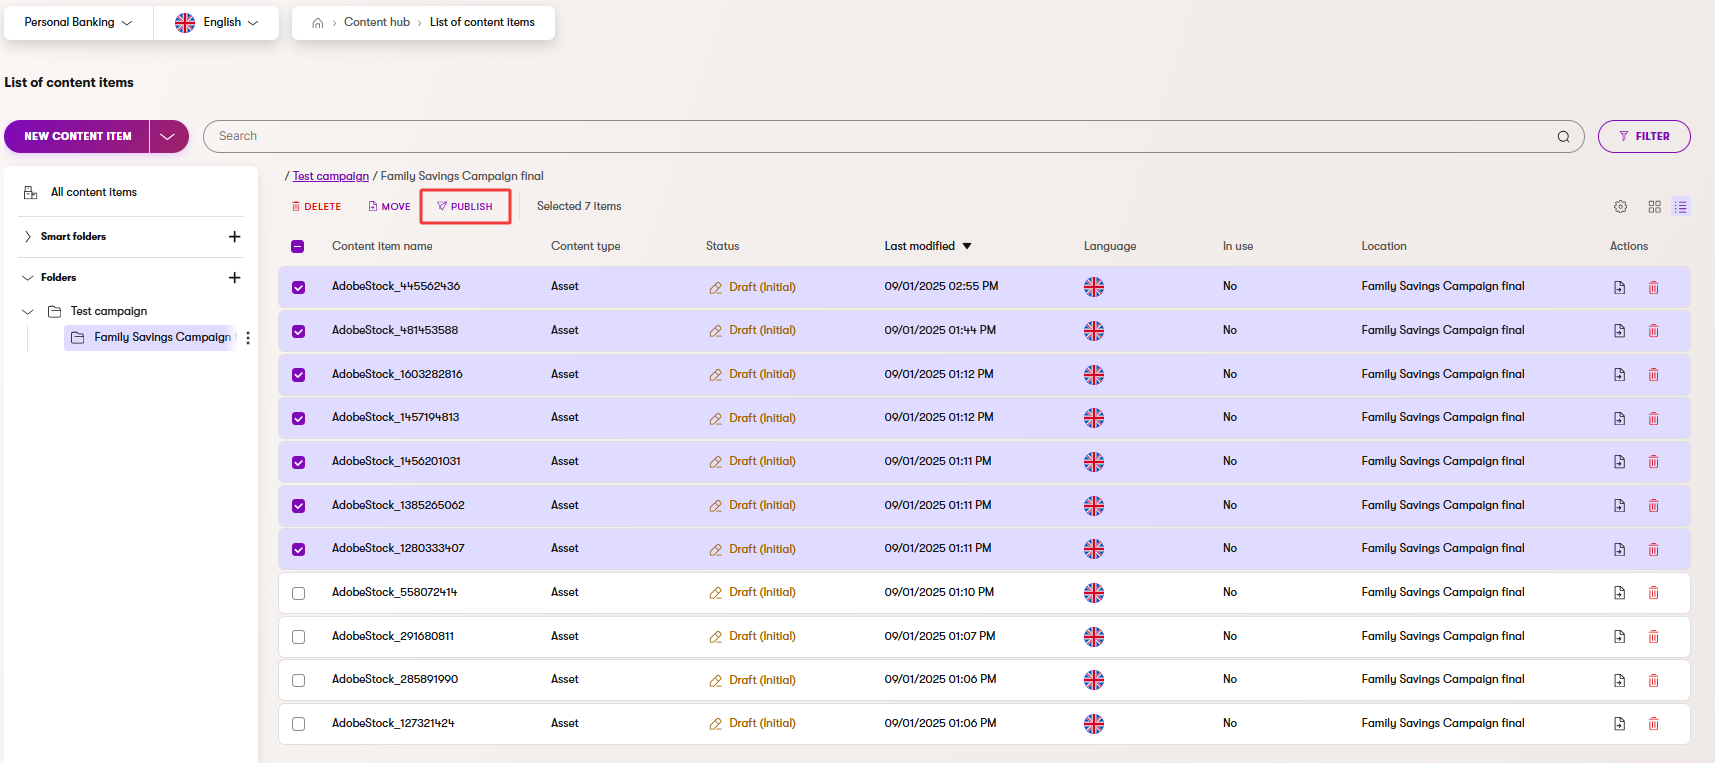
- If unsure about the result, verify that the status of the selected assets has changed from Draft (Initial) to Published.
Nice work! You’ve just uploaded and organized a larger set of images in one smooth process. By using bulk upload, AIRA-assisted tagging and adding alt description, and creating manually updated variants, you’ve built a tidy, reusable library that will save you and your team time later.
Exercise 2: Add an image to the Premier credit card image widget
Now that you know the basics of working with assets in Xperience, let’s add an image to a page that only your editor team will be able to manage. Follow these steps to add an image to the empty image widget on the website channel’s Premier credit card page.
To follow along with the exercise, download a sample image file we prepared for you.
Open the page for editing
- In the Personal Banking channel, navigate to the Cards section.
- Open the Premier credit card page and Edit page.
Select the empty Image widget
- The empty image widget needs setup.
- Open the widget properties to insert the sample image you downloaded.
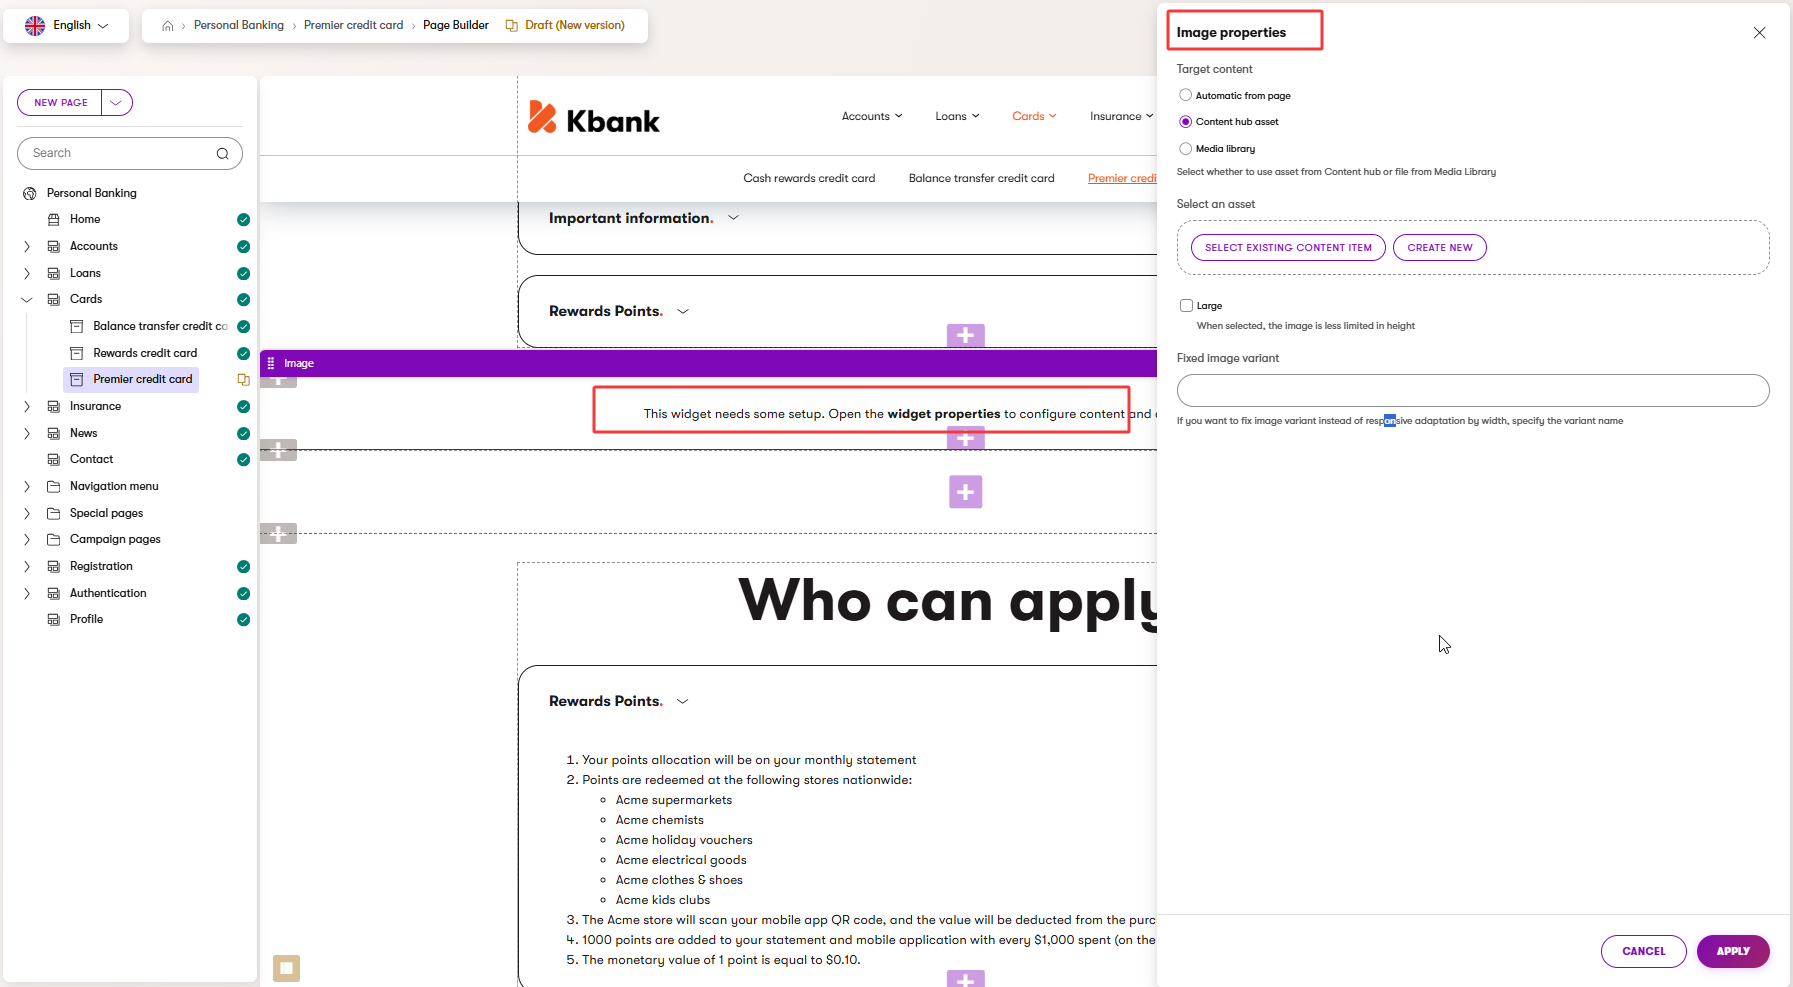
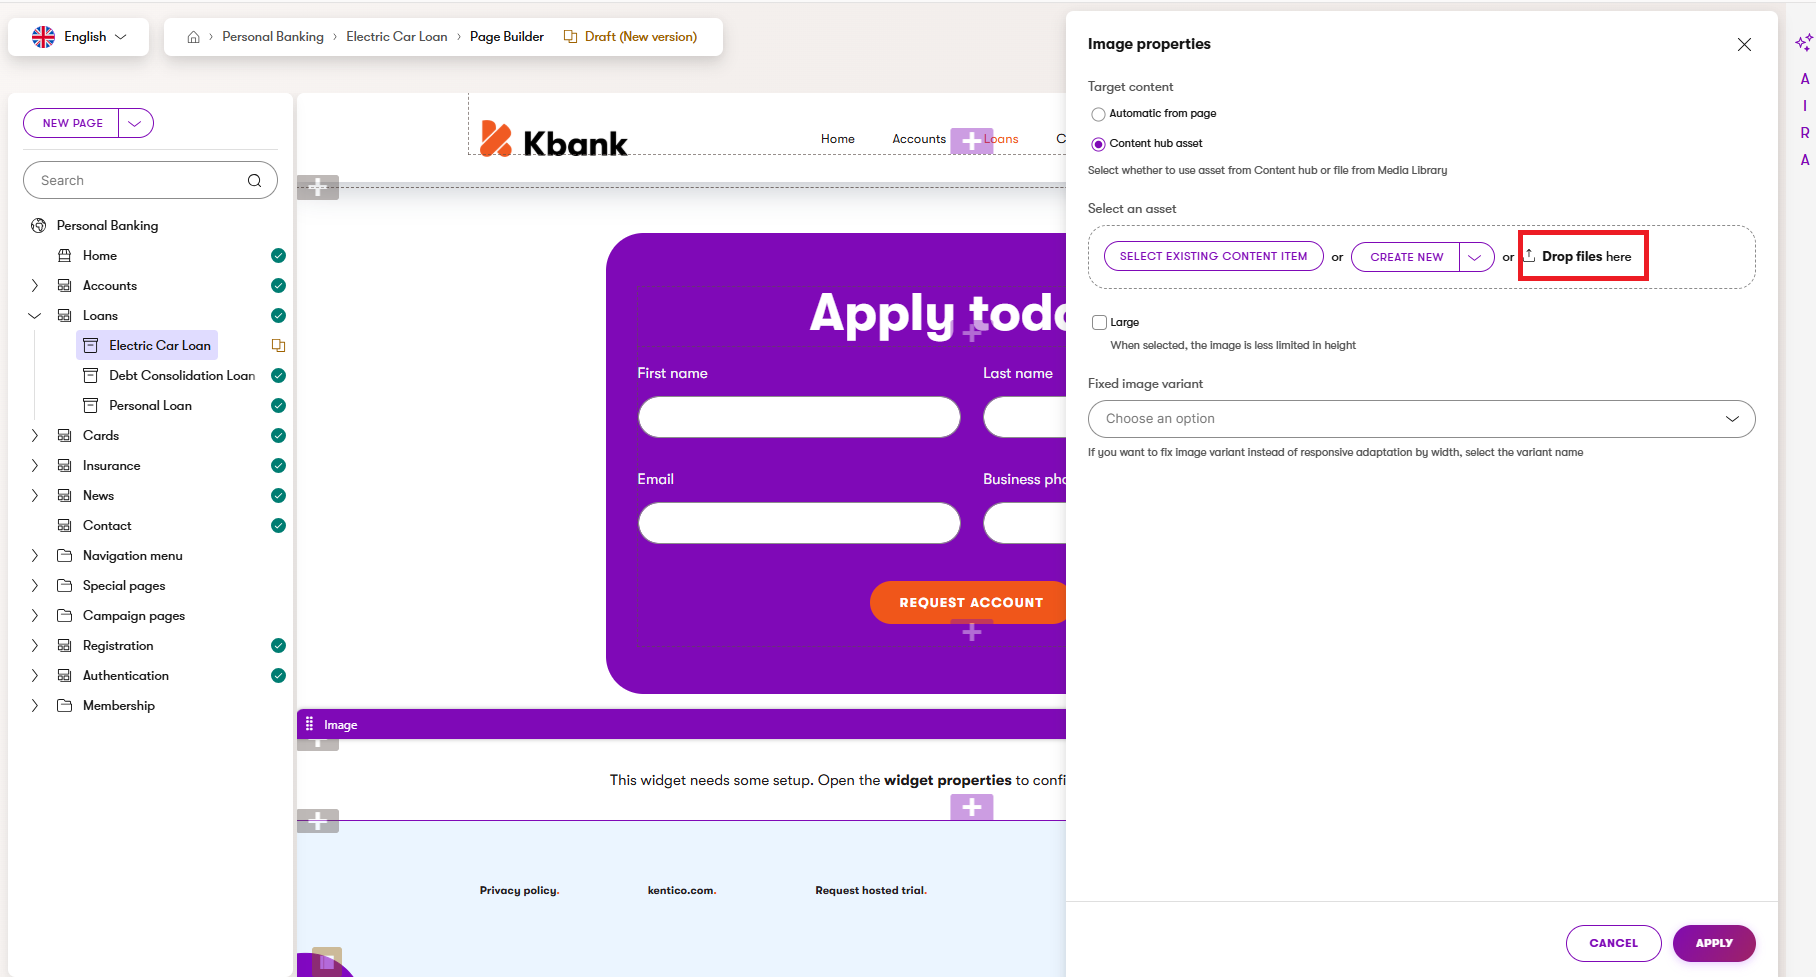
Create a new image
- In the image properties dialogue, choose Content hub asset.
- To add a new picture, you can select Create new, and choose the following in the Create new item dialogue:
- Content item name – Enter a clear, descriptive name, like Premier credit card holder.
- Workspace – Select the Personal Banking workspace.
- Location – Leave the default Uncategorized (no folder).
- Content type – Select Asset and Continue.
- Description – Add a meaningful description to help your team understand where and how to use the picture. Like: Image of a young man holding a credit card, to be used as a Premier credit card product image.
- Alt text – description of image content to enhance usability. In this case: Smiling man holding a credit card.
- File – Upload the exercise-sample-manage-files-man-holding-credit-card.png file.
- Tags – Select one or more tags that best describes what’s in the image, like Young people. Consistent tagging helps with search and asset reuse later.
- If you’re in a rush, you can also drag the exercise-sample-manage-files-man-holding-credit-card.png file from your computer and drop it into the widget upload zone, instead of creating the asset through the standard dialog shown above.
- Xperience then starts the upload automatically and creates a new content item asset in the Content hub.
- Save and Close your newly created content item. This step will return you to the Image properties dialogue, where you can finish setting up your image widget.
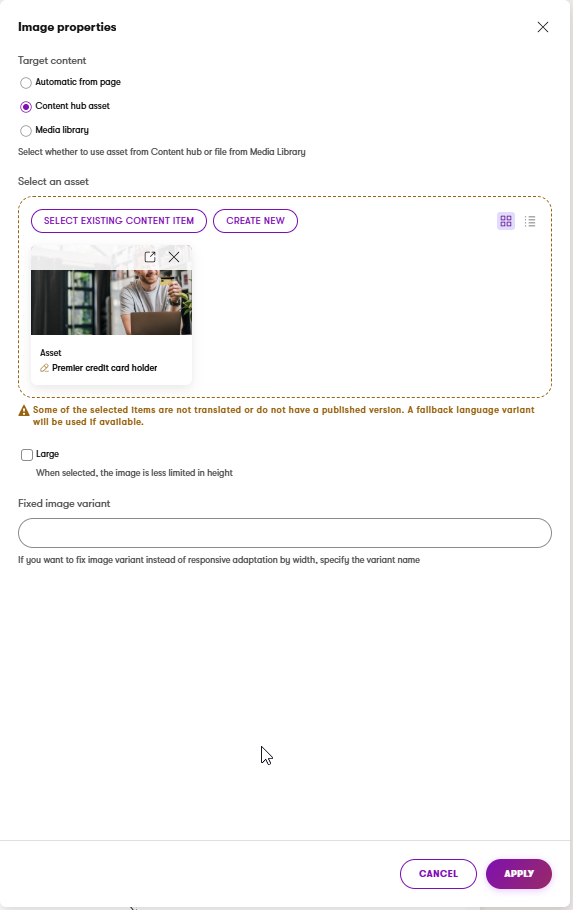
Adjust widget display settings
After inserting the image, you can adjust how it appears on the page before you save the image properties.
You can, for example, display the image as Large to make it less limited in height.
The available options depend on your project’s configuration, so the options in your project may differ from our example.
- Save your changes
- Apply the changes you just made, and Save the page to Preview your updates.
- If you’re happy with the newly created image, return to the Page Builder view and Publish the new version of the Premier credit card page.
The page should look something like the following image: 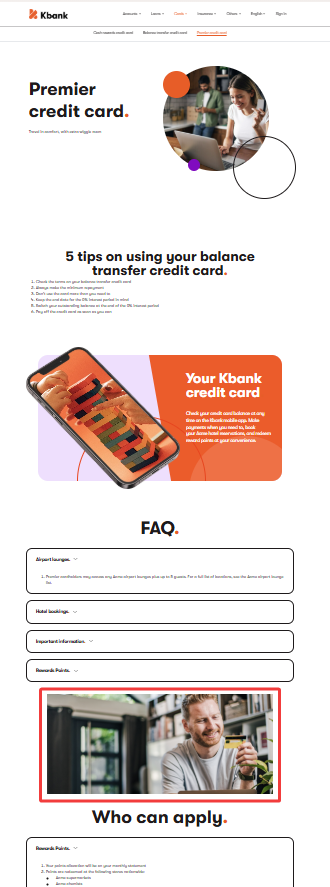
Exercise 3: Try smart upload in a rich text widget
You already saw how the smart drag-and-drop asset upload functionality speeds up your editing process in the previous exercise. Let’s try smart upload while editing rich text content. You can easily insert images into the rich text without leaving the Page Builder, or switching to the Content hub first.
- Open a Rich text widget for editing
- Stay on the Premier credit card page, and add a new Rich text widget below the FAQ widget.
- Drag and drop an image into the rich text widget
- Drag an image file from your computer and drop it directly into the rich text editor.
- Xperience uploads the image and automatically creates a new reusable asset in the Content hub.
- Choose Workspace: Kbank Global Media Assets.
- Leave Location: Uncategorized (no folder).
- Create the new content item using the Upload button.
- You can now style your rich text field, including the image.
- Preview the asset and publish the changes
- Apply the changes you just made, and Save the page to Preview your updates.
- If you’re happy with the newly created image, return to the Page Builder view and Publish the latest version of the Premier credit card page.
See where your images are used before making any changes
Before you edit or remove an image, take a moment to review the impact of your changes with the Content Reuse Locator. You’ll find this tool in the Used in tab of the asset details within Content hub. The Used in tab shows every page or content item that references the image. You can confidently update or change the image while knowing how your changes affect other content.
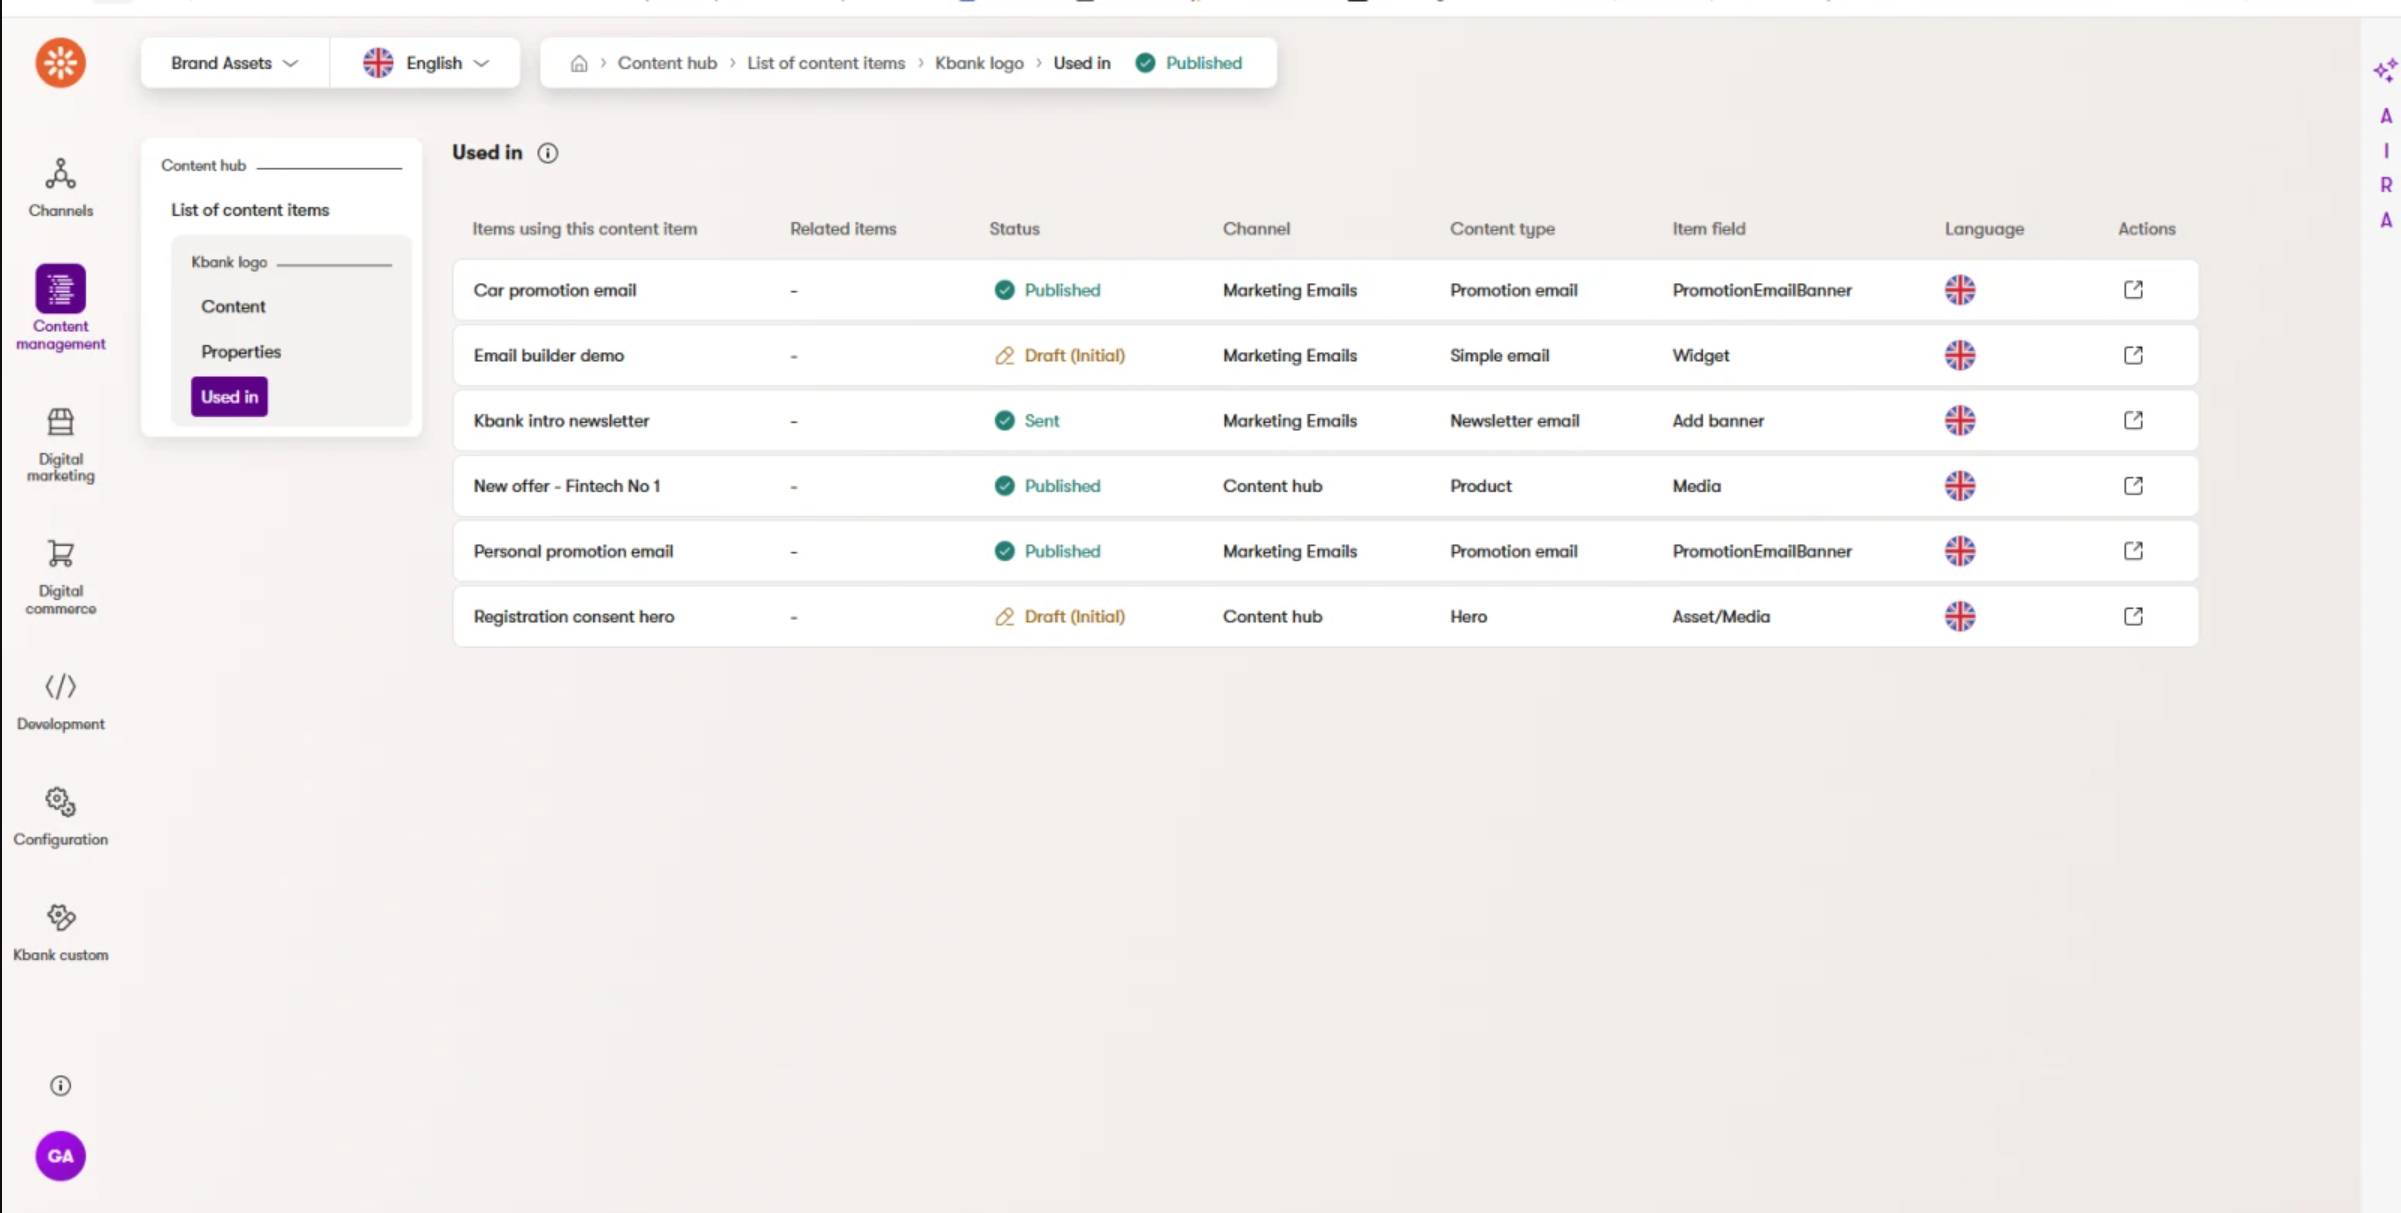
Image AI features
Xperience AIRA provides additional features when it comes to images stored in the Content hub. It can automatically adjust images when you upload them by, for example, automatically selecting the image focal point and creating different image variants for desktops and mobile devices. This ensures your audience sees the best version of your image, no matter their device.
If you want more control over how the final image looks, you can manually adjust the focal point to crop the image appropriately before saving the new content item.
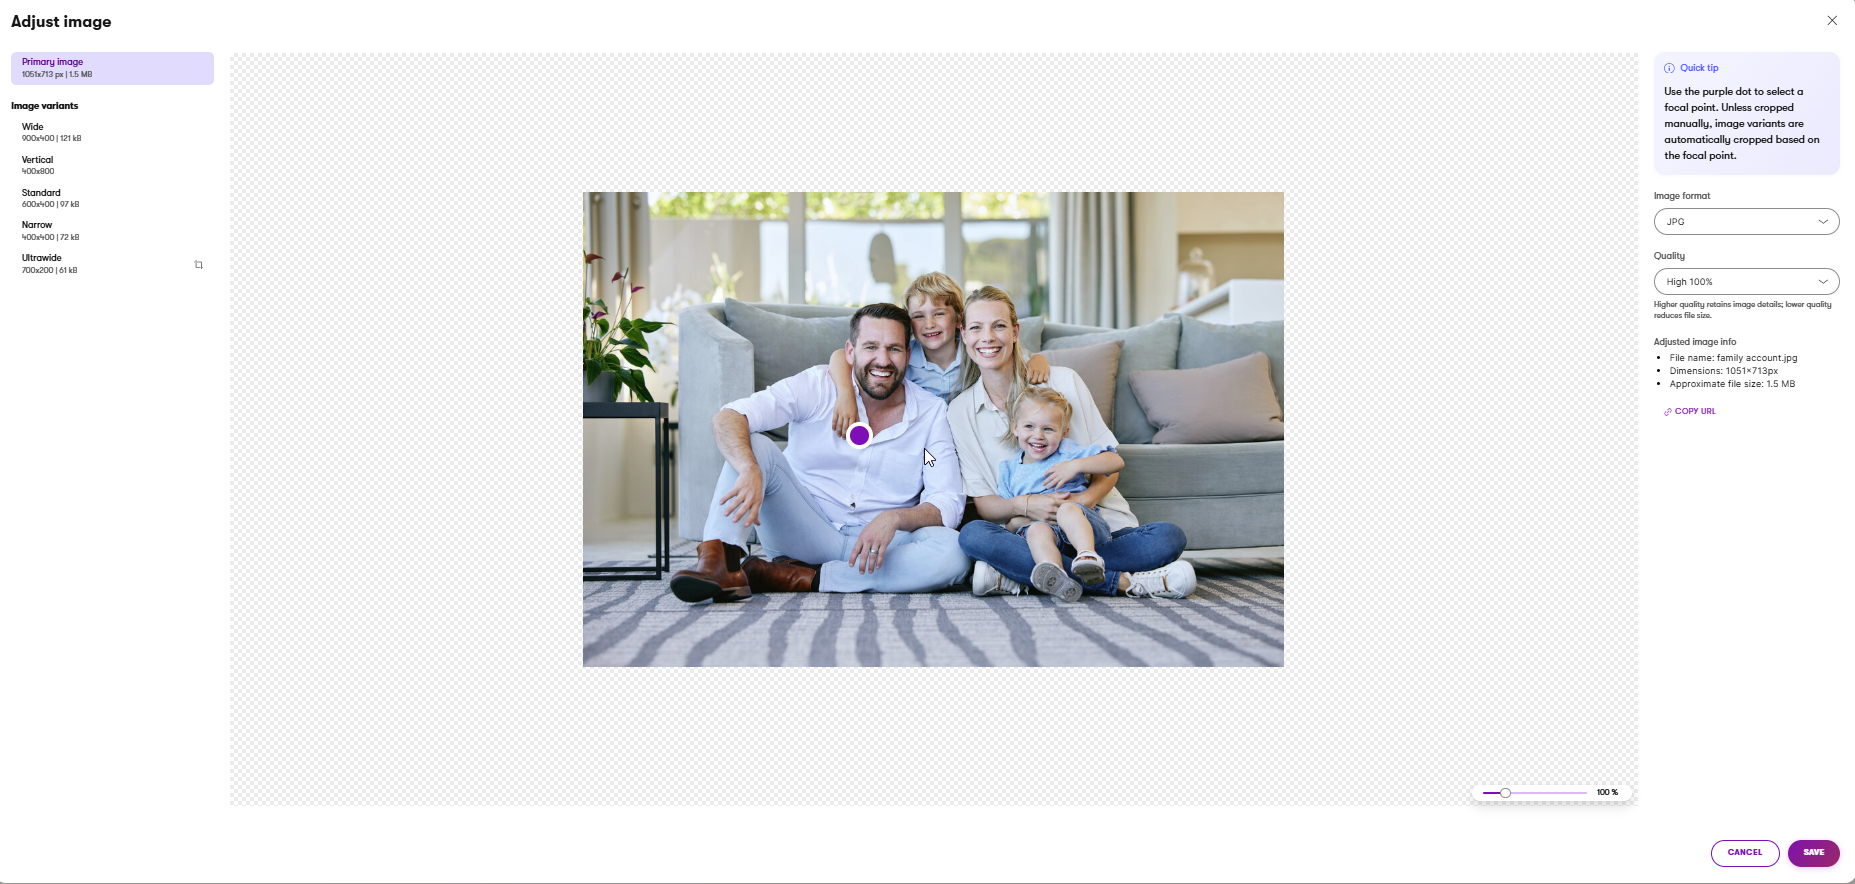
You can test this for yourself and instantly see how changing the focal point also adjusts the cropped variants of the image to be in line with the newly selected focal point.
Learn more about how AIRA processes and adjusts your images to improve performance and visual quality.
If you want to leverage the most out of working with assets, and see how AIRA optimization works firsthand, check out the following short demo, where you’ll learn how to upload images into the Content hub and how to keep them organized. You’ll also see how Xperience automatically prepares the uploaded images for use across your websites and campaigns.
To follow along with this demo step by step, see details in our dedicated guide on working with assets.
Media libraries sunset
Media libraries are a legacy feature and have been officially sunset. Their related API members are marked as obsolete, and support will end on July 24, 2026, after which the feature and all associated APIs will be removed. If your project still uses media libraries, discuss our migration guide and the migration of media library files to Content hub with your developers.
In previous versions of Kentico, media libraries stored file types such as images, videos, and audio files for use on websites. While they worked similarly to assets in the Content hub, they offered fewer customization options, only had a predefined set of fields, and could not be secured (meaning that anyone with the direct file URL could access them).
For all of the above reasons, the clear way forward is to organize, optimize, and safeguard your assets in the Content hub.
Wrap up
By now, you’ve seen how Xperience helps you keep files organized and easy to reuse. You also practiced uploading and working with image assets directly from a widget. These skills make it easier to handle your daily tasks with less manual effort and much faster than before.
Use Content hub to:
- Store and reuse assets across different channels.
- Upload files directly in the Content hub or from within an image widget.
- Smart drag‑and‑drop uploads right into the Content hub and widgets, so you don’t break your flow.
- Use multi-file upload to speed up and simplify your asset management.
- Benefit from automatic image variants and taxonomy tags.
- Use AIRA to process and optimize images for better performance automatically.
- Add and configure images in widgets to control how they display on your site and on different devices.
- Improve working with assets when compared to Media libraries.
Next step
You’ve now learned the basics of managing your files in Xperience. You’re in a great position to take a deep dive look at how working with image variants and focal point can make your daily image-related chores a walk in the park.
If you’re curious about content management, you can also learn more about how developers define the content type assets and retrieve their content to the website.