
Build your first customer journey that works
Features described on this page require the Xperience by Kentico Advanced license tier.
If you’re a marketer juggling multiple priorities, it can be tough to know whether your website content is doing its job. Stop guessing and finally understand how visitors interact with your business. The Customer journeys application in Xperience by Kentico help you uncover how visitors move through your site, where they drop off, and what leads them to convert.
A customer journey is a series of touch points (called stages in Xperience) that show how a visitor progresses toward a specific goal, such as submitting a form, reading a case study, or requesting a product demo.
Want a deeper dive into the theory behind customer journeys? Check out our Getting started
This guide will walk through a practical example using the Kbank Business Banking demo site. We aim to get at least 50 small business owners to request a loan.
If you don’t have your demo site, request the Xperience by Kentico - Business Tutorial Kbank demo site through a form at Kentico website.
Walk in your customer’s shoes: why build a journey?
Imagine you’re a marketer at a bank tasked with promoting small business loans. Your goal is to help small business owners understand the benefits of your offering and encourage them to request an account. The business owners must get at least 50 new account requests, which becomes your ultimate KPI.
To support the campaign, you’ve created a dedicated landing page, a form where customer can request the account, and a case study that highlights how your services helped another small business succeed. You also have a follow-up email with a downloadable case study and links to more details. It’s a solid content mix but how do you know if it’s actually working?
That’s where the Customer journey application comes in. By mapping these content pieces as stages in a journey from the campaign landing page all the way to the final form submission, you can measure how many people engage with each step. More importantly, you can see where they drop off. This lets you pinpoint which content resonates with your audience, and which pieces may need a tweak to keep the momentum going.
The Kbank Business Banking site is just a demo website that we use to show you how the Customer journeys application works. We’re not trying to teach you the perfect marketing strategy, which resources you’ll need to execute perfect digital marketing campaign, or tell you what your customer journey should look like.
Instead, think of this guide as a hands-on tutorial. You’ll learn how to set up journeys, define stages, and read the results so you can apply the same process to your own campaigns, content, and goals. It also means that some of the object “names”, for example, forms, might differ from how you will name them in a real life.
Build your first journey in an interactive walktrough
Not a fan of reading? Skip the line with our interactive video that directly walks you through building your own customer journey, step by actionable step.
Ensure you access the video in Fullscreen mode to make the most out of its interactive features.
Sounds like too much hassle? Continue reading to learn the full details of the process.
Step 1 – Start with the end in mind
Let’s start with the most important indicator for the Kbank business, the final conversion point: a user submitting the Small Business Loan Request form.
- Open the Customer journeys application in Xperience by Kentico and Create New journey.
- Edit the auto-generated name to, for example: Small business loan - demo and Save your changes.
- Use the Stage button to create new touch point.
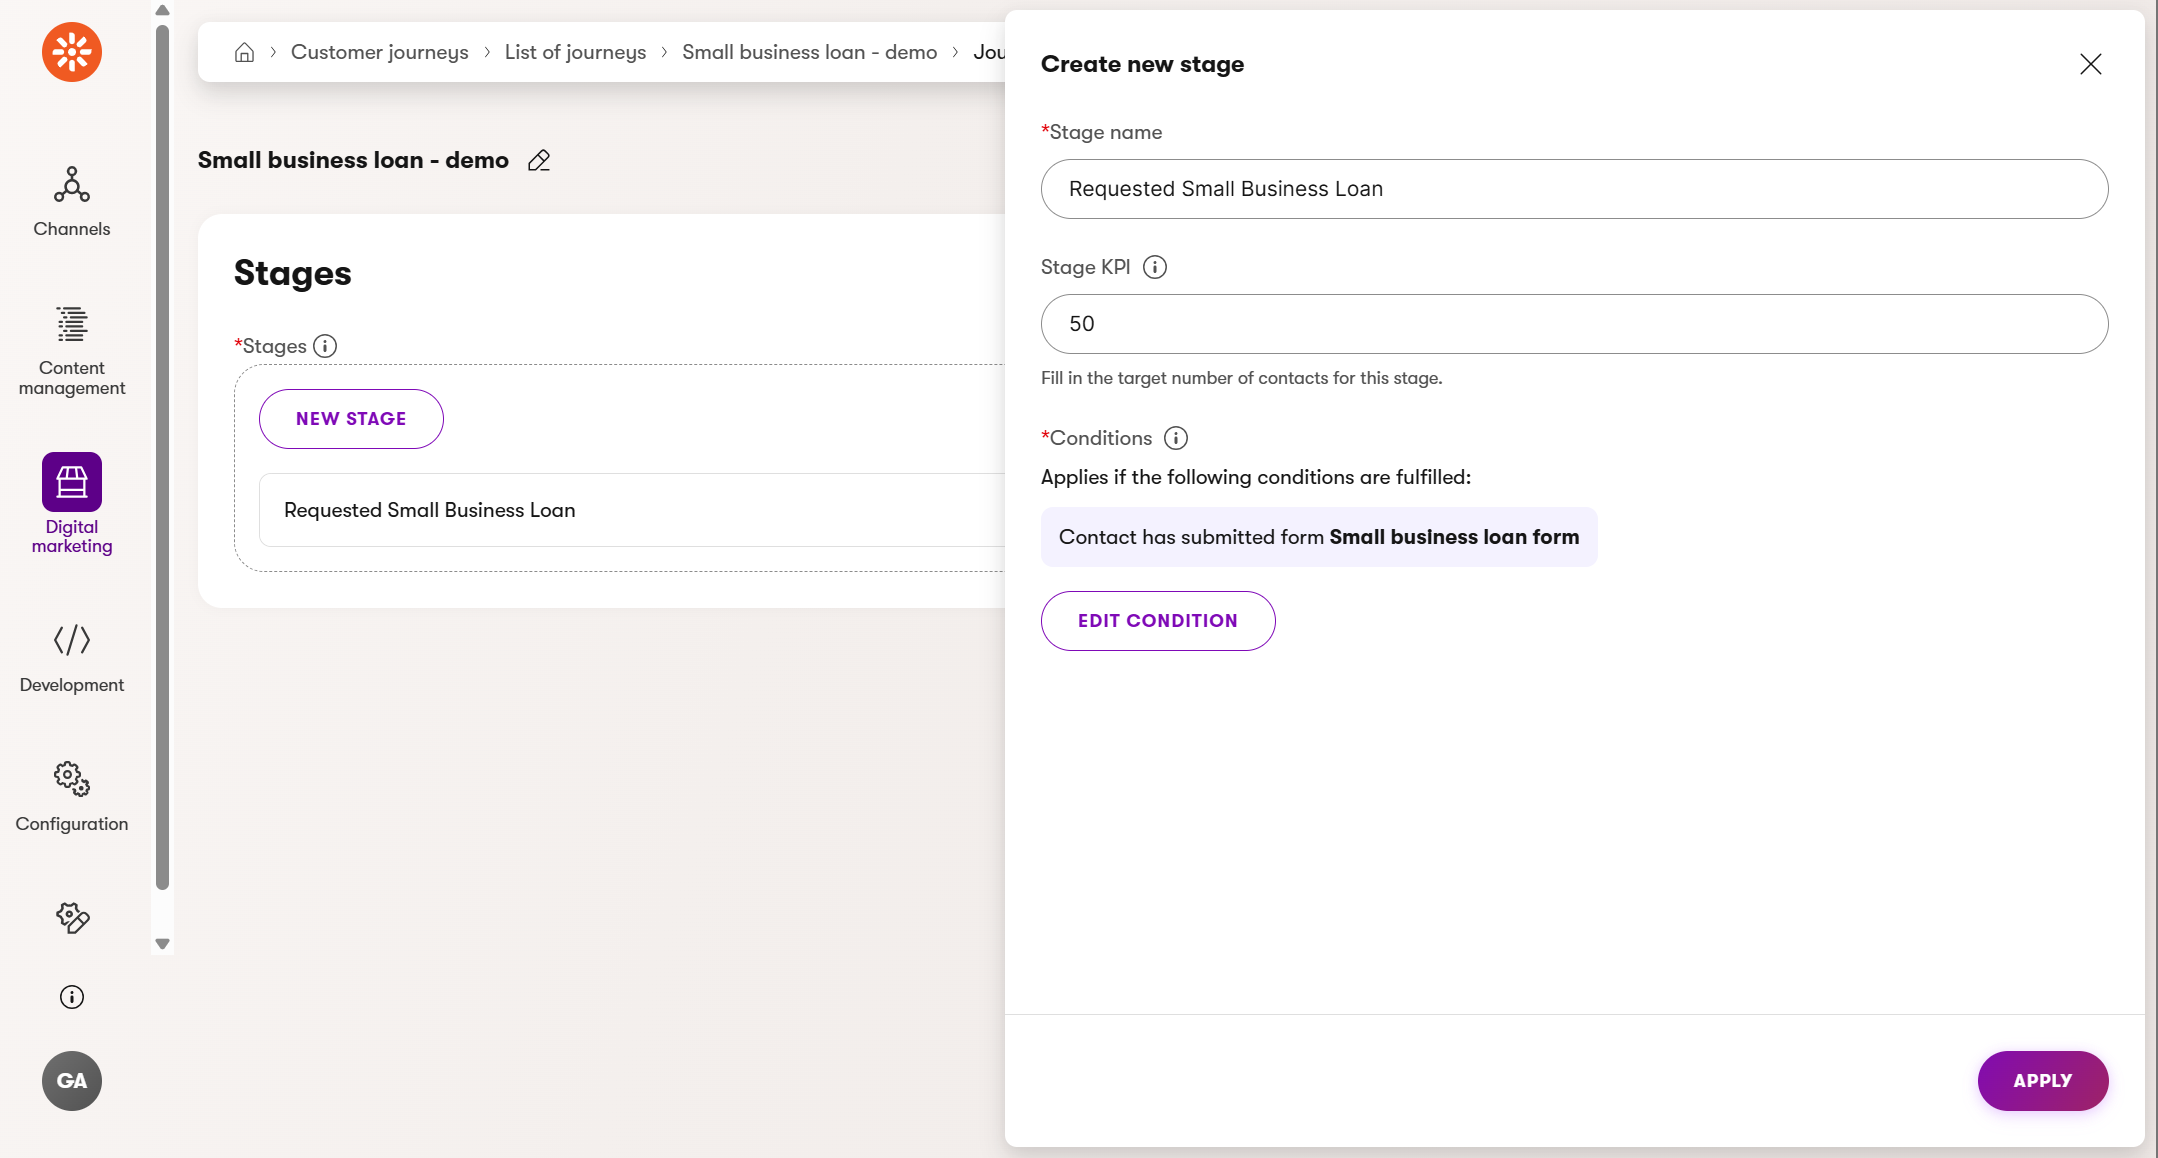
- Name this stage appropriately, for example: Requested Small Business Loan.
- Set the KPI target to 50 conversions.
- Use the Condition button to create condition.
- Then, add a condition group.
- From the list of options, use the built-in condition rule: Contact has submitted form.
- Select the Small Business Loan form.
- Apply and Save your changes.
Why this stage matters: This final stage represents your business goal requested by the business owner. You should design everything else in the journey to get people to this stage. Measuring conversions helps you align your marketing content with real outcomes. It’s the clearest indicator that your digital marketing efforts are turning interest into real leads and that you’re delivering.
Watch for low form completions.
Once completed, the campaign journey will show you drop-off between individual stages. If you see a drop off before this final stage, meaning customer don’t submit the form, consider whether your form is too long, unclear, or unappealing. Try optimizing the form design, headline, or incentives.
Step 2 – Track the page before the form
Most visitors don’t land on just a form. They’ll likely end on a page that hosts the request form. Let’s create a touchpoint for this page as well.
- Add new Stage.
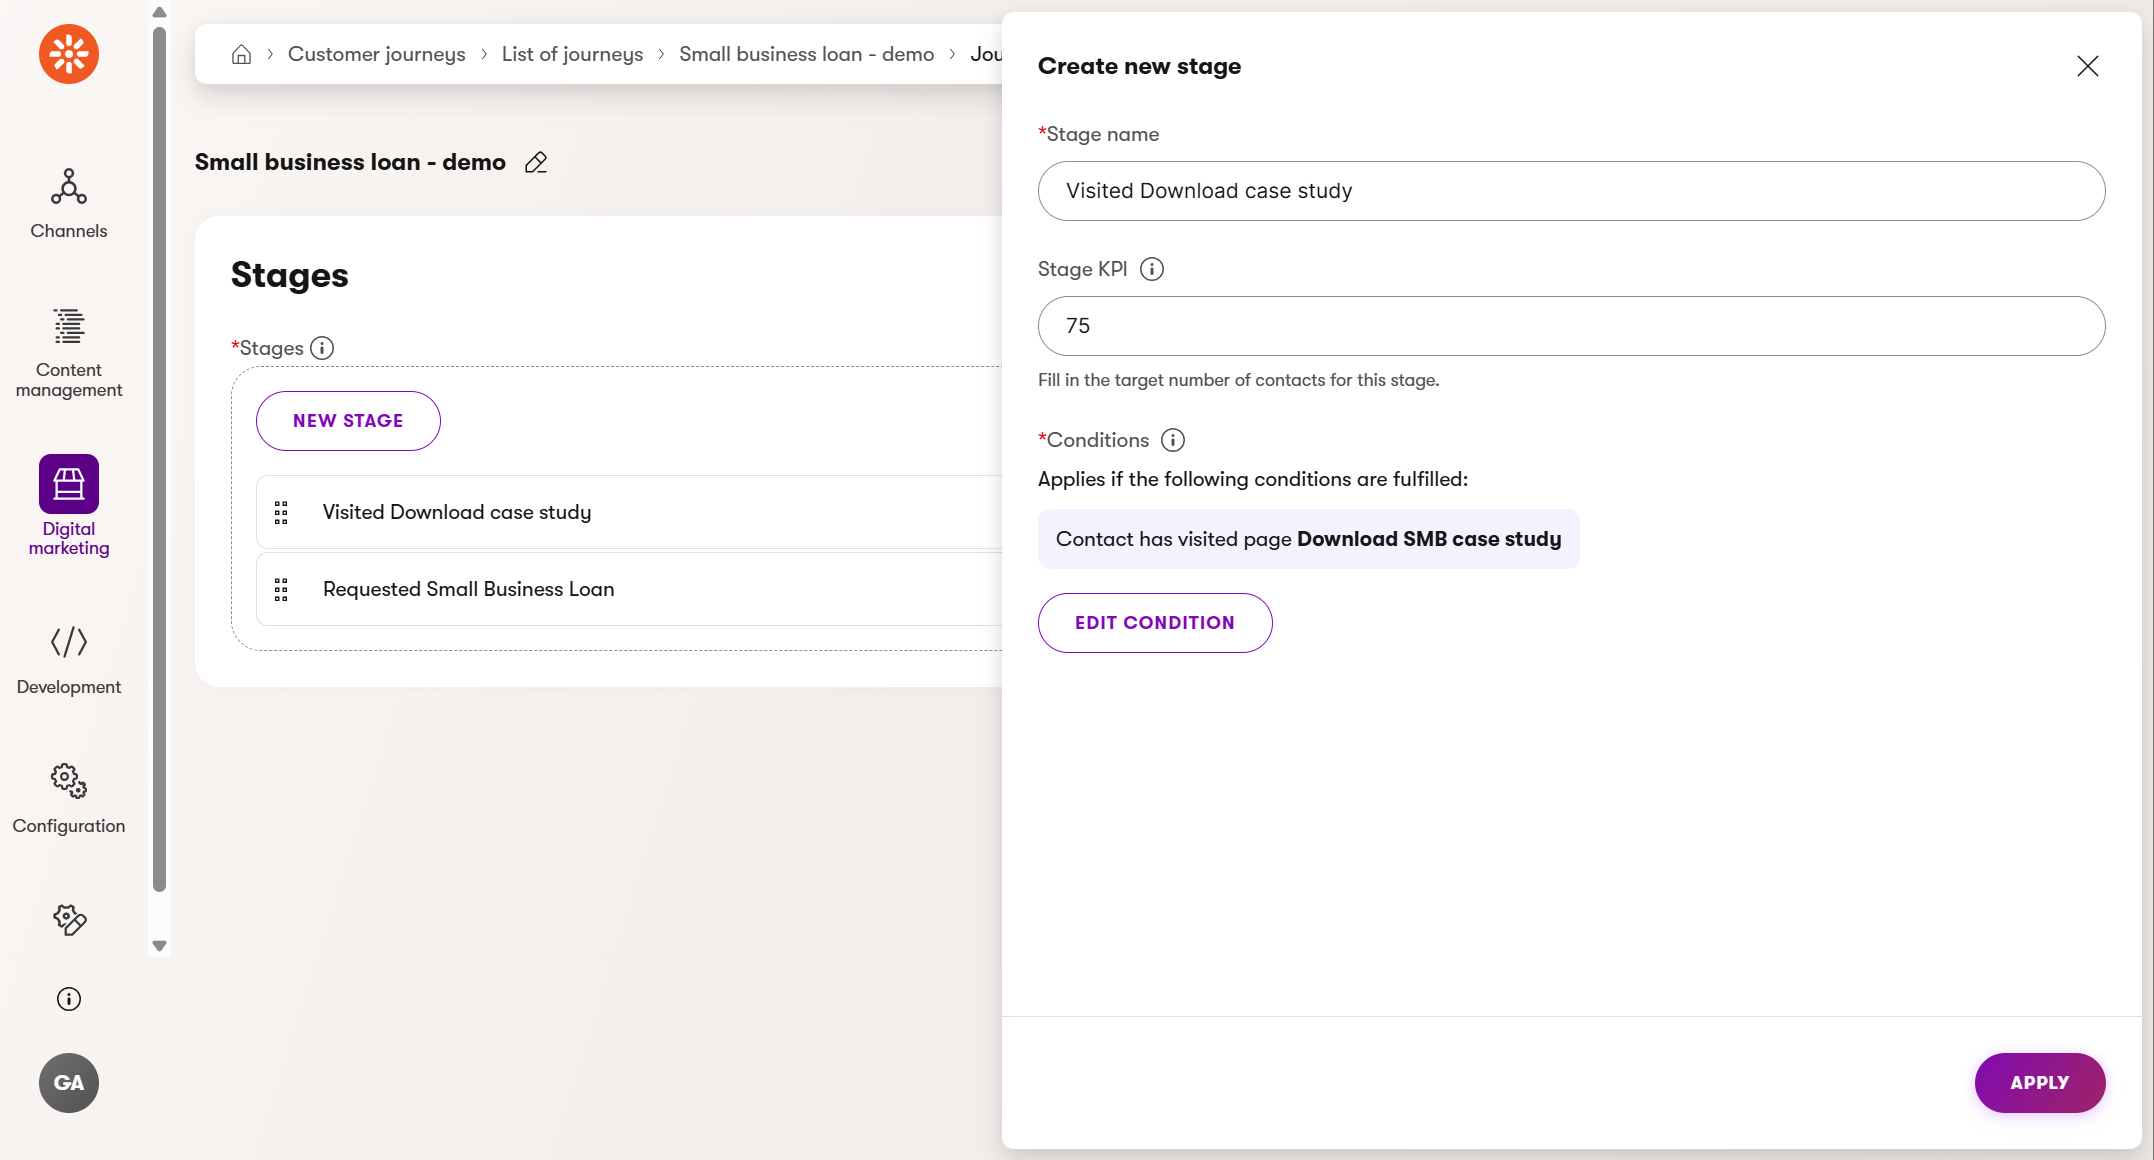
- Name the stage, for example: Visited Download case study page.
- Set the KPI target to 75 visits.
- Use the built-in condition rule: Contact has visited page.
- Select the Business banking channel, and from the content tree, choose the Download SMB case study page in the Campaign assets > Downloadables subfolder.
- Apply the condition and rearrange the stages using drag and drop.
Why this stage matters:
This step shows intent. If users are visiting the loan page but not submitting the form, it can indicate confusion or friction. To mitigate the drop-off, improve clarity or create more persuasive content to meet your visitor’s expectations.
Watch for a high drop-off after this page. This may signal that your content isn’t convincing enough or that the Call to action buttons are unclear. Check the loading speed, clarity of the message, and whether the value promoted by this page is obvious.
Step 3 – Measure traffic from your landing page
Let’s trace users to a campaign page your team created to capture leads.
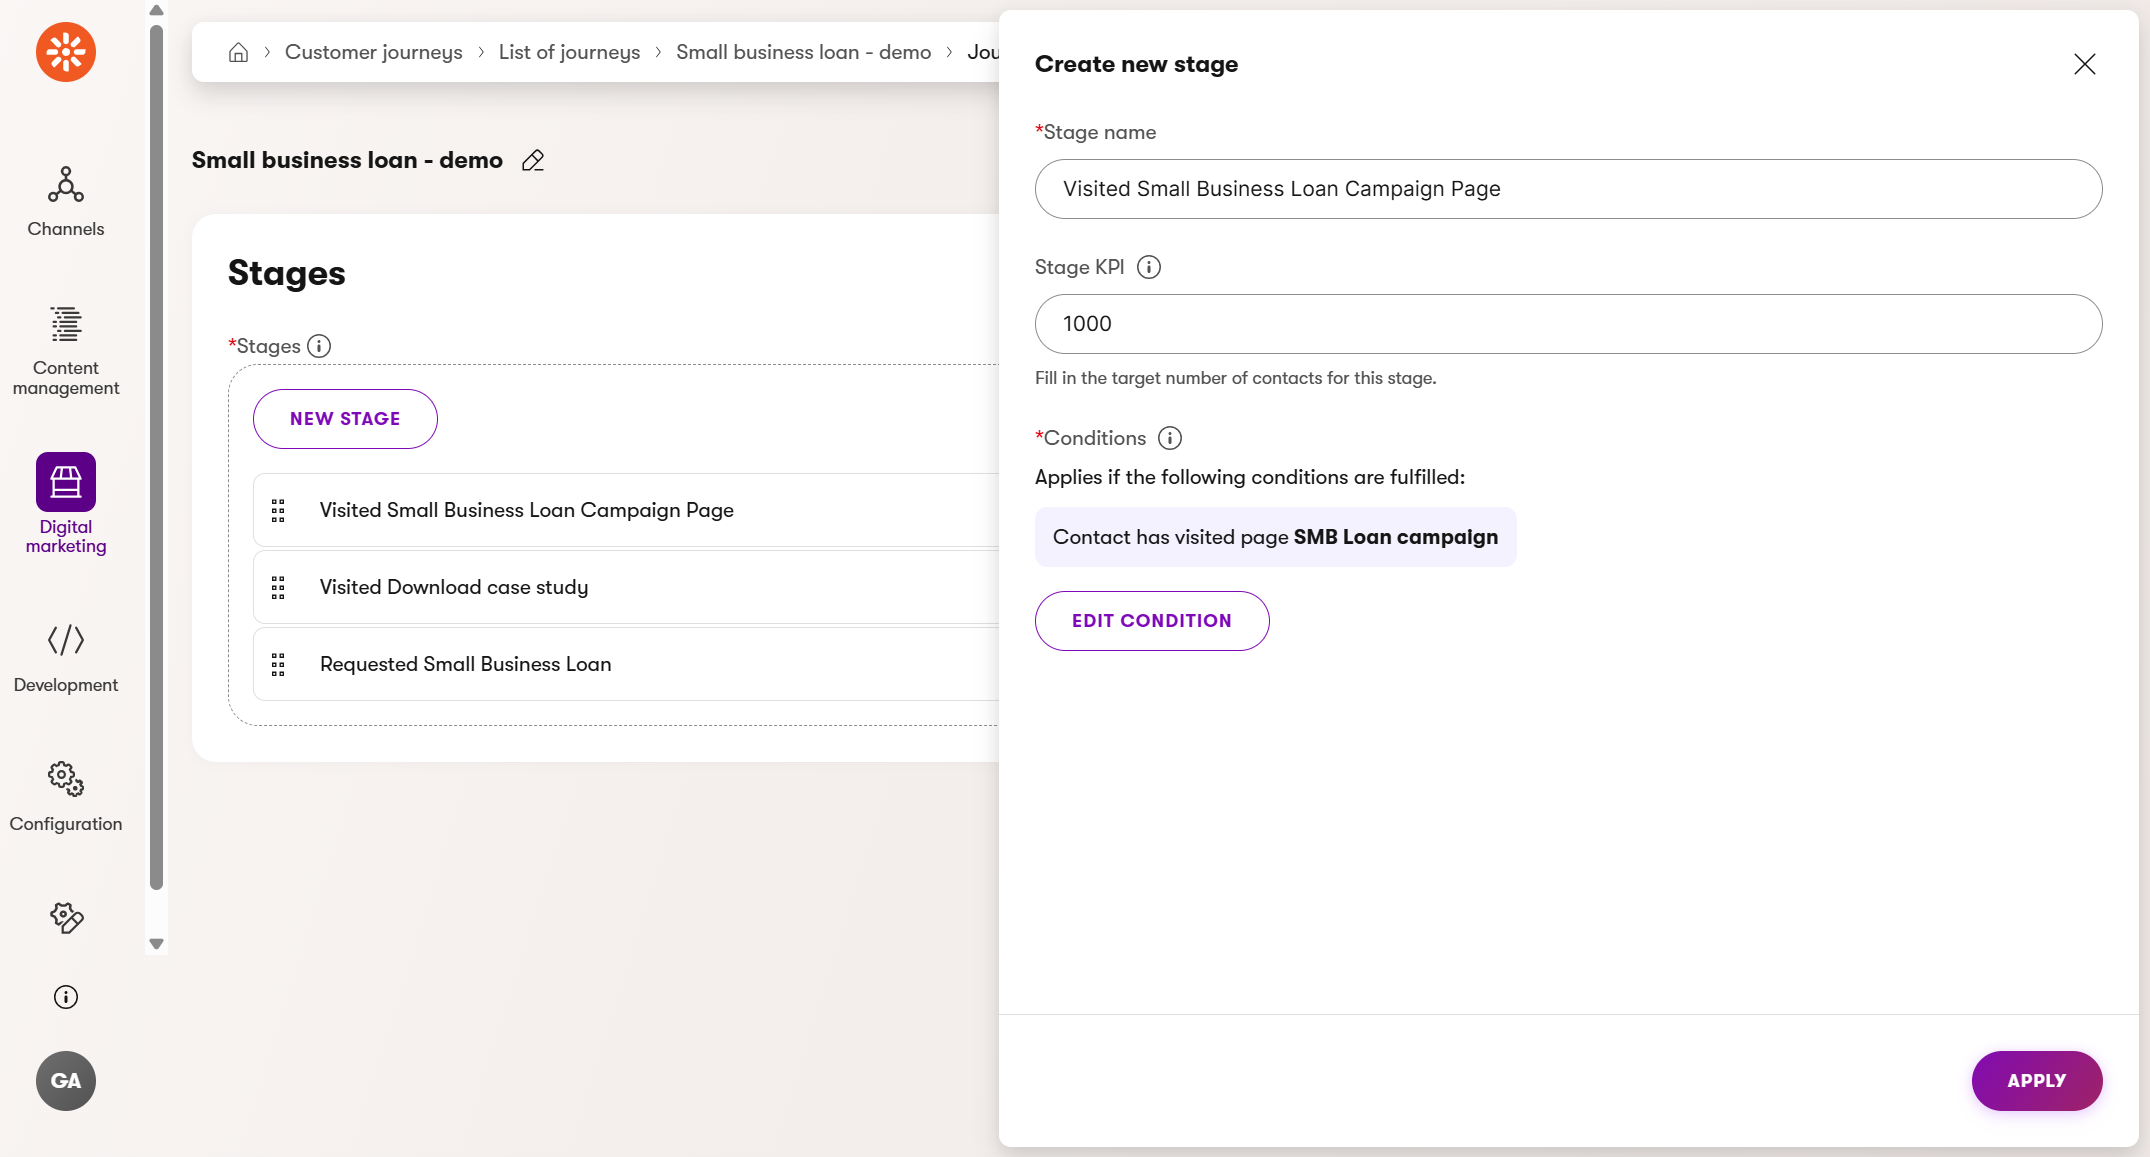
- Add a new stage: Visited Small Business Loan Campaign Page.
- Set the KPI target to 1,000 page visits.
- Add a built-in condition rule Contact has visited page and ensure you’ve selected the Business Banking channel.
- Select the SMB Loan campaign page in the Campaign pages folder in the content tree.
- Click Apply and reorder the journey.
Why this stage matters:
This is your campaign launchpad. It’s where ads, personalized content across your website, emails, and social traffic converge. If this page isn’t performing, you lose customers before they begin exploring. It’s your first impression.
Watch for low traffic here. Drop-off between this stage and the following touch point may suggest problems with your promotion strategy. Review how you drive traffic through personalized content, ads, emails, or social posts.
Step 4 – Track interest in deeper content
The campaign landing page features a case study. Let’s measure how many people show interest by requesting it.
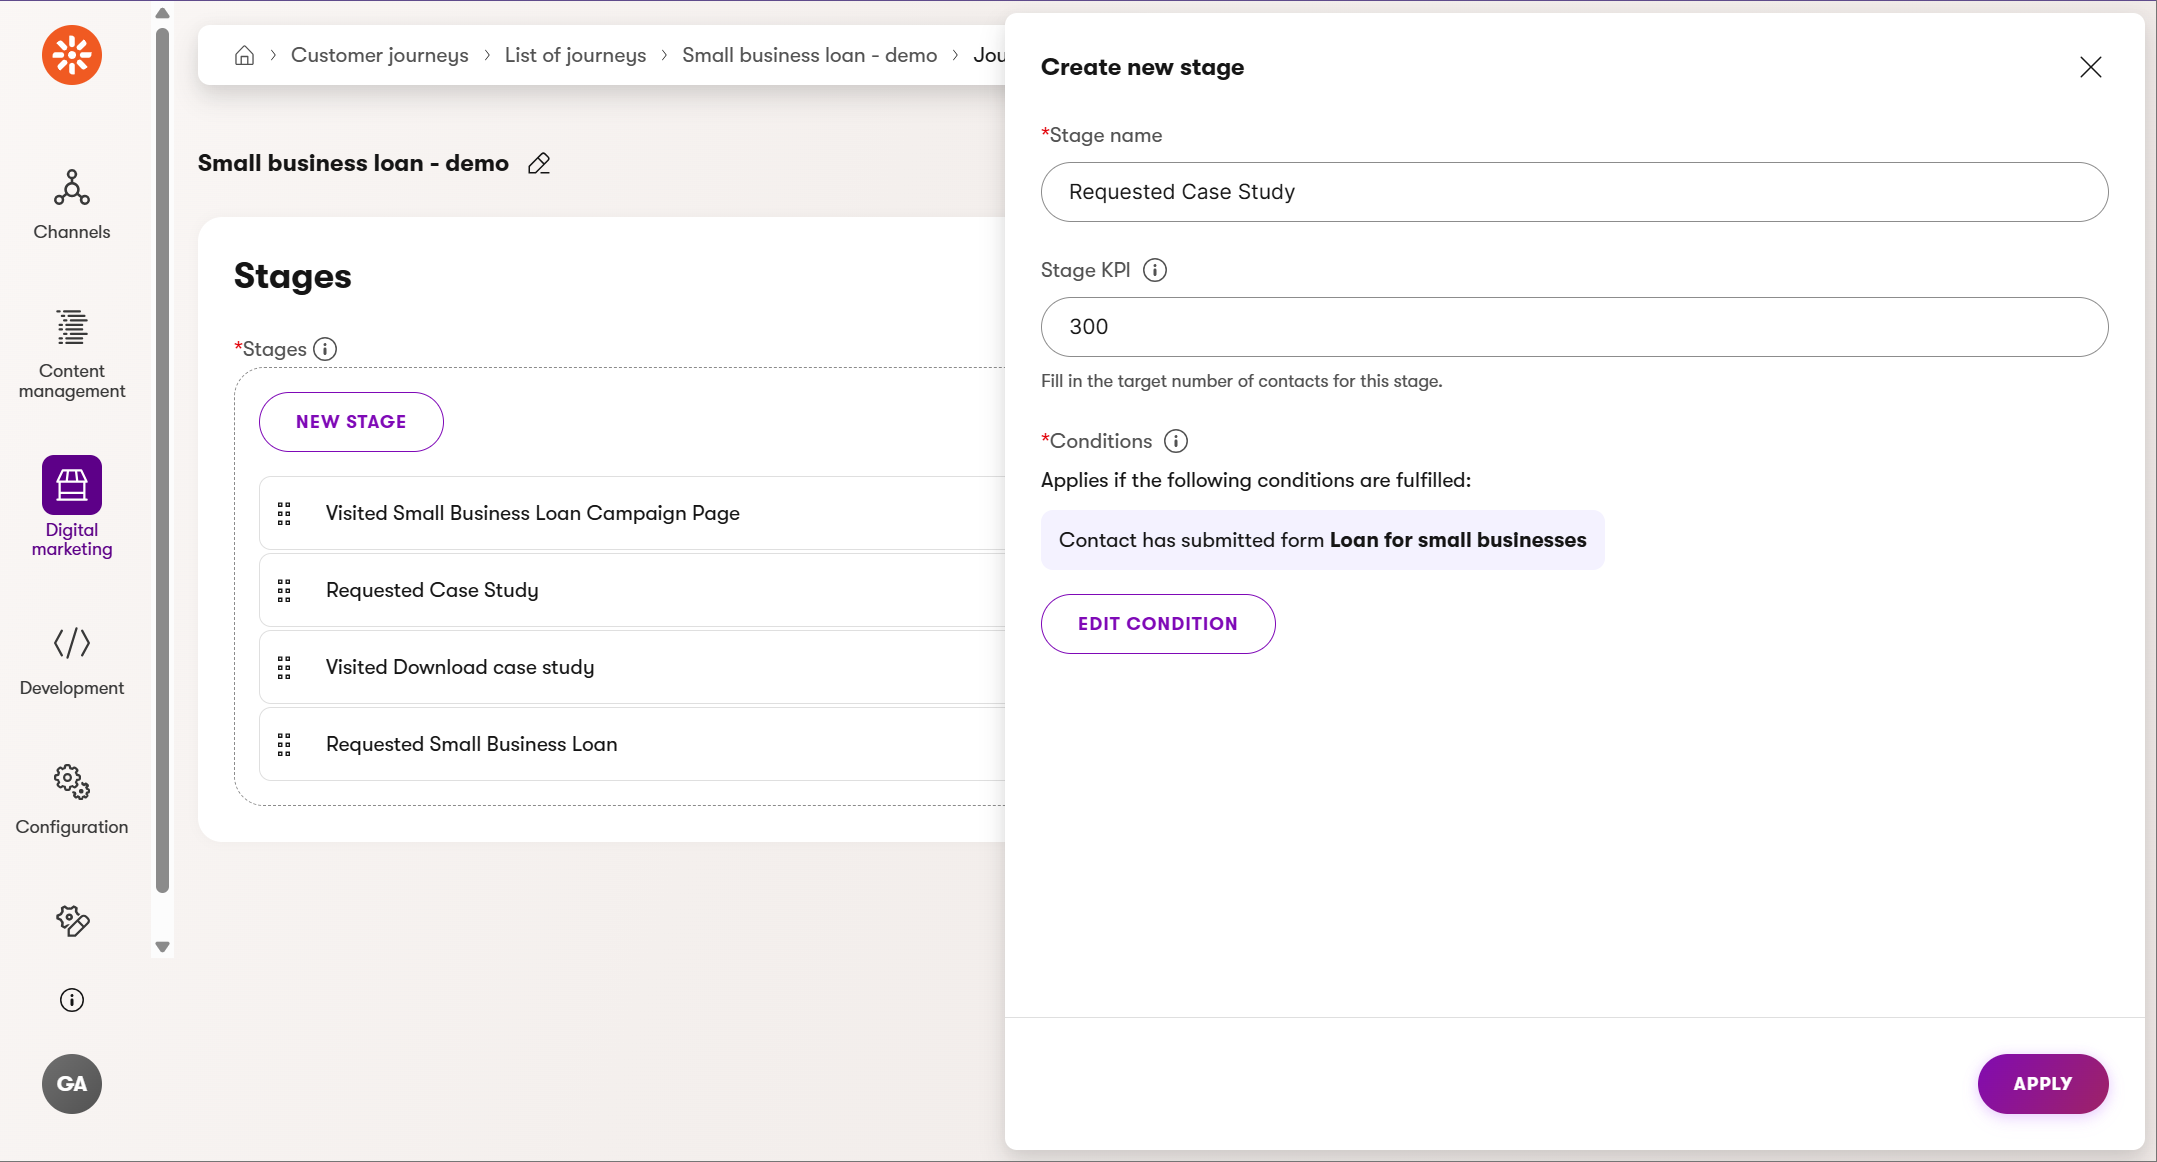
- Add a new stage: Requested Case Study.
- KPI target: 300 form submission.
- Set Condition to Form submitted: Loan for small businesses.
- Apply, arrange the journey steps and Save your journey.
Why this stage matters:
Case studies build trust and credibility. If users take the time to fill out a form to request one, they’re clearly engaged and see value in what you offer. It also shows that they’re moving beyond curiosity into evaluation.
Low interest here could mean your offer isn’t strong enough.
Ensure that the content on the page clearly explains the value of the case study. Add testimonials or highlight results upfront.
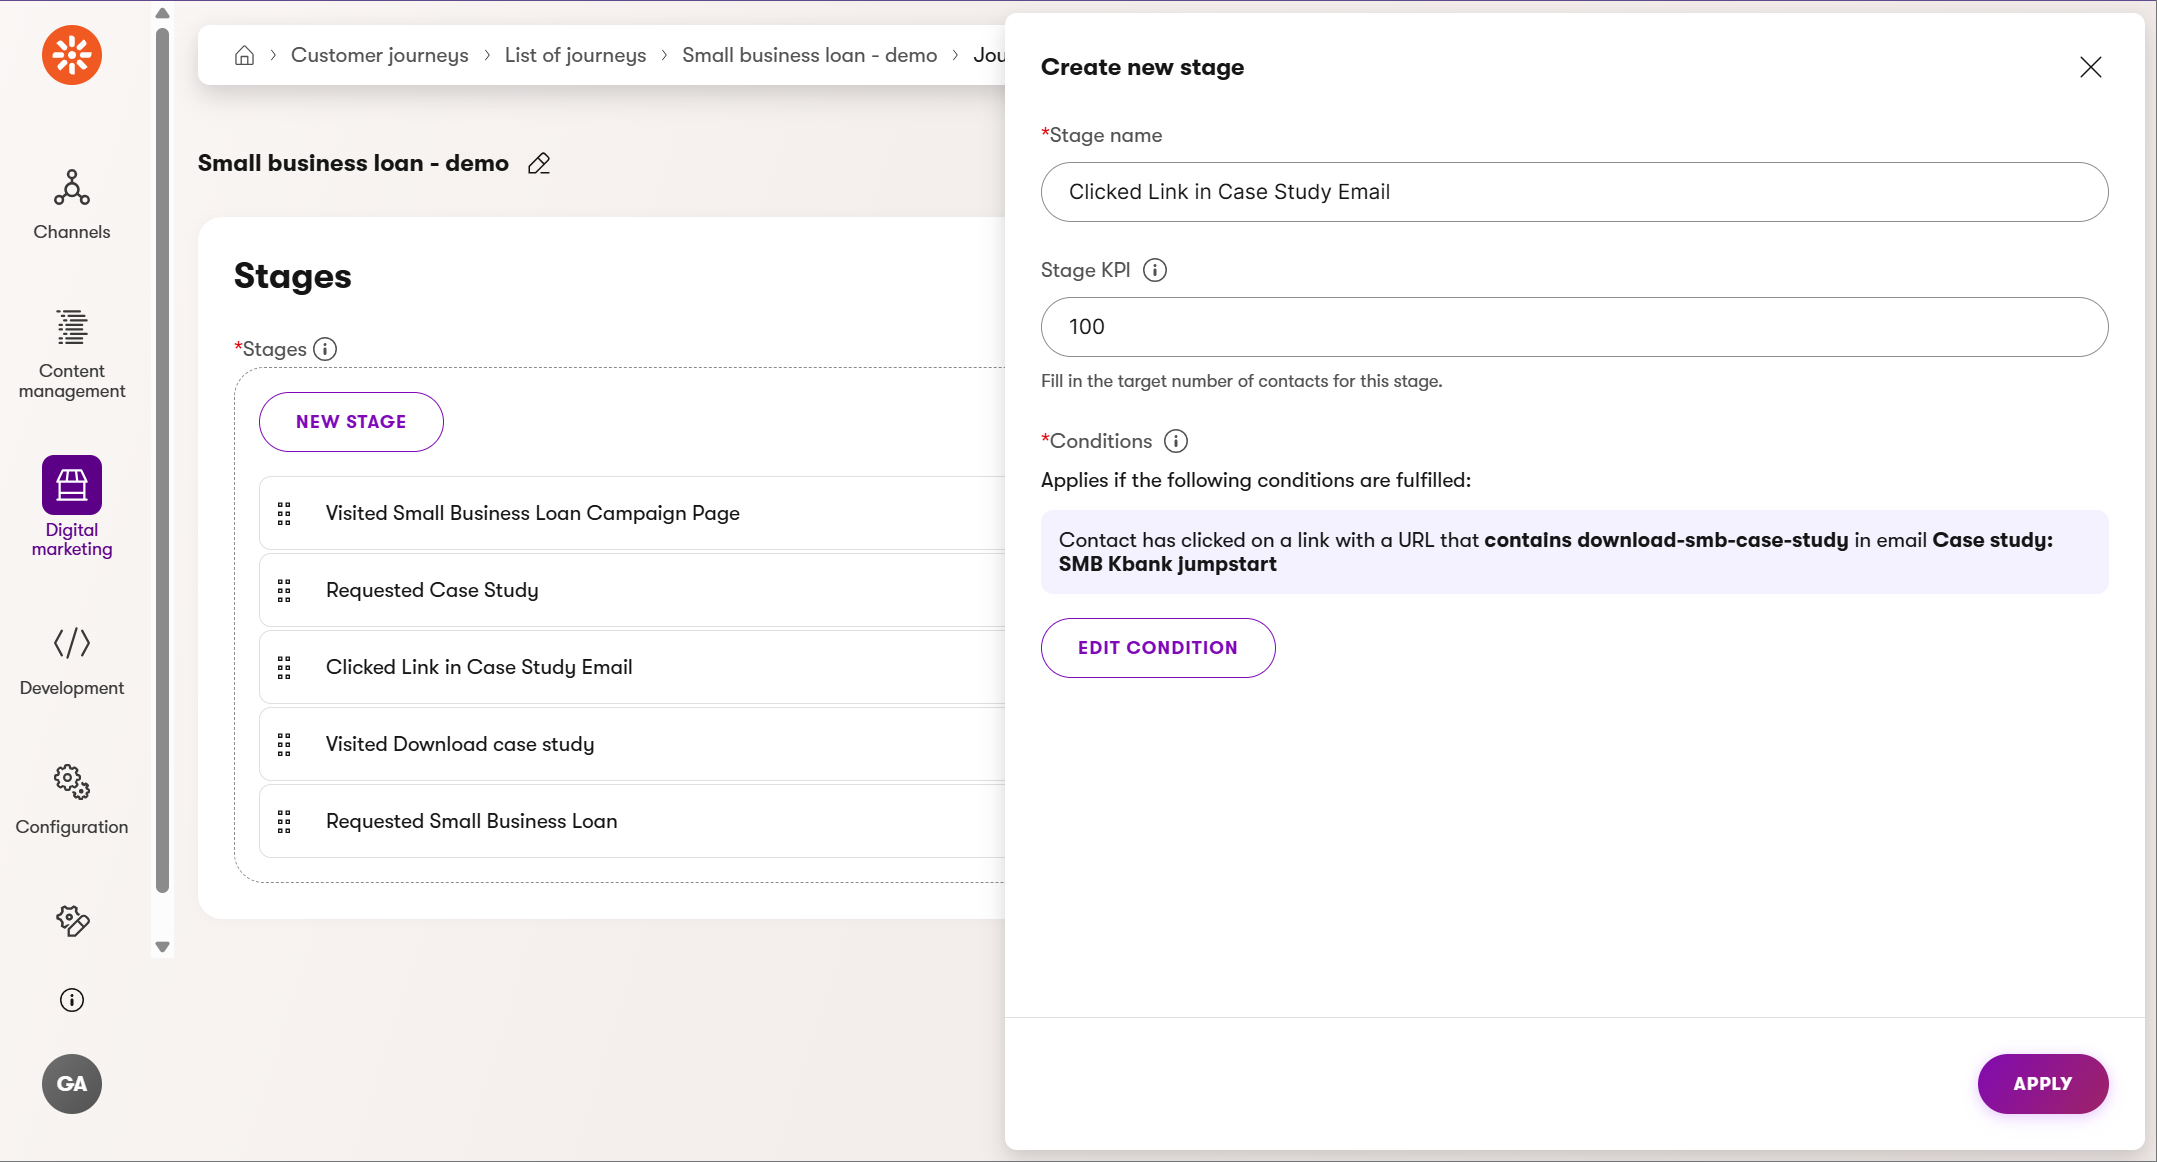
Step 5 – Measure email engagement
After submitting the case study form, users receive an email with a download link. Let’s see who clicks.
- Add a stage: Clicked Link in Case Study Email.
- KPI: `100* clicks.
- Use the built-in condition: Contact has clicked on a link with a URL.
- Configure the condition to link contains with value: download-smb-case-study (The value represents the URL slug of the target page.)
- Email: SMB Kbank Jumpstart Loan.
- Apply the condition.
Why this stage matters:
Email engagement tells you how well your follow-up content works. If they open the email and click, you’ve successfully extended the journey. If not, you might need to rethink the subject line, timing or its content.
Poor email click-through rates?
Review your subject line, email layout, and clarity of the call-to-action.
Step 6 – Track who downloads the case study
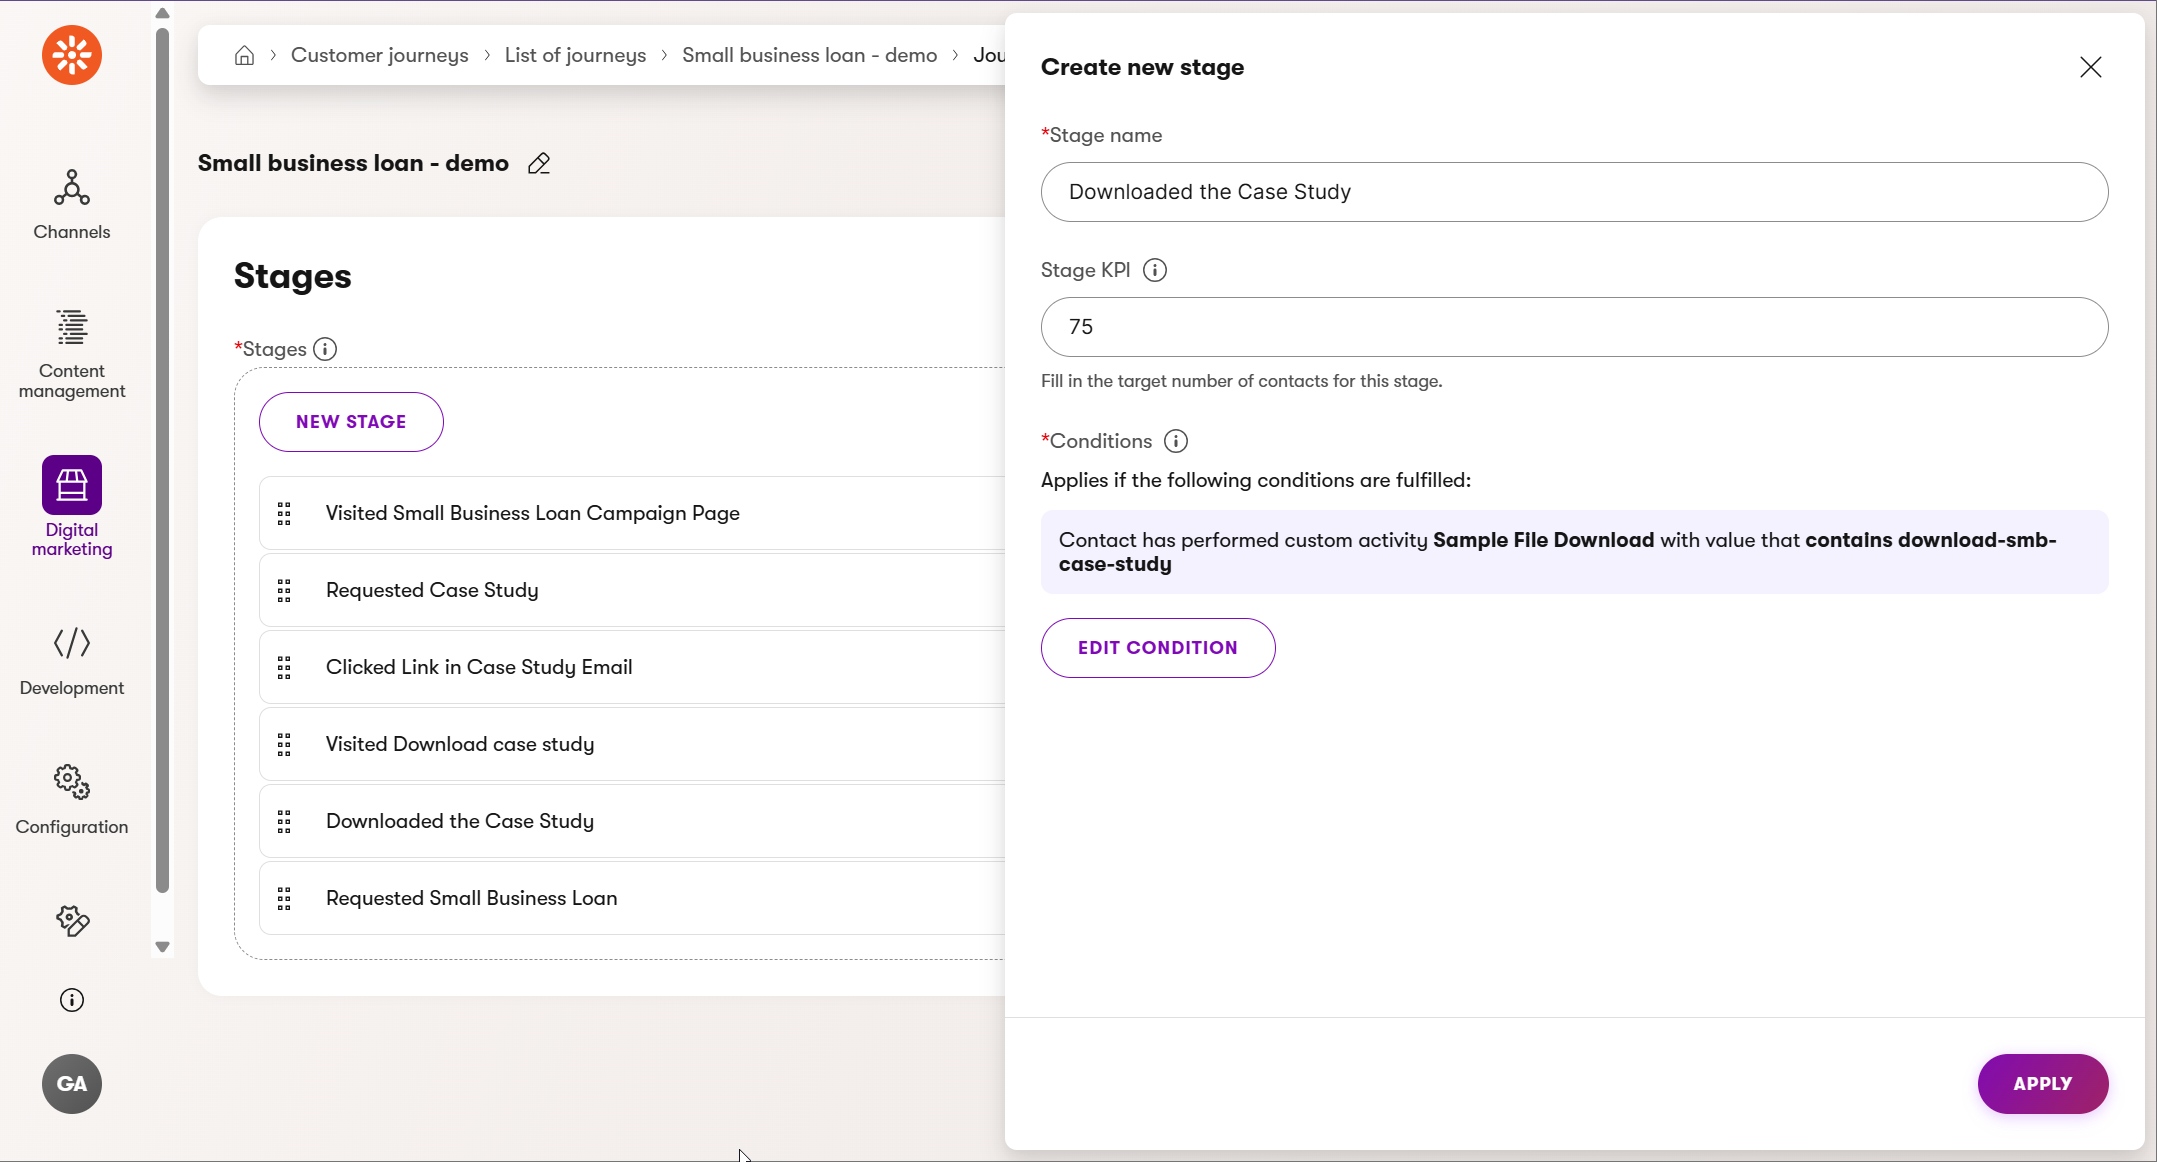
Last, let’s track who reaches the final destination: downloading the case study from the website.
- Add the last stage: Downloaded the Case Study
- KPI: 75 downloads
- Use the built-in Contact has performed custom activity
- Select Custom activity Sample File Download (The Sample File Download and other conditions in the dropdown selector were custom-built for the demo website. Your website options might vary)
- Specify that the activity contains value: download-smb-case-study (Targeting the value of the logged activity was custom built for the Kbank demo site; your website options might vary.)
- Apply and save.
Why this stage matters:
This is your moment of truth. It’s the clearest sign of real interest in your product or service. If many users stop just short of this step, it may indicate a technical issue or a misalignment in expectations.
If people don’t reach this step:
Double-check that the email link works, the download page loads correctly, the user action logs, and your messaging stays consistent throughout the journey.
See the full journey and find drop-offs
Once you save and preview your complete journey using the Journey view, Xperience by Kentico will calculate the data. You’ll see each stage with conversion counts and drop-off percentages.
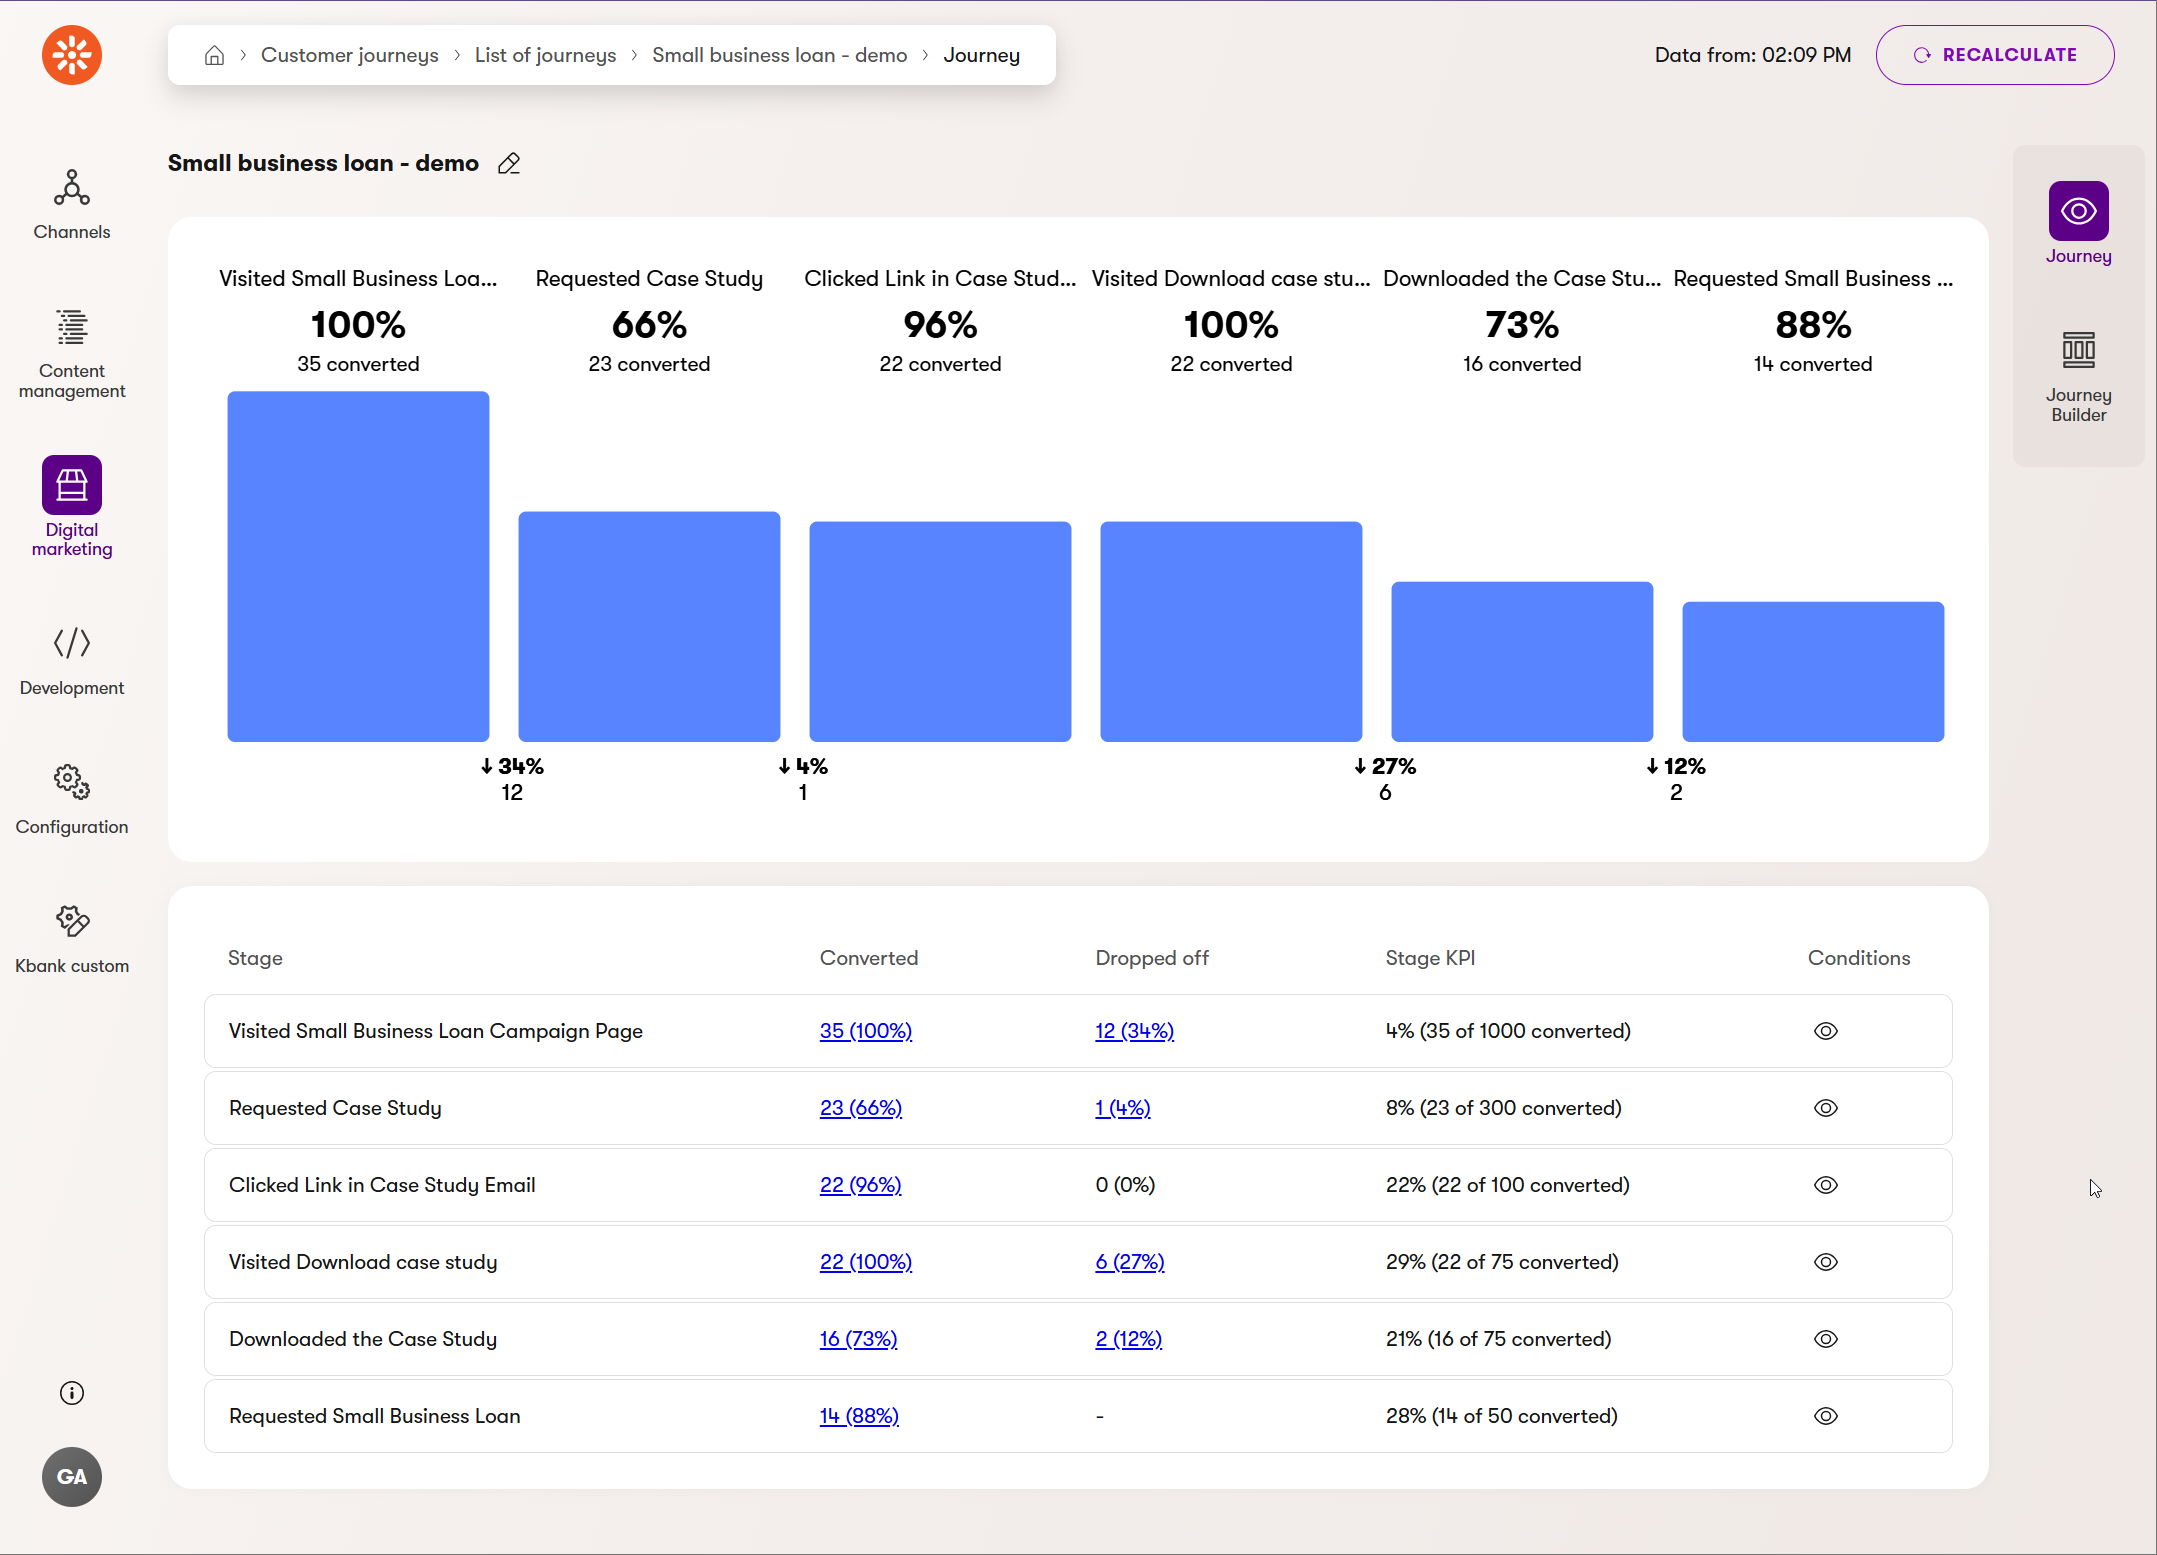
Use this view to:
- Spot weak links between touchpoints.
- Identify content gaps or unclear CTAs.
- Prioritize improvements that will increase conversions.
What next?
Building a customer journey isn’t just a technical exercise, it’s a strategic one. With just a few stages, you can:
- Uncover where visitors lose interest
- Validate whether your content supports your goals
- Make smarter decisions based on actual behavior
To explore what you should do before building the journey in Xperience, check out the full Customer Journeys Getting Started series.
You’re not just creating a diagram. You’re making a map that leads your customers to value and your business to results.