
Use the Email Builder Starter Kit in your project
Email Builder in Xperience by Kentico empowers non-technical users to define the appearance of emails with a friendly drag-and-drop interface. Through Templates, Sections, and Widgets, marketers have more flexibility than standard email templates in controlling email structure, visual design, and content.
The Email Builder Starter Kit provides a pre-made set of Email Builder components that you can use in your project, saving you time to spend on additional custom components or other areas of the project.
Let’s look into the process of integrating the Starter Kit into an existing project, using the Training guides repository as an example.
Before you start
This guide requires the following:
- Familiarity with C#, .NET Core, Dependency injection, and the MVC pattern.
- A running instance of Xperience by Kentico, preferably 31.3.3 or higher.
Some features covered in the training guides may not work in older versions.
Code samples
You can find a project with completed, working code samples from this guide and others in the finished branch of the Training guides repository.
The main branch of the repository provides a starting point to code along with the guides.
The code samples in this guide have only been tested in .NET 8.
They come from a project that uses implicit using directives. You may need to add extra using directives to your code if your project does not use this feature.
Prepare your solution for Email Builder
To begin, install the Kentico.Xperience.Mjml and Microsoft.AspNetCore.Components.Web NuGet packages in your solution.
Make sure to install the version of Kentico.Xperience.Mjml that matches your other Kentico NuGet packages (30.11.1 in this example).
The process may vary depending on your approach. In the Training guides repository, you can simply edit the Directory.Packages.props file.
<Project>
  ...
  <ItemGroup>
    ...
    <PackageVersion Include="kentico.xperience.mjml" Version="30.11.1" />

    <PackageVersion Include="Microsoft.AspNetCore.Components.Web" Version="8.0.14" />
...
Copy the Starter Kit to your solution
Clone or download the Email Builder Starter Kit repository from GitHub.
Copy the entire Kentico.Xperience.Mjml.StarterKit.Rcl directory from the src folder of the Email Builder Starter Kit repository to your project, for example, into the src folder of the Training guides repository. Remember to include the Starter Kit’s project, Kentico.Xperience.Mjml.StarterKit.Rcl.csproj, in your solution. Your development environment likely has a way to do this in the UI, but it is also possible through the .NET CLI:
dotnet sln TrainingGuides.sln add Kentico.Xperience.Mjml.StarterKit.Rcl\Kentico.Xperience.Mjml.StarterKit.Rcl.csproj
Depending on the configuration of your project and environment, you may need to modify the Starter Kit’s project file. For the Training guides solution, we need to disable default embedded resources to avoid build errors.
...
<PropertyGroup>
    ...
    <EnableDefaultEmbeddedResourceItems>false</EnableDefaultEmbeddedResourceItems>
</PropertyGroup>
...
Map the Starter Kit’s models to your content types
The Starter Kit repository includes Product and Image widgets.
However, there is no way to guarantee that product and image entities are represented by identical content types in every project, so we need to create a mapping between the models used by the Starter Kit widgets and our project’s content types. For this example, we will use the Product widget to display ServicePage items, and we will use the Image widget to display Gallery image and Asset items.
The Starter Kit repository contains example mappers for the Dancing Goat project for reference.
The Starter Kit also includes an email template that utilizes the subject and preview text of the email to which it applies, regardless of the email’s content type. Since these fields are not part of a shared interface, we need to create a data mapper to extract them from each possible content type.
Implement the model mappers
To use the Image and Product widgets, we need to implement the IComponentModelMapper<TModel> interface for the ImageWidgetModel and ProductWidgetModel types. These implementations tell the Starter Kit how to populate the widget models from our ServicePage, GalleryImage, and Asset content types.
In case we need to update and overwrite the Email Builder Starter Kit files in the future, let’s minimize any changes to that project. Otherwise, we might lose them when overwriting or replacing the folder.
In the TrainingGuides.Web project, create a ~/Features/Shared/EmailBuilder/Mappers folder to hold our implementations.
Image model mapper (simple content type)
The Training guides repo has two reusable content types that primarily represent images: Asset and Gallery image.
However, the Gallery image type simply wraps the Asset type with additional properties. The image file associated with a Gallery image always belongs to the Asset it links, so we don’t need to worry about handling gallery images here.
You can also map multiple content types to a single Starter Kit model, but it is not necessary for this example.
using Kentico.Xperience.Mjml.StarterKit.Rcl.Mapping;
using Kentico.Xperience.Mjml.StarterKit.Rcl.Widgets;
using TrainingGuides.Web.Features.Shared.Services;

namespace TrainingGuides.Web.Features.Shared.EmailBuilder.Mappers;

public class ImageEmailWidgetModelMapper : IComponentModelMapper<ImageWidgetModel>
{
    private readonly IContentItemRetrieverService contentItemRetrieverService;

    public ImageEmailWidgetModelMapper(
        IContentItemRetrieverService contentItemRetrieverService)
    {
        this.contentItemRetrieverService = contentItemRetrieverService;
    }

    public async Task<ImageWidgetModel> Map(Guid itemGuid, string languageName)
    {
        var asset = await contentItemRetrieverService.RetrieveContentItemByGuid<Asset>(
                itemGuid,
                languageName: languageName);

        if (asset is null)
        {
            return new ImageWidgetModel();
        }

        string imageUrl = asset.AssetFile?.Url ?? string.Empty;

        return new ImageWidgetModel()
        {
            // Populate the image URL and alt text from the retrieved content item's fields
            ImageUrl = imageUrl,
            AltText = asset?.AssetAltText ?? string.Empty
        };
    }
}
Product model mapper (composable content type)
The ServicePage content type in the Training guides repo is composable. It wraps a reusable Service content type, which itself is made up of other content types like Service feature, Benefit, and Asset. If we compare the Service content type with the properties of the ProductWidgetViewModel from the Starter Kit, we can see that Service and Asset are the only parts of ServicePage that we need.
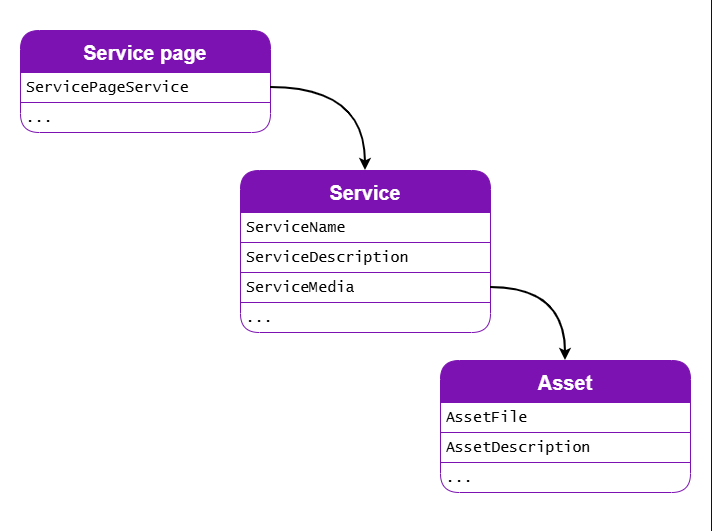
When you query the service page, remember to set the depth appropriately, in order to handle this content model.
using Kentico.Xperience.Mjml.StarterKit.Rcl.Mapping;
using Kentico.Xperience.Mjml.StarterKit.Rcl.Widgets;
using TrainingGuides.Web.Features.Shared.Services;

namespace TrainingGuides.Web.Features.Shared.EmailBuilder.Mappers;

public class ProductEmailWidgetModelMapper : IComponentModelMapper<ProductWidgetModel>
{

    private readonly IContentItemRetrieverService contentItemRetrieverService;

    public ProductEmailWidgetModelMapper(
        IContentItemRetrieverService contentItemRetrieverService)
    {
        this.contentItemRetrieverService = contentItemRetrieverService;
    }

    // Here we set a very specific name for the Guid parameter to clarify that the web page's ContentItemGuid should be used instead of WebPageItemGuid
    public async Task<ProductWidgetModel> Map(Guid webPageItemContentItemGuid, string languageName)
    {
        var page = await contentItemRetrieverService.RetrieveWebPageByContentItemGuid<ServicePage>(
            contentItemGuid: webPageItemContentItemGuid,
            depth: 2,
            languageName: languageName);

        var service = page?.ServicePageService.FirstOrDefault();

    // If the service or page is null, return an empty model. Note that the service will always be null if the page is null.
        if (service is null)
        {
            return new ProductWidgetModel();
        }

        string webPageItemUrl = page.GetUrl().AbsoluteUrl;

        var image = service.ServiceMedia.FirstOrDefault();
        string imageUrl = image?.AssetFile?.Url ?? string.Empty;

        return new ProductWidgetModel
        {
            Name = service.ServiceName,
            Description = service.ServiceDescription,
            Url = webPageItemUrl,
            ImageUrl = imageUrl,
            ImageAltText = image?.AssetAltText ?? image?.AssetDescription ?? string.Empty,
        };
    }
}
Create the data mapper
Next, we can move on to the data mapper.
First, define the class as an implementation of IEmailDataMapper, and define default values for the subject and preview text.
Then, set up a private method for each email content type in the project, and call the appropriate one based on the content type name in the email context.
The methods can share logic that falls back to the appropriate default value if a value is null.
If you have more type-specific requirements for the fallbacks, provide more tailored values in the methods for each type.
using Kentico.EmailBuilder.Web.Mvc;
using Kentico.Xperience.Mjml.StarterKit.Rcl.Contracts;
using Kentico.Xperience.Mjml.StarterKit.Rcl.Mapping;

namespace TrainingGuides.Web.Features.Shared.EmailBuilder.Mappers;

public class TrainingGuidesEmailDataMapper : IEmailDataMapper
{
    private const string DEFAULT_SUBJECT = "Training guides";
    private const string DEFAULT_PREVIEW_TEXT = "The latest communication from Training guides.";
    private readonly IEmailContextAccessor emailContextAccessor;

    public TrainingGuidesEmailDataMapper(IEmailContextAccessor emailContextAccessor)
    {
        this.emailContextAccessor = emailContextAccessor;
    }

    public async Task<IEmailData> Map()
    {
        var emailContext = emailContextAccessor.GetContext();

        return emailContext.ContentTypeName switch
        {
            // Newsletter email content type
            BasicEmail.CONTENT_TYPE_NAME => await MapBasicEmail(emailContext),

            // Promotional email content type
            NatureSpotlightEmail.CONTENT_TYPE_NAME => await MapNatureSpotlightEmail(emailContext),

            // Subscription confirmation email content type
            SubscriptionConfirmationEmail.CONTENT_TYPE_NAME => await MapSubscriptionConfirmationEmail(emailContext),

            // Default fallback for unknown content types
            _ => GetEmailData(DEFAULT_SUBJECT, DEFAULT_PREVIEW_TEXT)
        };
    }

    /// <summary>
    /// Maps a BasicEmail content item to an EmailData object, using its subject and preview text.
    /// </summary>
    /// <param name="emailContext">The email context containing the BasicEmail item.</param>
    /// <returns>EmailData with subject and preview text from the BasicEmail item, or default values if null.</returns>
    private async Task<EmailData> MapBasicEmail(EmailContext emailContext)
    {
        var email = await emailContext.GetEmail<BasicEmail>();

        return GetEmailData(email?.EmailSubject, email?.EmailPreviewText);
    }

    /// <summary>
    /// Maps a NatureSpotlightEmail content item to an EmailData object, using its subject and preview text.
    /// </summary>
    /// <param name="emailContext">The email context containing the NatureSpotlightEmail item.</param>
    /// <returns>EmailData with subject and preview text from the NatureSpotlightEmail item, or default values if null.</returns>
    private async Task<EmailData> MapNatureSpotlightEmail(EmailContext emailContext)
    {
        var email = await emailContext.GetEmail<NatureSpotlightEmail>();

        return GetEmailData(email?.EmailSubject, email?.EmailPreviewText);
    }

    /// <summary>
    /// Maps a SubscriptionConfirmationEmail content item to an EmailData object, using its subject and preview text.
    /// </summary>
    /// <param name="emailContext">The email context containing the SubscriptionConfirmationEmail item.</param>
    /// <returns>EmailData with subject and preview text from the SubscriptionConfirmationEmail item, or default values if null.</returns>
    private async Task<EmailData> MapSubscriptionConfirmationEmail(EmailContext emailContext)
    {
        var email = await emailContext.GetEmail<SubscriptionConfirmationEmail>();

        return GetEmailData(email?.EmailSubject, email?.EmailPreviewText);
    }

    /// <summary>
    /// Returns EmailData with the provided subject and preview text values, reverting to default values if they are not passed or null.
    /// </summary>
    /// <param name="subject">The subject of the email</param>
    /// <param name="previewText">The preview text of the email</param>
    /// <returns>EmailData using the provided subject and preview text</returns>
    private EmailData GetEmailData(string? subject = null, string? previewText = null) =>
        new(subject ?? DEFAULT_SUBJECT, previewText ?? DEFAULT_PREVIEW_TEXT);
}
We recommend handling all of the available email content types, even if they aren’t currently allowed by any templates that use a data mapper.
It is possible to call an IEmailDataMapper implementation from several different places in code, so it’s best to be prepared for potential future changes.
Register the mappers
Now that the mappers are ready, let’s register them with the dependency injection container.
In our example, we can simply add them to the AddTrainingGuidesServices method of the ServiceCollectionExtensions class.
using Kentico.Xperience.Mjml.StarterKit.Rcl.Mapping;
using Kentico.Xperience.Mjml.StarterKit.Rcl.Widgets;
using TrainingGuides.Web.Features.Shared.EmailBuilder.Mappers;
...
namespace TrainingGuides.Web;

public static class ServiceCollectionExtensions
{
    public static void AddTrainingGuidesServices(this IServiceCollection services)
    {
        ...
        services.AddScoped<IComponentModelMapper<ImageWidgetModel>, ImageEmailWidgetModelMapper>();
        services.AddScoped<IComponentModelMapper<ProductWidgetModel>, ProductEmailWidgetModelMapper>();
        services.AddScoped<IEmailDataMapper, TrainingGuidesEmailDataMapper>();
        ...
    }
    ...
}
The Program.cs file calls this method on startup, registering all of the mappers.
Set up the Starter Kit and Email Builder
Register the MJML Starter Kit template
By default, the Starter Kit does not register its included page template. This allows you to specify which of your content types should have access to it, or easily leave it out.
Create a new file in the ~/Features/Shared/EmailBuilder folder of the TrainingGuides.Web project called StarterKitComponentRegister.cs
using Kentico.EmailBuilder.Web.Mvc;
using Kentico.Xperience.Mjml.StarterKit.Rcl.Templates;
using TrainingGuides;

[assembly: RegisterEmailTemplate(
    identifier: EmailBuilderStarterKitTemplate.IDENTIFIER,
    name: "MJML Starter Kit template",
    componentType: typeof(EmailBuilderStarterKitTemplate),
    // Enter the code names of all email content types where you wish to use Email Builder
    ContentTypeNames = [BasicEmail.CONTENT_TYPE_NAME])]
The Training guides project includes other email content types, but for this example, we’ll only enable the BasicEmail type.
In your own projects, you can include as many content types as you want in the ContentTypeNames collection.
Enable Email Builder
If you run your project now, you’ll notice that you can’t use the MJML Starter Kit template for emails, even though you just registered it. This is because you haven’t yet enabled Email Builder.
During startup, we need to enable Email Builder and configure its options. We must specify which content types should use Email Builder at startup. You can also override the default section used in Editable areas on email templates.
Let’s enable Email marketing and Email Builder for the Basic email content type and set the default section to the Full-width section from the Starter Kit.
...
using Kentico.EmailBuilder.Web.Mvc;
using Kentico.Xperience.Mjml;
...

builder.Services.AddKentico(async features =>
{
    ...
    features.UseEmailMarketing();
    features.UseEmailBuilder();
});
...
builder.Services.Configure<EmailBuilderOptions>(options =>
{
    options.AllowedEmailContentTypeNames = [BasicEmail.CONTENT_TYPE_NAME];
    // Replaces the default Email Builder section
    options.RegisterDefaultSection = false;
    options.DefaultSectionIdentifier = FullWidthEmailSection.IDENTIFIER;
});

builder.Services.AddMjmlForEmails();
...
Configure the Starter Kit
Similar to the Email Builder configuration, you also need to configure the Starter Kit when the application starts.
The available options allow you to define the path to a stylesheet that Email Builder will use, and the allowed content types to restrict the selections of the Image and Product widgets.
For our example, let’s use styles from the Starter Kit, and restrict the widget selectors to the content types we already mapped to the widget models.
Copy the stylesheet
Since email CSS is beyond the scope of this example, let’s just copy the Dancing Goat stylesheet for Email Builder from the Starter Kit repository.
In the Starter Kit repo, find the EmailBuilder.css file under the examples/DancingGoat/wwwroot folder and copy it to the wwwroot folder of your TrainingGuides.Web project.
Now, you can reference this file in the Starter Kit configuration.
Configure the Starter Kit
Returning to the Program.cs file, use the AddKenticoMjmlStarterKit method to configure the Starter Kit’s options. You need to tell it where to find your Email Builder CSS and which content types the Image and Product selectors can use.
...
using Kentico.Xperience.Mjml.StarterKit.Rcl;
using Kentico.Xperience.Mjml.StarterKit.Rcl.Sections;
...
builder.Services.AddKenticoMjmlStarterKit(options =>
{
    options.StyleSheetPath = "EmailBuilder.css";
    // The Asset content type, which we mapped to the Image widget earlier
    options.AllowedImageContentTypes = [Asset.CONTENT_TYPE_NAME];
    // The Service page content type, which we mapped to the Product widget earlier.
    options.AllowedProductContentTypes = [ServicePage.CONTENT_TYPE_NAME];
});
...
If you prefer to configure these values in your appsettings.json file, you can call builder.Services.AddKenticoMjmlStarterKit(builder.Configuration); instead.
Then you can set the options under the MjmlStarterKitOptions object in appsettings.json.
See the results
The Starter Kit is now integrated into your project.
If you’ve been following along with the Training guides example, you can see the results by creating a new email in the Training guides emails channel.
Explore further
To see more examples of Email Builder components in action, we recommend checking out those used on the Community Portal.
Here, you can see the code that makes up community.kentico.com, our site for the Xperience by Kentico community, which features many helpful resources.
What’s next
Continue to the next guide in this series to walk through the construction of a custom Article widget in line with the examples from the Starter Kit.