
Store files
About this guide
This page is a part of the Content modeling guide which you should follow sequentially from beginning to end. You can also follow this series in Content modeling guide, which helps you keep track of your progress as you move through this sequential material.
Xperience by Kentico allows teams to store and manage different files, such as images, videos, documents, and more, as part of their structured content. Instead of treating files as generic uploads, you can model them as reusable content items and manage their metadata, permissions, and relationships to other content in your system.
We’ll explore how to design and implement content types to store assets in the Content hub application. You’ll learn how to define content types for different file formats, what fields to include, and how to support editorial workflows and front-end delivery requirements.
Xperience provides editors with a rich set of tools, including:
- Automatic image transformations to predefined formats.
- Responsive image variants.
- Focal point selection for smart cropping and scaling.
- Optimized delivery through the Content Retriever API.
By modeling your files as structured content items, editors and developers can control how the files are stored, categorized, retrieved, and reused. This approach supports long-term scalability and content delivery across channels, enables content personalization features, and helps teams comply with SEO strategies.
The guide also touches on when and how to work with unmanaged files. These files aren’t part of the project’s content model but are still needed for development, layout, or system integrations. You’ll learn how to correctly separate content-managed assets from technical files and handle each type.
Store images and other assets in the Content hub
Modeling file assets as content items gives you more than a place to store files. It provides the editor team with structured, reusable building blocks to deliver optimized and personalized content across all channels. Whether you’re working with images, documents, or video, storing assets in Content hub offers a flexible and future-friendly approach.
See the benefits of storing assets in Content hub
Media libraries have historically been used to store files in previous Kentico products, such as Kentico 12 or Kentico Xperience 13. However, the market has evolved and media libraries are not the recommended approach for storing files in Xperience by Kentico.
Content item assets offer a modern, structured approach to media management. They address many limitations that make it difficult for Media libraries to extend or integrate into content-first solutions. The result is a more flexible and secure way to manage files in content-driven projects.
Media libraries are considered an Xperience by Kentico legacy feature. We consider sunsetting the Media library feature, marking the functionality as obsolete and phasing out Media libraries in the future.
Let’s cover improvements you gain from using the Content hub.
Define custom content types to store images
Xperience by Kentico doesn’t come with a pre-built content type to store images. During content modeling sessions, you define the structure of each asset content type based on the project’s needs. Instead of relying on a one-size-fits-all file system, you can:
- Create different content types for various file formats, such as images, videos, PDFs, or audio files.
- Store only the fields you need and don’t clutter the admin UI with unnecessary fields.
- Include custom fields to support business use cases, such as licensing notes, expiration dates, or external system IDs.
- Use the built-in Content item asset to upload the binary file and the Combined content selector component to reference assets in other content items, Email Builder, or Page Builder widgets.
This flexibility supports editorial workflows and compliance requirements and opens the door to tailor-fit Xperience to custom integrations.
Let’s explore how moving away from media libraries towards the Content hub can help in the mentioned use cases.
Aim for an editor experience
Xperience provides an editing interface that streamlines how teams upload, organize, and reuse files, especially images. Key features include:
- Enforced default editing workflow.
- Drag-and-drop mass uploads into Content hub.
- Built-in AIRA-driven image transformations to automatically create predefined image formats.
- Focal point for smarter cropping and scaling.
- UI for creating and previewing responsive image variants.
- Hierarchical taxonomies to improve image categorization, dynamic content resurfacing, or auto-tagging in mass uploads using AIRA.
- Combined content selector with thumbnail preview that simplifies reuse across content items without re-uploading.
These features help reduce friction and ensure consistency across the system.
Support responsive and optimized asset delivery
Xperience provides the ContentRetriever API, which supports advanced asset retrieval options. The API helps developers serve optimized assets to traditional websites or email channels.
For images, Xperience can:
- Serve as a central repository for images.
- Automatically resize and adjust image formats depending on your application configuration when uploading.
- Restrict visitor’s access to files when they need to authenticate to access the files, for example, in scenarios that include gated content or licensed media.
- Manage assets under content workflows to ensure consistent messaging.
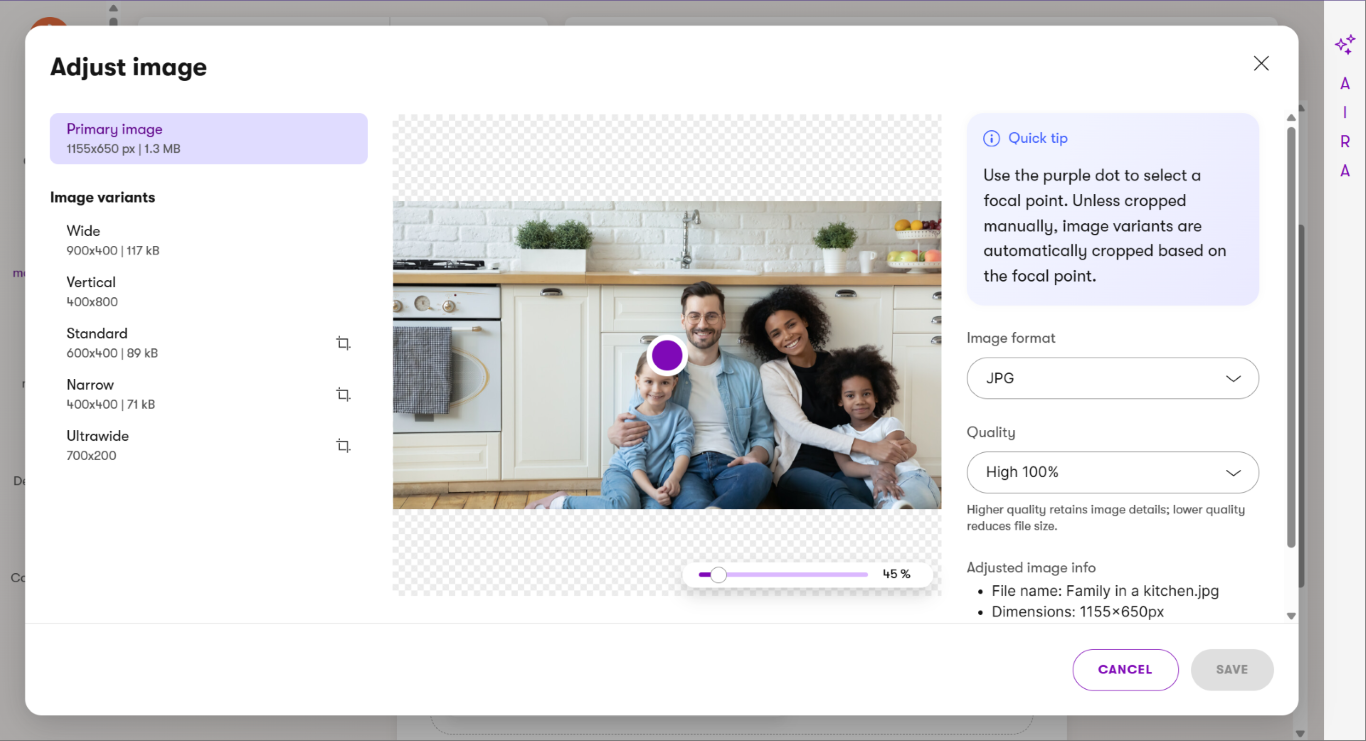
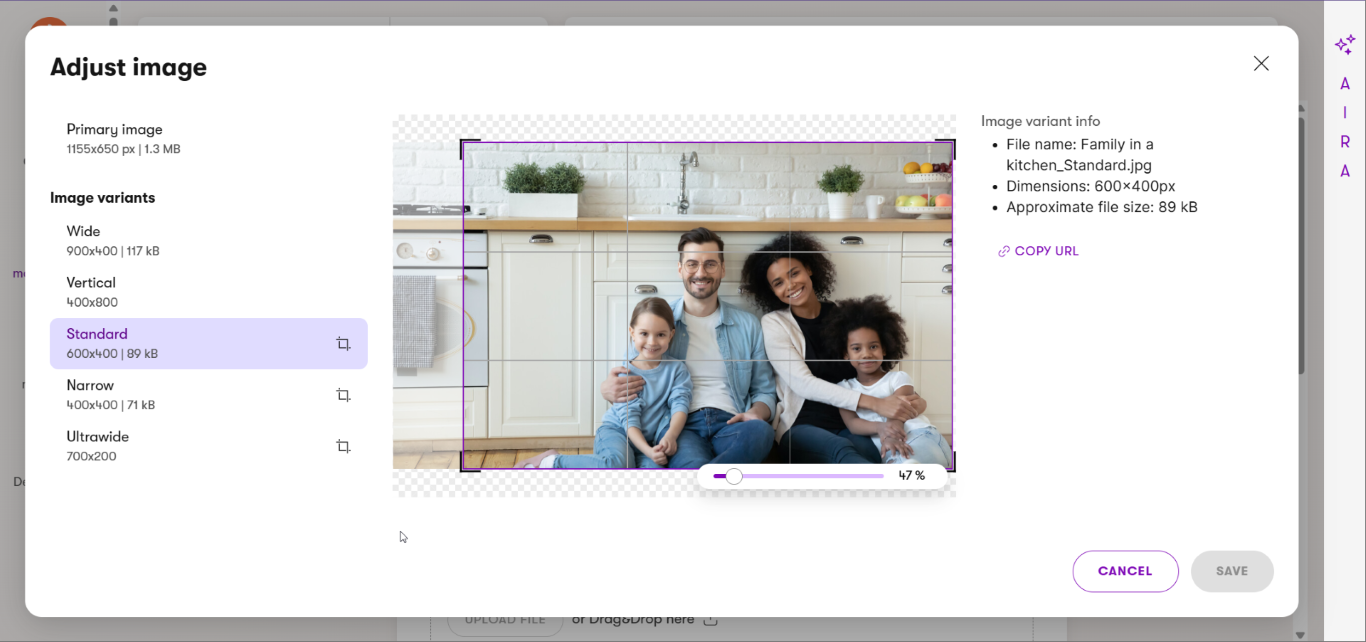
As the image illustrates, editors can use the image‑adjustment interface to crop and fine‑tune an uploaded photo for different display variants.
When configured, Xperience generates image variants, such as wide, vertical, standard, narrow, and ultrawide that help ensure image stays responsive across different environments.
Using the main preview area with a selected image, editors can use a purple focal‑point indicator and move it to ensure variants crop around the image’s point of interest. They can also use a slider to control zoom or cropping adjustments, and a dropdown selector to adjust image processing.
Together, image optimization and focal-point adjustments, and the ability to require sign-in to access the asset ensure the content is delivered efficiently and securely.
Define structured metadata without developing custom UI components
Each business needs different data about its files. In Media libraries, adding fields like captions, copyright info, or internal usage notes requires custom UI development. Customers often turned to third-party DAM (Digital Asset Management) solutions to avoid unnecessary UI customizations.
Built-in features in Xperience allow you to avoid using third-party DAM solutions in many customer scenarios. Your Content hub assets can directly contain the fields you need in the data model and metadata requirements. Editors can manage their data in one interface and don’t need to rely on workarounds or developer interventions.
Leverage built-in taxonomies
Media libraries don’t support categorization or tagging. This limits filtering, personalization, and content discovery. In contrast, Content hub assets can use taxonomies out of the box, allowing your teams to group and retrieve assets dynamically based on marketing themes, campaigns, or topics.
For example, a marketing team can tag product images with taxonomies, such as Winter Campaign or Eco-Friendly Collection.
When building a campaign landing page, editors can use a widget and select only the images tagged with Winter Campaign without manually sorting through folders. Developers can also use these tags to dynamically load matching assets on the website or in personalized email campaigns, ensuring the right visuals appear in the proper context automatically.
Control access to protected files
Files stored in Media libraries are always publicly accessible through their URLs. Developers or DevOps engineers need to create custom solutions to enforce sign-in or restrict access.
Content hub assets support access control natively. Editors can configure which assets require authentication in the default admin UI, making content hub assets more than suitable for storing gated, licensed, or confidential content.
Track versions and localize assets without workarounds
Media libraries don’t offer publishing workflows or language variants. That made it hard to manage content across regions or align with campaign timelines.
Reusable content items support default draft and published states. Editors can build custom workflows that fully fit the project’s content lifecycle. Additionally, items support scheduled publishing and creating per-language variants with the option to fallback to the default language variant.
Optimize image delivery
Media libraries don’t support image transformations, focal point cropping, or responsive image variants. These tasks always required customization by front-end developers.
Content hub assets simplify delivering a responsive experience with built-in tools for image resizing, format switching, and responsive rendering—without requiring extra markup or manual asset prep.
Define content types for media assets
Xperience does not provide a default content type for managing media assets. Instead, customers define their asset content types based on the file types they plan to use and the structure their solution requires.
Xperience offers advanced functionality for working with image-based assets, like transformations, focal point cropping, or responsive variants. However, these capabilities are only available when the asset is stored in a properly modeled content type.
To support a flexible, scalable approach to asset management, we recommend defining different content types for each major file format used in your project.
Image content type
Define this content type to manage image files used in banners , articles, product listings, or promotional content. Then, enable built-in image tools and responsive delivery features, such as transformations, focal point cropping, and device-based variant selection.
The image below shows recommended fields for Image content type:
- File – image uploader using the Asset uploader form component. Configure mass asset upload for this content type and set this field as the target field.
- Title
- Alt text
- Caption (or Description)
- Tags – reference to taxonomy collections.
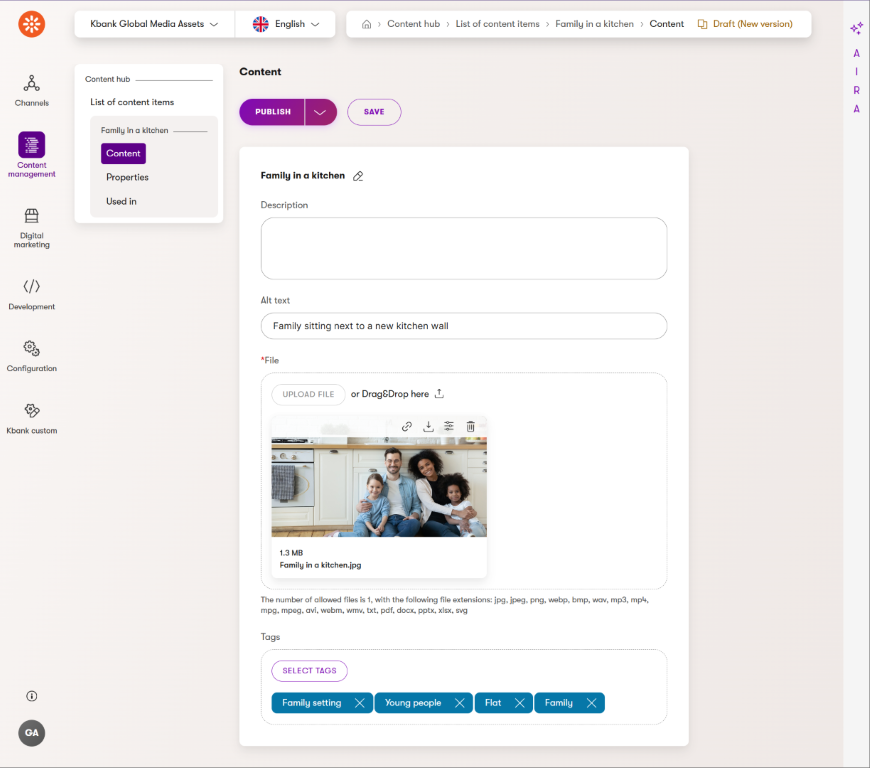
Optional fields depending on the business requirements:
- Expiration date – for managing licensing or campaign life cycles.
- License owner
Restricted image content type
For some projects, you might need to introduce a second asset content type to store files for legally protected, license-limited, or tightly controlled images. Typical use cases include licensed photos from an agency, regulated visuals in the medical or pharmaceutical space, and internal or embargoed media. Customers can leverage this content type when they don’t plan to use Xperience’s built-in transformations.
We recommend creating an additional content type and defining dedicated fields to hold different file variants you plan to serve in the presentation channels. For example, you can introduce the following fields:
- Separate content item asset fields for desktop, tablet, and mobile to store only pre-approved image variants.
- Metadata fields for licensing notes or usage restrictions.
- Do not enable image transformations in the Asset uploader – editors can upload pre-approved variants only.
- Enable authentication if the content needs to be hidden behind a sign-in process.
This approach ensures that Xperience doesn’t automatically apply any unauthorized changes to the asset and gives developers full control over which version appears on different devices or regions.
Content types for non-image files
Depending on the business requirements, you might need to introduce additional content types to hold other asset types.
Document asset
A Document asset content type can store and manage files that aren’t images or videos but are still crucial for sharing information with website visitors or internal users. This typically includes file formats, such as PDFs (brochures, whitepapers, or eBooks), Microsoft Word documents (such as reports or instructional guides), spreadsheets (for example, pricing sheets or data summaries), presentations created in PowerPoint, and other downloadable files like ZIP archives or plain text files.
Recommended fields:
- File – document field using the Asset uploader form component.
- Title
- Author
- Publication date
- Lede, Perex, or Summary
- Download tracking – optional boolean to log custom file download activity for every reference. Your developers can enable editors to enable download tracking in the presentation layer, e.g., in a widget property.
Video asset
Editors can use the Video asset content type to store and manage video content they want to embed or share on their website. This can include externally hosted videos, such as YouTube or Vimeo links, and internally hosted video files in formats like MP4 or WebM. Video assets make it easy to centralize video content so editors can reuse it across multiple pages without uploading it repeatedly.
Customers might use this content type for promotional videos, customer testimonials, product demos, feature walkthroughs, recorded webinars, or training videos. Whether the video is streamed from an external platform or hosted directly within the system, a Video asset helps ensure consistent access, descriptions, and preview images across the site.
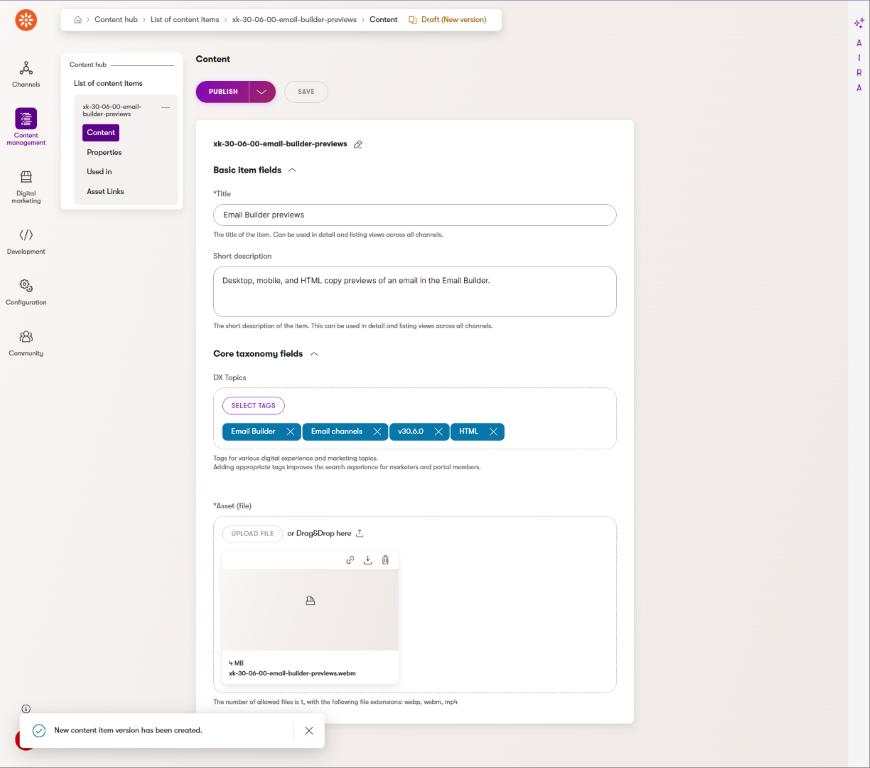
As you can see in the image, the Video assets contains basic fields like Title and Short Description, followed by taxonomy tags and asset selector component.
Depending on your project’s requirements, consider adding the following properties:
- File – local video file
- Video ID - external embed code, e.g., YouTube URL slug or Vimeo ID.
- Platform ID – an optional field for third-party video services.
- Duration
- Transcript
- Thumbnail image - can reference to Image content type using the Combined content selector form control.
The Video content type can include a visibility condition, letting editors choose how to add a specific video. For example, when creating a new video content item, an editor can select through a Radio button form component whether the video is coming from YouTube or they uploaded it directly. Based on that selection, Xperience automatically hides or shows only relevant fields.
Developers can implement visibility logic into the content type and display data using the correct presentation. If the editor selects YouTube, the system might display a field for entering the YouTube URL and hide any file upload options or the Thumbnail field. If they choose to upload a file, the interface might show a field for uploading the video file and hide the YouTube URL input. This approach makes the content editing experience cleaner and more intuitive, helping editors focus only on the information they need to fill out.
Developers can define different presentation options based on the video source. For example, they can present the YouTube link through an embedded YouTube player component to leverage its capabilities and serve uploaded videos through a custom media player to ensure proper embedding, styling, and playback behavior.
Audio asset
If the project requires it, you might need to define a dedicated Audio asset content type to store and manage audio content. This can include direct uploads of audio files, such as MP3 or WAV formats, and links to externally hosted audio, like a podcast episode hosted on a streaming service.
Customers can store data, such as podcast recordings, voiceovers for tutorials, interviews, background music for specific sections of a website, or downloadable audio guides. Just like with Video and Document assets, audio files stored as Audio can be reused across multiple website pages or referenced from emails, and editors can manage metadata like titles, descriptions, and cover images for consistent presentation.
Recommended fields:
- File – uploaded audio file.
- Duration
- Transcript
- Series / Episode number – for podcasts or serialized content.
Serve the right asset for every context
Once assets are stored as structured content items, developers can retrieve them consistently across channels using the Xperience API.
Provide optimized asset delivery
To render content that includes asset references, developers will use the ContentRetriever API, which allows them to query asset metadata and binaries defined in the project’s content types, including:
- File URLs (original and predefined image variants) using the built-in attribute TagHelper.
- Related custom Metadata fields (e.g., alt text, caption, copyright).
- References to related content via taxonomy or linked items.
This supports rendering content in web pages, mobile apps, and other delivery channels, without requiring separate queries for file storage or metadata.
Best practices for images
To ensure responsive and accessible image delivery across devices, follow these best practices when working with Content item assets:
- Use predefined image variants (e.g., thumbnail, mobile, desktop) to support responsive display.
- Reference variants using
<picture>andsrcsetto adapt to screen size or device type. - Let editors define focal points during upload for smart cropping and visual consistency.
- The system automatically optimizes image variants for performance.
- Developers can request variants by name or use predictable URL patterns.
- Always include alt text and fallback images to support accessibility and reliability.
Metadata, taxonomy, and smart organization
Asset content types in Xperience give you complete control over how files are described, categorized, and grouped for reuse. You can include structured metadata and taxonomies based on your project’s requirements to make assets easier to search, filter, personalize, and manage over time.
Use metadata to support retrieval and compliance
Include fields that help editors and developers retrieve and evaluate the asset quickly, for example:
- Title and description for identifying the asset.
- Alt text for accessibility and SEO.
- Copyright, author, or licensing information for legal tracking.
- Expiration dates for campaign or usage control.
- Internal notes to support editorial workflows.
Metadata can also support integrations with external systems by including fields like external IDs or source references.
Tag assets using Taxonomies
Taxonomies let editors classify assets in a consistent, structured way. Instead of relying on folder names or filenames, editors can assign tags to reflect the topic, a campaign, or the dedicated audience.
Benefits of using taxonomies:
- Editors can filter assets during selection or content creation.
- Developers can query assets dynamically based on tags.
- Marketers can use categories to support personalization and targeting.
This approach also helps large teams stay aligned on naming and categorization, making it easier to scale content operations without confusion or duplication.
Use Smart folders for organization
Smart folders provide a dynamic way to group and filter content items based on live conditions. Editors don’t need to manually maintain content in smart folders, as it automatically includes or excludes items when an item’s data or tags change, and it now fits the smart folder filter conditions.
Each smart folder is defined by a filter, such as Items modified in the last 7 days, Items with the Draft status, or Items tagged with [company/topic/campaign name]. A single content item can appear in multiple smart folders if it matches more than one condition.
Smart folders help both editorial workflows and content delivery. Editors use them to create views to quickly find relevant items in the Content hub. They also don’t need to manually manage item references or update the widget each time, since developers can use the smart folders API to retrieve content dynamically into website pages.
For example, an editor working on a website adds a widget to the homepage and selects a smart folder, such as “This month’s campaign” or “Press releases”. The widget then displays a rotating set of items that updates automatically as other team members add or change their content items. Developers, in turn, build this widget to pull content from these folders at runtime and ensure that the website stays in sync with editorial updates.
Additional details about smart folders:
- Conditions are evaluated in real time as content changes.
- A single item can belong to any number of smart folders.
- They support organizing content in the admin interface, as editors don’t need to sort content items manually.
- Dynamic data retrieval and display help editors manage campaign content, seasonal assets, or status-based workflows.
- They can be used to dynamically filter and deliver content on website channels.
Currently, Xperience doesn’t support smart folder-based delivery for headless or email channels.
Using smart folders helps large teams stay organized and makes dynamic content filtering much easier to manage across growing libraries.
Summary: Recommendations for modeling asset content types
When modeling content types that store different assets in Xperience, treat each media format as a distinct content structure with its purpose, metadata, and lifecycle. Let’s consider a few aspects that will help you design flexible and consistent asset content types that align with how the editor team creates and delivers their content.
- Model each media format separately. Use dedicated content types for images, videos, PDFs, or audio files. This lets you define only the fields relevant to each asset type and keeps the UI clean for editors.
- Use an image asset type as your baseline. Image content types benefit from Xperience’s built-in features, like responsive variants, focal point cropping, and automatic transformations. Most projects will need this type from the start.
- Add controlled asset types only where needed. Use a Restricted image content type when legal, licensing, or technical constraints prevent automated resizing or transformation. Keep this structure lean and purpose-driven.
- Make use of asset selectors. Include the Combined content selector in other content types to reference assets to avoid data duplication, support reuse, and ensure consistency.
- Tag assets using taxonomies. Taxonomies support dynamic filtering, content personalization, and campaign grouping. Editors can apply tags directly in the asset form, and developers can query by tag.
- Structure for editorial clarity, not just technical needs. Collaborate with marketers, content designers, and legal teams when defining which asset types to create and what each should include.
- Plan for growth. Choose field names and structures that will scale with your library—avoid assumptions that only work for initial content volume or a single channel.
Using Xperience Content hub to store assets in purpose-built content types gives editors and developers more control over how files are described, used, and delivered. It ensures that your content model remains flexible and scalable as your content library and team needs grow.
Unmanaged files and when to use them
Not every file in your project has to become a content item. Some files make more sense to handle outside the content model, especially when they’re static, technical, or not part of the team’s editorial workflow.
Let’s look at what qualifies as an unmanaged file, when to use them, and how to organize them in your project.
What are unmanaged files?
Unmanaged files aren’t created, edited, or referenced through the Content hub or the Xperience content API. Instead, they are deployed directly as part of your project code or infrastructure.
Unmanaged files include:
- Front-end assets – icons, favicons, fonts, CSS, JavaScript, or background images used for styling and layout.
- System or integration files – configuration files, embedded PDFs, or attachments managed by a third-party service.
- Non-marketing assets – internal-only resources that don’t need metadata, tagging, or structured reuse.
These files are not searchable, taggable, or retrievable via the Xperience API, and editors cannot manage them through the content lifecycle.
Where to store unmanaged files
Store unmanaged files in a separate location in your project’s directory structure. We recommend using subfolders under ~/assets/<project_name>/.
Avoid placing unmanaged files in folders used by the Content hub or legacy Media libraries. This helps prevent confusion and keeps deployment pipelines clean.
When deploying to a SaaS environment, the Export-DeploymentPackage.ps1 script bundles unmanaged files from the $StorageAssets directory in the deployment package. For other unmanaged files, you need to directly deploy them to Azure Blob storage as part of your application’s asset pipeline, for example, using AzCopy CLI commands.
When to use unmanaged files
Use unmanaged files when:
- The file is tightly bound to your front-end layout or code.
- There’s no need for editor access, tagging, or personalization.
- The file doesn’t change often (e.g., logos, placeholder images, system PDFs).
- The file is part of an integration that manages its storage lifecycle.
Avoid unmanaged files for anything that requires:
- Metadata or structured categorization.
- Reuse across multiple content items that editors might want to update from the UI.
- Personalization, localization, or content security.
- Editorial updates or workflows.
By keeping unmanaged files separate from content-managed assets, you simplify your content model and avoid unnecessary complexity for developers and editors alike.
Summary
Modeling files as structured content items in Content hub gives your project a strong foundation for flexibility, scalability, and long-term maintainability. Whether you’re managing images, PDFs, videos, or licensed assets, treating them as content opens the door to better editorial workflows, secure delivery, and content reuse across channels.
Let’s recap what this guide covered:
- Use Content hub to store and manage assets as structured content items.
- Model each media format, such as images, PDFs, videos, audio, with its content type.
- Leverage built-in features for image optimization, responsive variants, and focal point cropping.
- Use taxonomies and metadata to make assets discoverable and reusable.
- Apply asset selectors to connect files to pages, components, or other content items.
- Avoid Media libraries for new projects—they are being deprecated and lack critical features.
- Use unmanaged files only for static or technical assets that don’t require structured management.
A well-structured asset model improves editors’ day-to-day content operations, strengthens content curation, supports compliance, and future-proofs your solution for personalization and multichannel delivery.
What’s next?
You have learned about the options for storing data in Xperience. In the Design content section, you’ll learn about different approaches to designing and presenting this data in your application.