
Create email automation
Email automation helps you respond to your customers’ actions right when they matter most.Instead of manually sending follow-ups, welcome messages, or reminders, you can create effective, automatic workflows triggered by user behavior.
Reaching the right customer at the right time can make all the difference. But sending every follow-up, welcome message, or reminder manually? Keeping track of who to send what by hand? That’s not scalable, and marketers can easily miss the moment.
That’s where email automation comes in. Xperience’s Automation application helps you create simple, effective workflows that run automatically in the background. These workflows are triggered by your customers’ behavior like signing up for a newsletter, registering in your business or reaching a specific milestone on their journey. To maintain momentum in the customer journey, these messages must reach people precisely when they’re most relevant.
In this hands-on material, you’ll learn how to build a simple but powerful email automation using Kbank instance.
You’ll need a demo Kbank website to follow along with the exercises. If you don’t have your demo site yet, request the Xperience by Kentico - Business Tutorial Kbank demo site through a form at Kentico.com.
Create an automation with a reminder email
Imagine you’re managing email marketing at Kbank. Right now, when visitors submit the Contact Us form, they only receive a quick thank-you message and nothing more.
But you see an opportunity.
To grow your subscriber list, you decide to follow up. If the visitor hasn’t subscribed to your newsletter yet, why not send them a friendly message letting them know it exists—and how to sign up?
Let’s build that flow in Xperience and see how the platform makes it easy to automate. And you don’t even need to write the email yourself. The “Newsletter signup reminder” is already prepared in your Kbank environment, you just connect it to your workflow and you’re ready to go.
Step 1: Start a new email automation process
- Go to the Automation application in Digital marketing.
- Start a New process.
- Fill in the Process name: Newsletter signup follow-up.
- Leave Process recurrence set to If not already running (default).
- Save the automation process.
Step 2: Add trigger
Let’s trigger the automation when a contact submits the Contact Us form.
- In the visual designer, Add trigger.
- Select Form submission activity:
- In the Form settings:
- Trigger name: Contact Us form submitted
- Select a form: ContactUsForm and Apply changes.
Step 3: Add a Wait step
- Add step: Wait
- Update Wait settings:
- Step name: Wait
- Specific interval: After 1 minute.
- Apply the wait step.
In real-life projects, you might want to provide the customers some extra time to react. We’ll add 1 minute to give you an opportunity to see how the system actually works using the Kbank demo site.
Step 4: Add a condition
Now, we’ll check whether the contact has subscribed.
- Add step: Condition
- Update Condition settings:
- Change the Step name: Is subscribed to newsletter?
- Add condition and continue to Add condition group: Contact is in recipient list
- The final condition should look like this: Contact is receiving in the Newsletter recipient list
- Apply your changes.
Step 5: Send the reminder email
Let’s set up what happens if the user is NOT currently on the newsletter recipient list.
- Add step in the NO fork of the condition step (meaning the contact has not subscribed to the newsletter yet).
- Update Send email settings:
- Step name: Send newsletter reminder
- Choose an email and continue to Select existing: Newsletter signup reminder
- Select and Apply your changes.
Step 6: Finish the process
- Add step in both the YES fork of the condition step, and after the “Newsletter reminder” step of the NO fork.
- Select step type: Finish
- To make the process clear, add two different finish statuses:
- In YES fork, call the Finish step Is already subscribed.
- In NO fork, call the Finish step Finish with email sent
- Apply.
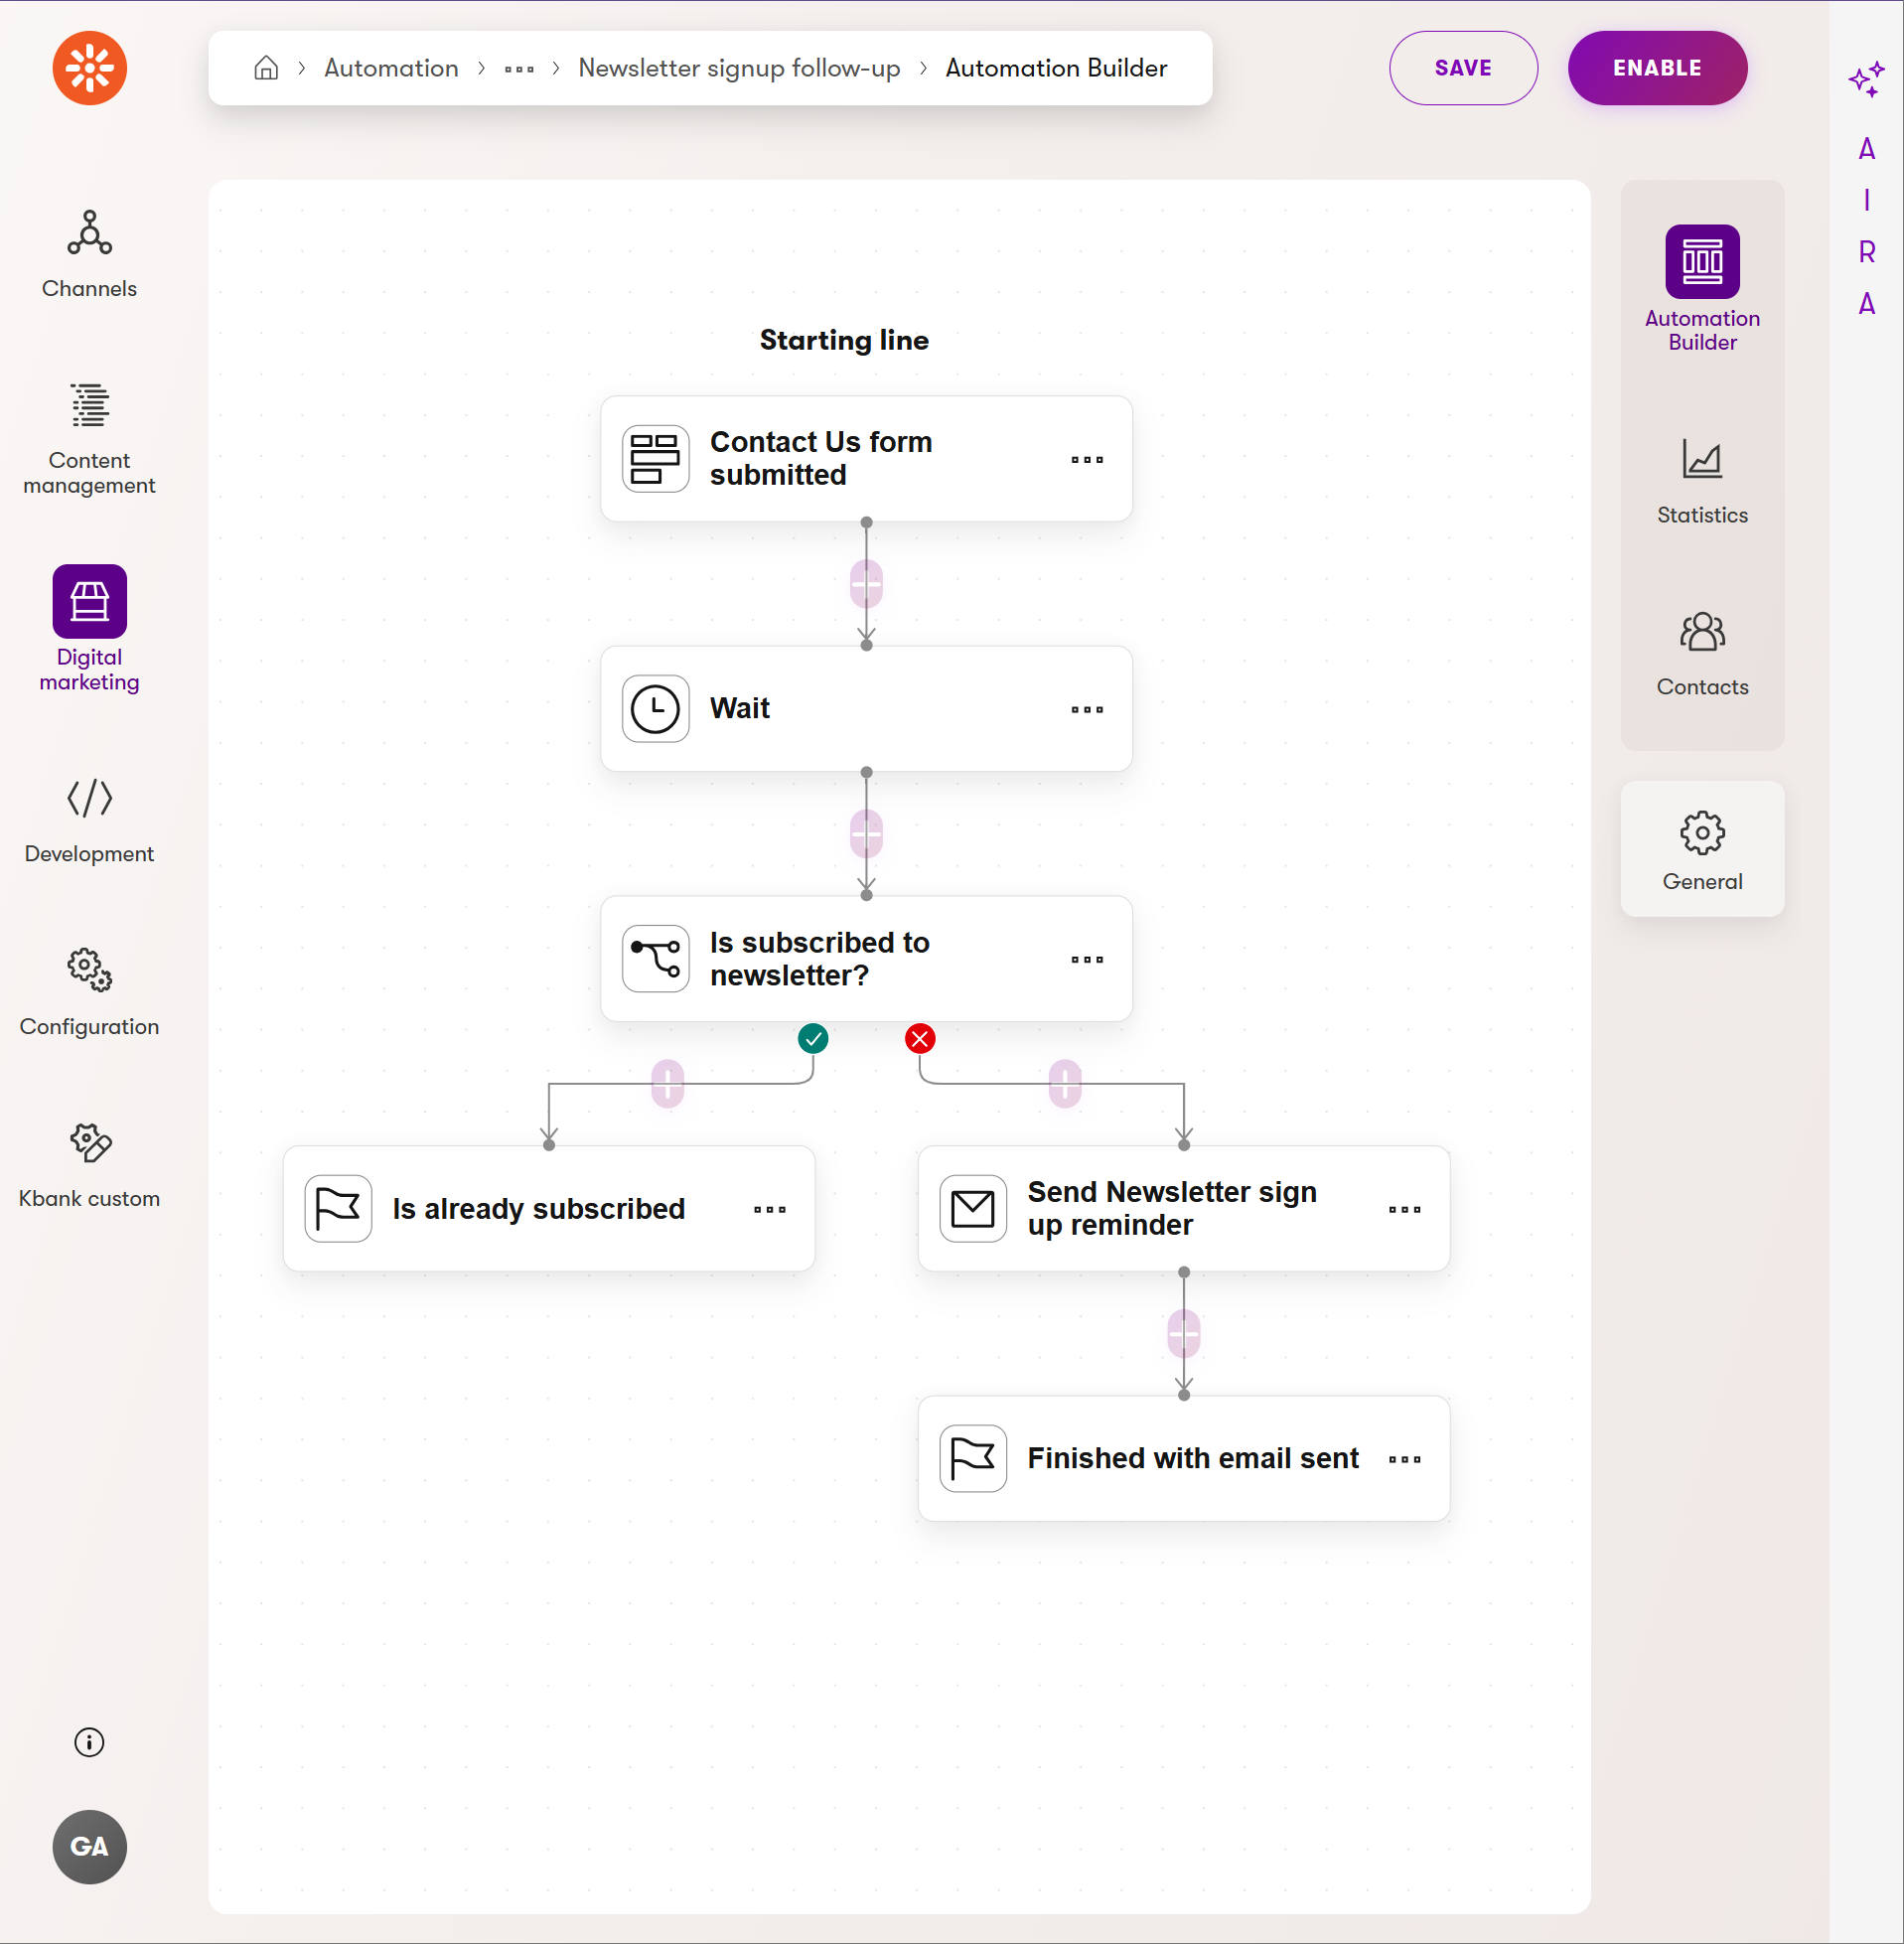
- Your automation process should look similar to the following:
Step 7: Enable the automation
- Review settings in the General tab if needed.
- Enable to start the automation.
- Check Statistics for the individual steps.
- In the case of a live website, you’ll see the collected Contacts in a dedicated view on the right.
Your automation is now live!
Test your automation process
Visit your website using an anonymous window and agree with the tracking. Visit the Contact us page on the Personal Banking website, and submit the Contact us form using a memorable email address. (Make sure you haven’t used this email address to subscribe to the newsletter in another activity).
Switch to the administration interface. Go to the Email Queue application and find the email sent to your memorable email address. Then, go to the Automation application to your Newsletter signup follow-up process and look at the data.
Wrap up
Congrats, you’ve just built your first email automation! This beginner-friendly flow used the following key components:
A trigger (form submission)
A delay (wait step)
A condition (checking subscription status)
A marketing email in the form of a newsletter reminder (sent only when needed)
You can build on what you learned later with more features, such as split paths, tagging, and other advanced scenarios.