
Upgrade overview
If you’re in charge of moving project from Kentico Xperience 13 (KX13) to Xperience by Kentico (XbyK), or considering doing so, you may have some questions about what that process looks like at a high level.
You’ve probably come across the Kentico Migration Tool for Xperience by Kentico, but as you might imagine, simply running the tool is probably not the only magical step to completely migrate your whole solution.
Let’s take a look at the process together. There are four main parts to consider:
- Plan your upgrade approach and understand how to leverage XbyK’s capabilities
- Set up your environment and configure the migration tool
- Migrate your data and binary files using the migration tool
- Adjust your code and any custom artifacts not covered by the migration tool
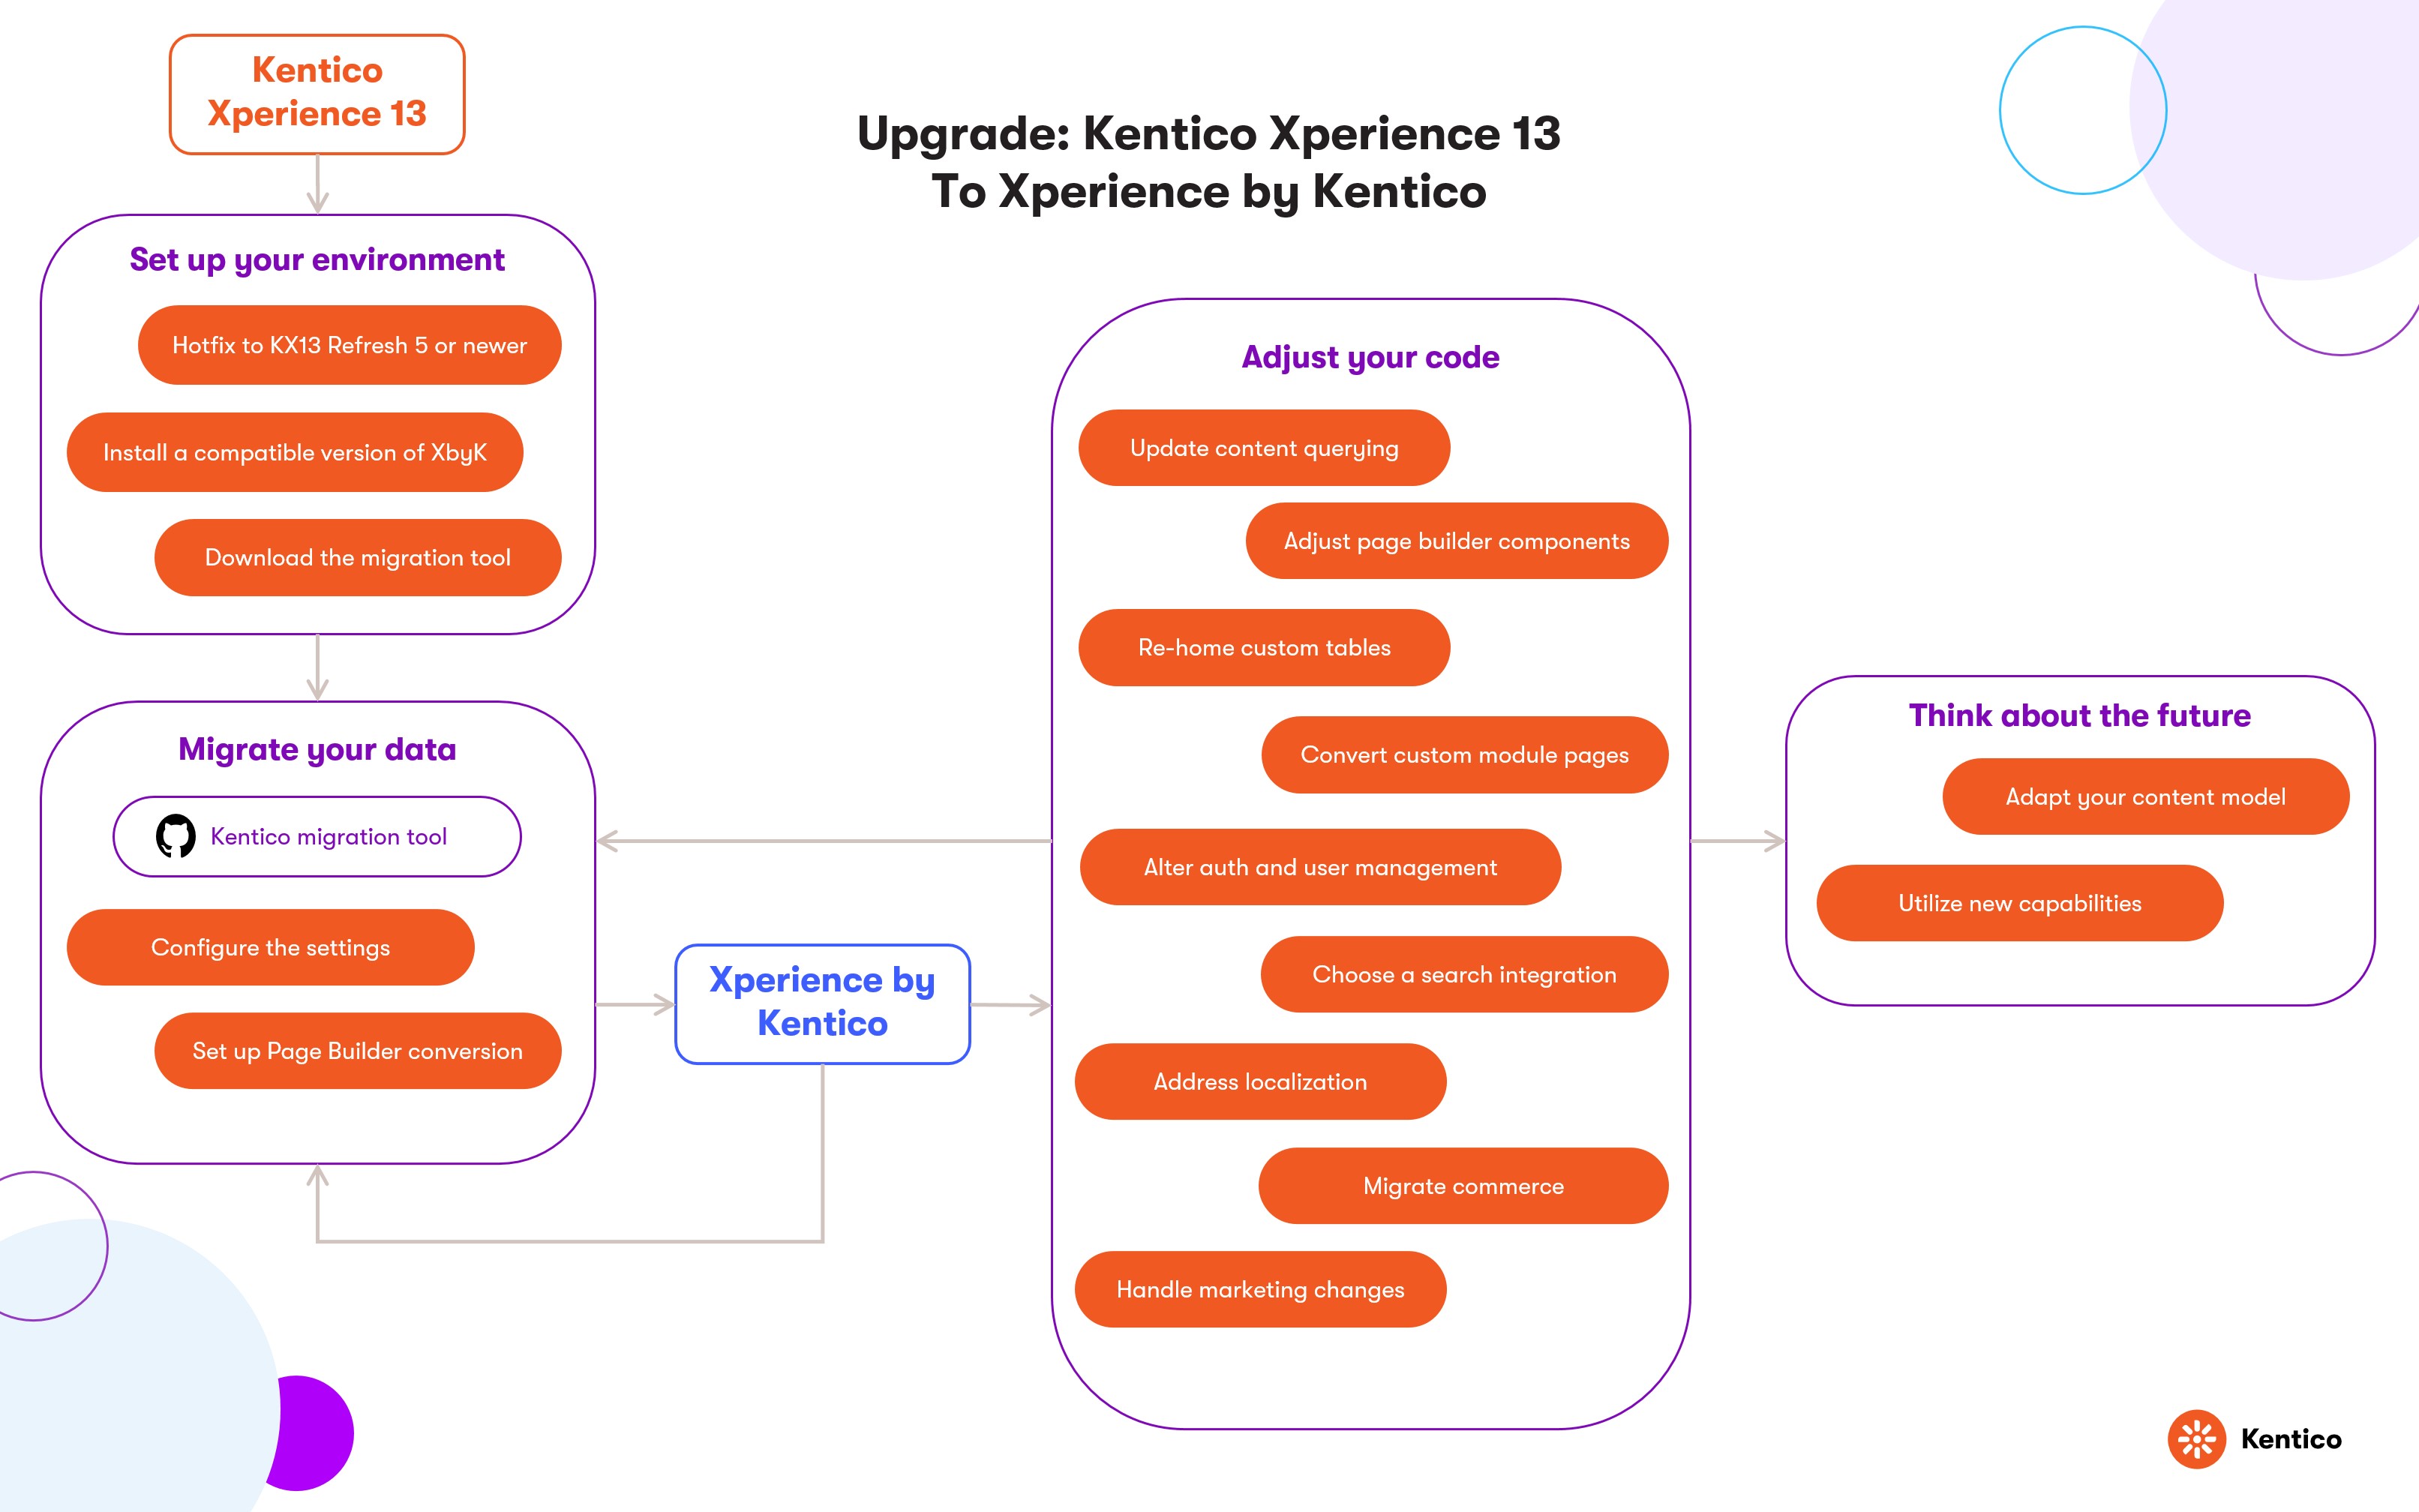
In case you’re looking for more explanation than some orange pill shapes on a diagram, let’s break down each point.
Plan your upgrade approach
Before diving into technical aspects, take time to understand Xperience by Kentico’s capabilities and plan how to best leverage them for your project. Strategic planning at this stage will help you make informed decisions during migration and maximize your return on investment.
Think about the future
The upgrade to Xperience by Kentico is not just a technical migration—it’s an opportunity to rethink your content strategy and architecture for the long term:
- Long-term business goals – Consider future channels like mobile apps or email campaigns beyond your current setup.
- Content scalability – Ensure your structure will support efficient management and delivery as content grows.
- Editor efficiency – Design a content model that reduces maintenance costs and speeds up time-to-market.
- Technical evolution – Position your solution to take advantage of XbyK’s ongoing platform improvements.
We recommend you look at the upgrade as a strategic reset, not just a lift-and-shift.
Familiarize yourself with Xperience by Kentico features
Xperience by Kentico is built from the ground up as a new product with modern capabilities that work differently from Kentico Xperience 13. Key features include the Content hub for channel-agnostic reusable content, taxonomies for advanced categorization, smart folders for dynamic content organization, reusable field schemas for shared field structures, and redesigned commerce capabilities.
Review the documentation to understand how these features align with your business needs. For a detailed feature-by-feature comparison showing migration effort levels, see Plan your strategy for migrating features. If you’re migrating commerce functionality, see the commerce features comparison.
Perform a content audit
Analyze your existing Kentico Xperience 13 content to identify what makes sense to restructure or enhance during the upgrade:
- Flatten your content tree structure and assess content reusability – Review your current page tree and decide what content should remain web-specific versus what should be extracted into the Content hub as channel-agnostic reusable content items that can be referenced across multiple channels.
- Evaluate categorization needs – Determine whether your current tagging and categorization approach could be improved using taxonomies.
- Review content structure – Look for repeated field patterns across content types that could be consolidated into reusable field schemas.
- Improve editor experience – Consider how the upgrade can enhance your content editors’ workflow. The Content hub’s centralized content management, combined with smart folders and AI features offers opportunities to simplify content creation and maintenance.
- Plan commerce approach – If migrating e-commerce functionality, decide whether to use XbyK’s built-in commerce, integrate with Shopify, or build a custom solution. See the commerce features comparison for detailed guidance.
Design your target content model
Based on your feature review and content audit, you should have a clear picture of your target content model before running the migration. These decisions will inform how you configure the migration tool and whether you need to restructure content during or after the technical migration process.
For best practices on designing content models in XbyK, see our Content modeling guide.
Consider using our KentiCopilot tools to help accelerate your upgrade planning and implementation tasks with AI assistance.
We’ve released a Kentico Xperience 13 library on Context7 that you can use to look up KX13 API references and code samples. Note that Context7 is a third-party service not maintained or supported by Kentico, so your experience may vary.
With your strategic plan in place, your team is ready to begin the technical implementation. The following sections provide an overview of the data migration and code adjustment work.
Set up your environment
Now that you’ve planned your approach, the first technical step is to make sure your environment supports the migration tool and both platforms, and to prepare them for the upgrade.
Hotfix to Kentico Xperience 13 Refresh 5 or newer
Make sure to your Kentico Xperience 13 instance is running on Refresh 5 (hotfix 13.0.64) or newer. If not, make sure to apply a hotfix within the supported range.
Install a compatible version of Xperience by Kentico
Check the Library Version Matrix in the Xperience by Kentico: Kentico Migration Tool repository to see which versions of Xperience by Kentico and the migration tool are compatible.
Download the migration tool
Clone or download the Xperience by Kentico: Kentico Migration Tool. Make sure your environment meets the requirements to run the solution specified in the repository.
Install the Documentation MCP server
Before you begin migrating your code, add the Documentation MCP server to your workspace mcp.json file. This allows AI assistants to access Kentico documentation directly from your IDE while you handle migration tasks.
If you use the KentiCopilot plugins, remember that these plugins register the Documentation MCP server globally in the CLI-level .mcp.json. If you also add the server to your workspace’s mcp.json, you will have two registered instances.
If you run your AI assistant in Agent mode with auto-accept enabled, both Documenation MCP server instances are used, which can double your token usage when the server’s tools run.
Migrate your data
Once the environment is ready, you can migrate data from Kentico Xperience 13 to Xperience by Kentico.
Thanks to the CLI parameters that allow you to specify which objects to migrate, you can iteratively migrate data in multiple runs before adjusting code. Alternatively, you can do so in parallel with code updates.
To accelerate data migration, consider using the KX13 content audit and KX13 content migration plugins from the KentiCopilot repository. These AI-powered skills help automate your migration by:
- Reading your KX13 database
- Exporting the content model
- Turning it into a migration plan with your input
- Generating an
appsettings.jsonand any required extensions for the migration tool - Running the migration
- Checking the result against the initial plan
Treat the generated output as a starting point – always review, verify, and adjust the results to fit your specific project requirements.
Configure the settings
Follow the guidance in the Usage guide and the CLI README to configure the details of your data migration.
Set up Page Builder conversion
If you use Page Builder in your Kentico Xperience 13 instance, consider paying special attention to the section about Source instance API discovery. By adding a special endpoint to your current live site, you can enable the tool to convert your Page Builder data to a format that uses Xperience by Kentico’s new UI form components.
Adjust your code
While past Kentico releases were built as expansions on previous versions, Xperience by Kentico is a brand new product, built from the ground up. It shares many similarities with legacy Kentico products, but also has some important differences you will have to account for when transferring your code.
To accelerate codebase migration, consider using the KX13 codebase migration skills from the KentiCopilot repository. These AI-powered skills for GitHub Copilot or Claude Code provide guided assistance for migrating global code, page presentation logic, widgets, and shared components. Treat the generated output as a starting point – always review, verify, and adjust the results to fit your specific project requirements.
Update content querying
Xperience replaces the DocumentQuery and MultiDocumentQuery APIs from legacy Kentico versions with the Content item API. Your team will need to update code that retrieved page data to work with the new API.
Adjust Page Builder components
If you choose to enable Source instance API discovery, you will need to change the editing components used by the properties of your Page Builder components to the new admin UI components.
Re-home custom tables
Xperience by Kentico does not have a direct analog for the Custom tables functionality in legacy Kentico products.
The Kentico Migration Tool transfers each custom table to a custom object type, but does not provide a user interface. Your team must create a UI for each class, or alternatively, convert the data to reusable content items that editors can manage through the Content hub.
Convert custom module pages
Xperience’s admin UI is no longer built with web forms, so your team will have to recreate any custom module pages as UI pages in the new admin.
Alter auth and user management
Where legacy Kentico products utilized the User entity to represent users of the administration interface and the live site, Xperience by Kentico has a separate Member object type representing those who sign in to the live site. Your team must change old registration and authentication code to work with members.
Choose a search integration
Xperience by Kentico does not include search functionality out-of-box, but rather provides three integration options: Lucene, Azure AI search, and Algolia. You need to recreate search functionality through one of these services.
Address differences in localization
Live site localization
Xperience by Kentico supports localization, with the migration tool automatically transferring multilingual pages and Cultures (as Languages). However, some features are not covered.
Kentico Xperience 13 allowed you to add custom resource strings to the database through the administration interface. Xperience by Kentico does not include this feature out-of-box, so your team must use a resource file, or store custom strings as content items of a specific type in the Content hub.
Alternatively, you can use or modify Nittin’s Xperience community localization module for this functionality, or implement your own custom module.
Admin localization
Like Kentico Xperience 13, Xperience by Kentico supports localization of the admin UI. However, many of the key names and values are different from those in the KX13 UI, so you will need to create new resource files for XbyK.
Migrate commerce
Xperience by Kentico supports commerce, but the system has been redesigned from scratch. You’ll start by setting up the built-in commerce features in Xperience, and then extend and customize the rest according to your project needs.
As an alternative, you can utilize the Shopify integration.
For a detailed comparison of commerce features and migration considerations, see our commerce features overview guide.
Handle marketing changes
Xperience by Kentico has many marketing features, but it does not aim for feature parity with Kentico Xperience 13, so there are some differences you’ll need to consider when transferring your project. Xperience by Kentico does not support personas or A/B tests natively, and it does not cover all possible marketing automation scenarios.
However, we do offer pathways to help your team handle these potential challenges. Learn more in our Plan your strategy for migrating features guide.
Validate and evolve
While we strongly recommend planning and remodeling your content during the initial migration, we understand that budget constraints or tight timelines may require a more conservative first pass. If you need to perform a lift-and-shift migration initially to deliver value quickly, you can revisit the planning steps later.
The strategies outlined in Plan your upgrade approach can be applied after your initial migration is complete. However, be aware that depending on your project, restructuring content post-migration may require more effort and cost than doing it during the initial upgrade.
What’s next?
The following guides in this series provide detailed information for each phase of the upgrade process:
- Plan your strategy for migrating features – Feature-by-feature comparison with effort estimates to inform your planning
- Prep for the upgrade and transfer data – Environment setup and data migration details
- Adjust your code and adapt your project – Code adjustments, validation, and post-migration evolution strategies
For specific topics:
- Upgrade - Commerce features overview – Detailed commerce migration guidance
- Upgrade - Frequently asked questions – Answers to common upgrade questions
- Upgrade deep dives for developers – Advanced migration scenarios and customization examples
You can also find more information in the documentation and the Xperience by Kentico: Kentico Migration Tool repository.
Visit our FAQ page for answers to frequently asked questions about the upgrade, migration tool or deployment considerations for upgraded projects.