
Add a custom field to the Contact profile
Contact management in Xperience by Kentico is an essential tool of digital marketing for your customers. Each contact represents a visitor and contains information, such as personal details, their consents or activity.
In Xperience source code, the Contact class has a predefined set of fields to store customer information. But in many cases, your customer needs to track custom domain-specific data about visitors, e.g., their favorite coffee.
If you are looking for a way to extend contact in Xperience by Kentico with custom fields, this page is for you!
Overview
You can add custom properties to the contact class using the administration interface.
To expose the custom fields for editors and marketers, we recommend creating a custom UI page with a new UI form and displaying it on a new tab in the Contact profile.
This article will guide you step-by-step through the process.
Before you start
This guide requires the following:
- Familiarity with C#, .NET Core, Dependency injection, and the MVC pattern.
- A running instance of Xperience by Kentico, preferably 31.3.3 or higher.
Some features covered in the training guides may not work in older versions.
Code samples
You can find a project with completed, working versions of code samples from this guide and others in the finished branch of the Training guides repository.
The main branch of the repository provides a starting point to code along with the guides.
The code samples in this guide are for .NET 8 only.
They come from a project that uses implicit using directives. You may need to add additional using directives to your code if your project does not use this feature.
Add custom database columns to Contact
- Open the Modules application and select the Contact management module.
- On the Classes tab select the Contact class (code name OM.Contact).
- Switch to the Database columns tab and add custom fields using the field editor. For our example, let’s add these three fields:
- TrainingGuidesContactMemberId
- Data type: Text
- Size: 200
- TrainingGuidesContactFavoriteCoffee
- Data type: Text
- Size: 200
- TrainingGuidesContactLastCommunicationDate
- Data type: Date and time
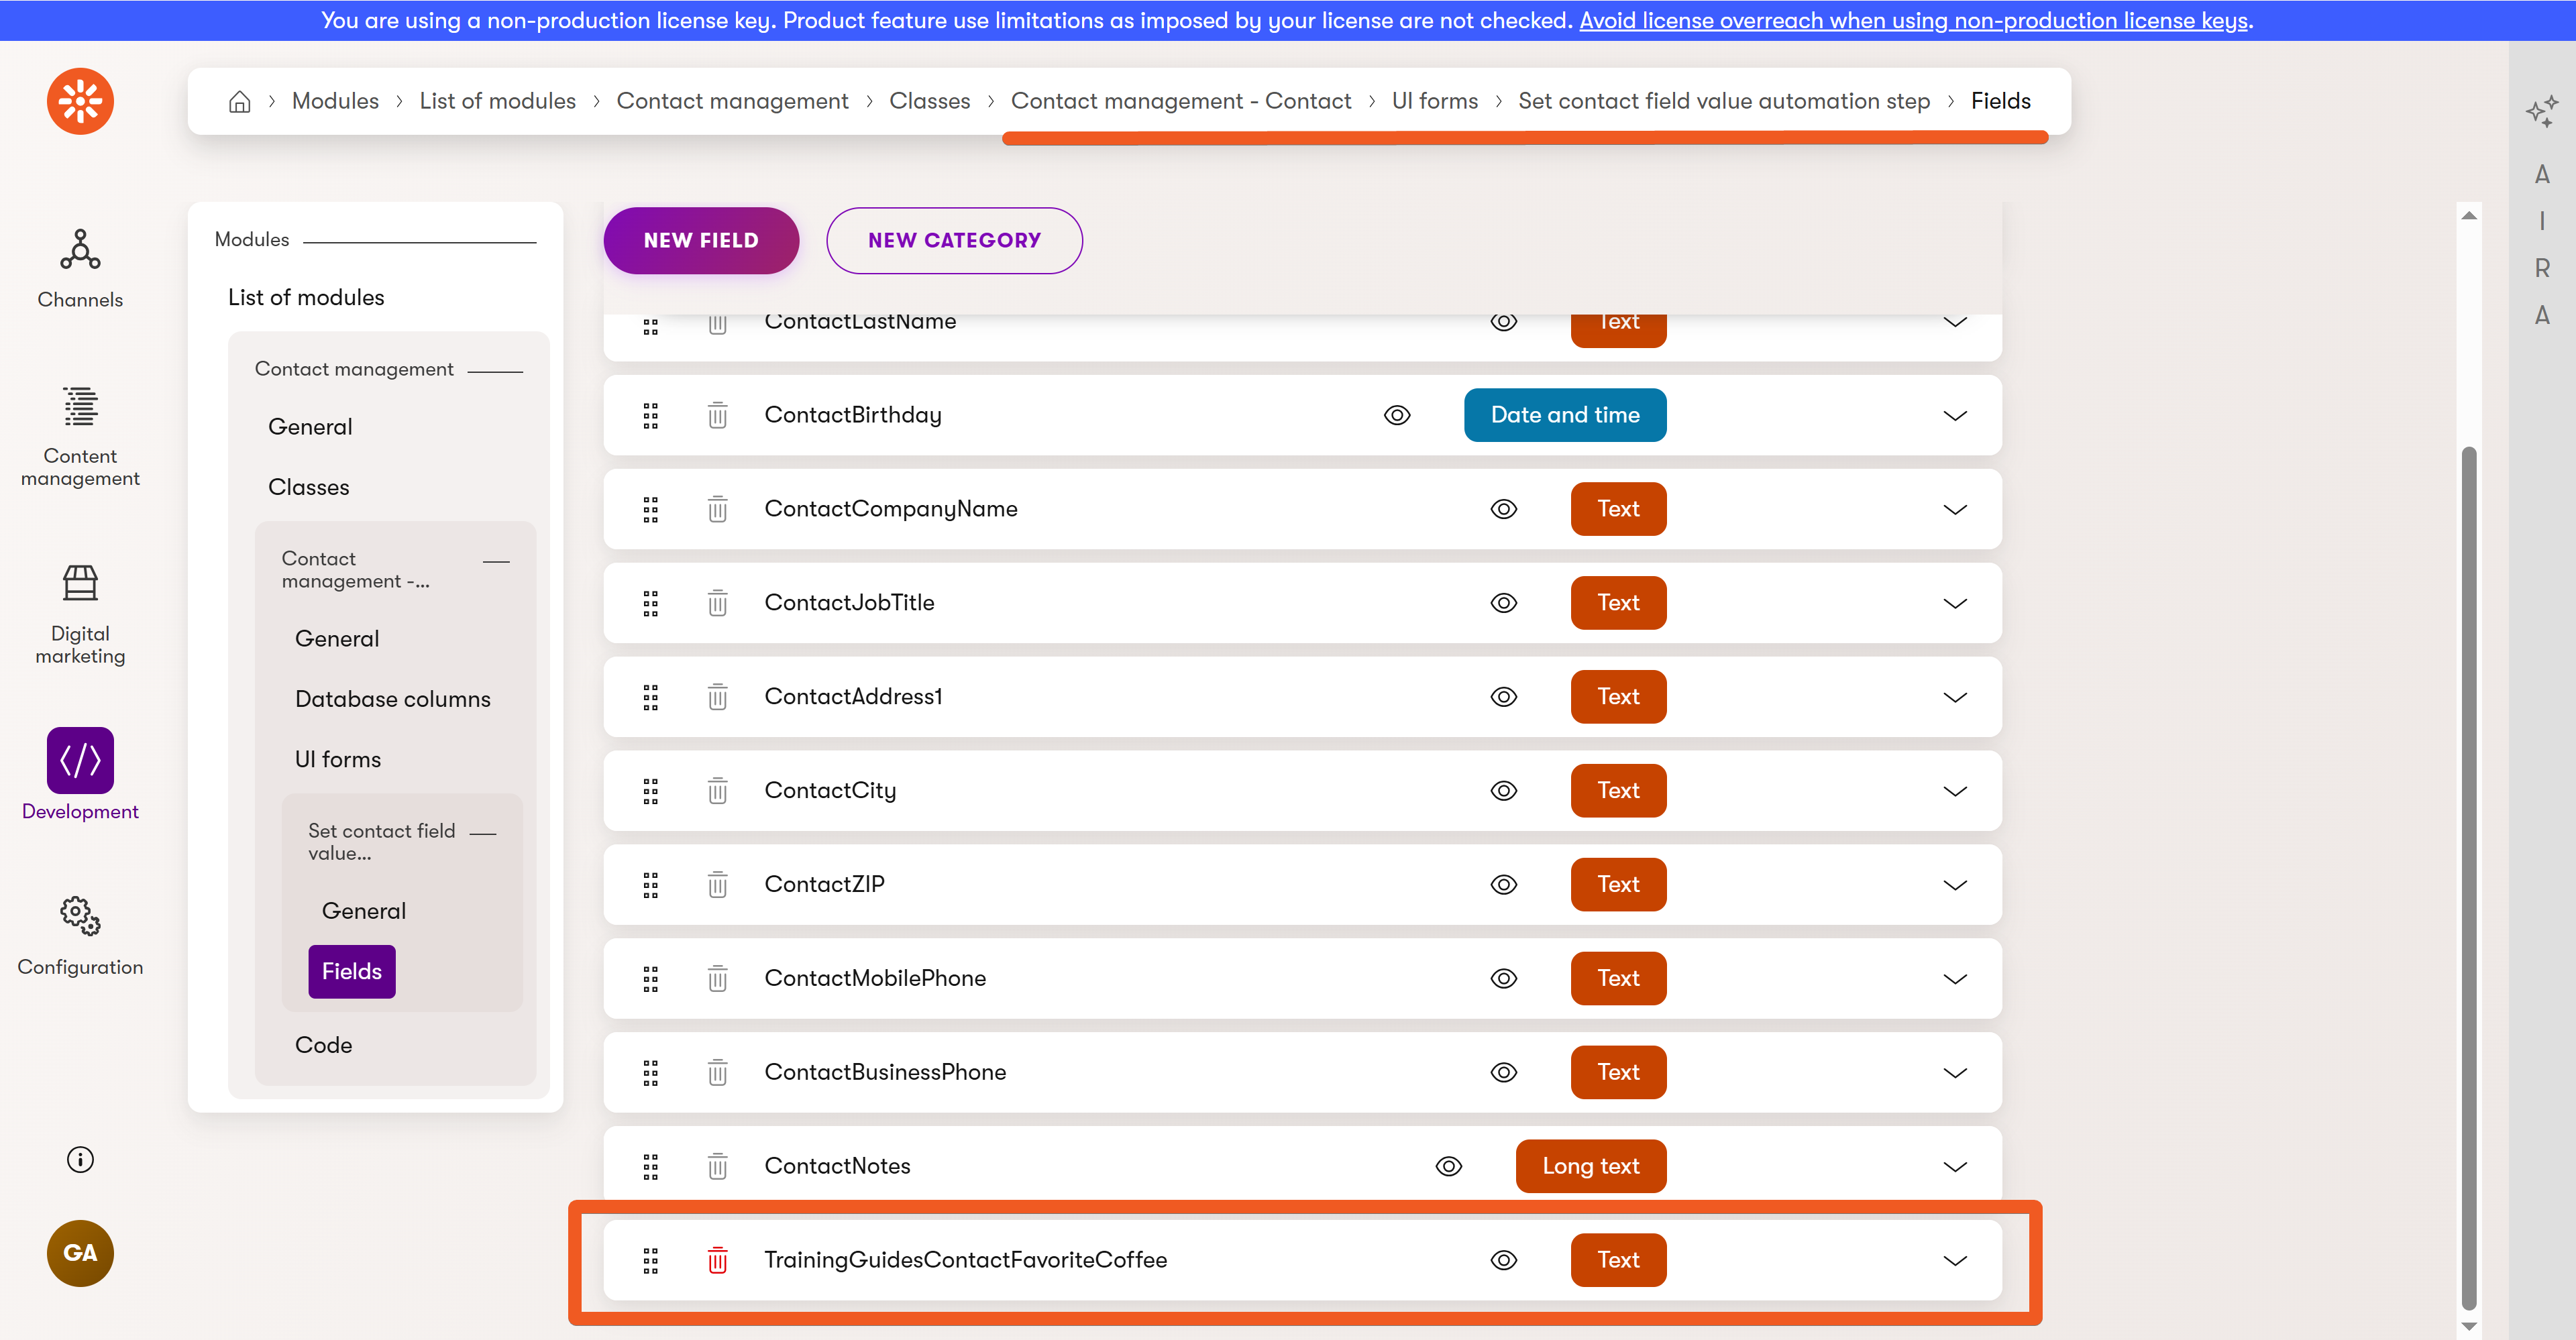
- TrainingGuidesContactMemberId
Naming convention for Contact custom field names
We recommend naming the custom fields <CustomerNamespace>Contact<FieldName>.
This helps with clarity and the identification of custom fields, both in code and administration. For example, when creating a new UI form, Xperience orders them alphabetically.
In your Xperience administration, your new fields will appear at the bottom of the list: 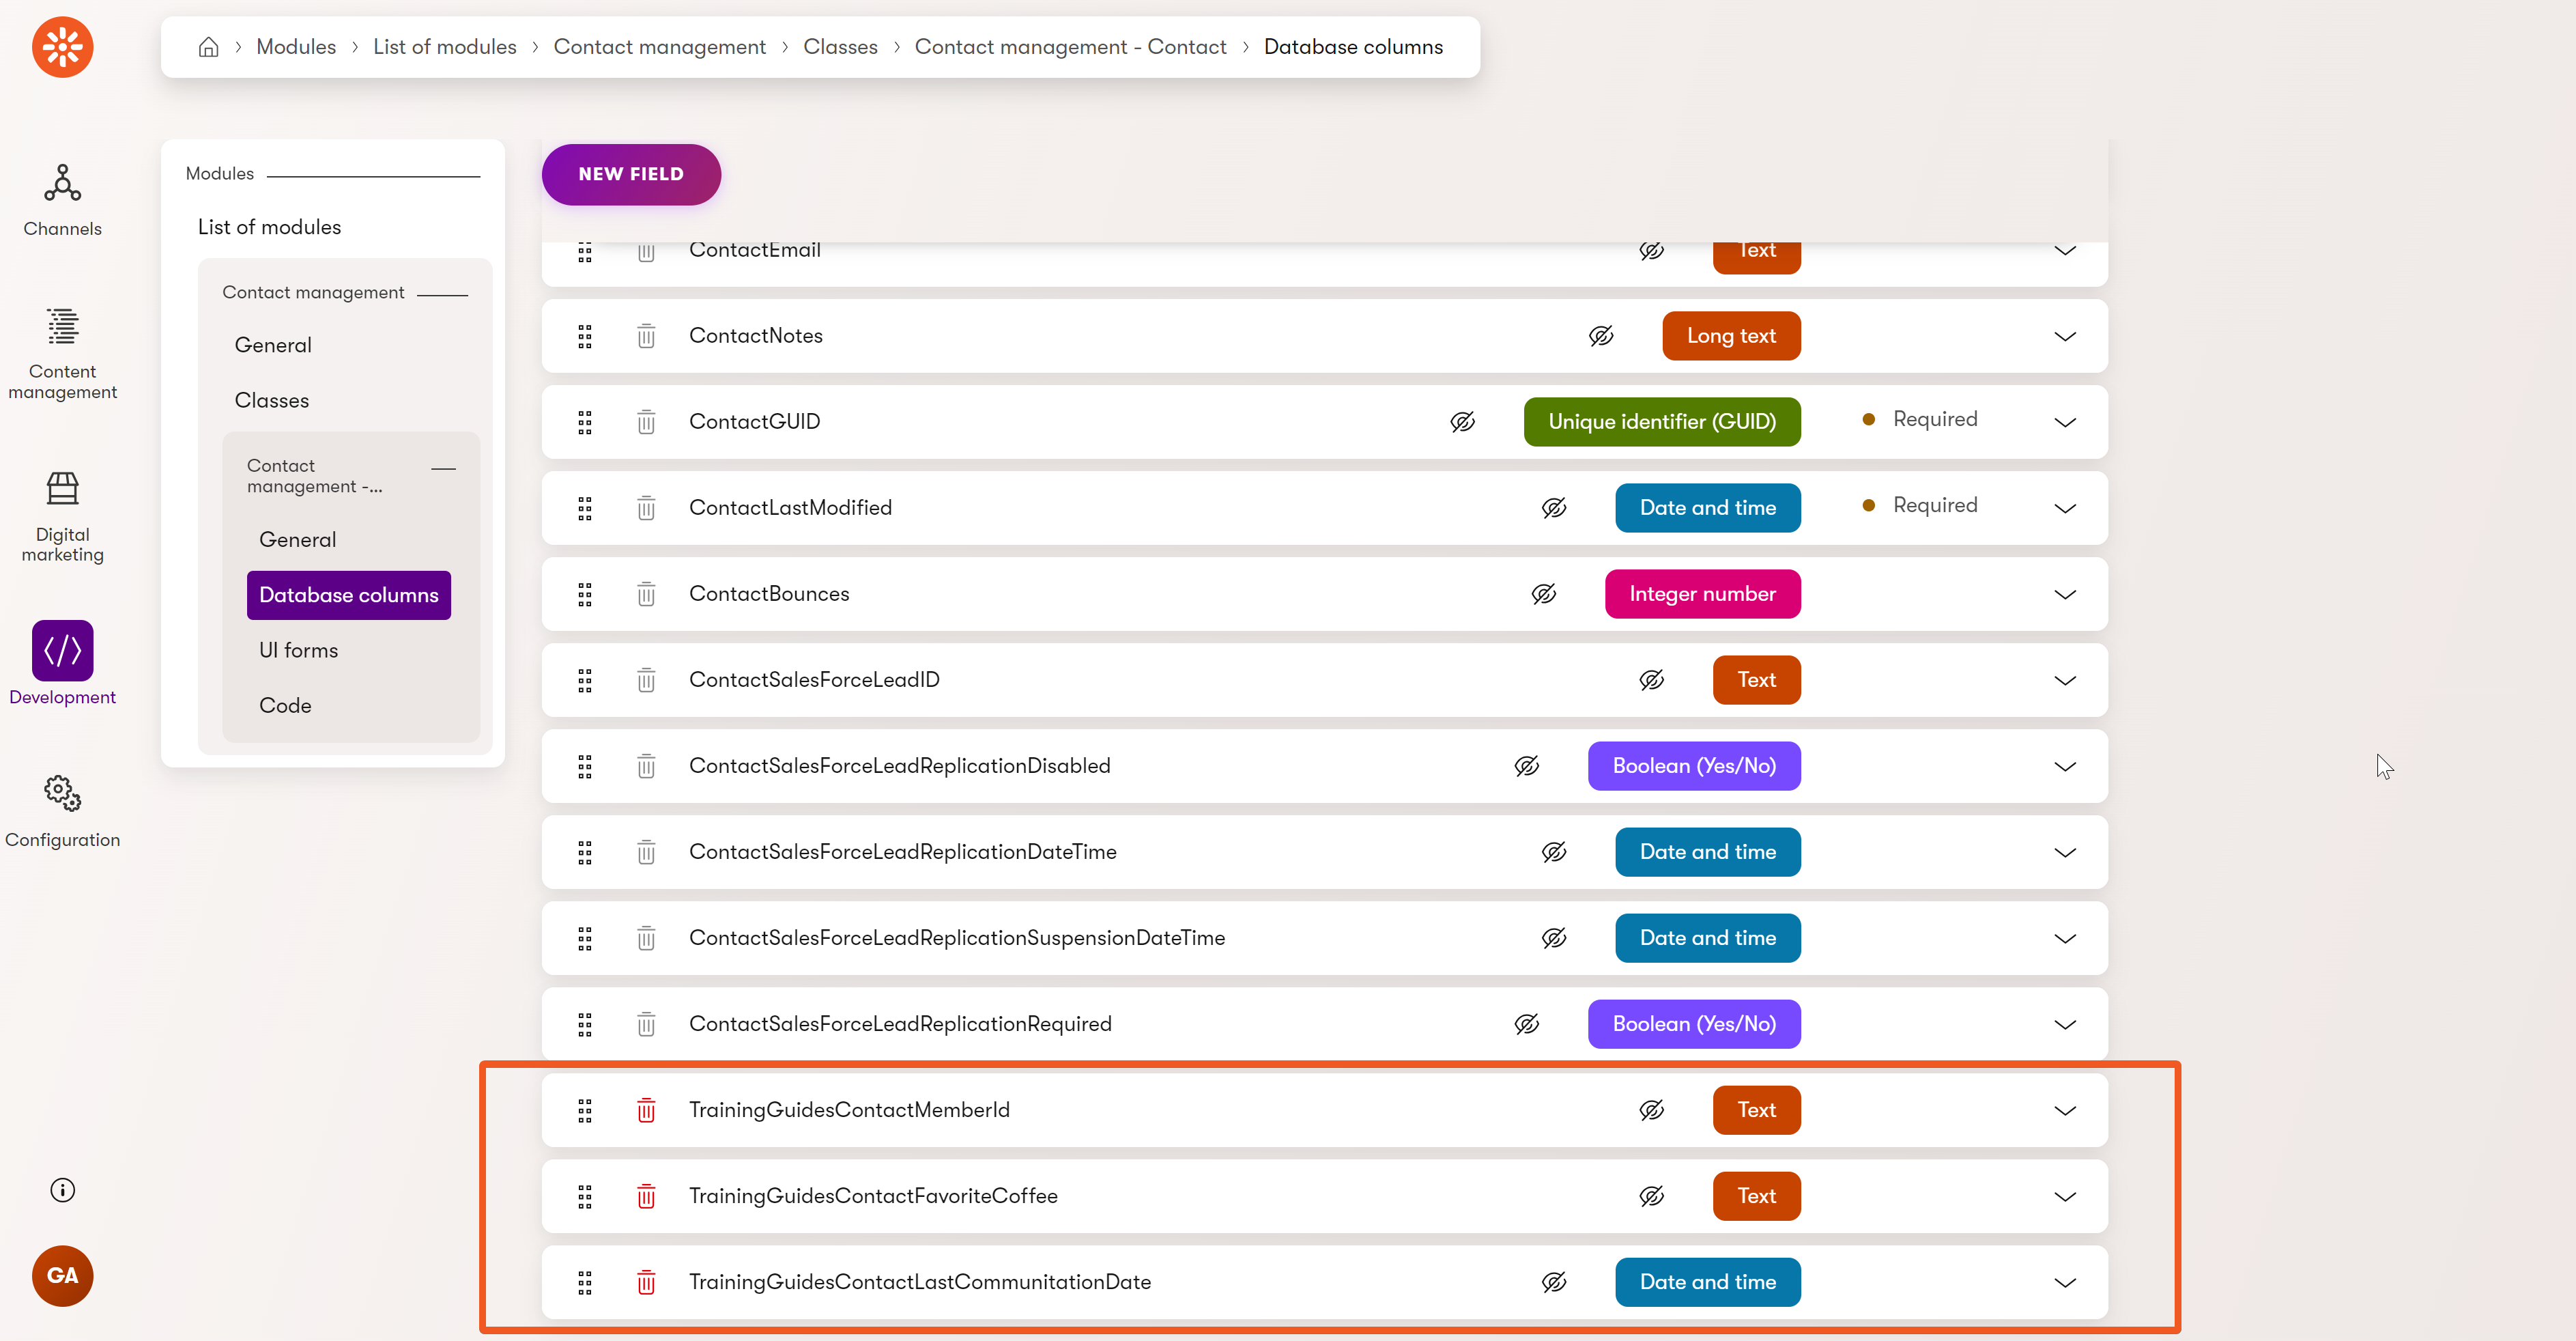
Define your UI form
- Stay in the Contact class under the Contact management module.
- Switch to the UI forms tab.
- Click New UI form button and fill out:
- UI form name: Training guides fields edit
- Code name: TrainingGuidesFieldsEdit
Leaving Pre-fill code name automatically checked will generate the same code name in this case.
- Click Save to create your new UI form.
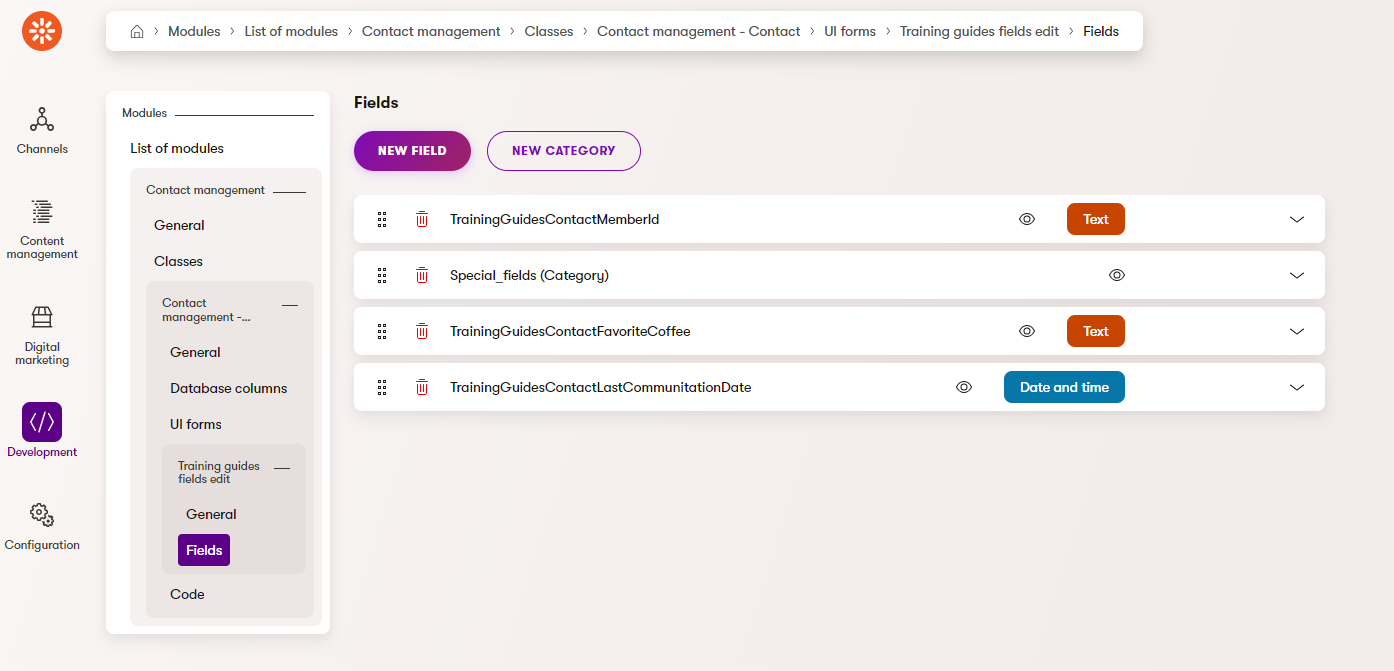
- Switch to the Fields tab in the left menu.
- Add a new UI field for each of your custom Contact fields:
- Click New field.
- Select a database column you want to map the field to. The available columns are sorted alphabetically.
- Fill out field settings as desired and hit Save.
Feel free to play around with different settings (e.g., Enabled - checked or unchecked), field order, and using various UI form components.
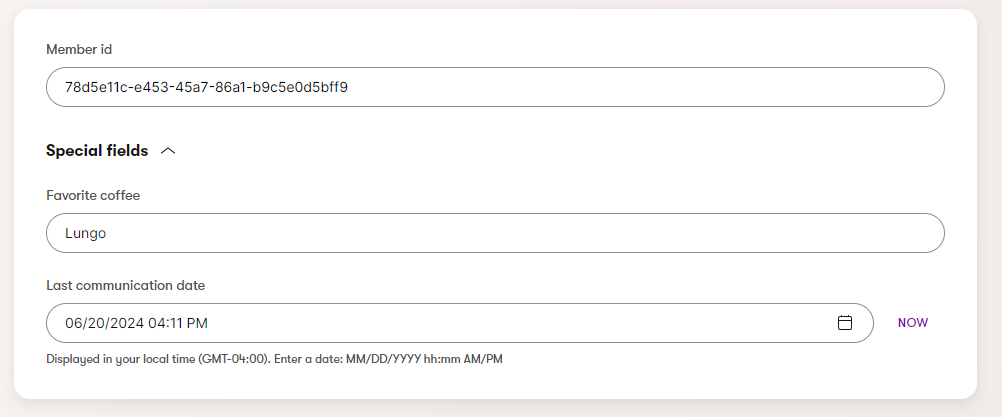
You can also define a Category, to help organize your form fields. For example, your UI form definition can look like this:
which renders for the editor like this:
You may have noticed that out-of-the-box, the Contact class already has two forms: Contact edit and Personal details - read only.

The Contact edit form allows mapping form fields to contact attributes and exposing contact fields in the Contact groups application. We will discuss it later on.
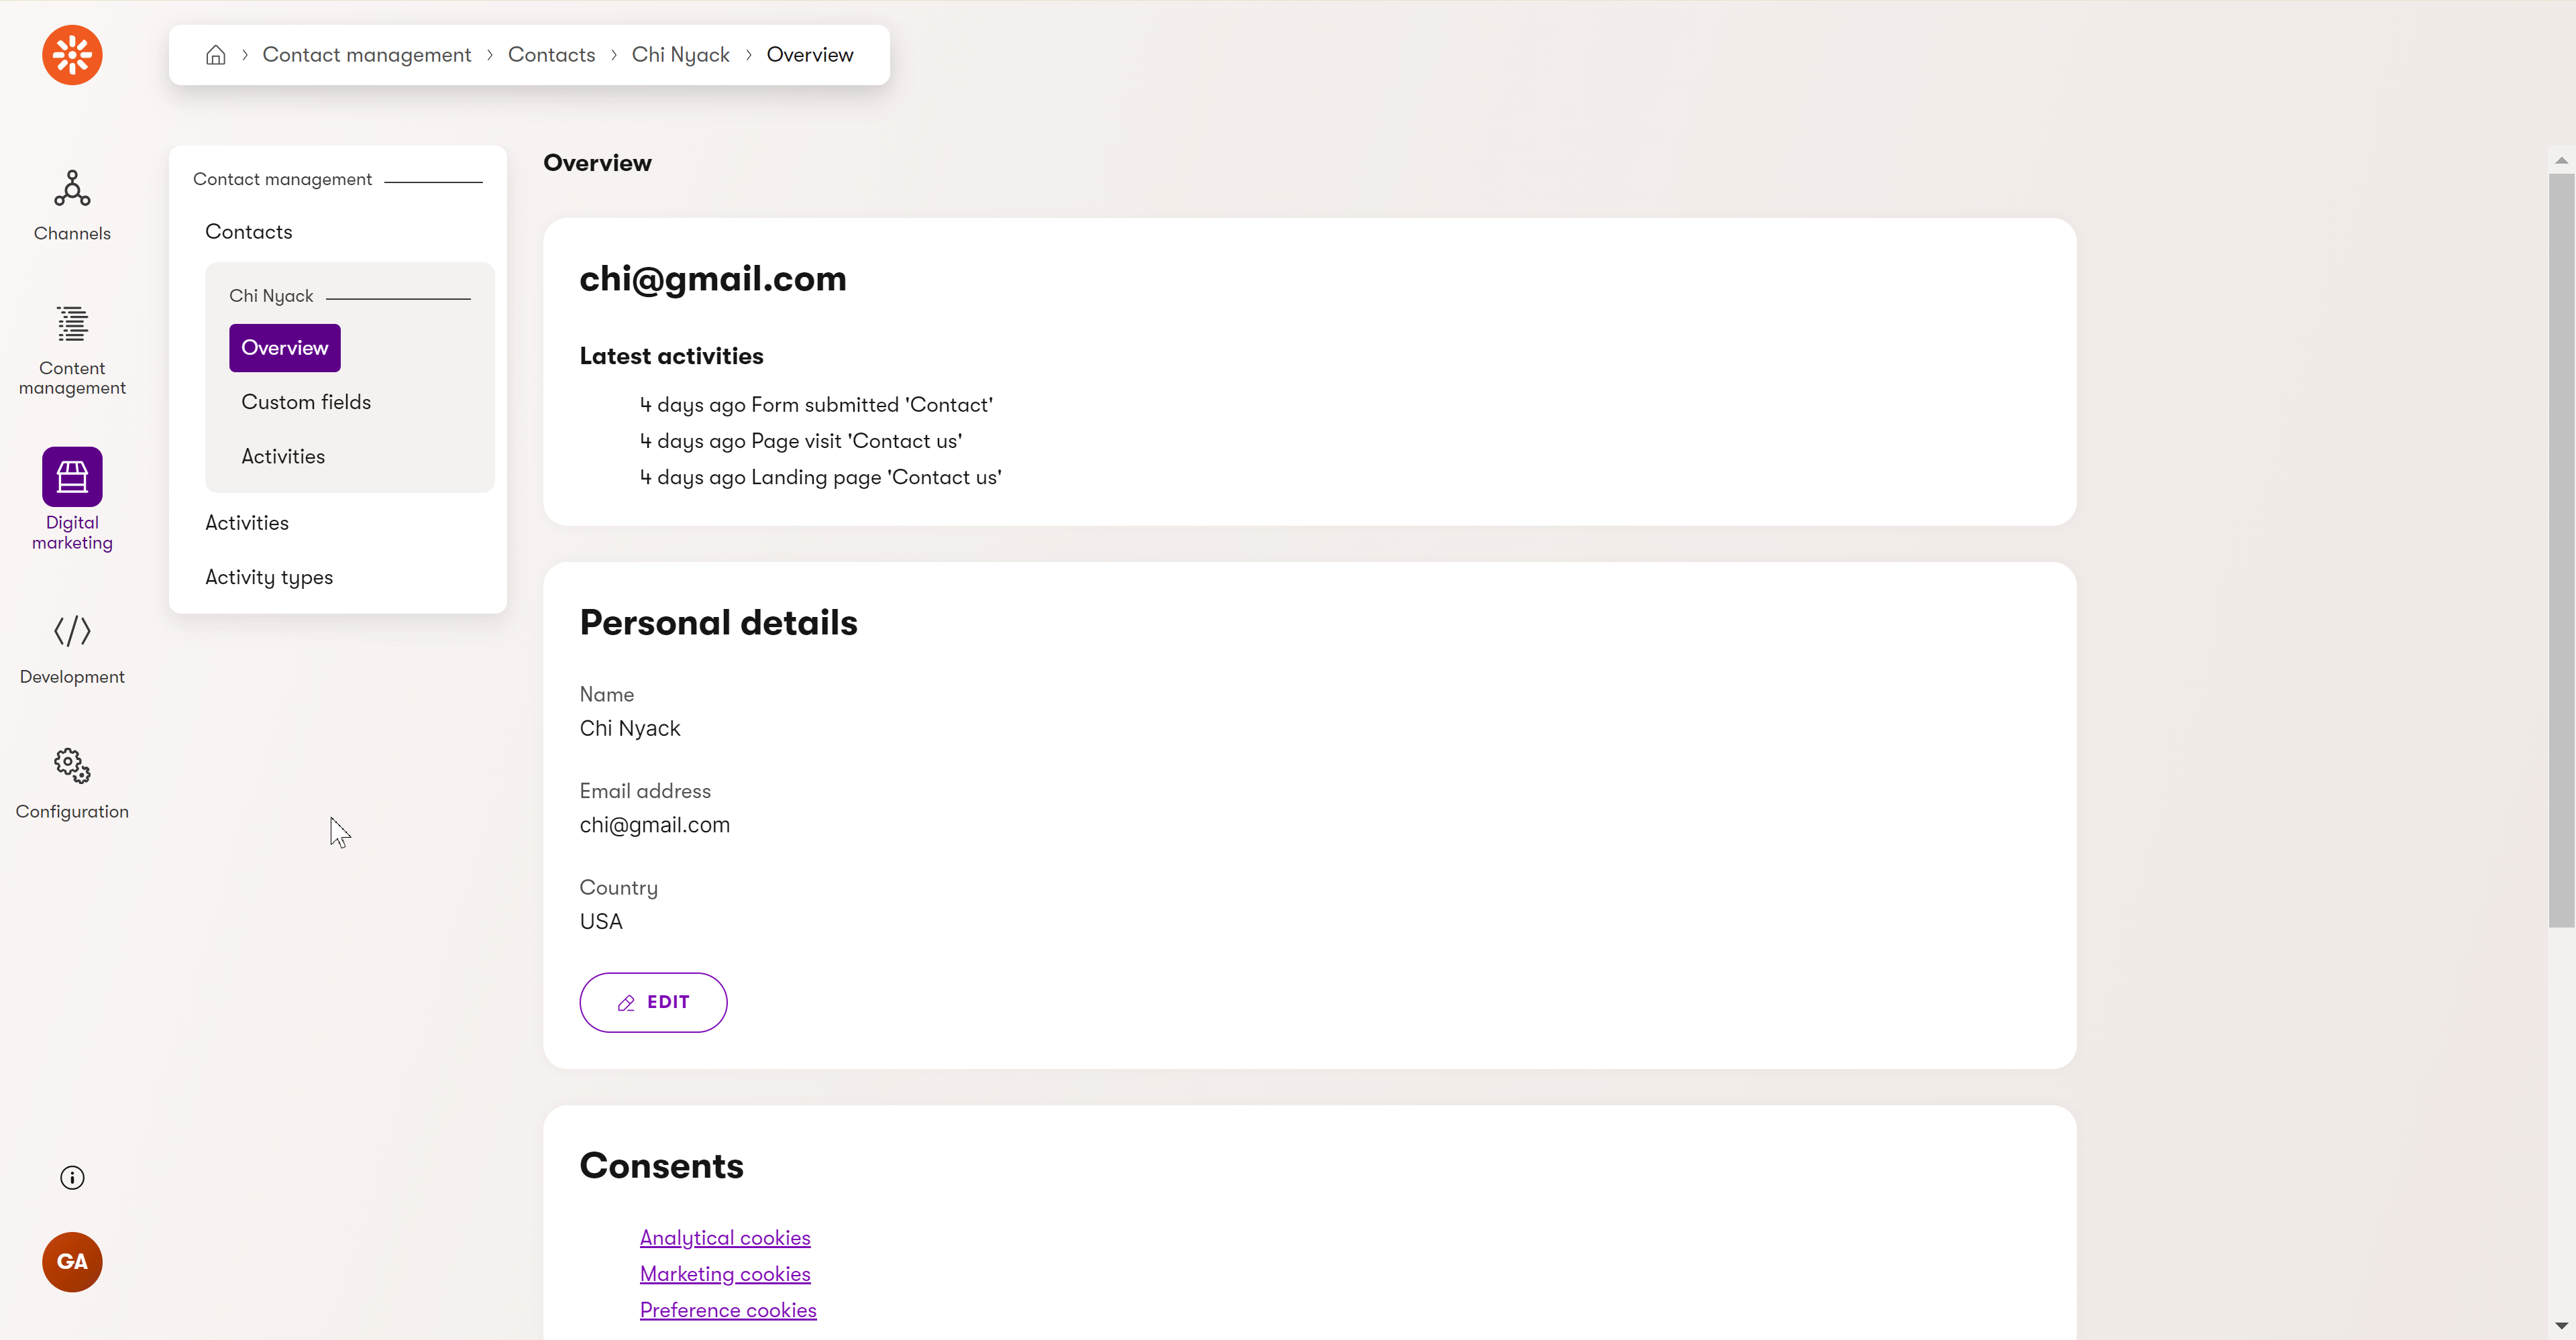
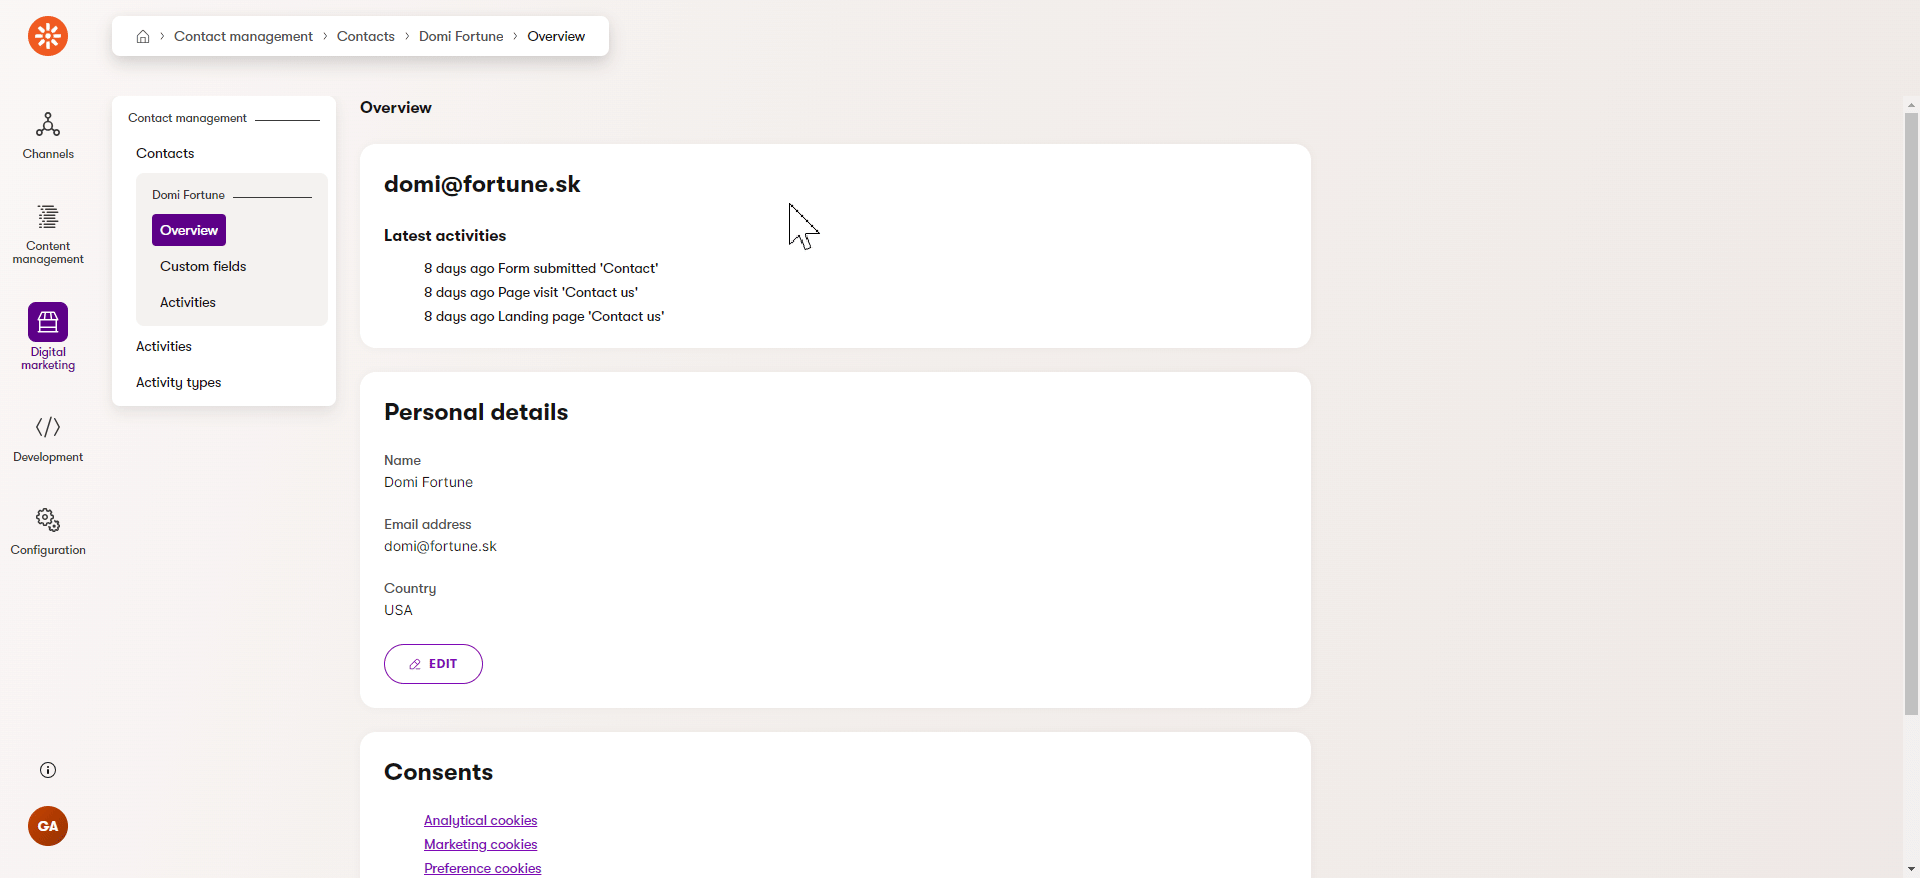
Personal details - read only is the form displayed in the contact Overview under the Personal details section. If you add fields to this form, they will automatically appear there.
To avoid UI inconsistency, we do not recommend this approach.
Due to a system limitation, you cannot easily add fields to the default edit dialog. It would not be a good UX practice to add fields to the Personal details with no control over what fields will render after the user clicks Edit.
Implement your new edit page
You now have a custom UI edit form, holding your custom contact fields. You can display the form to editors by passing its code name to a new edit page in your code.
Store customization files separately
We recommend storing any files customizing the Xperience administration separate from the channel-specific files. In our Training guides repository, and this guide we use the TrainingGuides.Admin project for this purpose.
If you are following along using the main branch of our repository and your solution does not contain this project yet, you can follow the steps in the Set up the project section of this guide.
If you are working with more of an enterprise-sized solution, our guide about utilizing Clean architecture in Xperience projects may be interesting to you.
In your source code, navigate to your administration customization project (e.g. TrainingGuides.Admin).
In Pages folder, create a new class file, ContactCustomFieldsEditPage.cs.
Implement your custom edit UI page:
C#ContactCustomFieldsEditPage.csusing CMS.ContactManagement; using Kentico.Xperience.Admin.Base; using Kentico.Xperience.Admin.Base.Forms; using Kentico.Xperience.Admin.DigitalMarketing.UIPages; using TrainingGuides.Admin.Pages; // Register the page as using EDIT template, under "Custom fields" name. // parentType and order attributes determine it's position in the UI. // See more details in the next section, under the code sample. [assembly: UIPage( parentType: typeof(ContactEditSection), slug: "training-guides-fields-edit", uiPageType: typeof(ContactCustomFieldsEditPage), name: "Custom fields", templateName: TemplateNames.EDIT, order: 150)] namespace TrainingGuides.Admin.Pages; // All edit pages inherit from the InfoEditPage<TInfo> base class. // Substitute TInfo with the ContactInfo class - to tell Xperience this is to edit the Contact object type. public class ContactCustomFieldsEditPage : InfoEditPage<ContactInfo> { // Holds the ID of the edited contact. // Needs to be decorated with the PageParameter attribute to propagate // contact ID from the request path to the configuration of the page. [PageParameter(typeof(IntPageModelBinder))] public override int ObjectId { get; set; } // Mandatory constructor providing required services via dependency injection. public ContactCustomFieldsEditPage( IFormComponentMapper formComponentMapper, IFormDataBinder formDataBinder) : base(formComponentMapper, formDataBinder) { } public override Task ConfigurePage() { // Assign your 'TrainingGuidesFieldsEdit' UI form code name to the page. The assignment is case-insensitive. PageConfiguration.UIFormName = "trainingguidesfieldsedit"; return base.ConfigurePage(); } }
For more details about implementing Edit UI page template visit this page in our documentation.
Specify the page tab position in the UI tree
Take a look at the page registration from the code sample above:
...
[assembly: UIPage(
        parentType: typeof(ContactEditSection),
        slug: "training-guides-fields-edit",
        uiPageType: typeof(ContactCustomFieldsEditPage),
        name: "Custom fields",
        templateName: TemplateNames.EDIT,
        order: 150)]
...
We’ve decided to render our Custom fields page tab between the Overview and Activities tabs in the Contact profile:
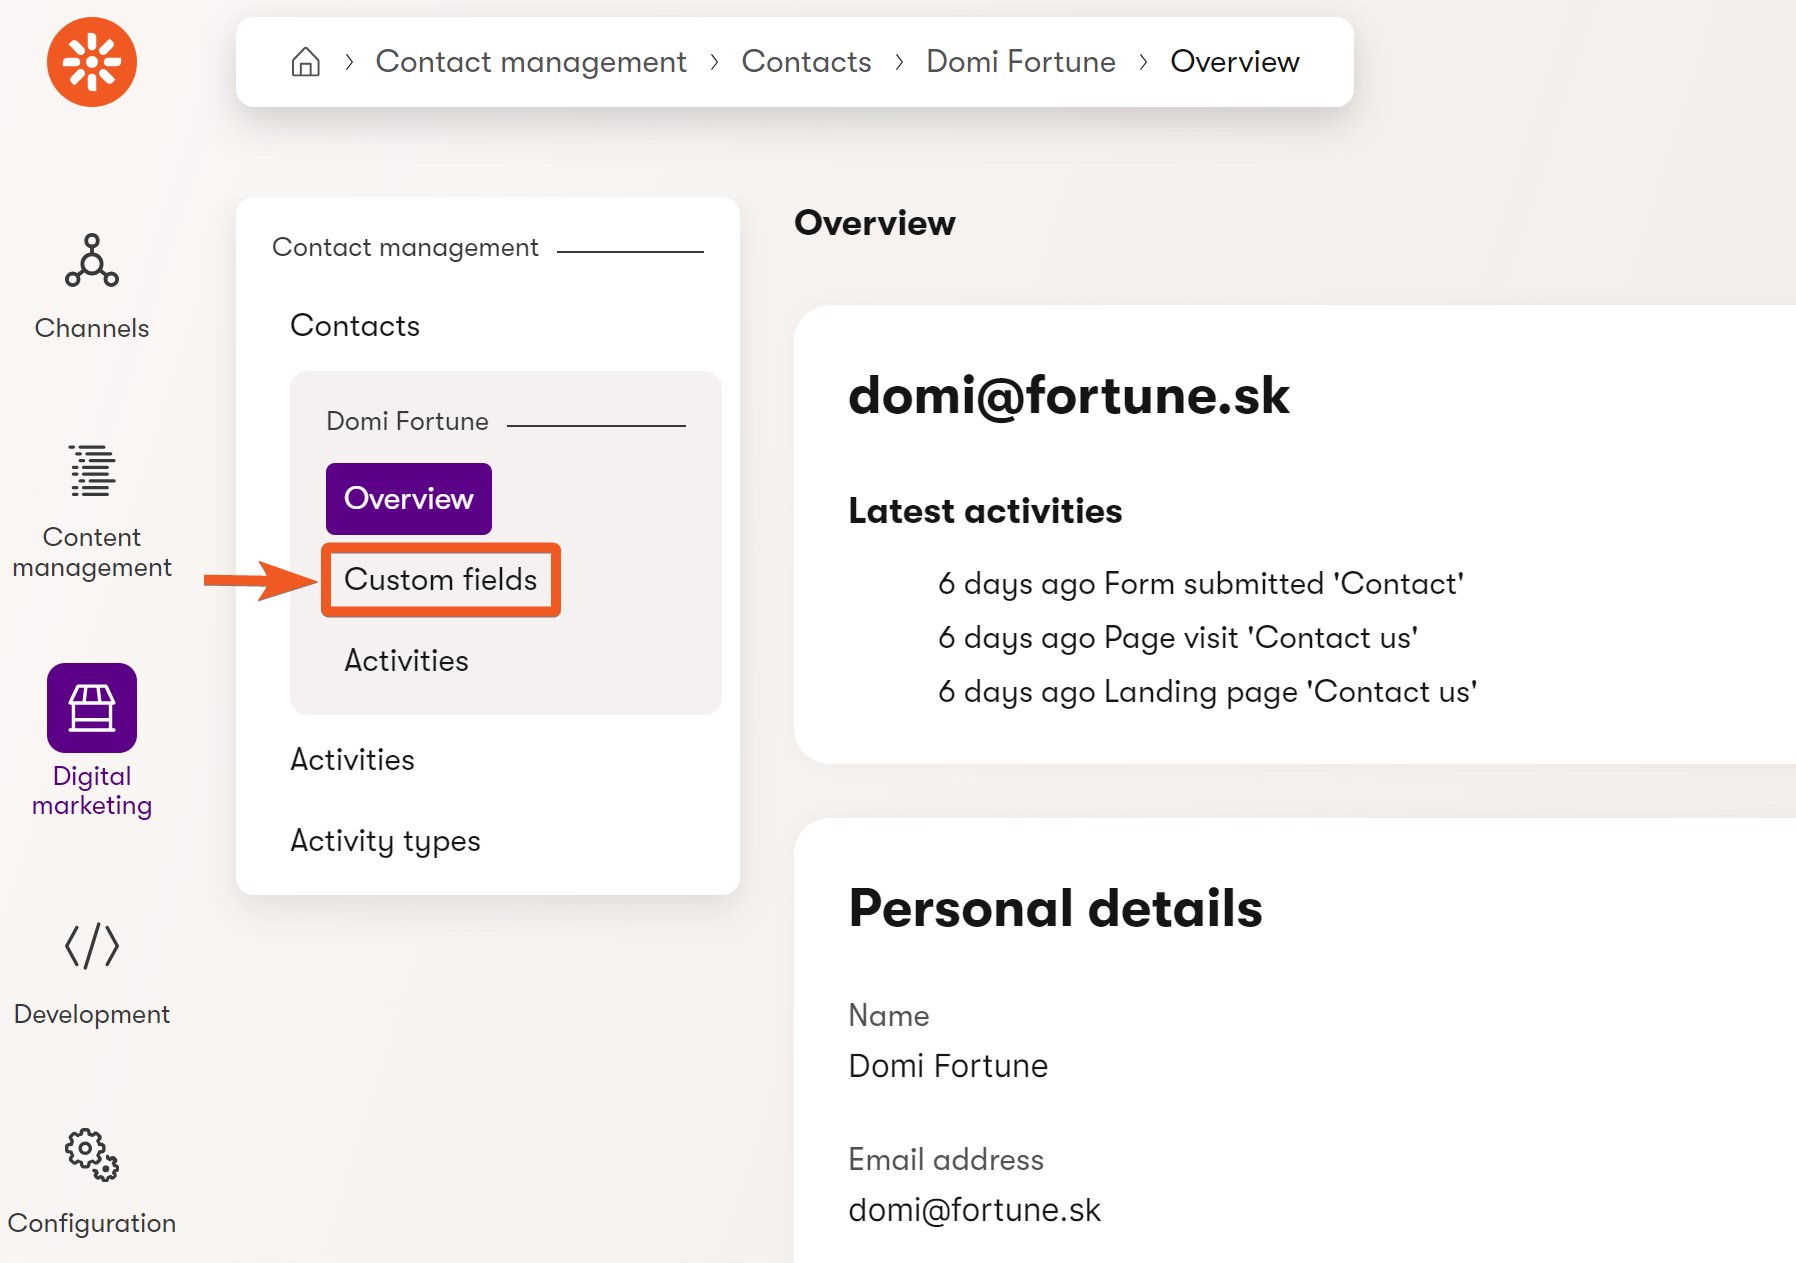
When adding a page to an existing structure, you can achieve this by setting parentType to an existing application page. In this case, the ContactEditSection type.
You can find the code name of an existing application page in the UI tree under System application. For more guidance see this page.
If you register a UI page without specifying order, Xperience will place the new page tab last.
By default, the order of existing pages is set in increments of 100. In our example, we set order: 150 to place the Custom fields page tab between the Overview (100) and Activities (200) tabs.
Find more details about UI page registration parameters on this page of our documentation.
Now, when you build your solution and open a profile of any contact in your Xperience administration, you should be able to see your new UI form in a custom tab, as illustrated in this video:
Additionally, if you navigate to System → UI tree, you should be able to see your page in the UI tree structure: 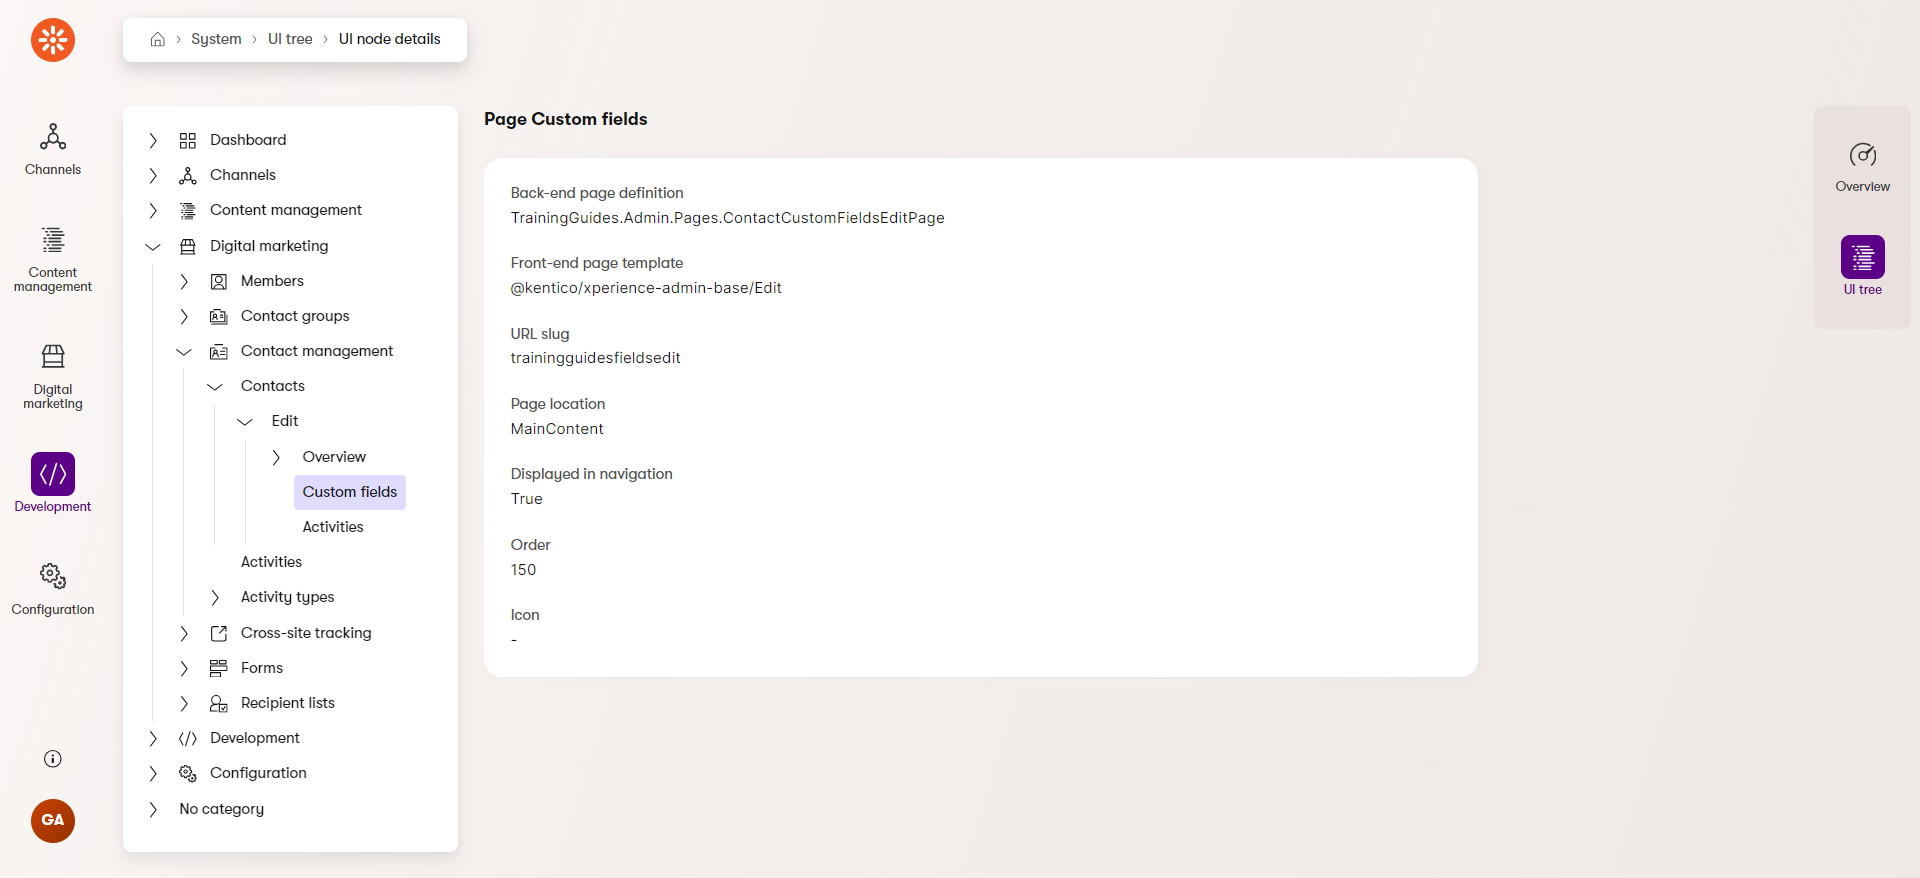
Customize the form fields
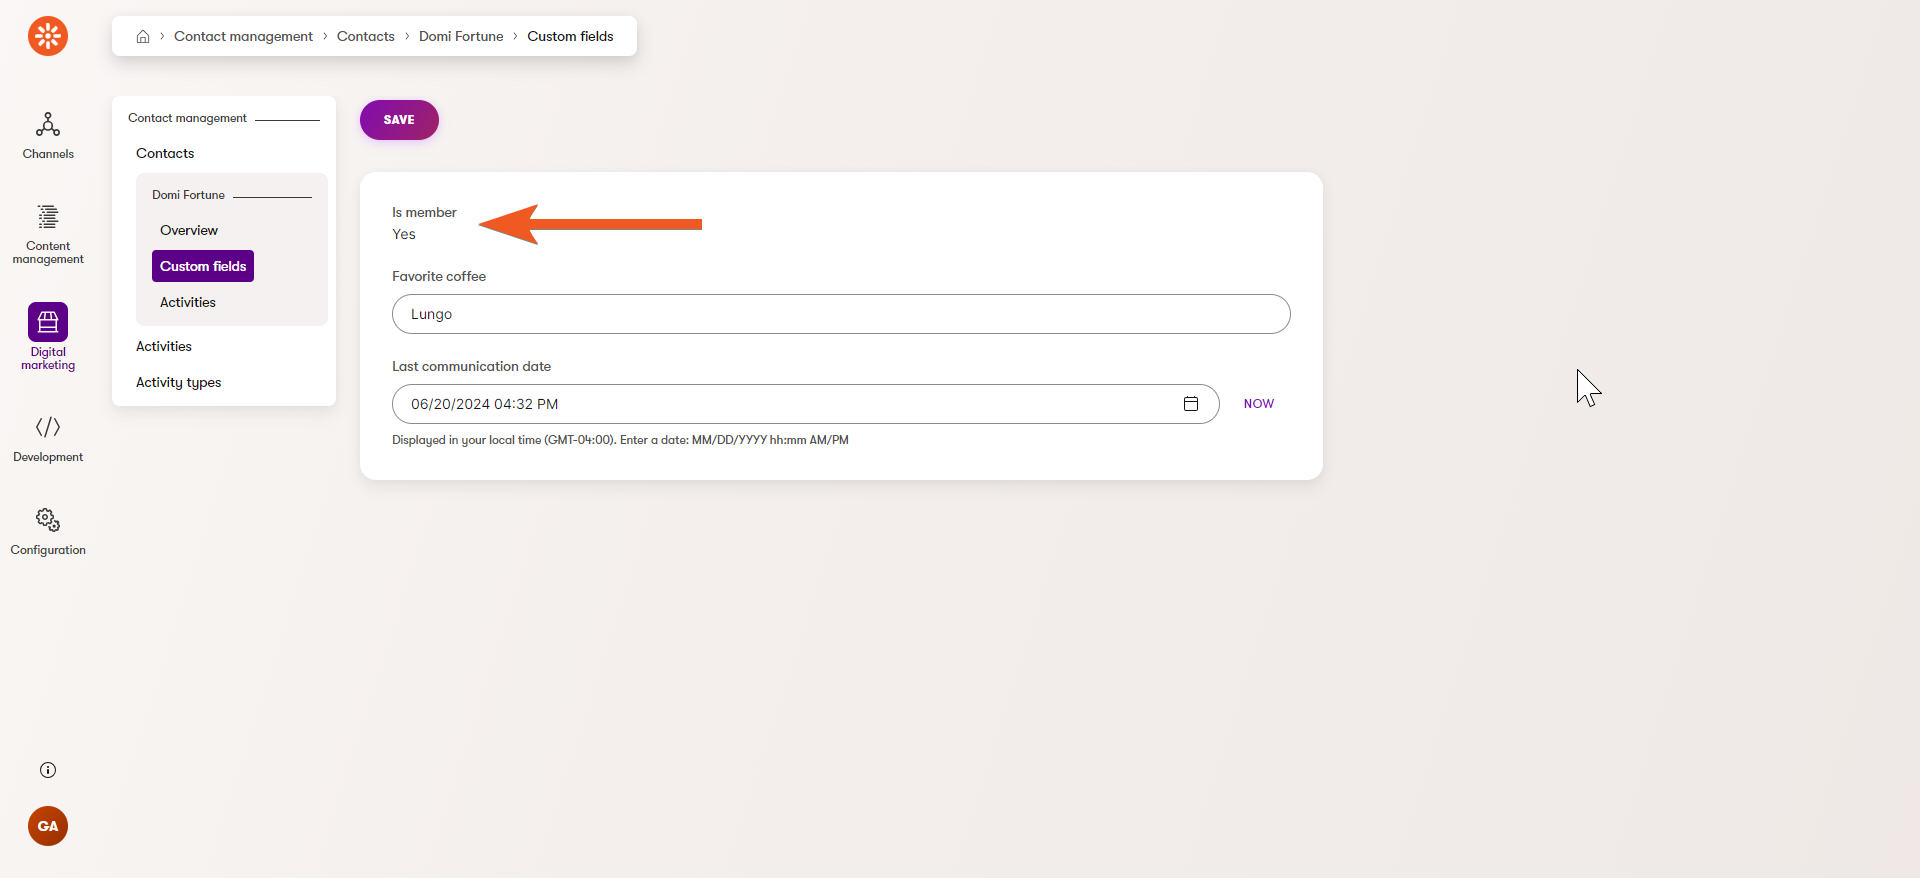
In some cases, you will need to show values that are based on contact data but not directly tied to a database column. Maybe the editors don’t care about the contact Member Id you created earlier. Instead they only need to know whether the contact is a member or not.
Let’s modify the form to replace the editable Member Id with a readonly flag Is a member: Yes/No.
Navigate to your Training guides fields edit form in your Xperience administration (Modules → Contact management → Classes → Contact management → Contact → UI Forms → Training guides fields edit).
In the Fields tab, remove the Member Id field.
Add a new field. In the Database column select, pick New field without database column.
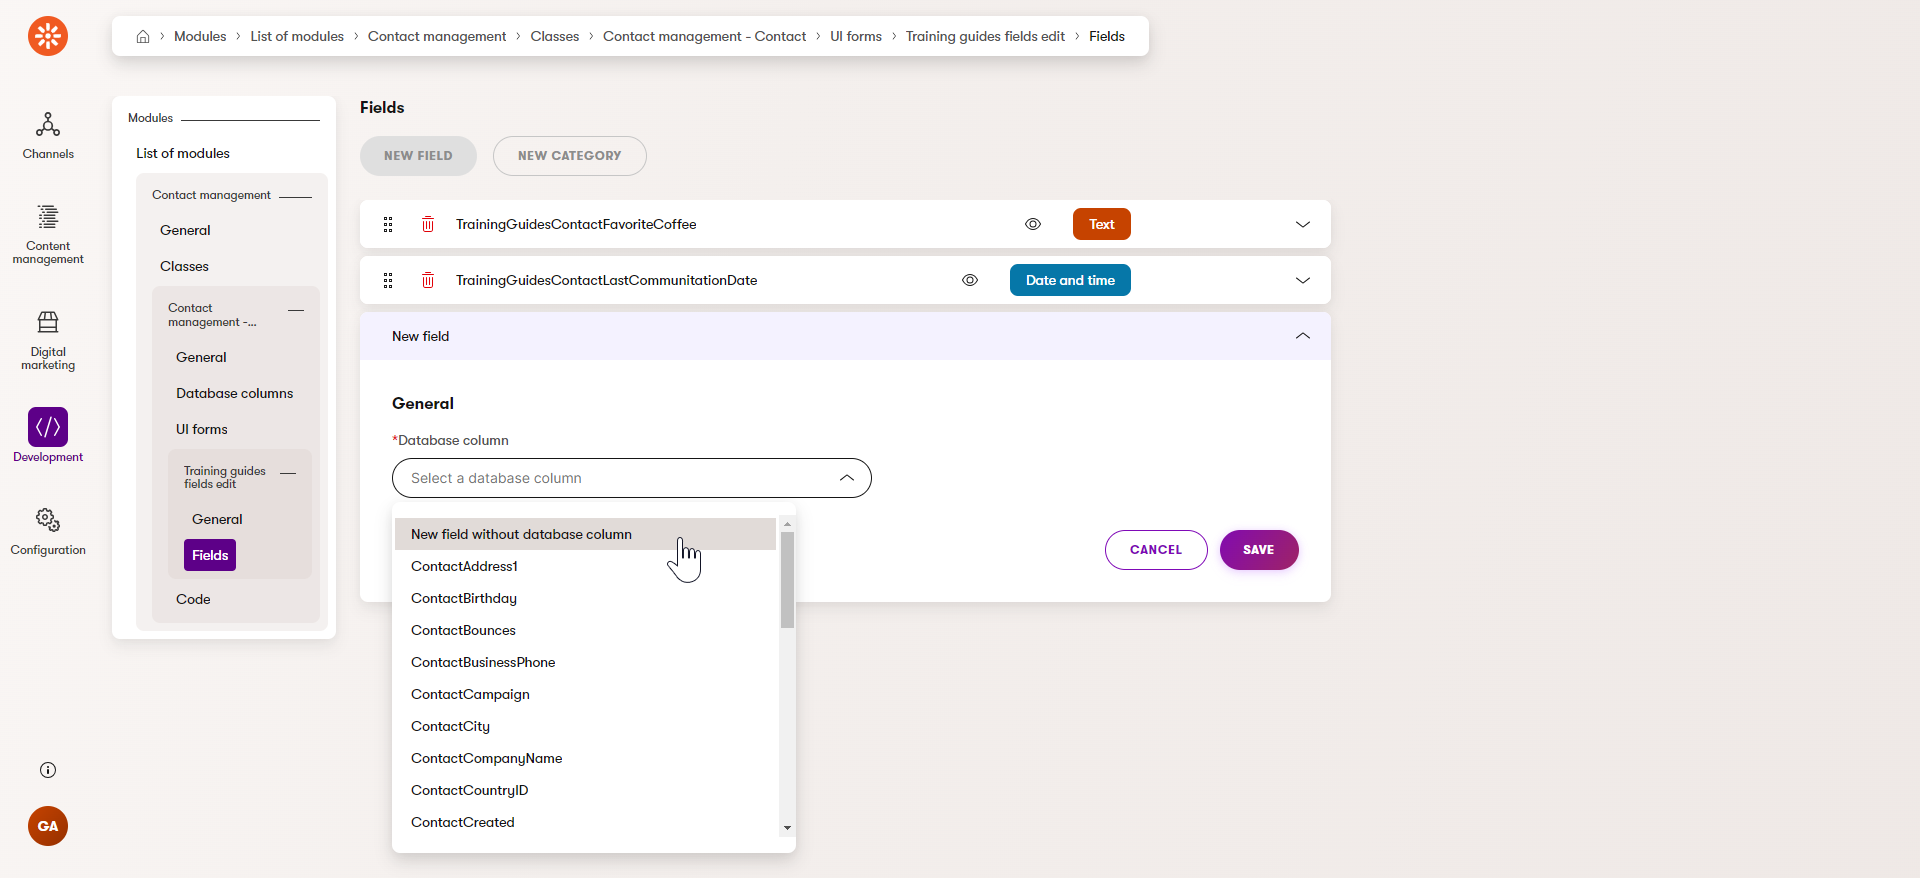
Fill out the following:
- Field name: TrainingGuidesContactIsMember
- Data type: Text
- Field caption: Is a member
- Form component: Text with label (as the value is supposed to be readonly)
Save and optionally drag and drop the new field to your desired position (e.g. the top).
Open your ContactCustomFieldsEditPage.cs file.
Define constants to hold the names of the custom fields.
C#ContactCustomFieldsEditPage.cs... private const string CONTACT_IS_MEMBER_FIELD_NAME = "TrainingGuidesContactIsMember"; private const string CONTACT_MEMBER_ID_FIELD_NAME = "TrainingGuidesContactMemberId"; ...Add a
GetFormItemsmethod override:C#ContactCustomFieldsEditPage.cs... protected override async Task<ICollection<IFormItem>> GetFormItems() { // Retrieve form items. var items = await base.GetFormItems(); // Return a method call that modified the form items. Implemented in the next step. return SetContactIsMember(items); } ...Implement
SetContactIsMember(items)method:C#ContactCustomFieldsEditPage.cs... /// <summary> /// Sets the value of the "Is a member" field based on the value of the "Member ID" field. /// </summary> /// <param name="items">Collection of form items</param> /// <returns>The updated collection of items</returns> private ICollection<IFormItem> SetContactIsMember(ICollection<IFormItem> items) { // Retrieve the 'Is a member' field. var contactIsMemberField = items.OfType<IFormComponent>() .FirstOrDefault(i => i.Name == CONTACT_IS_MEMBER_FIELD_NAME) as TextWithLabelComponent; // Calculate the string value of 'Is a member' field, based on the 'Member Id' value. // GetContactMemberId() implemented in the next step. string contactIsMember = string.IsNullOrEmpty(GetContactMemberId()) ? "No" : "Yes"; // Set the new value to the 'Is a member' field. contactIsMemberField?.SetValue(contactIsMember); return items; } ...Implement
GetContactMemberId()to retrieve the value of TrainingGuidesContactMemberId field:C#ContactCustomFieldsEditPage.cs... // Inject contactInfoProvider. private readonly IInfoProvider<ContactInfo> contactInfoProvider; public ContactCustomFieldsEditPage( IFormComponentMapper formComponentMapper, IFormDataBinder formDataBinder, IInfoProvider<ContactInfo> contactInfoProvider) : base(formComponentMapper, formDataBinder) { this.contactInfoProvider = contactInfoProvider; } ... // Use contactInfoProvider to retrieve the current Contact // and get the value of the TrainingGuidesContactMemberId field. private string? GetContactMemberId() => contactInfoProvider.Get() .WhereEquals(nameof(ContactInfo.ContactID), ObjectId) .FirstOrDefault() ?.GetValue(CONTACT_MEMBER_ID_FIELD_NAME) as string; ...Build your solution. If you followed along, your page in Contact profile should now look similar to this:
See the full ContactCustomFieldsEditPage.cs file in our Training guides repository for your reference.
Enable custom fields in other applications
Enable usage in Contact groups
Contact groups allow to editors organize contacts by defining custom conditions.
Since the 29.1.0 Xperience by Kentico refresh, the editor can set up a new condition, ‘Contact has value in field’.
Your contact fields are not yet available for the editor to utilize in this condition. To expose them, you need to add your custom fields to the Contact edit form.
Navigate to the Contact edit form in your Xperience administration (Modules → Contact management → Classes → Contact management → Contact → UI Forms → Contact edit).
Add your fields one by one.
When assigning a Database column, the available fields are ordered alphabetically.
The Field caption is what the editors will see in the Contact groups application as a field identifier. The other settings don’t affect the Contact groups conditions.
String values only
The system currently only supports string (Text) fields in the Contact has value in field condition.
For example, despite adding both TrainingGuidesContactFavoriteCoffee and TrainingGuidesContactLastCommunitationDate fields to the Contact edit, only the TrainingGuidesContactFavoriteCoffee field will be available in the Contact groups condition.
Enable usage in Automation
Similarly, if you want your custom field to be available in automation steps, you need to add it to the Set contact field value automation step UI form.
Navigate to Modules → Contact management → Classes → Contact management → Contact → UI Forms → Set contact field value automation step and add your custom field.
After you save, you should be able to utilize your new field in steps of your automation processes, like in the video below.
Like in Contact groups, the Contact has value in field condition in Automation only supports string values.
However, you can utilize non-string contact fields in the Set contact field value, for example, the TrainingGuidesContactLastCommunitationDate.
Branch out
You now have the tools to add custom fields to Contact and expose them to the editor. You also know how to create a custom UI page displaying a custom UI form.
In this guide, we created a page using the edit UI page template. On this page, you can read more about other available templates, their methods, and usage.
If you are interested in learning how to create a custom class in Xperience rather than just extending system objects, take a look at our custom module guides. Over the course of four guides, the series shows how to build a custom “settings” module.
What’s next?
Continue learning about contact customization, covering how to import contacts from an external system in the next contact customization guide.
If you have ideas you’d like us to cover in future guides, or if you’ve encountered any problems or issues in our existing materials, please click the Send us feedback button below to let us know.