
Create a marketing email
Learn step-by-step how to create a marketing email in Xperience by Kentico.
The sample covers what it takes to create and send a marketing newsletter informing your subscribers about personal loans.
Do you know what it’s like working with Xperience by Kentico? Try our Kbank demo website and get a hands-on experience. And if you don’t have your demo site, request it through the form at Kentico website and request the Xperience by Kentico – Business Tutorial Kbank demo site. Once you approve the request, we will automatically send you a link to the demo site.
- Go to the Marketing Emails channel application and create a New email.
- Fill in the email properties:
- Name: Convenient personal loans.
- Email purpose: Regular.
- Content type: Newsletter email
- Email template: Regular template with reusable content.
- Save the changes.
- Create the email content:
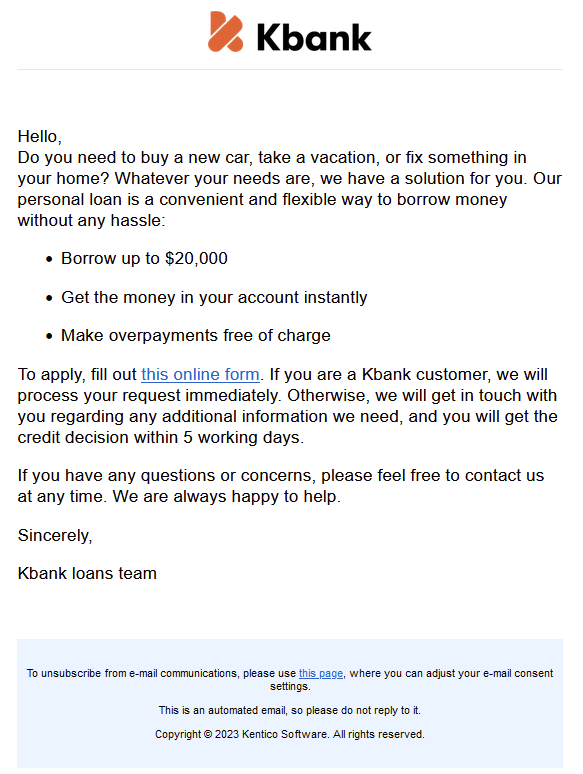
Subject: Take advantage of our convenient personal loans.
Preview text: Don’t miss the opportunity to use our personal loans at convenient terms.
Email content - use the rich text editor to add the following text:
Hello,
Do you need to buy a new car, vacation, or fix something in your home? Whatever your needs are, we have a solution for you. Our personal loan is a convenient and flexible way to borrow money without any hassle:
Borrow up to $20,000
Get the money in your account instantly
Make overpayments free of charge
To apply, fill out this online form [link]. If you are a Kbank customer, we will process your request immediately. Otherwise, we will contact you regarding any additional information we need, and you will get the credit decision within five working days.
If you have any questions or concerns, please get in touch with us anytime. We are always happy to help.
Sincerely,
Kbank loans teamAdd the link:
- Select the “this online form” part of the email and Insert link.
- Select Page.
- From the content tree, select Loans and pick the Personal loan.
- Confirm your choice with the Insert button.
You can style the text with the rich text editor if you want.
- Save the email.
- Open the Properties tab on the right side and fill in the Sender and recipients part:
- Sender: Kbank.
- Send to: Newsletter recipient list.
- Save the changes.
Send emails
You can now send the email to the recipients. You can select Preview to see what the final email looks like. Your email is now ready for Review and send. You can schedule the email for later and pick a date and time or send it immediately.
The demo environment is not connected to an email server, so you won’t be able to send emails to real inboxes.
Email statistics
Xperience shows you essential information about your email performance. Open your email in the Marketing Emails channel application and switch to the Statistics tab. You can view the statistics of a tracked email once you’ve sent some emails. But for the time being, there won’t be any.
Next step
IN the next guide, learn how to create newsletter confirmation and unsubscription emails.