
Access custom global configurations
Earlier in this series, you learned how to create a custom module that holds custom channel-agnostic key-value-based settings.
Let’s say your customer wants to use the new module to define two custom email notification settings: Email notification recipients and Email notification sender.
Every time Xperience sends a certain type of email notification, these two settings should determine who the recipients and the sender are.
How do you access the values in your code to meet the customer’s requirements?
Using the email notification settings described above as an example, let’s explore how you can access custom module values and how to utilize the Options pattern to work with custom settings defined in the Xperience in a strongly typed manner.
Before you start
This guide requires the following:
- Familiarity with C#, .NET Core, Dependency injection, and the MVC pattern.
- A running instance of Xperience by Kentico, preferably 31.3.3 or higher.
Some features covered in the training guides may not work in older versions.
The examples in this guide require that you:
- Have followed along with the samples from the previous guide that implement a custom module holding global settings.
Code samples
You can find a project with completed, working versions of code samples from this guide and others in the finished branch of the Training guides repository.
The main branch of the repository provides a starting point to code along with the guides.
The code samples in this guide are for .NET 8 only.
They come from a project that uses implicit using directives. You may need to add additional using directives to your code if your project does not use this feature.
Enter the data
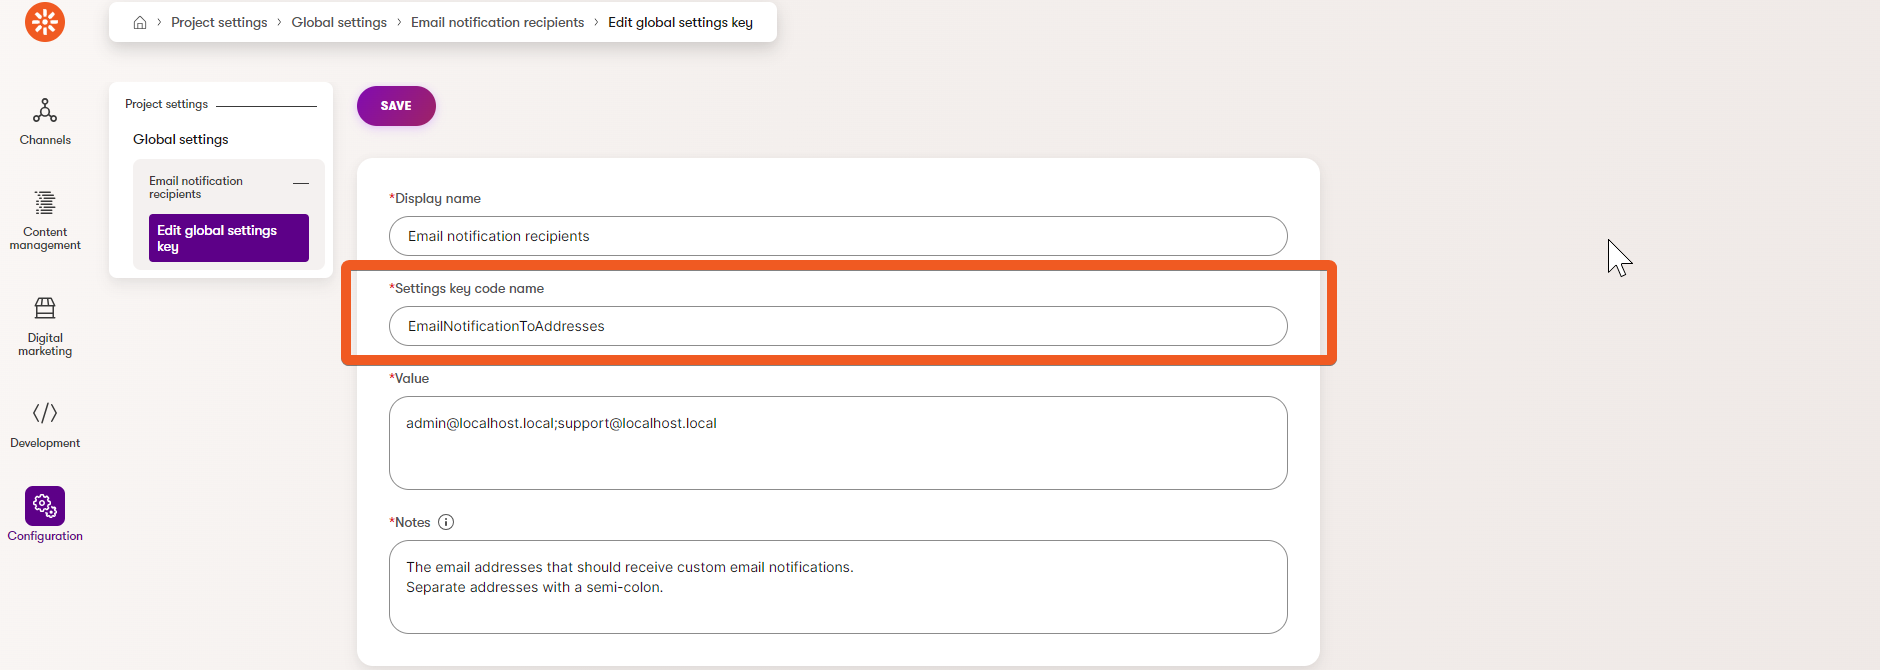
To follow along with the example here, use the UI developed earlier in this series to create two email notification settings, as seen in this video.
You can copy-paste these values:
- Display name: Email notification recipients
- Settings key code name: EmailNotificationToAddresses
- Value::admin@localhost.local;support@localhost.local
- Notes: The email addresses that should receive custom email notifications. Separate addresses with a semi-colon.
- Display name: Email notification sender
- Settings key code name: EmailNotificationFromAddress
- Value: notifications@localhost.local
- Notes: The email address that custom email notifications will be sent from.
Expose your custom configuration
In general, you can access objects of custom classes in Xperience using the ObjectQuery API.
Our module holds information related to system configuration (email notifications). To access it in a strongly typed manner, with the principles of encapsulation and separation of concerns in mind, we recommend using the Options pattern.
If you are new to the Options pattern, outside of the official Microsoft documentation, you may find this article or this video helpful in understanding its basic principles.
In a nutshell, we will:
- Create an options model class to hold our configuration values.
- Create an options “setup” class to populate the model from Xperience objects using the ObjectQuery API.
- Register the option classes with the DI container.
- Use DI to access the values and implement the desired functionality.
Create an options model
In our example, the customer has defined two settings: Email notification recipients and Email notification sender.
Let’s create an EmailNotificationOptions class with two properties - one string value per setting.
Place your file in the TrainingGuides.Web/Features/EmailNotifications folder. If you are following along using our Training guides repository, you can place all the files we’ll create in this folder.
namespace TrainingGuides.Web.Features.EmailNotifications;
public class EmailNotificationOptions
{
    public string SenderAddress { get; set; } = string.Empty;

    public string RecipientAddresses { get; set; } = string.Empty;
}
Map configuration to the options model
Next, create an EmailNotificationOptionsSetup class that implements the IConfigureOptions<TOptions> interface, and pass in the EmailNotificationOptions model class.
Both email notification settings are objects of the GlobalSettingsKeyInfo class from earlier in this series.
Retrieve global settings with the generic IInfoProvider, using ObjectQuery API extension methods to filter your query based on their Settings key code name.
using CMS.DataEngine;
using Microsoft.Extensions.Options;
using TrainingGuides.ProjectSettings;

namespace TrainingGuides.Web.Features.EmailNotifications;

public class EmailNotificationOptionsSetup : IConfigureOptions<EmailNotificationOptions>
{
    // Settings key code names of the two email notification settings.
    private const string FROM_ADDRESS_SETTINGS_KEY = "EmailNotificationFromAddress";
    private const string TO_ADDRESSES_SETTINGS_KEY = "EmailNotificationToAddresses";

    // Provide access to the objects of GlobalSettingsKeyInfo class using the generic IInfo provider and dependency injection.
    private readonly IInfoProvider<GlobalSettingsKeyInfo> globalSettingsKeyInfoProvider;

    public EmailNotificationOptionsSetup(IInfoProvider<GlobalSettingsKeyInfo> globalSettingsKeyInfoProvider)
    {
        this.globalSettingsKeyInfoProvider = globalSettingsKeyInfoProvider;
    }

    // Implement the Configure method of the IConfigureOptions interface.
    public void Configure(EmailNotificationOptions options)
    {
        // Retrieve GlobalSettingsKeyInfo objects
        // with a 'EmailNotificationFromAddress' or 'EmailNotificationToAddresses' code name
        // using ObjectQuery API.
        var emailSettings = globalSettingsKeyInfoProvider.Get()
            .WhereEquals(nameof(GlobalSettingsKeyInfo.GlobalSettingsKeyName), FROM_ADDRESS_SETTINGS_KEY)
            .Or()
            .WhereEquals(nameof(GlobalSettingsKeyInfo.GlobalSettingsKeyName), TO_ADDRESSES_SETTINGS_KEY)
            .GetEnumerableTypedResult();

        // Filter out sender address and recipient addresses and store them in variables respectively.
        var fromAddress = emailSettings.FirstOrDefault(s => s.GlobalSettingsKeyName == FROM_ADDRESS_SETTINGS_KEY);
        var toAddresses = emailSettings.FirstOrDefault(s => s.GlobalSettingsKeyName == TO_ADDRESSES_SETTINGS_KEY);

        // Populate the EmailNotificationOptions model.
        options.SenderAddress = fromAddress?.GlobalSettingsKeyValue ?? string.Empty;
        options.RecipientAddresses = toAddresses?.GlobalSettingsKeyValue ?? string.Empty;
    }
}
Register the options setup class
Now, you need to tell your application to use your new custom class. Register the setup class and associated model with the DI container by calling builder.Services.ConfigureOptions<EmailNotificationOptionsSetup>(); before application build.
Our Training guides repository uses a static ServiceCollectionExtensions class to register all services.
If you are working in this repo or you extract service registrations in your project in a similar way, there are two steps:
Add a new static method to register options (
AddTrainingGuidesOptionsmethod below).C#ServiceCollectionExtensions.cs... using TrainingGuides.Web.Features.EmailNotifications; namespace TrainingGuides.Web; public static class ServiceCollectionExtensions { public static void AddTrainingGuidesServices(this IServiceCollection services) { ... } // New static method to register options. public static void AddTrainingGuidesOptions(this IServiceCollection services) { // Register your custom options setup class with the DI container. services.ConfigureOptions<EmailNotificationOptionsSetup>(); } }Call the new method in Program.cs on application start.
C#Program.cs... builder.Services.AddTrainingGuidesServices(); // new method call builder.Services.AddTrainingGuidesOptions(); ... var app = builder.Build(); app.InitKentico(); ...
Utilize custom settings values in your application
Thanks to the options pattern, you can now easily access your configuration anywhere in your code where dependency injection is available.
Choose any of the options interfaces that best fits your use case and application lifecycle.
For example, IOptions<TOptions> is a singleton service that holds a snapshot of the settings at the time of its first construction. It will work well in cases where the configuration values do not change during the application’s life.
In other scenarios, it may be better to take advantage of a scoped service, IOptionsSnapshot<TOptions>, which re-evaluates the options every time it’s constructed.
IOptionsMonitor<TOptions>, as the name suggests, is a suitable choice if you need a singleton service to monitor values that you expect to change continuously.
Find the full list of options interfaces in the official Microsoft documentation.
Build a notification service
Let’s build a service that will send notifications to your configured email addresses.
namespace TrainingGuides.Web.Features.EmailNotifications;
public interface IEmailNotificationService
{
    Task SendEmailAsync(string subject, string message);
}
using CMS.EmailEngine;
using Microsoft.Extensions.Options;

namespace TrainingGuides.Web.Features.EmailNotifications;

public class EmailNotificationService : IEmailNotificationService
{
    private readonly IEmailService emailService;

    // Use DI to access your configuration options
    private readonly IOptionsMonitor<EmailNotificationOptions> emailNotificationOptions;
    private readonly IOptionsMonitorCache<EmailNotificationOptions> emailNotificationOptionsCache;

    public EmailNotificationService(IEmailService emailService,
        IOptionsMonitor<EmailNotificationOptions> emailNotificationOptions,
        IOptionsMonitorCache<EmailNotificationOptions> emailNotificationOptionsCache)
    {
        this.emailService = emailService;
        this.emailNotificationOptions = emailNotificationOptions;
        this.emailNotificationOptionsCache = emailNotificationOptionsCache;
    }

    public async Task SendEmailAsync(string subject, string message)
    {
        // Clear the options cache to ensure we always get the latest data when settings have changed.
        emailNotificationOptionsCache.Clear();

        var msg = new EmailMessage()
        {
            // Assign the email sender based on the configuration.
            From = emailNotificationOptions.CurrentValue.SenderAddress,

            // Assign email recipients based on the configuration.
            Recipients = emailNotificationOptions.CurrentValue.RecipientAddresses,

            Priority = EmailPriorityEnum.Normal,

            Subject = subject,

            Body = message,
        };
        await emailService.SendEmail(msg);
    }
}
Register your service.
...
using TrainingGuides.Web.Features.EmailNotifications;

namespace TrainingGuides.Web;

public static class ServiceCollectionExtensions
{
    public static void AddTrainingGuidesServices(this IServiceCollection services)
    {
        services.AddSingleton<IHttpRequestService, HttpRequestService>();
        ...
        // Register EmailNotificationService as a singleton service.
        services.AddSingleton<IEmailNotificationService, EmailNotificationService>();
    }
    ...
}
Notice that we use IOptionsMonitor<TOptions> to inject notification options. This way, we can monitor the settings while saving resources using a singleton service.
The options are cached. For simplicity, we clear the cache each time the SendEmailAsync method fires so that we always have fresh data. A more advanced approach example could be implementing another global handler that watches the settings keys.
Because the IOptionsMonitor<TOptions> is a singleton, we registered our EmailNotificationService in the same way.
Watch your settings work in practice
To see our email notifications based on custom global settings at work, let’s generate a notification every time a new user is created in the system.
We will achieve this by creating a custom object handler (module class) that registers a typed insert event handler for the UserInfo class.
using CMS;
using CMS.Core;
using CMS.DataEngine;
using CMS.Membership;
using TrainingGuides.Web.Features.EmailNotifications;

[assembly: RegisterModule(typeof(EmailNotificationHandlerModule))]

namespace TrainingGuides.Web.Features.EmailNotifications;

// Module class discovered by Xperience during startup.
// Its responsibility is only to register event handlers.
public class EmailNotificationHandlerModule : Module
{
    public EmailNotificationHandlerModule() : base(nameof(EmailNotificationHandlerModule))
    { }

    // Registration code that is executed before module initialization.
    protected override void OnPreInit(ModulePreInitParameters parameters)
    {
        base.OnPreInit(parameters);

        // Assign a handler to the InfoObjectAfterInsert event for the UserInfo class.
        // This event occurs after a new user object is created.
        parameters.Services.AddInfoObjectEventHandler<InfoObjectAfterInsertEvent<UserInfo>, UserAfterInsertHandler>();
    }
}

// Dedicated handler class that contains business logic for the event.
// Keeping this outside the module allows constructor injection.
internal sealed class UserAfterInsertHandler(IEmailNotificationService emailNotificationService)
    : IInfoObjectEventHandler<InfoObjectAfterInsertEvent<UserInfo>>
{
    // Synchronous fallback required by the interface.
    // Fire-and-forget is acceptable for After handlers, because the save operation has already completed.
    // Avoid this pattern in Before handlers, where execution must wait for completion.
    public void Handle(InfoObjectAfterInsertEvent<UserInfo> infoObjectEvent) =>
        _ = SendNotificationAsync(infoObjectEvent.InfoObject, CancellationToken.None);

    // Preferred asynchronous entry point used when an async flow is available.
    // Cancellation is propagated to the notification method.
    public Task HandleAsync(InfoObjectAfterInsertEvent<UserInfo> infoObjectEvent, CancellationToken cancellationToken) =>
        SendNotificationAsync(infoObjectEvent.InfoObject, cancellationToken);

    private async Task SendNotificationAsync(UserInfo user, CancellationToken cancellationToken)
    {
        cancellationToken.ThrowIfCancellationRequested();

        // Build a simple message from the newly created user and send it.
        await emailNotificationService.SendEmailAsync($"New user created ({user.Email})", $"New user inserted with ID {user.UserID}, email {user.Email}, guid {user.UserGUID}");
    }
}
The module registers a strongly typed handler in OnPreInit using AddInfoObjectEventHandler.
The UserAfterInsertHandler class can then use constructor injection for IEmailNotificationService, which keeps the module focused only on event registration and keeps notification logic in a dedicated handler.
Build and run your solution. Navigate to the Xperience administration and add a new user. If you entered valid email addresses in the Project settings, the recipients should receive an email notification.
Alternatively, you can place a breakpoint in your application to see that your custom global settings are propagating in your application on user creation.
Try changing the email addresses and creating another user. If you followed our example and used the IOptionsMonitor<TOptions> options interface, you should see the changes take effect without restarting your app.
What’s next
In this and the previous guide, we talked about utilizing modules in Xperience by Kentico to implement custom global (channel-agnostic) settings.
Continue with this series’s next two guides to learn how to implement custom settings applicable per website channel.