
Install, configure and develop a SaaS-ready project
Now that you’ve set up your Xperience Portal, let’s prepare your project for Kentico SaaS deployment.
Before you start
To follow along, we recommend your machine has the following installed:
- .NET 8.0
- Microsoft SQL Server 2022 (or compatible version, such as the free SQL Server Express Edition)
- an IDE that supports ASP.NET Core development, such as Visual Studio or Visual Studio Code
Install SaaS-ready project
Kentico provides an easy way to ensure all the default configuration is in place with our .NET templates and installation parameters.
First, check your existing Kentico template versions and install the desired one.
Then, create a project using the kentico-xperience-sample-mvc template (the Dancing Goat sample site).
The --cloud parameter will automatically add SaaS-specific sample configuration to your newly generated project.
dotnet new kentico-xperience-sample-mvc --cloud -n DancingGoat.Web
You can use the --cloud parameter with any of the Kentico templates. For example, for your own project, you may want to use the empty boilerplate (kentico-xperience-mvc) and either develop your project from scratch or migrate your existing solution into it.
Create and connect the database
Obtain a license key from your Xperience Portal (you only need this for local development):
- Navigate to the License key generator page.
- Select the Xperience by Kentico version compatible with your project.
- Click Generate license key.
- Copy-paste the key and store it in a text file (e.g., license.txt) on your local machine.
Make sure to store the key before you click OK. The generated key is NOT stored in the Portal so you will not be able to access it later.
Next, obtain the hash string salt for your project from the Xperience Portal dashboard: 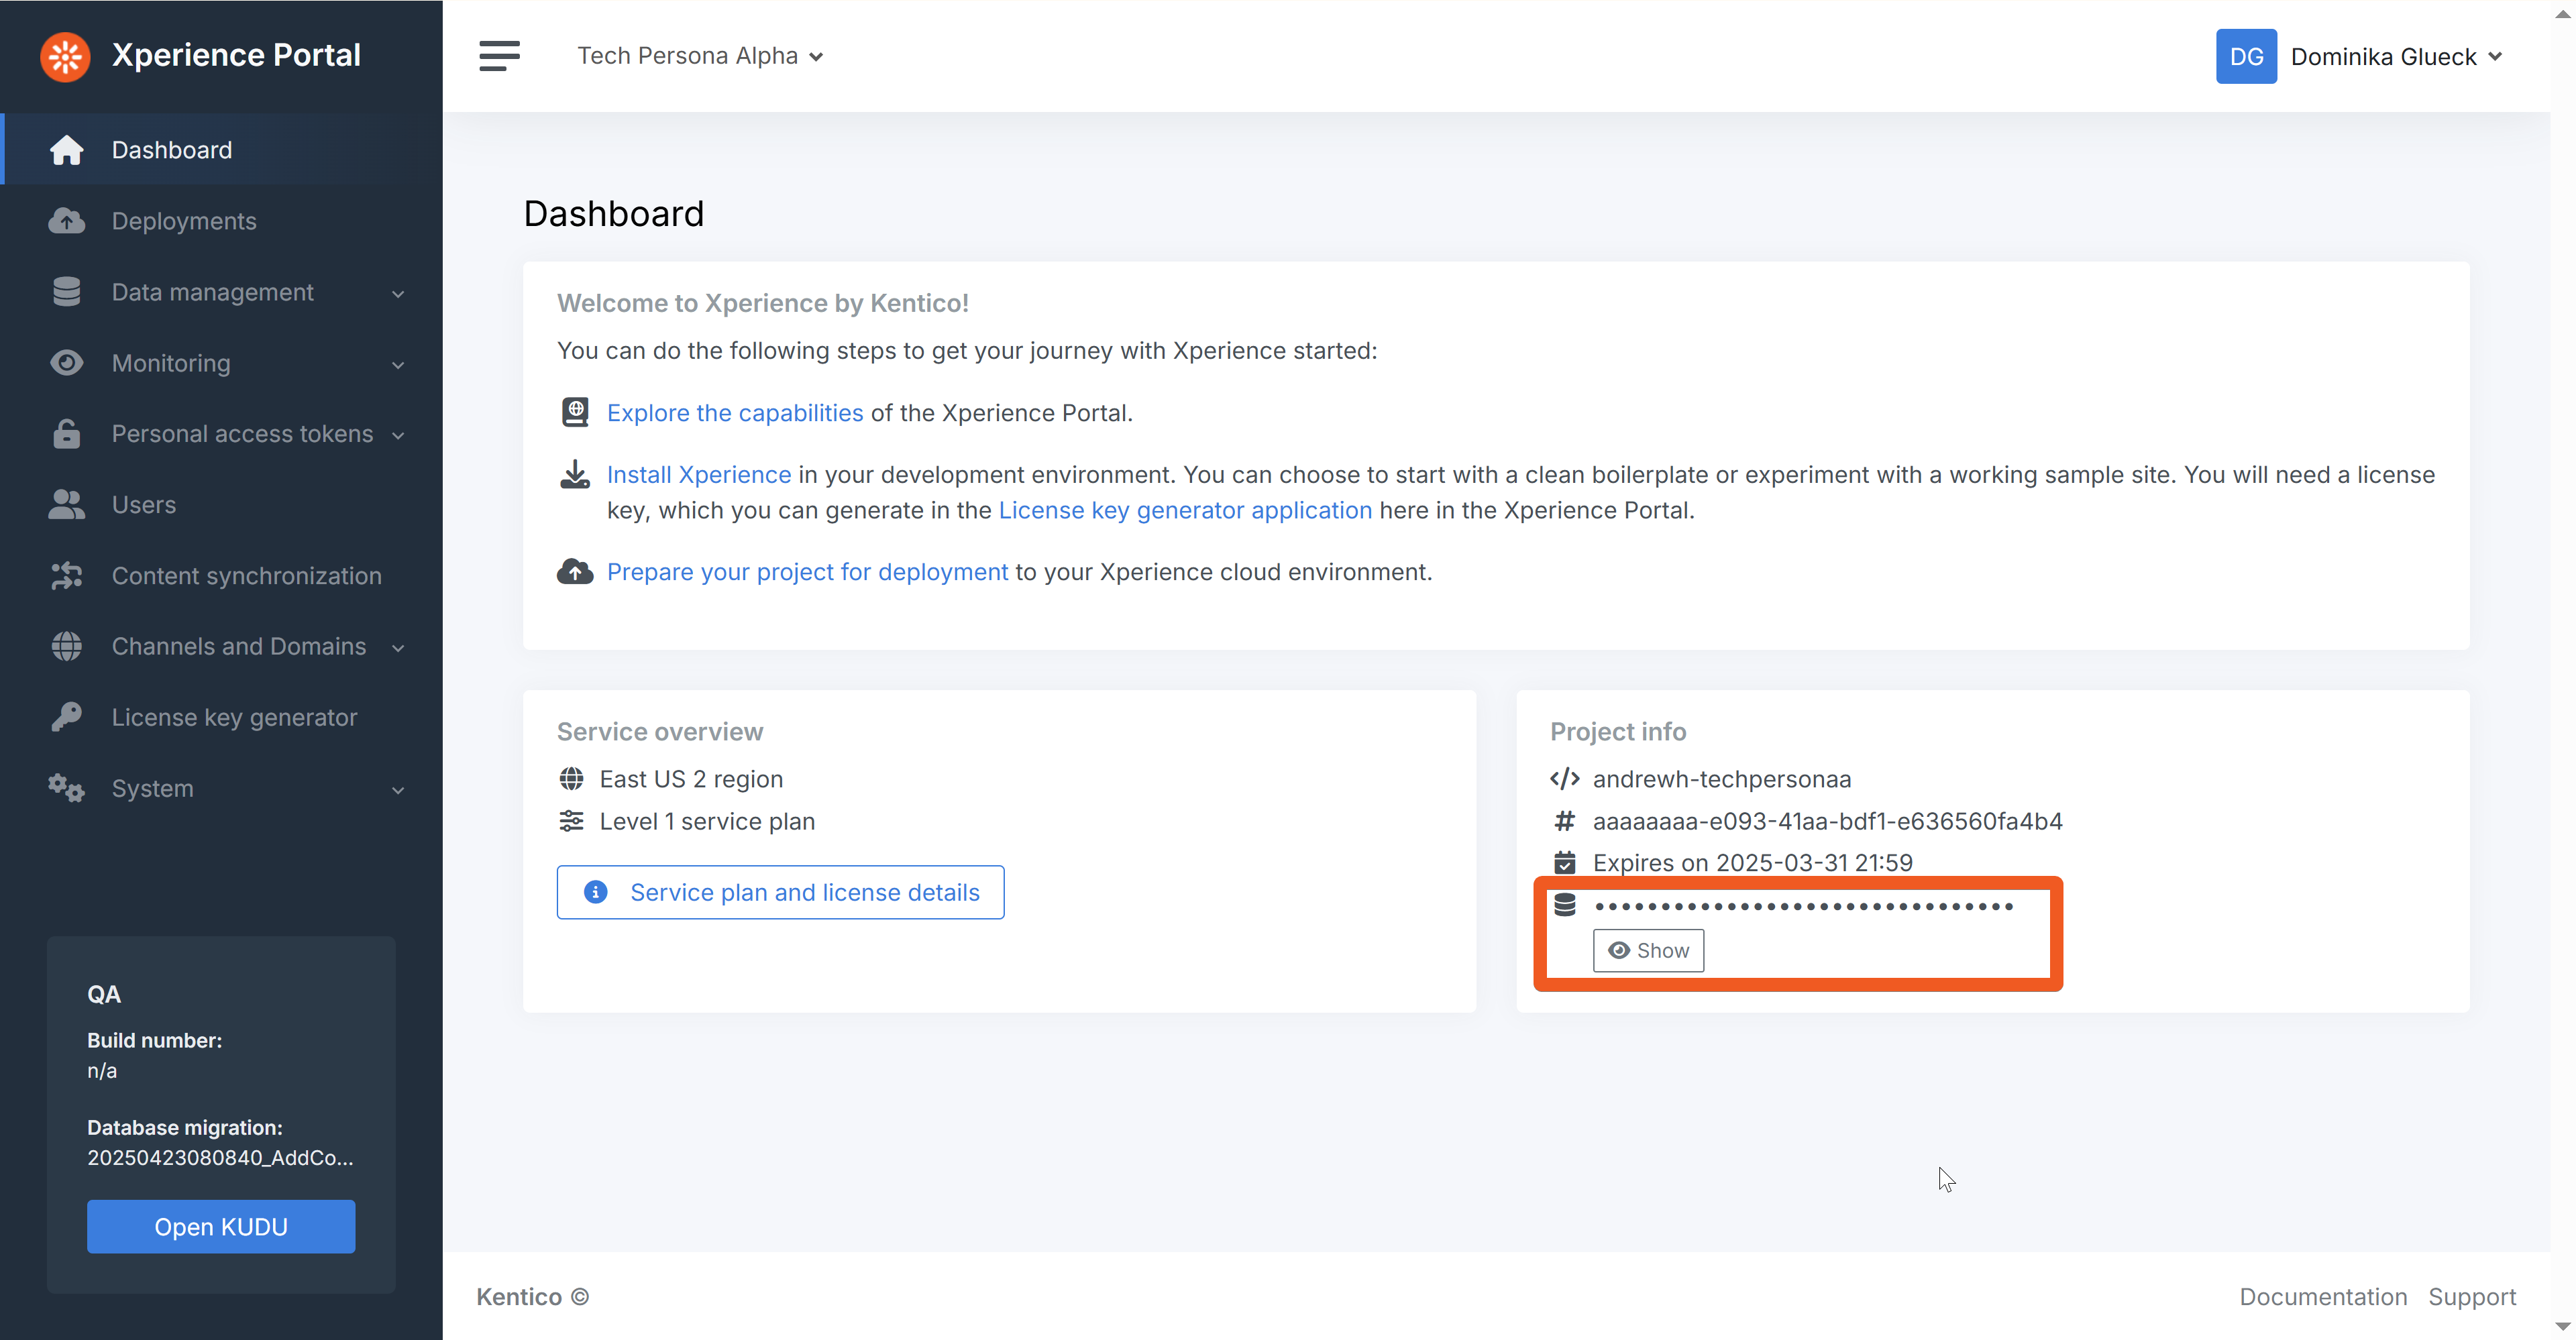
Run the following command to create and connect a database to your project.
dotnet kentico-xperience-dbmanager -- -s "<sql_server_name>" -a "dg123*" -d "Xperience.DancingGoat" --hash-string-salt "<your_Xperience_Portal_hash_string_salt>" --license-file "<path_to_your_license_txt_file>"
Remember to replace the <sql_server_name> and <path_to_your_license_txt_file> placeholders with values relevant to your local environment.
The hash string salt value has to match the value from your Xperience Portal dashboard.
For more information about database creation and the command’s parameters, visit our documentation.
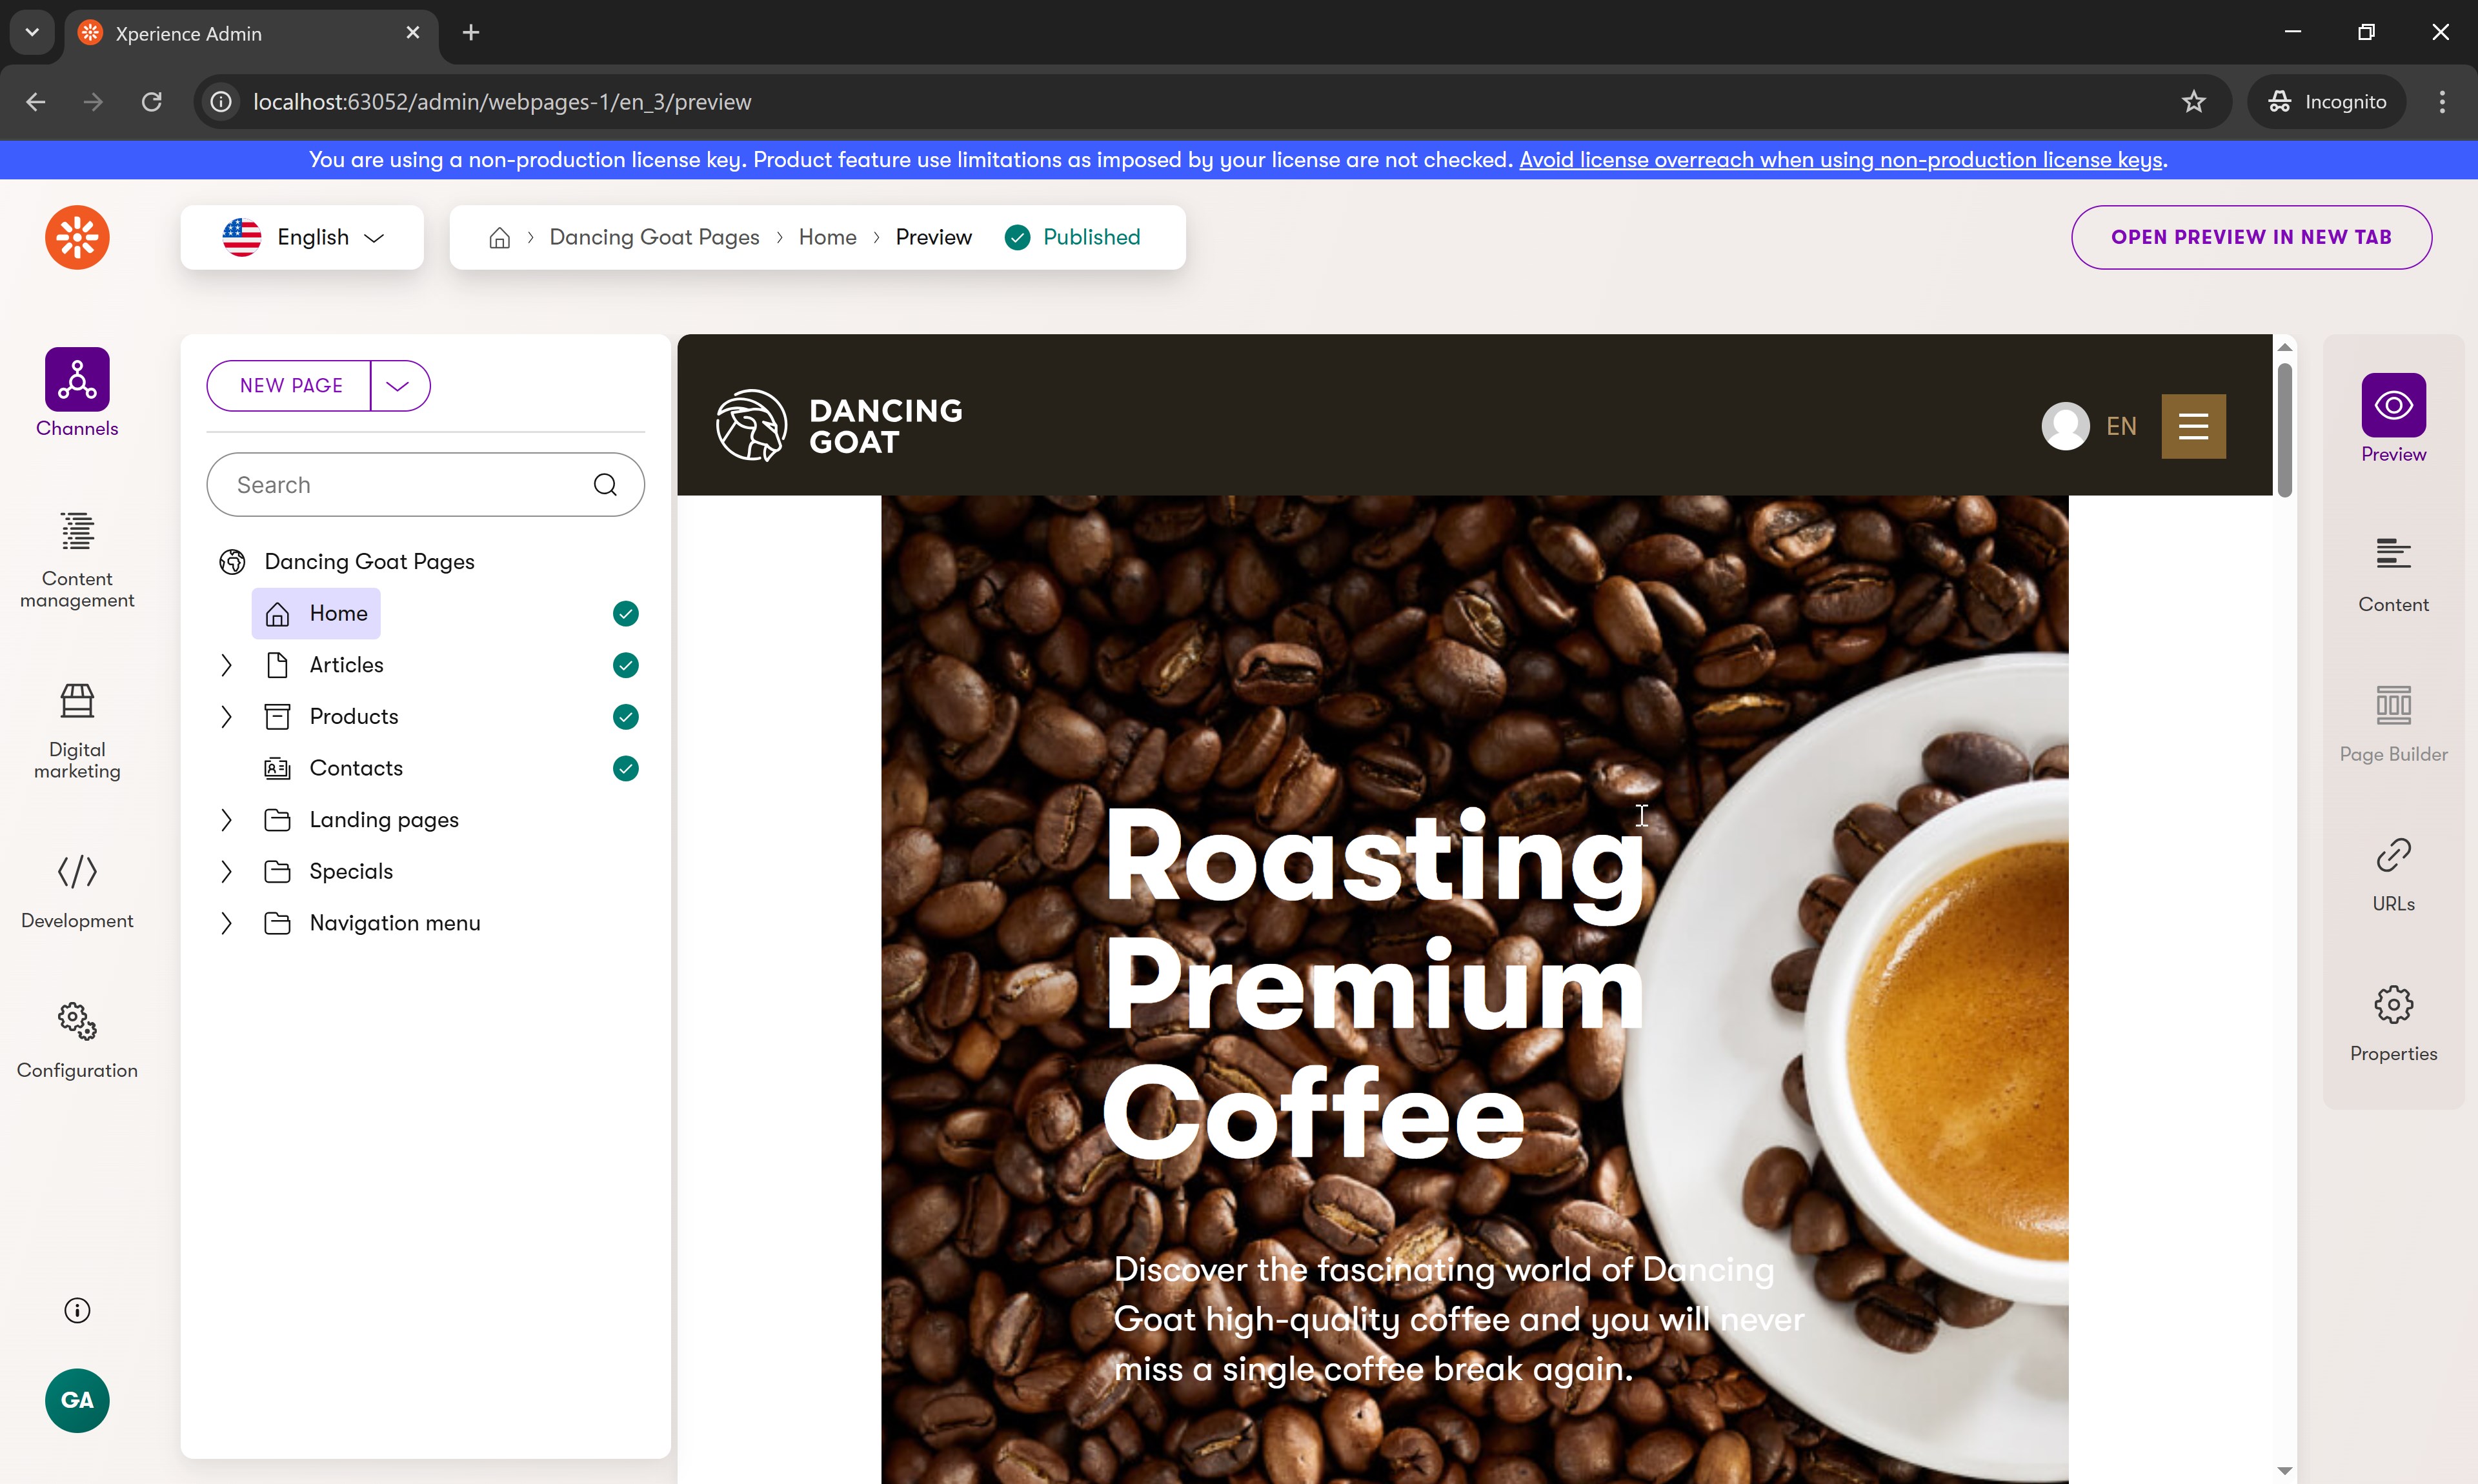
After successful database installation, run the project. You should see the Dancing Goat sample site Home page. Visit the /admin path and sign in to the administration to ensure everything installed correctly.
Enable Continuous Integration (CI) - optional
Enabling Continuous Integration is not a must from the perspective of Kentico SaaS; it’s more of the choice of your project’s development team.
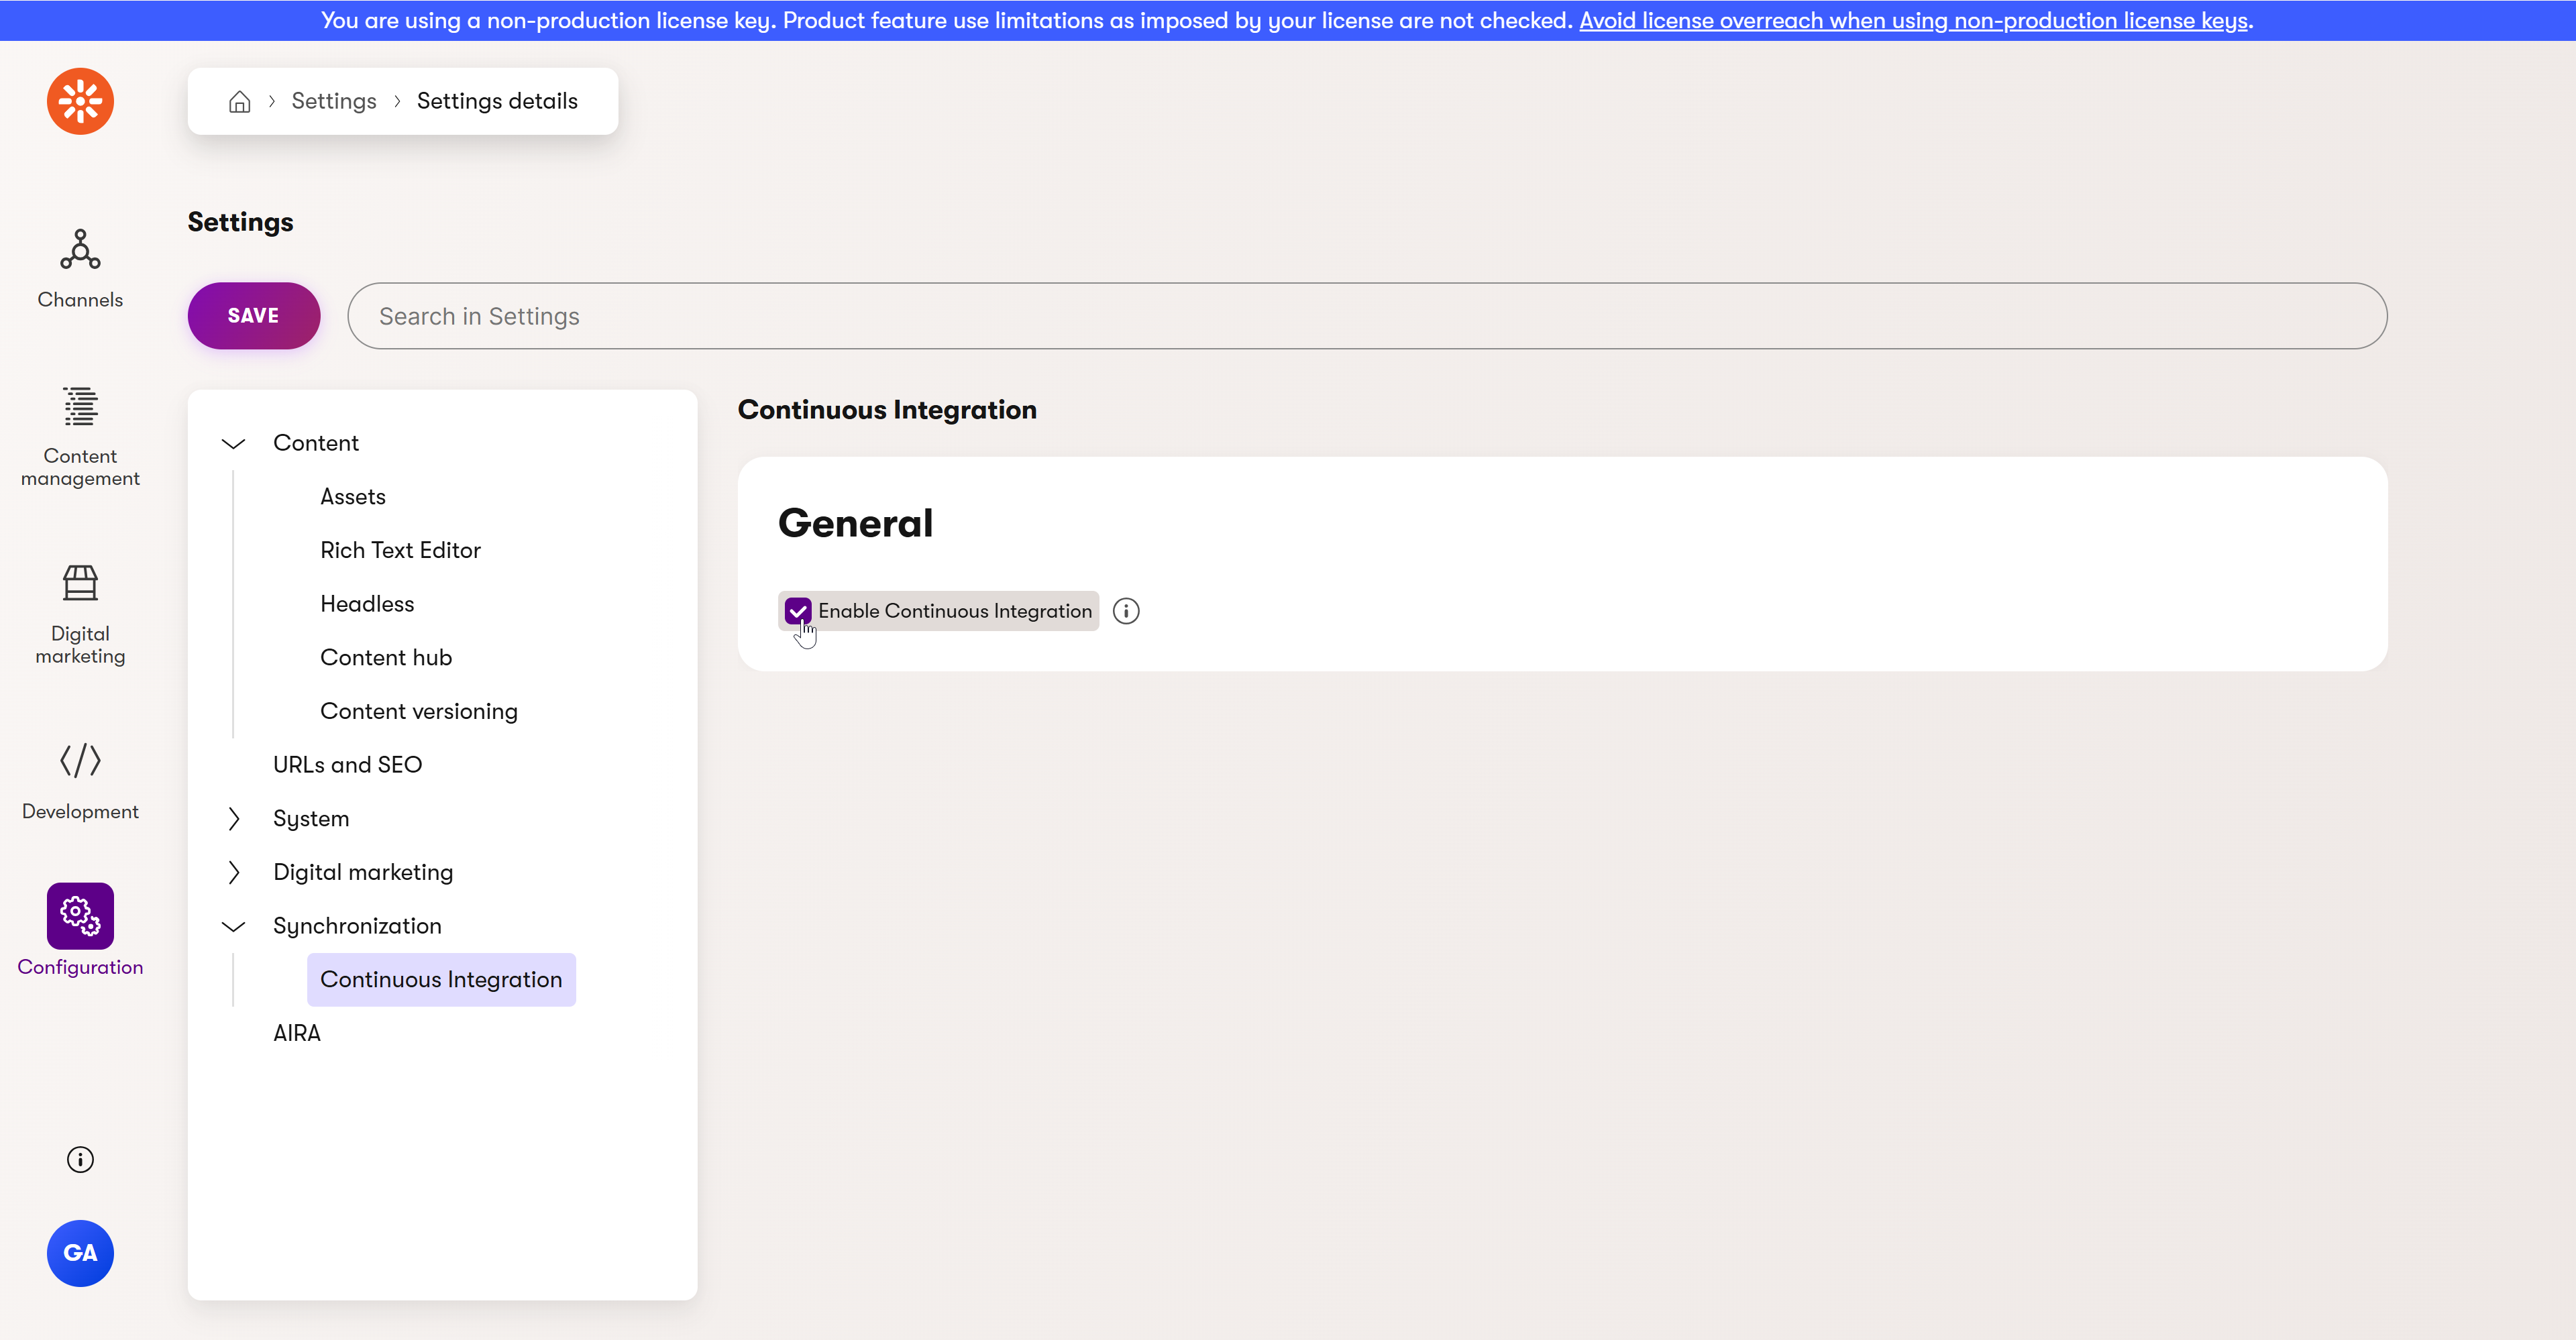
If you wish to enable CI for your project, sign in to your administration interface, navigate to the Settings application (under Configuration in the dashboard). Under Synchronization -> Continuous Integration check the Enable Continuous Integration checkbox.
Save.
Now you can use the --kxp-ci-store and --kxp-ci-restore commands as explained in our documentation.
Examine and adjust the SaaS-specific configuration
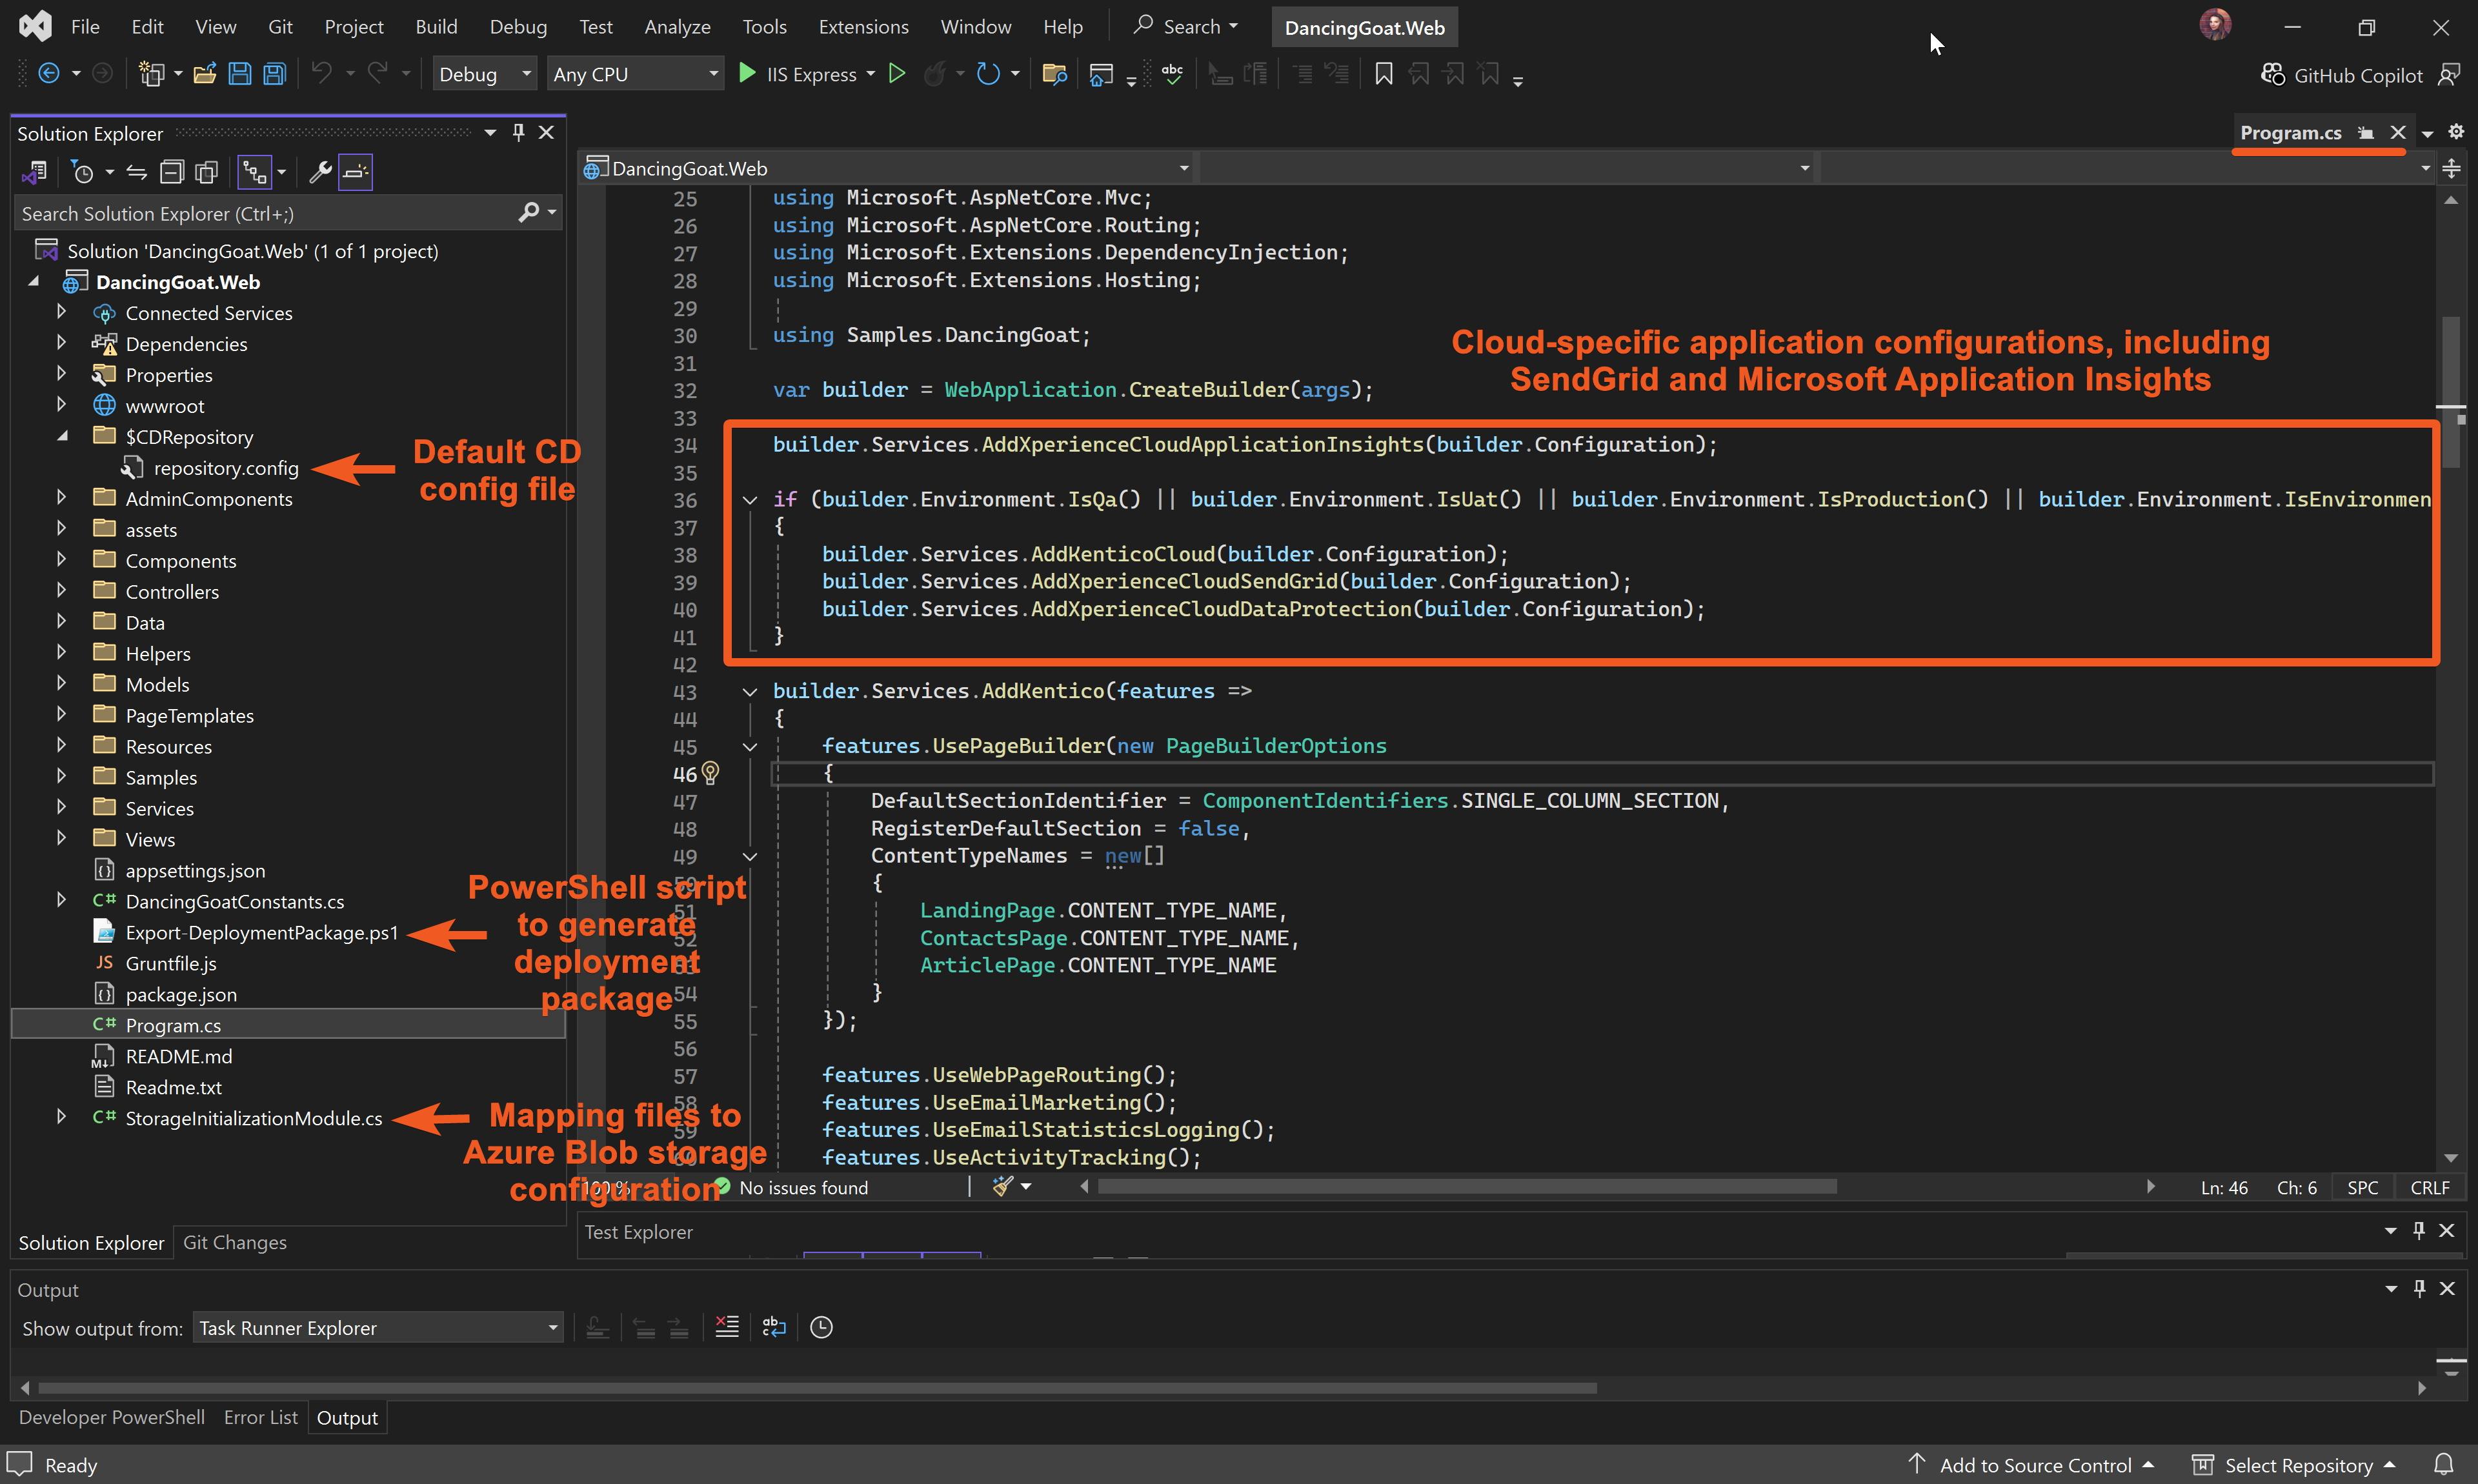
Thanks to the --cloud parameter, your new project now includes the necessary NuGet packages, including the Kentico.Xperience.Cloud and all the default SaaS-specific configuration:
- repository.config - a file holding the default Continuous Deployment (CD) configuration
- Program.cs - includes cloud-specific app configurations
- Export-DeploymentPackage.ps1 - a script to generate the future deployment package
- AddXperienceCloudStoragePathMapping() - registers automatically file paths for the Azure Blob storage mapping
- AddXperienceCloudApplicationInsights() - configures the Microsoft Application Insights integration
Let’s examine the default configuration one-by-one.
Continuous Deployment
Continuous deployment (CD) in Xperience converts content and objects from the database into XML files. These files are deployed with your code and restored in target environments through automated pipelines. This is a mechanism that Kentico SaaS uses for project data deployment.
Content sync
After your initial deployment, you don’t necessarily need CD every time you want to move content changes between SaaS environments. For supported content, you can use content sync to deploy updates (Advanced license required).
See Content sync configuration for configuration details. If the updated content is not supported by content sync or if the feature is not available, deploy the changes via a new deployment package.
Take a look at the $CDRepository folder and its repository.config file.
The repository.config holds the default CD configuration in an XML format. It includes and excludes objects, determining which ones will be a part of the deployment in the Xperience portal.
The object types are identified by their CI/CD folder names. Visit our documentation for a list of objects supported by CD, their CI/CD folder names, and additional notes.
Your file right now is set up correctly for the Dancing Goat sample site project and should look like this:
<?xml version="1.0" encoding="utf-8"?>
<RepositoryConfiguration xmlns:xsd="http://www.w3.org/2001/XMLSchema" xmlns:xsi="http://www.w3.org/2001/XMLSchema-instance">

  <!-- Specifies which types of object operations are performed in the target database when restoring the repository:
     Create - only creates new objects. Never deletes or modifies existing objects.
     CreateUpdate - creates new objects and updates existing objects. Never deletes objects.
       Full - creates new objects, updates existing objects, deletes objects that do not exist in the repository.
     -->
  <RestoreMode>CreateUpdate</RestoreMode>

  <!-- After changing the included or excluded object types, you need to run serialization for all objects to bring
       the repository folder into the required state. Use the CLI and execute the store command for Continuous Integration or Deployment.
     Always synchronize the repository.config along with the other content of the repository folder. -->

  <!-- To learn which object types can be used in the IncludedObjectTypes and ExcludedObjectTypes definitions,
       visit the documentation: https://devnet.kentico.com/CMSPages/DocLinkMapper.ashx?version=xp&link=ci_object_types -->

  <!-- If one or more main object types are specified, only objects of the given type and their child types are processed.
       All supported object types are included if empty. -->
  <IncludedObjectTypes>
    <ObjectType>cms.class</ObjectType>
    <ObjectType>cms.consent</ObjectType>
    <ObjectType>cms.contenttype</ObjectType>
    <ObjectType>cms.contentlanguage</ObjectType>
    <ObjectType>cms.scheduledtaskconfiguration</ObjectType>
    <ObjectType>cms.settingscategory</ObjectType>
    <ObjectType>cms.settingskey</ObjectType>
    <ObjectType>cms.user</ObjectType>
    <ObjectType>cms.role</ObjectType>
    <ObjectType>cms.memberrole</ObjectType>
    <ObjectType>cms.channel</ObjectType>
    <ObjectType>cms.websitechannel</ObjectType>
    <ObjectType>cms.websitecaptchasettings</ObjectType>
    <ObjectType>cms.contentitem</ObjectType>
    <ObjectType>cms.pagetemplateconfiguration</ObjectType>
    <ObjectType>cms.contentfolder</ObjectType>
    <ObjectType>cms.smartfolder</ObjectType>
    <ObjectType>cms.standardmediadimensions</ObjectType>
    <ObjectType>cms.workspace</ObjectType>
    <ObjectType>cms.workspacedatapermission</ObjectType>
    <ObjectType>cms.allowedchildcontenttype</ObjectType>

    <ObjectType>cms.headlesschannel</ObjectType>
    <ObjectType>cms.headlessitem</ObjectType>

    <ObjectType>media.library</ObjectType>
    <ObjectType>media.file</ObjectType>

    <ObjectType>om.activitytype</ObjectType>
    <ObjectType>om.recipientlist</ObjectType>
    <ObjectType>om.contactgroup</ObjectType>
    <ObjectType>om.customerjourneyhistory</ObjectType>
    <ObjectType>om.customerjourney</ObjectType>
    <ObjectType>om.customerjourneystage</ObjectType>
    <ObjectType>cms.formclass</ObjectType>
    <ObjectType>cms.formfeaturedfield</ObjectType>

    <ObjectType>emaillibrary.emailchannel</ObjectType>
    <ObjectType>emaillibrary.emailchannelsender</ObjectType>
    <ObjectType>emaillibrary.emailconfiguration</ObjectType>
    <ObjectType>emaillibrary.emailtemplatecontenttype</ObjectType>
    <ObjectType>emaillibrary.recipientlistsettings</ObjectType>
    <ObjectType>emaillibrary.sendconfiguration</ObjectType>
    <ObjectType>emaillibrary.emailtemplate</ObjectType>

    <ObjectType>ma.automationprocess</ObjectType>
    <ObjectType>ma.automationstep</ObjectType>
    <ObjectType>ma.automationaction</ObjectType>
    <ObjectType>ma.automationtemplate</ObjectType>
    <ObjectType>cms.objectworkflowtrigger</ObjectType>
    <ObjectType>cms.workflowtransition</ObjectType>

    <ObjectType>cms.webpageitem</ObjectType>
    <ObjectType>cms.webpageurlpath</ObjectType>
    <ObjectType>cms.webpageformerurlpath</ObjectType>
    <ObjectType>om.trackedwebsite</ObjectType>
    <ObjectType>cms.form</ObjectType>

    <ObjectType>cms.contentworkflow</ObjectType>
    <ObjectType>cms.contentworkflowcontenttype</ObjectType>
    <ObjectType>cms.contentworkflowrole</ObjectType>
    <ObjectType>cms.contentworkflowstep</ObjectType>
    <ObjectType>cms.contentworkflowsteprole</ObjectType>
    <ObjectType>cms.taxonomy</ObjectType>
    <ObjectType>cms.tag</ObjectType>
    <ObjectType>cms.notificationemailtemplate</ObjectType>
    <ObjectType>cms.notificationemail</ObjectType>
    <ObjectType>cms.notificationemailform</ObjectType>
    <ObjectType>cms.notificationemailuser</ObjectType>

    <ObjectType>cms.webpagescope</ObjectType>
    <ObjectType>cms.webpagescopecontenttype</ObjectType>
  </IncludedObjectTypes>

  <!-- Excluded object types filter the set of included object types. The specified object types are excluded from processing.
     May include both main and child object types. -->
  <ExcludedObjectTypes>
  </ExcludedObjectTypes>

  <!-- You can exclude objects from processing by adding included or excluded code names for any object type.
       Use the % wildcard at the start or end of the values to include or exclude multiple objects based on code name prefixes or suffixes.
       You can add multiple code name values separated by semicolons for each object type. -->
  <ObjectFilters>
    <!-- Ensures serialization for reusable field schemas. -->
    <IncludedCodeNames ObjectType="cms.class">cms.contentitemcommondata</IncludedCodeNames>
    <!-- If one or more code names are included, only objects matching the specified code names are included. Other objects are not processed.
         All objects are included if empty. -->
    <!-- <IncludedCodeNames>IncludedCodeNameA;IncludedCodeNameB</IncludedCodeNames> -->
    <!-- <IncludedCodeNames ObjectType="ObjectTypeB">IncludedCodeNamePrefix%;%IncludedCodeNameSuffix</IncludedCodeNames> -->

    <!-- Excludes license key settings -->
    <ExcludedCodeNames ObjectType="cms.settingskey">CMSInstanceFriendlyName;CMSInstanceID</ExcludedCodeNames>

    <!-- Excluded code names add further filtering for the set of included objects. Objects that match the specified code names are excluded from processing. -->
  </ObjectFilters>

</RepositoryConfiguration>
For this series, we don’t need to adjust the CD configuration. If you decide to modify the repository.config file in your own project, be careful about including all the necessary objects.
If you realize your deployment is missing anything (e.g., can’t see pages), check your repository.config. It may be excluding or including some objects incorrectly.
Identification of your working environment
Sometimes, you may need to run certain code only in a specific environment. You can do this using the environment identification extension methods.
Take a look at the Program.cs file in the root of your project to see an example usage.
...

// the following code will only execute in cloud (QA, UAT, PROD or custom) environment
// but never when you run the solution locally
if (builder.Environment.IsQa()
    || builder.Environment.IsUat()
    || builder.Environment.IsProduction()
    || builder.Environment.IsEnvironment(CloudEnvironments.Custom))
{
    builder.Services.AddKenticoCloud(builder.Configuration);
    builder.Services.AddXperienceCloudSendGrid(builder.Configuration);
    builder.Services.AddXperienceCloudDataProtection(builder.Configuration);
}

builder.Services.AddKentico(features =>
{
...
If you run the project locally and place a breakpoint inside the if statement, you can observe that it will never get hit.
For this series, we don’t need to change this configuration. However, if your Xperience Portal does not have a UAT environment (e.g., subscription Level 1), you can remove the builder.Environment.IsUat() condition.
If you do make changes, remember to rebuild the solution for them to take effect.
Microsoft Application Insights
This integration allows you to see errors and warnings from Xperience event log and .NET exceptions (including ones that occur before the Xperience app is fully running) in the Xperience Portal.
Our generated project already has the Microsoft Application Insights enabled - you can see the line of code in the Program.cs file, when building the web application:
...
builder.Services.AddXperienceCloudApplicationInsights(builder.Configuration);
...
You can turn off the insights entirely by simply removing the line.
If your project uses client-side telemetry, you can add the logs by following the Microsoft documentation.
If you make changes to this setting, rebuild the solution for them to take effect.
SendGrid integration
The SendGrid integration to send emails is also a part of your generated Program.cs file:
if (builder.Environment.IsQa()
    || builder.Environment.IsUat()
    || builder.Environment.IsProduction()
    || builder.Environment.IsEnvironment(CloudEnvironments.Custom))
{
    ...
    builder.Services.AddXperienceCloudSendGrid(builder.Configuration);
    ...
}
We are using the environment identification extension methods mentioned above to enable SendGrid only in the SaaS environment, as it will not work locally.
Read more about the SendGrid integration in our documentation.
Cloudflare CDN configuration
Kentico SaaS integrates with the Cloudflare CDN to perform caching.
For this series, you can stick to the default caching configuration, which you can read more about in our documentation.
If you’d like to override the default caching, you can, for example, set the TTL to a specific number by setting the Cache-Control HTTP header for each HTTP response. See an example in the documentation.
Azure Blob storage folder mapping
By default, Kentico SaaS uses Azure Blob storage to store media or binary files.
Projects created with the --cloud parameter include a default storage path mapping configuration, AddXperienceCloudStoragePathMapping(). It automatically configures where Xperience stores files based on the environment:
- Cloud environments (QA, UAT, Staging, Production, etc.) use the Azure Blob Storage account provided with the Xperience subscription.
- Local development stores files in a local project folder so they can be included in deployment packages.
The mapping is applied automatically to all Xperience system storage paths, including content item assets, media library files, AIRA-generated images, and files uploaded through form components. These paths are registered by Xperience and do not require manual configuration.
This default setup allows developers to work with local file storage during development while ensuring that cloud environments use Azure Blob Storage for file persistence. You only need to customize the storage path mapping if your media files use a folder structure different from Xperience by Kentico’s default.
Custom static page to display when app is unavailable
In case your app is temporarily offline, it is a good practice to define a custom static page that the visitor will see instead of a default generic page.
Add this file to your project’s root (including the ’_’ suffix). Feel free to modify the structure or style to your linking or branding needs:
<!DOCTYPE html>
<html>
<head>
  <meta charset="UTF-8">
  <title>Offline</title>
</head>
<body style="margin:3em;font-family:sans-serif">
  <h2>Offline</h2>
  <p>This site is offline for maintenance.</p>
</body>
</html>
Develop your solution
Your project is now ready from the configuration standpoint.
If you are following along using the Dancing Goat sample site, there’s no need for any code adjustments at this time. In your own solution, you can now perform any development, adjustments, or data/code migration, before you move to the next step - the initial project deployment.
Continue learning
When you’re ready, move on to the next page: Deploy your solution to Xperience Portal.