
Content sync configuration
Features described on this page require the Xperience by Kentico Advanced license tier.
Content synchronization allows users to easily transfer content from one instance of Xperience by Kentico to another.
The purpose of content sync is to help manage content when using multiple environments. For example, a project’s developers may have a local Development instance, from which initial content is sent to a hosted Staging instance. The staging instance is accessible only by editors and other staff, who use it to prepare content updates. The final content is then synchronized during regular releases to a public-facing Production instance.
This page describes how to set up and configure your applications to use content sync:
- Learn about the supported environment topologies
- Set up content sync connections between environments:
- Configure Xperience features and data for content sync
To learn how to synchronize content, see Content sync.
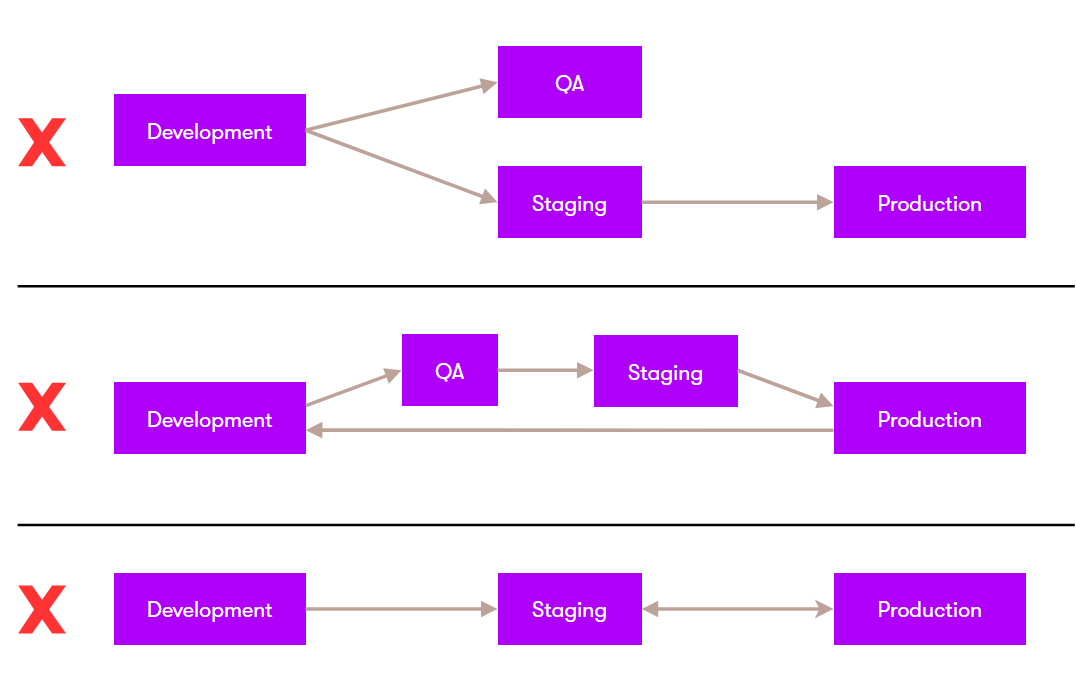
Supported topologies
Before you start setting up content sync, it is important to understand which environment topologies are supported.
The most basic usage of content sync consists of a connection between one source instance and one target instance. Such connections can be chained to additional instances – a target can be configured as the source for another instance. However, only strictly linear topologies are supported. For example:

Unsupported topologies
More complex topologies, for example with multiple branching target connections, loops, or bi-directional connections are not supported. The system does not strictly block content sync with unsupported topologies, but it may result in inconsistencies, errors or unintentionally overwritten content.
Set up content sync
Prerequisites
- Instances connected via content sync must use exactly the same version of Xperience (including the hotfix version).
- Target instances must run on HTTPS with a valid trusted certificate.
- If using auto-scaling for a private cloud project with content sync, the ~/assets folder must be mapped to a shared storage location, such as Azure Blob Storage or Amazon S3.
Source and target configuration
To set up an application as the source or target in a content sync connection, configure ContentSynchronizationOptions using the .NET options pattern (available in the CMS.ContentSynchronization namespace).
The options are separated into Source and Target configuration. The following properties must be configured:
Enabled– a bool value that enables the application as a source or target for content sync.Secret– a secret key containing at least 32 characters. The same secret must be configured for the source and target applications.TargetUrl– only available for theSourceconfiguration. Specify the URL where the target application is running. Must be absolute, with the HTTPS scheme, without query or fragment components.
Use environment-specific configuration or IHostEnvironment extension methods to set the correct values for each application in your environment. To learn how to identify environments for SaaS projects, see Environment identification extension methods or Application settings for different SaaS deployment environments.
using Microsoft.Extensions.Hosting;

...

WebApplicationBuilder builder = WebApplication.CreateBuilder(args);

...

// Configures the development environment as the content sync source
if (builder.Environment.IsDevelopment())
{
    builder.Services.Configure<ContentSynchronizationOptions>(options =>
    {
        options.Source.Enabled = true;
        // Secret key that is at least 32 characters
        // Must be the same for source and target application.
        options.Source.Secret = "<YourSecretKey>";
        options.Source.TargetUrl = "https://productiondomain.com";
    });
}
// Configures the production environment as the content sync target
if (builder.Environment.IsProduction())
{
    builder.Services.Configure<ContentSynchronizationOptions>(options =>
    {
        options.Target.Enabled = true;
        options.Target.Secret = "<YourSecretKey>";
    });
}
Content sync for SaaS environments
For SaaS projects, you do not need to configure content sync manually (except for local development environments).
SaaS deployment environments have their content sync configuration done automatically based on Content synchronization connections defined in Xperience Portal.
Xperience 30.5.0 or newer required
Content synchronization and Staging environments are only available if the deployed Xperience project uses version 30.5.0 or newer.
Content staging best practices
You can use the content sync feature to transfer content from all types of environments, including non-production ones (local development, QA, UAT). This is a viable approach during development and for small projects. However, non-production environments do not provide sufficient performance, availability, and backup policies for projects with larger content editing teams.
To set up a stable and robust environment for long-term editing and staging of content, add the optional Staging (STG) deployment environment to your service plan.
The Staging environment provides a platform where editors and other staff can prepare content, and then transfer it to the production environment using content sync. Staging environments are designed to be nearly identical to production environments in most aspects, such as performance, availability, backup policies, and the option to set custom domains.
Set up a Staging environment
Use the following process to initialize a Staging deployment environment for an existing project:
- Download an export of your production environment.
- Create a new deployment package.
- Make sure that the package contains all required data by editing the $CDRepository/repository.config file (see Configure CI/CD repositories).
- If you are updating to version 30.5.0 or newer as part of this deployment, you must include the
cms.userobject type in the package and use theCreateUpdaterestore mode (Createis not sufficient).
- Deploy the package through the available environments up to Staging (STG).
- Configure any required custom domains for the staging environment.
Manage synchronization connections
To use content sync for SaaS projects, you need to create synchronization connections between environments in Xperience Portal:
Limitations
The limitations described in Supported topologies apply for content sync between SaaS environments. Only linear connection chains are supported, without multiple branching target connections, loops, or bi-directional connections.
The connected environments must be running exactly the same version of Xperience by Kentico.
Connections from SaaS environments to external private cloud instances are not supported. The only instance outside of SaaS environments that can participate in a content sync connection is a LOCAL development environment used as a source.
- Open the Content synchronization application in Xperience Portal.
- Select Create new connection.
- Choose the Source and Target environment.
- When setting up a LOCAL development environment as the source, see Add connections from local development environments.
- Select Create.
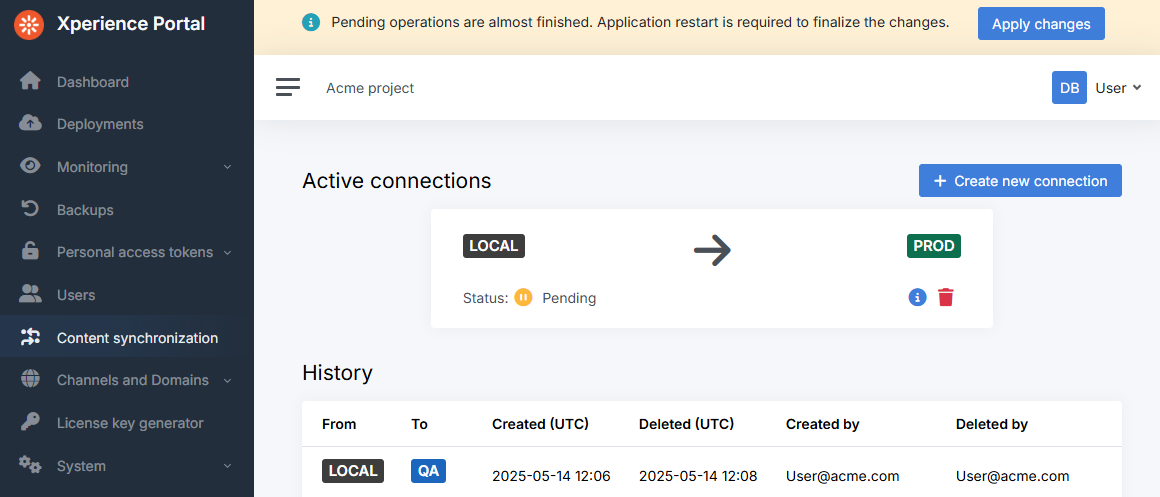
After you create connections, select the Apply changes button in the information ribbon at the top of the interface. Applying these changes triggers a restart of the affected applications. You may need to manually refresh the current page for the Apply changes button to appear in the information ribbon.
Once the connection becomes Active, content sync is configured for the given environments and users can start transferring content.
You can delete connections and apply the changes if you wish to disable content synchronization between the given environments.
Add connections from local development environments
When you create a content sync connection with a LOCAL environment as the source, Xperience Portal displays Target URL and Connection secret values. Copy the values and use them in the content sync configuration of the application in your local development environment:
- Target URL →
ContentSynchronizationOptions.Source.TargetURL - Connection secret →
ContentSynchronizationOptions.Source.Secret
The Connection secret value is not stored and cannot be displayed again in the future. If you lose the secret, you need to delete the connection and create a new one.
You need to ensure that the source configuration only applies to the local development environment. To learn how to identify environments for SaaS deployment environments, see Environment identification extension methods or Application settings for different SaaS deployment environments.
Configure Xperience for content sync
To prepare your Xperience instances for content sync, configure the following features:
- Permissions
- To synchronize content items, users need to have a role with the Synchronize permission assigned for the Content hub application and the appropriate workspaces.
- To synchronize website channel pages, users need to have a role with the Synchronize permission for individual pages or the Manage permissions permission for the website channel.
- To synchronize forms, users need to have a role with the Synchronize permission assigned for the Forms application.
- Workflows – if you use workflows to control the lifecycle of your content, only set up and apply the workflow on the source instance where content is edited. Any workflow applied on target content sync instances is ignored, as content items and pages are always transferred with the Published or Unpublished status and a completed workflow cycle.
- Allowed asset extensions – instances connected using content synchronization must use the same set of allowed file extensions for content item assets.
- Allowed slash character in page vanity URLs – to ensure consistent page URL behavior, instances connected using content synchronization must have the same enabled/disabled status for the slash (‘/’) character in page vanity URLs.
- Content folders – instances connected using content synchronization must have the same enabled/disabled status for content folders. See Enable content hub folders.
Ensure compatibility between instances
The following objects are required by content items and/or pages, but are not included in content synchronization:
- Channels that use the content (website, email, headless)
- Content types
- Page restrictions for content types do not apply when restoring synchronized content on target instances.
- Image variant definitions for asset content types must also match between instances connected using content sync.
- Languages
- Workspaces
- Member roles – member role definitions must exist on all connected instances if content items use role-based access restrictions. The system matches member roles between instances by their GUID and code name.
You need to ensure that all instances connected through content sync have exactly the same set of these objects. For example, an error will occur if you try to synchronize a content item for which an exactly matching content type or member role is not available on the target.
The compatibility of objects is calculated based on their GUID identifiers and all available data. It is not sufficient to manually recreate objects with the same code name (with the exception of languages, which are only validated by their code name). When you update or add any of the required objects on the source server, you need to transfer them to the next environments using other deployment methods, i.e., SaaS deployment via a deployment package or Continuous Deployment.
Project code compatibility requirements
To enable synchronization of website channel pages and forms, you also need to deploy via SaaS deployment package or Continuous Deployment to transfer all code components related to pages and forms.
This includes page views, controllers, routing configuration, Page Builder components, Form Builder components and sections, etc.
Synchronization of linked content
Synchronization of linked content items, pages, and forms relies on the system’s usage tracking features:
The limitations described for usage tracking also apply to content sync. Content items, pages or forms that are “linked” in an untracked manner are not automatically synchronized together with the linking item or page.
By default, all tracked linked content is included in the synchronization automatically. Users can open Detailed selection in the synchronization dialog to review selectable dependencies and exclude specific linked items before starting the synchronization. The usage tracking limitations described above still apply – detailed selection only shows dependencies that were detected through tracked references.
If your Xperience by Kentico instance was updated from an older version, you need to manually run the following scheduled tasks to track the missing content item or form usages:
- Track missing content item usages scheduled task
- Generates content item and page usage references when updating from a version older than 29.3.0
- Track missing object usages scheduled task
- Generates form usage references when updating from a version older than 30.11.0
- Track missing object usages scheduled task
- Generates form usage references for extended form widgets, custom widgets with form selectors, and widget properties marked for form reference tracking when updating from a version older than 31.2.0
Content sync internals
When a target application receives content through content sync, the updates are not immediately applied. Every synchronization is represented and stored in the following way:
- Data and asset files stored in the project’s
~/assets/synchronizationsfolder - Synchronization task (stored in the
CMS_Synchronizationdatabase table)
The synchronizations are applied automatically by the Content sync restoration scheduled task, which runs every 30 seconds. During the restoration, content is created or updated using the Xperience API:
- All content operations are performed in the context of the kentico-system-service (“System service user”) internal user account. Permissions are not evaluated.
- If an error occurs during the restoration, any updates that affect published content are rolled back. In some cases, added or modified Draft versions of content may remain after a failed synchronization restoration.
- Global events are triggered for the changes. The API is called in multiple waves when restoring content:
- Content items and pages are first created or updated in the Draft status.
- Items and pages are published or unpublished (depending on the status of the synchronized content).
- Workflow events are not triggered (having workflows applied on target content sync instance is not recommended)
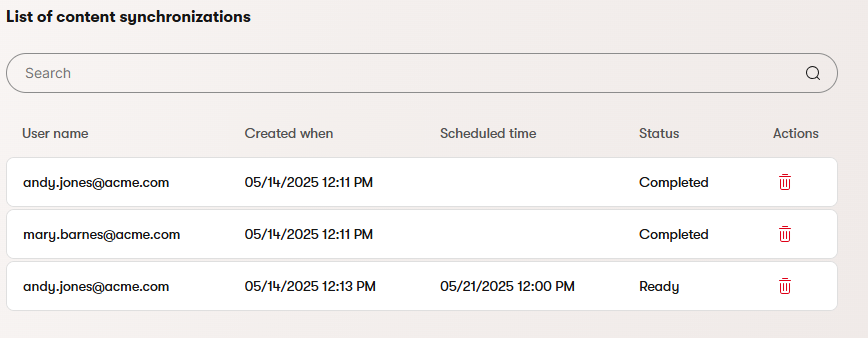
You can monitor synchronizations that recently occurred or are scheduled to take place in the Content synchronization application.
Synchronization cleanup
The Content sync clean data scheduled task automatically cleans up synchronizations once per day. During the cleanup, synchronizations with the Failed or Completed status are removed. In rare cases, a synchronization may get stuck in one of the other transitional statuses that occur during restoration. Such tasks are cleaned up if they are older than 24 hours.
Troubleshoot content sync
If you encounter any issues or errors when using content sync, you can use the system’s logging functionality to analyze the content sync process. Content sync provides structured logging data during all steps of the process, including content preparation and transfer on the source instance and content restoration on the target instance.
To view the full content sync logs, your preferred logging provider must be configured in the following way:
- Log level:
Debugor higher - Log categories:
CMS.ContentSynchronizationCMS.WebsitesCMS.ContentEngine
(for simplicity, you can adjust the configuration for all log categories starting withCMS)
The logs should help you identify the source of your issue, and can be helpful when describing the problem to Kentico support.
Troubleshooting without the administration
If your target production server is deployed without the administration, the built-in Event log is not available for troubleshooting content restoration. To work around this, you can add a custom logging provider to your application and view troubleshooting data externally (e.g., using Serilog, NLog, or Aspire dashboard).
If your logging provider supports distributed tracing, you can enable collection of content sync activities by adding the Kentico.Xperience.ContentSynchronization source to your tracing configuration. For example:
using Microsoft.Extensions.Logging;
using OpenTelemetry.Logs;
using OpenTelemetry.Trace;

// ...

var builder = WebApplication.CreateBuilder(args);

// ...

builder.Services.AddLogging(logging =>
{
    logging.AddOpenTelemetry(options =>
    {
        // ...
    });
});

// Configures OpenTelemetry tracing
builder.Services.AddOpenTelemetry()
    .WithTracing(t => t
        // Adds the source for content sync activities
        .AddSource("Kentico.Xperience.ContentSynchronization")
        .AddAspNetCoreInstrumentation()
        .AddOtlpExporter());