
Licenses
Activate your Xperience by Kentico application by following the steps described below for each subscription type:
- Xperience by Kentico subscription providing an Xperience Portal project for deploying to the SaaS environment.
- License-only subscription – for private cloud deployments.
- Evaluation license – a 30-day evaluation license.
Subscription expiration and renewal
Contact Kentico sales to renew your subscription.
Subscriptions expire at midnight (0 hours) at the start of the expiration date. For example, if a subscription expires on December 31, the last day it remains valid is December 30.
Private cloud deployments and Xperience Portal projects (SaaS deployment) expiration dates include a 30-day grace period. The grace period does not apply to evaluation licenses.
For SaaS subscriptions, the Kentico Client Portal Licenses tab can show two different date types:
- “License expires on …” (on the main license page) – the date when your purchased subscription period ends.
- “Issued” and “Expiration” (on generated individual license key details) – operational dates of generated license keys.
The Expiration date shown for an individual generated key is the key’s current validity end date (typically up to one month) and is automatically refreshed during license synchronization. This date does not mean your subscription will end earlier than the “License expires on …” date on the main license page.
Evaluate Xperience by Kentico
Create an account in Kentico Client Portal to receive a 30-day evaluation license key. For more information, see License keys.
Licensing Xperience by Kentico SaaS
When you purchase an Xperience by Kentico SaaS subscription, you receive access to an Xperience Portal project. The purchased service plan defines the set of available features in the Xperience Portal. You can see your current service plan on the Dashboard in the Xperience Portal.
Service plan change
Over time, your requirements for the service plan you use may change. When they do, contact Kentico sales and renegotiate with them your subscription plan and agree on a time for a scheduled Xperience Portal project maintenance. Your new service plan will be active once the scheduled maintenance finishes.
To help you decide which service plan best fits your needs, see SaaS service plans.
Licensing for applications in the SaaS deployment environments (QA, UAT, STG, Production) is automatically handled by the Xperience Portal, except for local development environments.
License keys for SaaS local development
Activate your local development instance by generating a license key in Xperience Portal:
Open the License key generator application in Xperience Portal.
Select your Xperience by Kentico version.
Select Generate license key.
Store the license key in a text file before you leave the license key generator.
Lost license keys cannot be recovered. If you lose the license key, you will need to generate a new one.Register the license key in the Xperience administration to activate your local Xperience instance. See Register license keys in Xperience.
The local development instance is activated. The license key expires with your subscription, but its expiration date is automatically extended with every subscription renewal when your local Xperience instance is connected to the Internet.
Licensing private cloud deployments
Private cloud licenses are available in two license tiers: Standard and Advanced. Activate Xperience by registering your license keys in the Xperience administration. For more information, see Register license keys in Xperience.
Obtain license keys by registering the serial number you received with your Xperience by Kentico purchase in the Kentico Client Portal.
Contact Kentico support if you cannot sign in to the Kentico Client Portal.
License keys
Each Xperience by Kentico instance must be activated using a license key tied to a license in the Kentico Client Portal. You can generate the following types of license keys:
- Evaluation – provides full access to all features of the product for 30 days.
- Production – for live deployments. See Production license keys.
- Non-production – for local development and pre-production environments (deployment pipelines, QA). See Non-production license keys.
License keys must be registered via the Xperience administration or during project database installation.
All license keys support unlimited auto-scaling, allowing sites to accommodate increased traffic and performance demands.
Best practices for license key management
Use one license key per instance
As a best practice, generate a unique license key for each Xperience instance in the Kentico Client Portal. This approach provides the following benefits:
- Simplified environment management – When you need to decommission a production instance, you can immediately disable its specific license key in the client portal.
- Accurate license tracking – Each instance is tracked separately, preventing licensing issues that can occur when sharing license keys across multiple instances.
- Easier troubleshooting – License violations and usage patterns can be traced to specific instances.
Disable unused license keys
A best practice is to always disable license keys in the client portal when they are no longer needed. This is especially true for production keys that count toward your license usage totals.
Example scenario: Consider a license that allows 8 channels. You have a production instance with 6 channels and decide to clone the production database for local development. If you replace the cloned instance’s license key with another production key (instead of a development key), the license server now tracks two separate instances, each reporting 6 channels, causing a license violation (12 channels > 8 allowed). Even if you later replace the production key with a development key, the license server continues to track the “abandoned” production instance for up to 14 days. To resolve this immediately, disable the unused production license key in the client portal, which purges the offending overusage information, removing corresponding license violation warnings.
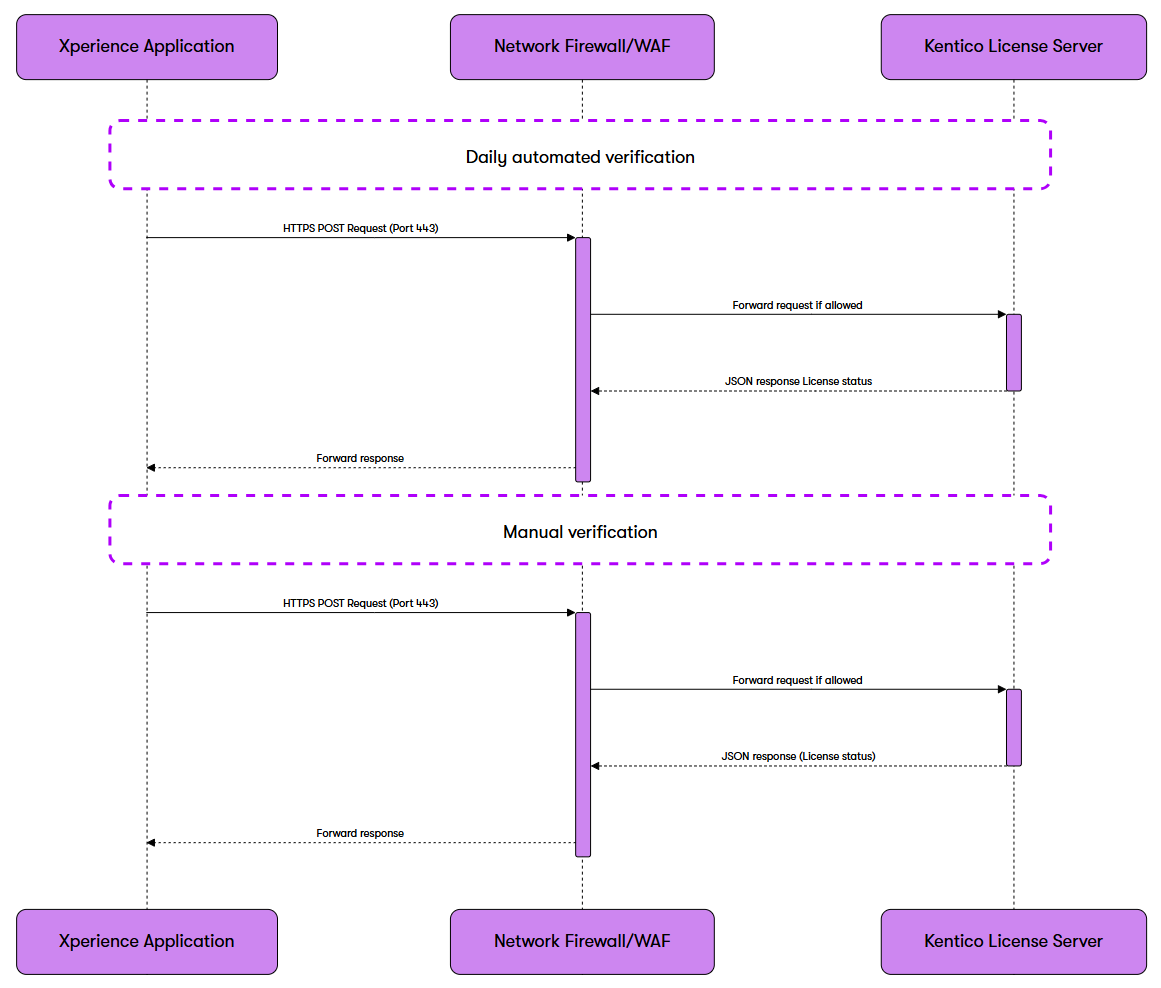
License server communication
To ensure fair product use, Xperience instances communicate with the Kentico license server on a daily basis. As a result, a working Internet connection is mandatory for all instances.
Communication details
License server communication uses the following specifications:
- Endpoint URL:
https://api.kentico.com/licensing/licenses/instanceverification - Protocol: HTTPS (TLS 1.2 or higher)
- Port: 443 (standard HTTPS)
- Method: POST
- Content-Type: application/json
- Request data: Information about your instance including license key, domain, instance name, and feature usage metrics
- Response: JSON with license validation results
Security considerations
The license verification process uses encrypted HTTPS communication and only transmits the minimum required information to validate your license. No sensitive customer data or content is ever transmitted to the license server.
When an Xperience instance cannot reach the Kentico license server for longer than five days, the administration interface starts notifying users via information popups and the event log. If you keep encountering issues after verifying that your instance is connected to the internet and the communication endpoint is accessible, contact our support department at support@kentico.com.
Testing license server connectivity
To verify your network connectivity to the license server, you can use the following methods:
- Manual synchronization in the admin interface:
- Go to Settings → System → License.
- Select Synchronize.
- View the event log to see the result of the synchronization operation. If unsuccessfull, consult the event log entry for subsequent troubleshooting steps.
- Command-line testing (using curl, for example):
# Test basic connectivity to the license server using a HEAD request
# This checks if the endpoint is reachable through your network/firewall
curl -I https://api.kentico.com/licensing/licenses/instanceverification
Common network configuration examples
For communication with the license server to work correctly, you need to ensure that the endpoint is whitelisted and accessible from your network. The following sections highlight the necessary configuration for common firewall providers.
Azure Front Door / WAF configuration
To allow license verification when using Azure Front Door or Web Application Firewall:
- Add a custom rule to your WAF policy:
- Rule Name:
AllowKenticoLicenseServer - Condition: Match request URI path pattern
*/licensing/licenses/instanceverification* - Action: Allow
- Rule Name:
- Ensure outbound HTTPS traffic (port 443) is permitted in your network security group.
Cloudflare configuration
When using Cloudflare as your web proxy or security service:
- Create an allow rule in Cloudflare Firewall:
- Expression:
(http.host eq "api.kentico.com" and http.request.uri.path contains "/licensing/licenses/instanceverification") - Action: Allow
- Expression:
- Disable any rate limiting rules that might affect API calls to this endpoint.
Corporate proxy configuration
For environments that use a corporate proxy server:
- Add
api.kentico.comto your proxy’s allowlist. - Ensure your application’s configuration includes proper proxy settings:
 {
   "HttpClientProxySettings": {
     "UseProxy": true,
     "ProxyAddress": "http://your-proxy-server:port",
     "BypassOnLocal": true
   }
 }
Manually synchronize instances with the license server
Instead of waiting for the daily synchronization period, you can also manually synchronize your instance with the license server via the Synchronize button located under Settings → System → License. This can be useful if you want to quickly recover from an accidental license violation, for example.
Register license keys in Xperience
Product license keys are managed via the Settings application under System → License.
To register a license key:
- Open the Settings application.
- Navigate to System → License.
- Insert your license key into the License key setting.
- (Optional) Set a friendly name for your instance. This value will be used in the license overview section of the Kentico Client Portal. You can use friendly names to identify instances under a single license.
- Save the changes.
The product is now activated using the provided key.
Important: When you register a license key through the Xperience administration interface, the system automatically generates a new instance identifier. This unique identifier distinguishes your instance from others under the same license. After the instance is synchronized, you will find an entry matching the identifier under the corresponding license in the Kentico Client Portal.
Database cloning considerations
When cloning databases (for example when creating test environments), be aware that the instance identifier and license key are preserved in the cloned database. This can lead to licensing issues where license usage may not be accurately tracked across separate environments.
The recommended approach when creating new environments is to use CI/CD store/restore operations, which exclude license data by default, and then register the correct license key for the target environment.
- Navigate to Settings → System → License in the cloned environment
- Enter the appropriate license key
- Save the changes (this automatically generates a new instance identifier)
If you directly clone a database that already contains license key data, always replace the cloned license key with an appropriate alternative.
Production license keys
Production license keys are intended for final, live production deployments.
Xperience by Kentico instances activated using production license keys perform daily checks that monitor product feature use (the number of active website channels, for example).
If the instance detects feature use that is outside the scope of the corresponding license, the administration interface displays a warning banner detailing the violation. Product use is not limited in these cases. However, note that such actions are monitored and you may be contacted by a Kentico representative should they persist for a prolonged period of time.
After addressing any reported issues on the current instance, the warning banner disappears immediately. If the violation originates from a different instance under the same license, the banner disappears as soon as all instances synchronize with the license server.
Non-production license keys
Non-production licenses are intended for local development and pre-production environments (deployment pipelines, QA).
Xperience by Kentico instances activated using non-production license keys do not monitor product feature use. Avoiding license overreach when using non-production license keys is the user’s responsibility.
License violation reporting
When the system detects a license violation, such as instances exceeding the number of allowed channels, it notifies users via the event log and a warning banner displayed atop the administration interface. The banner and event log entries provide details related to the violation and steps necessary to correct it.
License violation notifications are displayed across all instances registered under the same license.
For example, assume an environment with three instances (A, B, and C) registered using three separate production license keys generated from a single license. If instance A violates the license, instances B and C start displaying license violation notifications as well. However, instances B and C only know that a license violation occurred, they aren’t provided any specific details. They will only highlight the type of violation, not the instance responsible (A in this example). After correcting the violation, all instances return to normal once they synchronize with the license server.
Resolving persistent license violations
If you encounter persistent license violations after addressing the underlying issue, consider disabling unused license keys in the Kentico Client Portal. When an instance is decommissioned but its license key remains active, the license server continues to track its usage for up to 14 days. By disabling the license key immediately, you can resolve the violation without waiting for the automatic cleanup period.