
Customer data platform
Preview feature
The customer data platform feature is currently in preview mode. Expect the feature to be modified and expanded significantly in upcoming releases, including breaking changes.
The initial releases of the feature are primarily intended to gather early feedback. The scope of the feature is limited and much of the Xperience by Kentico digital marketing functionality is not supported yet.
All related API is marked as experimental and usage will result in warnings when compiling your project. The warnings are treated as errors for reporting purposes. To use the code, you need to suppress the warnings.
What should you do with this feature?
- DO try out this feature, for example, using the sample Dancing Goat project template or other demo sites.
- DO feel free to share your feedback with the Kentico Product team.
- DON’T use this feature in a production environment or invest heavily into development based on the current state.
Customer data platform is a collection of features that expand, rework and improve the contact management functionality in Xperience by Kentico.
Customer data platform is centered on profiles. Profiles fill the role of contacts after customer data platform is enabled – they represent people who view and interact with content through channels, for example, visitors of a website and email recipients. Each profile connects all data, activities and other information related to a person, which is available throughout the system across other entities:
- Members – each profile can optionally be linked with a member, representing a registered user on a website.
- Customers – each profile can optionally be linked with a customer, representing a buyer who has made a purchase (via a checkout process built using digital commerce features). In the current customer data platform release, integration with customers is not supported yet.
- Contacts – each profile is linked with exactly one contact entity, which internally stores the profile’s personal details.

The data and activities collected for profiles allow marketers to analyze client behavior, optimize content, identify potential buyers, and perform other marketing‑related actions.
Supported features
Customer data platform currently supports the following digital marketing features:
- Profile tracking
- Activity logging
- Consent management and development
- Member integration
- Mapping form fields to profile personal details (contact data)
- Identity resolution which automatically merges profiles representing the same person
- Segments for grouping profiles based on defined conditions
- Profile customization (adding custom fields to profiles, profile overview UI customization)
The following features are not supported:
- Emails and recipient lists
- Automation
- Form autoresponders and automation
- Custom activities
- Commerce customer integration
- Headless tracking
- Cross-site tracking
The following features are not fully compatible with customer data platform, but remain functional for the contact entities that are encapsulated by profiles:
Enable customer data platform
Customer data platform cannot be disabled
Once you enable the customer data platform feature, the system does not support switching back to a disabled state. Profile data cannot be returned to raw contacts and used with the default digital marketing features.
No contact data migration
Enabling customer data platform does not transfer any existing contact data to profiles.
To start using customer data platform, you need to enable it as a feature in your Xperience project:
Make sure deletion of inactive contacts is disabled. This feature is currently not supported with customer data platform, and may lead to data inconsistencies.
- Open the Settings application in the Xperience administration interface.
- Navigate to the Digital marketing → Contact management category in the settings tree.
- Select the Do not delete contacts option.
- Save the changes.
Open the Xperience project in your preferred IDE.
Edit your application’s startup class (Program.cs).
Within
AddKentico, callUseCustomerDataPlatform().- This automatically includes activity tracking, so you can remove the
UseActivityTrackingcall if it’s already present.
- This automatically includes activity tracking, so you can remove the
Call
AddCustomerDataPlatform()on your application’s service collection.C#Program.csusing Kentico.Web.Mvc; using Kentico.CustomerDataPlatform.Web.Mvc; WebApplicationBuilder builder = WebApplication.CreateBuilder(args); // ... builder.Services.AddKentico(features => { // Enables customer data platform // Also automatically enables activity tracking // and registers routes that receive activity logging requests features.UseCustomerDataPlatform(); // ... }); // Sets configuration options required for customer data platform builder.Services.AddCustomerDataPlatform(); // ...To enable logging of page visit and landing page activities for website channels, register the activity logging script onto all pages by calling the
ActivityLoggingScriptV2extension method in views.Call the method in your website’s main layout (and any other used layouts) to ensure that performed activities are logged for every page.
The logging script runs asynchronously, so we recommend adding it at the end of the <head> tag in the page code.
The method’s
logPageVisitparameter must betrue. This is the default state if you call the method without any parameters.cshtml@using Kentico.Activities.Web.Mvc @* Registers scripts that ensure logging of page-related activities *@ @Html.Kentico().ActivityLoggingScriptV2()
Customer data platform is now enabled. The system starts tracking visitors as profiles. In the administration, you can find the Profiles application under the Customer data management category, and the original Contact management application is no longer available.
Profile tracking
Customer data platform provides a centralized overview of all people who access and interact with content through your channels. These people are represented by Profiles.
Profile tracking works automatically after you enable customer data platform. However, due to personal data protection policies, profiles are only tracked for website channels with the Default cookie level set to Visitor or All, and for visitors who give tracking consent and increase their cookie level. For more information, see Consent development for profiles.
You can view tracked profiles in the Profiles application in the Xperience administration. Each profile has an automatically generated Unique ID, which identifies them in the system.
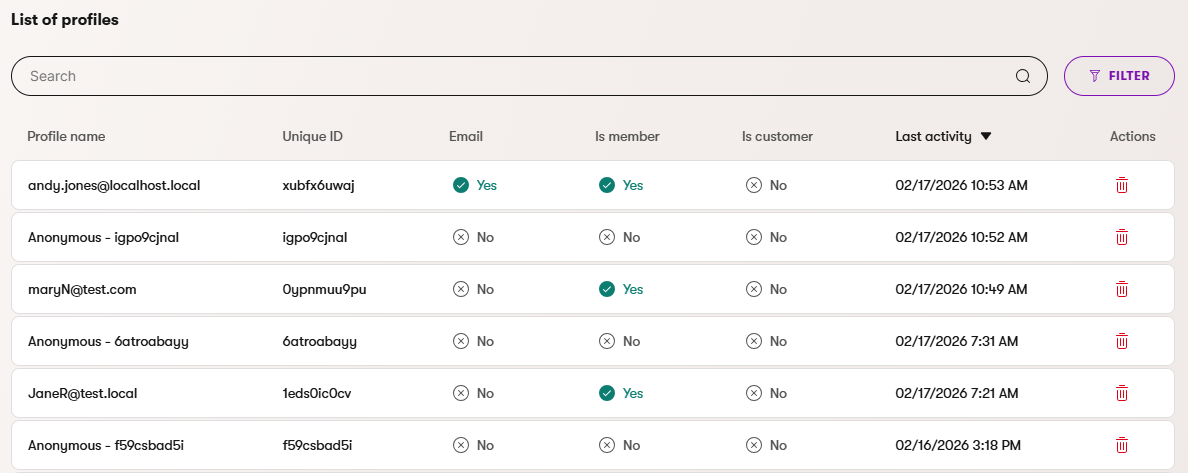
Profiles cover both anonymous visitors and those who verify their identity:
- Anonymous profiles – represents visitors identified only by the CMSCurrentProfile HTTP cookie in their browser (depending on the default cookie level), or created when a visitor performs an activity logged based on legitimate interest.
- Verified profiles – profiles are verified when the visitor registers as a member on a website.
Anonymous profiles with personal data
Profiles are considered as anonymous even if they contain personal details, such as a name and email address. For example, such data can be obtained when the visitor submits a form.
Currently, the system only recognizes profiles as verified if they have successfully registered as a member.
The listing in the Profiles application allows you to Filter profiles according to their verification status. Anonymous profiles are hidden with the default filter configuration. Anonymous profiles have their name in format: Anonymous - <Unique ID>
See Collect profile data to learn how to get more information about your audience.
Profiles and channels
Profiles are global and shared across all channels. For example, if you use your Xperience application to run two websites, send messages through an email channel, and deliver content to an external application through a headless channel, visitors and email recipients from all channels will belong to the same pool of profiles.
Profile merging
Profiles can be automatically merged when the system identifies that multiple profiles represent the same person. The merging process is based on configurable identity resolution rules.
For details, see Profile identity resolution and merging.
Delete profiles
You can manually remove profiles from the listing in the Profiles application – select the Delete () action for a profile.
Deleting multiple profiles in a single action is currently not supported.
Consequences of deleting profiles
Deleting a profile automatically removes the related contact entity. When customer data platform is enabled, contacts cannot exist without an associated profile.
Members and customers linked to a deleted profile are not removed and can exist in the system independently.
Deleting profiles also removes other associated data, notably consent agreements and logged activities. Only delete profiles if you are sure this data will not be needed in the future. Consent agreements in particular may be required to maintain compliance with data protection laws.
Collect profile data
Customer data platform provides several methods for gathering personal details and other information about your profiles. The following sections describe the available approaches.
Form submissions
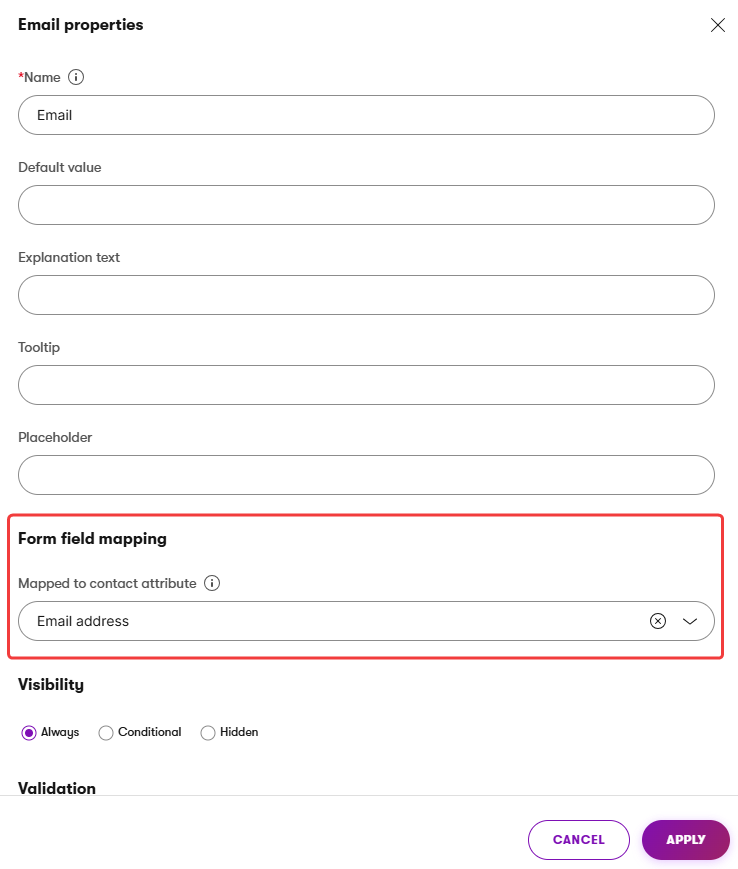
When a visitor submits a form on a website, the system can automatically transfer the entered values into the personal details of the visitor’s profile. This is achieved by mapping form fields to contact attributes in Form Builder. Contact attributes represent the fields that are available in the Personal details section of the Profile overview in the Profiles application.
For example, if a form contains fields for the visitor’s first name, last name, and email address, each field can be mapped to the corresponding attribute. When the form is submitted, the system saves the values as the profile’s personal details. Certain featured fields are preconfigured with the appropriate mapping.
Legitimate interest tracking of form submissions
Form submissions update profile data even for visitors who have not given tracking consent. In such cases, the system creates a new profile with personal details based on the form’s field-to-contact-attribute mapping. See Activity logging based on legitimate interest for more information.
Which contact attributes support mapping?
The attributes available for mapping are loaded from the Profile overview - personal details UI form. Administrators and developers can access this UI form in the Modules application under the Contact management - Contact class. This UI form can be extended if you customize profiles by adding your own contact fields.
Member registration
When a visitor registers as a member on your website, customer data platform allows you to update the associated profile based on the member’s data. This is done by configuring an OnRegistered handler, which runs every time a new member account is created.
The system provides a default OnRegistered handler that performs the following actions:
- Sets the profile as verified (
ProfileIsVerified = true). - Updates the profile’s display name to the member’s email address.
To customize or extend this behavior, assign your own OnRegistered handler:
- Open your Xperience project’s startup class (Program.cs).
- Locate the
AddCustomerDataPlatformcall (added when enabling customer data platform). - Configure the
MemberEvents.OnRegisteredoption.- The handler receives the
memberandprofileobjects as parameters, which you can use to set profile properties based on member data.
C#Program.cs// Sets configuration options required for customer data platform builder.Services.AddCustomerDataPlatform(options => { // Runs when a new member registers options.MemberEvents.OnRegistered = (member, profile) => { profile.ProfileIsVerified = true; // Adjusts the profile name based on the member name profile.ProfileDisplayName = $"{member.MemberName} ({member.MemberEmail})"; // Saves the profile values profile.Update(); return Task.CompletedTask; }; }); - The handler receives the
Assigning a custom OnRegistered handler replaces the default behavior entirely. If you wish to extend the default behavior with additional logic while keeping its original functionality, store a reference to the default handler and call it within your custom handler:
// Sets configuration options required for customer data platform
builder.Services.AddCustomerDataPlatform(options =>
{
    // Gets the default OnRegistered handler
    var defaultOnRegistered = options.MemberEvents.OnRegistered;

    // Runs when a new member registers
    options.MemberEvents.OnRegistered = async (member, profile) =>
    {
        // Calls the default OnRegistered handler
        if (defaultOnRegistered != null)
        {
            await defaultOnRegistered(member, profile);
        }

        // Add custom OnRegistered logic
    };
});
Activity logging
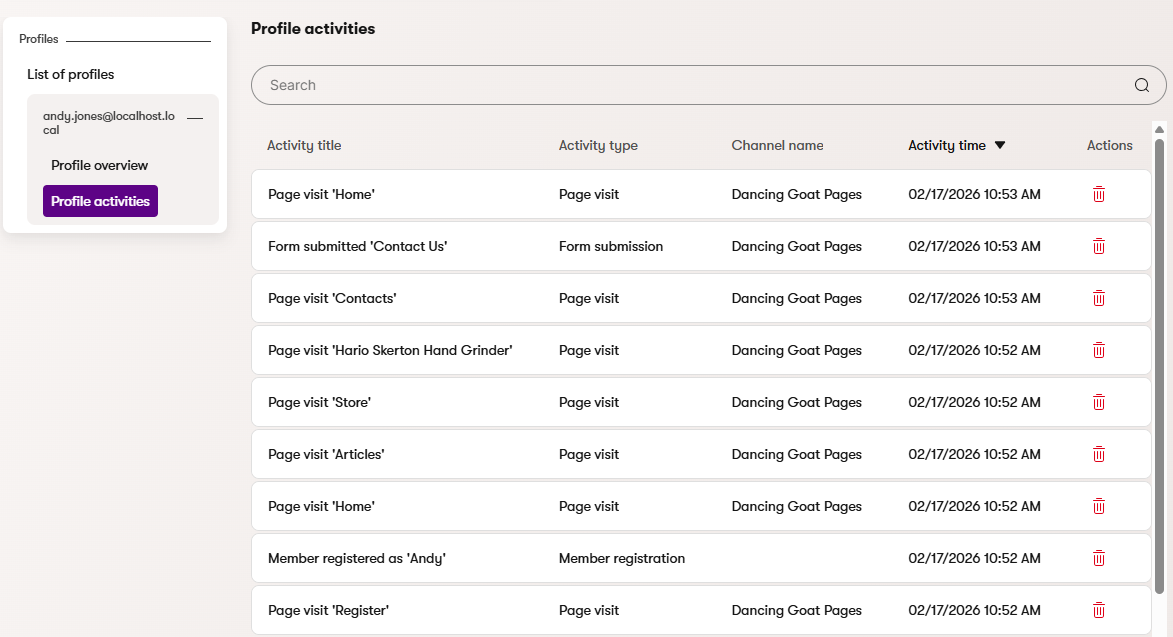
Activities represent actions that profiles perform when interacting with your channels. For example, the system logs activities when visitors view pages, register as members, or submit forms.
You can monitor the activities for specific profiles in the Profiles application – select a profile and view the Profile activities tab.
Activity logging for profiles in Xperience is enabled by default. Due to personal data protection policies, most activities are only logged for visitors who give consent to be tracked and have the required cookie level set (Visitor or All).
Custom activities not supported
The system currently does not support creation of custom activity types when customer data platform is enabled.
Activity logging based on legitimate interest
The system logs Form submission and Member registration activities even for visitors who have not given tracking consent.
Data added into the system as a result of such activities only includes information explicitly entered into the related form (or member registration form).
For example, when an untracked visitor submits a form, the system creates a new profile with personal details based on the form’s mapping of fields to contact attributes. This type of activity logging does not enable any other type of tracking for the visitor.
Additionally, the system does not include sensitive context-specific information when logging such activities (for example URLs, channel identifiers, etc.).
Important
You need to ensure that usage of personal data collected through such activities falls under legitimate interest purposes, based on your project’s legal requirements. For example, you may be able to legally use the data to send form autoresponder emails. However, using the data to send unsolicited marketing messages may be a breach of data protection regulations.
Activity and profile data processing
When activities are logged or profile personal details (contact data) is updated, e.g., via a form submission, the system initially saves the data into the application memory. This data is then batch processed from the memory into the database every 10 seconds by default.
If your system processes a large number of activities, you can consider increasing the default interval:
Edit your project’s configuration file (appsettings.json by default).
Add the
CMSProcessContactActionsIntervalkey. Increase the value to reflect how often you want the activities and contact data updates to be processed.JSONProcessing activities and contact updates every 30 seconds"CMSProcessContactActionsInterval": 30,Save the file.
The system now processes activities and contact data updates according to the configured interval. The interval affects the following:
- How often the application saves logged activities and personal detail updates from the memory into the database.
- How often the system recalculates data that could be affected by activities and profile updates, such as segment conditions, automation process triggers, etc.
Customize profiles
Profiles can be customized by adding custom fields to the entities they encapsulate – contacts, members and customers. Custom fields can help you store and organize additional data about the people interacting with your channels, for example, to capture data not collected out of the box or to support third-party integrations.
To add custom fields to a profile entity:
- Open the Modules application and navigate to the appropriate class:
- Contact data management → Contact management - Contact – stores the profile’s personal details.
- Membership → Member – stores registration-related information for profiles linked to a member account.
- Commerce → Customer – stores commerce-related information for profiles linked to a customer.
- Switch to the Database columns tab and add the required fields using the field editor.
For a detailed description of how to extend system objects with custom fields, see Extend system object types.
Unique names for custom fields
We recommend including a unique prefix (e.g., your company name) in the Field name of any custom fields. The prefix ensures uniqueness for the field name and prevents conflicts with system fields that may be added in the future.
Display custom fields in the profile overview
Adding database columns alone does not automatically display them in the administration. To make the added fields visible in the Profile overview in the Profiles application, add them to the corresponding UI form:
- Navigate to the class you extended and switch to the UI forms tab.
- Select the appropriate profile UI form:
- Profile overview - personal details (under the Contact management - Contact class) – displays contact-related fields in the Personal details section of the profile overview.
- Profile overview - registration information (under the Member class) – displays member-related fields in the Registration information section of the profile overview.
- Profile overview - customer information (under the Customer class) – displays customer-related fields in the Customer information section of the profile overview.
- Select New field and use the Database column selector to choose the added column.
- Configure the field using the field editor.
The added fields now appear in the corresponding section of the profile overview and are visible to administration users.
Include custom fields in contact field selectors
When setting mappings of form fields to contact attributes, the system provides selectors of contact fields.
Your custom fields are included in these selectors when you add them to the Profile overview - personal details UI form of the Contact management - Contact class. Contact field selectors display custom fields with the text entered as the Field caption of the corresponding UI form field.
Note: Fields with the Date or Date and time data type are not supported in contact field selectors.
Considerations for custom member fields
When extending the Member class, keep in mind that members use a separate authentication layer based on ASP.NET Identity.
You need to reflect the added fields in the ApplicationUser class used by ASP.NET Identity and configure the mapping between ApplicationUser and MemberInfo. For full instructions, see Add fields to member objects.