
Multi-instance support
Xperience projects can distribute computing among multiple application instances. This enables deployment to environments that utilize load balancing or auto-scaling. Each application increases the number of requests the project can handle, allowing you to scale performance as necessary. You can also use multiple instances to provide server failover and improve availability – if one of the servers hosting the project stops working, the other servers ensure the project continues running.
Multi-instance support in Xperience ensures that cached content and object data is automatically synchronized between all application instances. As a result, changes made on one instance are immediately reflected on the other instances.
The following image illustrates the structure of a multi-instance environment:
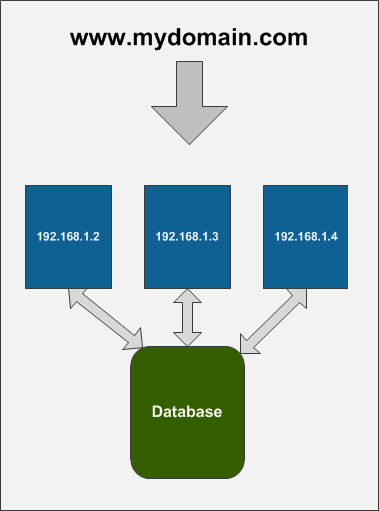
For example, if a page update occurs on one server (e.g., 192.168.1.2), other servers typically remain unaware. Multi-instance support resolves this by notifying all servers of the change, ensuring they take appropriate action, such as clearing their cache. This synchronization works because all instances are connected to the same project database. Xperience uses this central database to store and retrieve the necessary synchronization metadata.
Testing multiple instances in local environments
Multi-instance support is designed for deployed environments and relies on internal mechanisms specific to that context. It is currently not supported for local development or testing, even if multiple instances are set up locally. You can only reliably test multi-instance functionality in a deployed environment.
Handling physical files in multi-instance environments
When a file is uploaded on one instance in a multi-instance environment, other instances are notified about the change (e.g., to clear cache). To ensure these files are consistently accessible across all instances, you must configure shared storage.
- Configure Shared Storage: Set up a shared storage location accessible by all instances, such as Azure Blob Storage, Amazon S3, or a shared network drive. When using shared storage, files uploaded via any instance are placed directly into this central location. The system then informs other instances about new or updated files, ensuring data consistency. This configuration is required for managing files reliably in multi-instance environments.
Scheduled tasks in multi-instance environments
Execution of scheduled tasks only occurs once, regardless of the number of application instances.
Tasks that are ready to run are assigned to one of the active instances (in a nondeterministic way). Tasks launched manually via the Scheduled tasks application run on the specific instance that handled the given request.
Scale Xperience applications
Important: Xperience by Kentico does not support multiple instances in the web garden configuration.
SaaS environment
For projects deployed to the SaaS environment, no configuration is necessary. The number of available instances depends on your SaaS service plan. When the load increases to peak levels in the production environment, an additional instance is temporarily added to ensure load balancing. One extra auto-scaling instance is available across all plans. If more instances are required, they can be purchased through a custom service plan.
Private cloud hosting
Xperience multi-instance support is also compatible with other third-party cloud hosting providers, such as Microsoft Azure, that provide their own auto-scaling solutions. Deploy the project to Azure Web Apps or Azure Virtual Machines as you would any other application and use the scaling functionality inside Azure Portal.
Important: Regardless of the cloud provider’s scaling mechanism, you must configure shared storage for all web app instances. This is required to reliably handle physical files managed by the system across the scaled environment.
Private on-premise hosting
For projects hosted on-premise, multi-instance support is automatically enabled by connecting all running applications to the same database.
- Create copies of your Xperience application.
- Open an application’s configuration file (appsettings.json by default).
- Check that
CMSConnectionStringpoints to the same database for all applications. - Configure shared storage for all application instances.
- Deploy and run all applications.
Xperience automatically recognizes all running applications connected to the project’s database and synchronizes the necessary information between them.