
Admin UI localization
Xperience allows you to localize the administration interface, enabling users to select their preferred working language.
Admin UI vs. content localization
Admin UI localization affects only the administration interface (buttons, menus, labels, etc.). This is different from Languages, which manages language versions of your content.
Export system localization resources
Xperience includes a dotnet utility to export all system localization resources (Xperience’s default UI strings) to .resx files. This is useful when creating translations for new languages – you can export the default resources as a starting point for translation.
dotnet run --no-build -- --kxp-export-localization-resources --export-path {path}
The export always contains the default en-US localization and all registered languages.
Export options
|
Option |
Description |
|
|
(Required) The directory path where .resx files will be created. |
|
|
(Optional) Exports only the default system resources. When not provided, the utility exports both system and custom resources. The system treats all external resources registered using the RegisterLocalizationResource attribute as custom resources. |
|
|
(Optional) Skips the confirmation prompt before export. |
# Exports all resources to a local directory
dotnet run --no-build -- --kxp-export-localization-resources --export-path "./localization-export"

# Exports only system resources
dotnet run --no-build -- --kxp-export-localization-resources --export-path "./system-resources" --system-only
Export output structure
The export creates a structured directory with .resx files organized by resource type:
{export-path}/
├── en-US/
│   ├── system/
│   │   ├── localization.client.en-US.resx
│   │   ├── localization.server.en-US.resx
│   │   └── localization.builder.en-US.resx
│   └── custom/
│       ├── localization.client.en-US.resx
│       ├── localization.server.en-US.resx
│       └── localization.builder.en-US.resx
└── {language}
    └───
Each exported .resx file contains different types of localization resources:
- localization.client.en-US.resx – Contains strings used in client-side JavaScript/TypeScript admin components, such as button labels, validation messages, and UI text that appears in the browser. Client resources are bundled and sent to the browser when the admin UI loads, making them immediately available on the client.
- localization.server.en-US.resx – Contains strings used in server-side C# admin code, including API responses, server-generated messages, and backend validation text. These resources are resolved dynamically by the backend as part of API responses and request lifecycle processing.
- localization.builder.en-US.resx – Contains strings specific to builder components, including widget names, property labels, and builder-specific UI elements.
The custom folder contains external resources registered using the RegisterLocalizationResource attribute.
Translation workflow
The approach for translating admin UI resources depends on specific goals and target audience.
Create a default localization package
To create a general-purpose localization package for the admin UI:
Export system resources using
--system-onlyto get Xperience’s English strings:CMDExport system resourcesdotnet run --no-build -- --kxp-export-localization-resources --export-path "./system-resources" --system-onlyTranslate the resources to your target language.
Package and distribute the translations as a NuGet package for others to use.
This approach creates a focused translation package containing only the default resources, making it suitable for sharing and reuse across different projects.
Translate everything for local consumption
If your goal is to fully localize your specific application, including all custom resources:
Export all resources to obtain all strings that need to be localized:
CMDExport all resourcesdotnet run --no-build -- --kxp-export-localization-resources --export-path "./localization-export"Translate both system and custom .resx files to your target language, covering all admin UI text in your application.
Naming convention
Custom projects are not required to follow the naming convention used in exported files; use naming conventions that fit your project structure. For an example, see the finished branch of our Training guides repository.Translate custom Froala logic.
Register the translated resources in your application using the registration API, including both system and custom translations.
Configure the new languages in AdminLocalizationOptions.
This approach ensures complete localization coverage for your specific application, including any custom components or extensions you’ve developed.
Translation volume and tooling
Note that exported system resources contain thousands of localization strings. Professional translation tools or AI-powered translation services handle this volume efficiently. When using AI tools, process resources in manageable batches and have a language professional review the results to ensure accuracy and proper context.
Maintain translations across updates
Xperience by Kentico updates may add, modify, or remove system resource strings. If you maintain admin UI translations in a language other than English, review and update your translations after each update.
Translations do not update automatically
When Xperience modifies the English text of an existing resource string, your translations for that key remain unchanged. This means the translated UI may display outdated or incorrect text until you manually update the affected translations.
How updates affect translations
Resource string changes in an update can impact your translations in the following ways:
- New keys – The system falls back to English automatically. No immediate action is required, but you may want to translate new strings for a consistent experience.
- Modified keys – Your translation still uses the old text. The UI may display a meaning that no longer matches the actual behavior (e.g., a button translated as “Delete” when the action now moves items to the recycle bin).
- Changed format parameters – If the English string added or removed format placeholders (e.g.,
{0}), your translation with mismatched placeholders can cause runtime errors. - Removed keys – Unused translations remain in your .resx files without causing issues, but you can remove them to reduce clutter.
Update translations after an update
Follow this procedure to identify and fix affected translations after updating Xperience:
Before updating, export system resources as a baseline for comparison:
CMDExport pre-update resourcesdotnet run --no-build -- --kxp-export-localization-resources --export-path "./pre-update-resources" --system-onlyPerform the Xperience update following the standard update process.
After updating, export system resources again from the updated project:
CMDExport post-update resourcesdotnet run --no-build -- --kxp-export-localization-resources --export-path "./post-update-resources" --system-onlyCompare the two exports to identify added, modified, and removed resource strings. Use a diff tool or source control system. The following example uses Git:
CMDCompare exported resources (git)git diff --no-index ./pre-update-resources ./post-update-resourcesUpdate affected translations in your localized .resx files to reflect the new meaning and format of changed strings.
Automate your translations
We recommend using AI-powered translation tools to batch-analyze the diff and automatically produce updated translations for changed strings.
Register localized resources
To add custom localization resources for your admin UI translations, create and register .resx resource files using the conventional .NET approach.
Create a new .NET resource file in your custom assembly. See Create resource files for .NET apps.
Register the resource file using the RegisterLocalizationResource attribute:
C#Register localization resourcesusing CMS.Localization; // Register resources for additional languages [assembly: RegisterLocalizationResource(typeof(LocalizationClient), LocalizationTarget.Client, "cs-CZ")] [assembly: RegisterLocalizationResource(typeof(LocalizationClient), LocalizationTarget.Client, "de-DE")] namespace Acme.Web.Admin; // Class encapsulating the localization resource files public class LocalizationClient {}The
RegisterLocalizationResourceattribute accepts an optionalLocalizationTargetparameter to specify whether resources are used on the client-side, server-side, or in builder components. If not specified, defaults toLocalizationTarget.Server. For more details about theLocalizationTargetenum, see Integrate custom code.
Project configuration for multiple language variants
When registering multiple language variants using a single registration class (as shown in the example), configure the LogicalName property in the project’s .csproj file to map .resx files to the registration class. See the TrainingGuides.Admin project for an example.
Alternatively, place each .resx file next to its own .cs registration class, which requires a separate class per variant but no .csproj configuration.
English resources are optional
English (en-US) .resx files are not required in the project unless overriding Xperience’s default English strings is necessary. The system uses built-in English resources automatically. Register English resources only when customizing or replacing the default English text.
Distribute localization files
You can distribute your translations as NuGet packages. This approach allows other developers to easily include your translations.
Structure your project (typically a custom class library) to include the translated resource files and their registration.
Package the translation using
dotnet pack, and distribute:CMDCreate NuGet packagedotnet pack --configuration Release --output ./packages
Configure available languages for users
Use the AdminLocalizationOptions class to configure available languages for the administration interface. This configuration determines which languages appear in the language selector dropdown on the profile page, allowing users to choose their preferred admin UI language.
English language configuration
English (en-US) must be explicitly included in the SupportedCultures collection to be available as a language option, even when the project does not include English .resx files. The system uses built-in English resources automatically, but users can only select English if configured in SupportedCultures.
The following code sample demonstrates the configuration:
using Kentico.Xperience.Admin.Base;

var builder = WebApplication.CreateBuilder(args);

builder.Services.AddKentico( ... );

// Configures admin UI localization - must be placed after the AddKentico call to ensure localization services are registered
builder.Services.Configure<AdminLocalizationOptions>(options =>
{
    options.DefaultCultureCode = "en-US";
    options.SupportedCultures = new[]
    {
        new AdminCulture
        {
            CultureCode = "en-US",
            DisplayName = "English (United States)"
        },
        new AdminCulture
        {
            CultureCode = "cs-CZ",
            DisplayName = "Czech (Czech Republic)"
        },
        new AdminCulture
        {
            CultureCode = "de-DE",
            DisplayName = "German (Germany)"
        }
    };
});
AdminLocalizationOptions properties
|
Property |
Type |
Description |
|
DefaultCultureCode |
|
The default culture code used when no user preference is set or when the preferred language is unavailable (e.g., on the admin UI sign-in page). Must be present in |
|
SupportedCultures |
|
Collection of cultures available for the administration interface. |
Default content language vs. Default admin UI language
When editing content in the administration interface, content items are displayed in the default content language configured in Languages, regardless of the admin UI language set in DefaultCultureCode.
AdminCulture properties
|
Property |
Type |
Description |
|
CultureCode |
|
The culture code in the format “language-region” (e.g., “en-US”, “cs-CZ”, “de-DE”). |
|
DisplayName |
|
The display name shown to users in the language selector. If not provided, uses the culture’s native display name. |
|
UseDefaultSystemUICulture |
|
Indicates whether the default system UI culture provided by Kentico (en-US) will be used. This is used to set a different date format while preserving the default en-US translations provided by Kentico.
C#
UseDefaultSystemUICulture example
|
Access localized resources
When localizing your custom code and components, use the following APIs.
Back-end
Access registered resource strings using ILocalizationService:
// Contains instance resolved using dependency injection
private readonly ILocalizationService localizationService;

// Gets localized string for current UI culture
var message = localizationService.GetString("myproject.admin.users.createButton");

// Gets localized string for specific culture
var germanMessage = localizationService.GetString("myproject.admin.users.createButton", "de-DE");
Front-end
Client-side admin code uses the i18n library instead of ILocalizationService. The i18n library is automatically initialized with the current user’s preferred admin UI culture and provides access to client-side localization resources.
Access localized strings in React components using the useTranslation hook from react-i18next:
import { useTranslation } from 'react-i18next';

export const MyAdminComponent = () => {
    const { t } = useTranslation();

    return (
        <div>
            <h1>{t('myproject.admin.users.title')}</h1>
            <button>{t('myproject.admin.users.createButton')}</button>
            <p>{t('myproject.validation.emailRequired')}</p>
        </div>
    );
};
See the i18n documentation for a full usage guide and other resources.
Accessing globalization context
Use the useGlobalization hook to access the current admin UI culture information, including both resource string culture and datetime format culture.
The useGlobalization hook provides:
uiLanguage– The culture code used for resource string localization (matches admin UI language selection).uiLocale– The culture code used for datetime and number formatting (respects theUseDefaultSystemUICulturesetting).
import { useGlobalization } from '@kentico/xperience-admin-base';

export const MyAdminComponent = () => {
    const { uiLanguage, uiLocale } = useGlobalization();

    return (
        <div>
            <p>Current UI language: {uiLanguage}</p>
            <p>Current UI locale: {uiLocale}</p>
        </div>
    );
};
This is particularly useful when you need to format dates, numbers, or other culture-specific content in your React components while maintaining consistency with the admin UI’s localization settings.
Builder components
For builder elements that are used exclusively within the administration interface (such as widget configuration dialogs, or Page Builder inline editors), use IAdminBuildersLocalizationService:
@using Kentico.PageBuilder.Web.Mvc
@using Kentico.Web.Mvc
@using Kentico.Builder.Web.Mvc

@* Injects the localization service for admin UI components *@
@inject IAdminBuildersLocalizationService localizationService

@model LearningKitCore.Components.PageBuilder.InlineEditors.NumberEditor.NumberEditorModel

@using (Html.Kentico().BeginInlineEditor("number-editor", Model.SelectedNumber))
{
    <div style="position: absolute; top: 0px; right: 0px;">
        <button id="add-btn" type="button">
            @* Gets the localized string using current admin UI culture *@
            @localizationService.GetString("my.project.editors.numbereditor.add")
        </button>
        <button id="sub-btn" type="button">
            @localizationService.GetString("my.project.editors.numbereditor.subtract")
        </button>
    </div>
}
For content that appears on the live site, use the framework’s IHtmlLocalizer API.
Resource key consistency
Use the same resource keys in both your .resx files and client-side code. The admin UI automatically loads client-side resources (registered with LocalizationTarget.Client) and makes them available to the i18n library.
Admin UI fields
Fields in the admin UI support localization expression in the format: {$ resource.key $}
These expression automatically resolve to a matching string based on the language currently selected by the user. If the localization is not found in the target language, the expression resolves according to Resource string resolution and fallbacks.
For example, the following screenshot demonstrates the localization of field metadata via the field editor (label, explanation text, etc.).
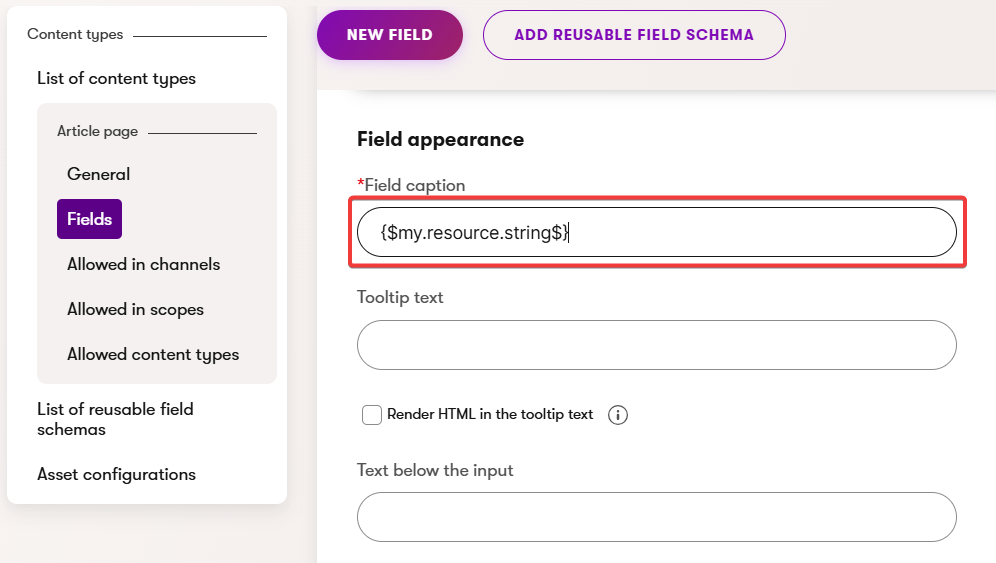
In the editing interface of the corresponding object, the expression resolves to the underlying string.

Froala rich text editor
The Froala rich text editor supports localization to match the user’s preferred admin UI language. The localization system works on multiple levels to ensure both system and custom elements are properly translated.
Default editor localization
By default, the editor automatically localizes its interface based on the user’s culture provided from the backend. The editor supports multiple languages out of the box, as documented in the Froala languages documentation.
The editor automatically applies the appropriate language pack when all of the following conditions are met:
- The user has set a preferred admin UI language in their profile
- The language is supported by Froala’s default language packs
If the language is not supported by Froala, the editor defaults to English (en-US).
Localize system customizations
Xperience’s customizations to the Froala editor (such as custom toolbar buttons and features) are not covered by Froala’s default localization. These strings are located inside localization.client.en-US.resx in the exported resources and must be translated as part of your localization efforts.
Localize custom configurations
For custom rich text editor configurations, you can use localization macros to translate custom options and display names.
The corresponding resource strings must be registered in a resource file with LocalizationTarget.Server.
Rich text editor configurations support localization macros in the format {$resource.key$}. This allows you to reference registered resource strings for any option with a custom display name. For example, when localizing text for inline styles, you can use the macros like so:
{
  "toolbarButtons": [
    "bold", "italic", "underline", "|", "inlineStyle", "customButton"
  ],
  "inlineStyles": {
    "{$mycompany.editor.redBoldText$}": "font-size: 16px; font-weight: bold; color: red;",
    "{$mycompany.editor.blueItalicText$}": "font-style: italic; color: blue;",
    "{$mycompany.editor.highlightText$}": "background-color: yellow; padding: 2px;"
  }
}
Resource string resolution and fallbacks
The localization logic uses a multi-step fallback process to resolve resource strings when a specific localized string is not available:
User preferred culture – The system first attempts to load the resource string using the user’s preferred admin UI language (if set in their profile). If no user preference is set, the system uses the
DefaultCultureCodespecified in AdminLocalizationOptions.English fallback (en-US) – If the resource string is not found in the selected culture, the system falls back to English (
en-US).Resource key display – If no localized string is found in English, the system displays the resource key itself as a last resort.
This cascading fallback helps ensure users see meaningful text in the admin UI even if some resources remain untranslated.
Example fallback scenario
Consider a user with Czech (cs-CZ) as their preferred language, and an application configured with German (de-DE) as the default culture:
- System looks for the resource key in Czech (
cs-CZ) resources (user’s preference). - If the translated resource isn’t found, the system falls back directly to English (
en-US) resources. - If the key doesn’t exist in English, the system displays the resource key itself.
If the user had no preferred language set, the system would use German (de-DE) in the first step instead of Czech.
Example implementation
For an admin UI localization implementation example, see the finished branch of the Training guides repository. The example includes localized custom Page Builder widget, a custom UI page, and sample localizations in Spanish and French. The localization resources are defined in the TrainingGuides.Admin project.
Demo translations only
The Spanish and French resource strings in the Training guides example are machine-translated for demonstration purposes only and may not be grammatically accurate. These translations are not suitable for production use.