
Translate pages
Before you can translate individual pages in your project into other languages, you need to set those up in the Languages application. For detailed info on how to configure multiple languages in Xperience, see Languages.
Afterwards, you can start to translate and create language variants of your pages:
Open the website channel where you want to translate pages.
In the header bar, open the language switcher.

The language switcher is available only if two or more languages are set up.
Select the language to translate pages into.
Select the page to translate.
Untranslated pages are visually marked by the Not translated () workflow status.
Enter the translated page name. You can now choose one of the following options:
- Copy content from another language is the preselected option. By default, the closest language in the fallback chain is preselected. You can choose a different language from the drop-down list. This option lets you prefill the content fields with the content available in the chosen language. If a linked item does not have a translated or published version, a warning will be displayed, and a fallback language variant of the item will be used.
- Create empty page allows you to create an empty page with blank fields. Linked items need to be re-linked into the new language variant of the translated page.
- Translate using AIRA see Translate using AIRA for more information.
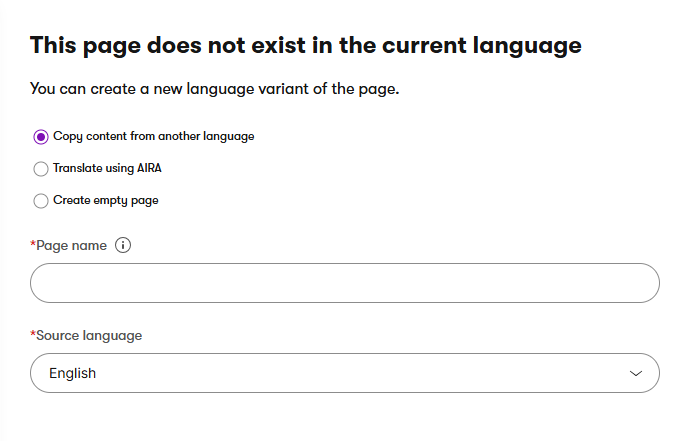
Select Continue.
Enter the translated values of the page’s fields.
Save the translated page.
You have now successfully translated the page. Note that the particular language variant is now only a Draft and won’t be accessible on the live site until you publish it. Until you do so, the language variant in the fallback language will be displayed.
If content locking is enabled, the page is now locked and only you can edit it. Variants created via Translate using AIRA are locked only once you start editing.
Translated content items on untranslated pages are loaded in the fallback language. However, there is an exception in case the content items are injected into the page via code. In that case, content items are loaded in the language variant according to the requested language. For more information on language fallbacks, see Languages.
Translate using AIRA
When you choose Translate using AIRA and start the translation process, the name and content of your page, including Page Builder content, will be translated using AIRA.
The translation workflow changes depending on the number of items submitted for translation. For a single item, AIRA creates a new language variant of the content in the Draft state and immediately takes you to it.
However, when translating multiple pages at once (for example, when translating pages along with their linked content), your content is sent to a Translation queue. This allows the translation to be processed in the background, freeing you up to continue your work. You can check on its progress in the Translation queue application. Once the translation of your content finishes, the related items are removed from the Translation queue application.
The behavior of the translation can be configured, allowing you to specify, for example, formatting rules or brand terminology.
Existing text links to the translated content are not redirected to the new variant or translated automatically and need to be manually reviewed to ensure they lead to the correct content.