
Notifications basics
Your websites and apps never sleep. It’s always working, collecting leads, processing requests, and capturing important visitor activity. But your team isn’t always watching the system.
That’s where notifications come in.
They help your colleagues respond faster to customer needs, stay in the loop, and avoid missing key actions without constantly checking the platform.
This how-to guide teaches you what notifications are and how to easily build one from scratch.
You’ll need a demo Kbank website to follow along with the exercises. If you don’t have your demo site yet, request the Xperience by Kentico - Business Tutorial Kbank demo site through a form at Kentico.com.
What are notifications?
Notifications in Xperience by Kentico are automated internal emails sent to your team, not to your customers. They can be triggered by specific actions visitors take on your website, such as when a visitor submits a form.
For example, you can alert the marketing team when someone fills out a contact form or notify an admin when a request is submitted through your newsletter subscription form.
You can also receive a notifications when someone from your team moves a piece of content through workflow.
These messages keep your team aligned and ready to act.
Why internal notifications matter
When a visitor requests a quote and no one follows up, it’s not just a missed opportunity. A lack of response, clarity, or care can impact your brand’s credibility and the trust you’ve built with your audience. In a busy marketing environment, it’s easy for form submissions or system events to slip through the cracks, especially when your team is juggling multiple tasks across campaigns and channels.
Notifications help you avoid that.
Here’s how setting up your notifications correctly makes your daily work easier:
- Help your team respond faster to visitor activity.
- Reduce the need to monitor submissions manually.
- Ensure essential actions, like form submissions or system events, aren’t missed.
What you can customize
Notifications aren’t one-size-fits-all. You can tailor them to match your team’s workflow and communication style. You can add proper brand styling and assets. You can make the notification stand out so the recipient processes it as the first thing.
At the same time, don’t overdo it. The goal of any notification is to ensure that the right people get the correct information at the right time without unnecessary noise.
As a marketer or content editor, you can:
- Edit the subject line and message content.
- Use dynamic placeholders (called macros) to insert form data and other context, like this one –
{{FormLink}}. - Choose who receives the notification.
- Choose the sending domain.
- Preview messages before they’re sent.
You don’t need to write any code to create your notification. Simply gather the pieces that matter to your project, and let notifications do the rest of the work.
What you need to set up
Before you create your first notification, check a few system basics to make sure everything will work as expected:
- Your admin domain should be correctly set in the system configuration.
- Your sender domain must be approved as a sending domain for system emails, especially in SaaS or private cloud environments.
- You need access to the Notifications app in the admin interface.
Ask your site admin or developer for help if you’re unsure about these settings.
Your developers can create custom notification templates with your brand design to keep consistent formatting.
Explore common use cases
Not sure where to start? Here are some everyday examples where notifications come in handy:
- Get notified when someone submits a specific form (e.g., Contact us, Request a quote, or Newsletter signup).
- Receive a notification when someone creates or updates content you are responsible for. Depending on your content management workflows, you might need to review this content or approve its publishing.
- Collaborate with developers to trigger notifications from other system activities, such as e-commerce-related, content-related, or other custom events built by your developers.
Exercise – Send a notification after form submission
Let’s walk through a practical example. You can either watch an interactive demo, or continue with the tutorial below the video and put your editing skills to a test.
Imagine you’re part of a marketing team handling incoming requests for electric car loans. Timely follow-up is key because every form submission could represent a qualified lead. Setting up an internal notification ensures that no customer interest goes unnoticed or unanswered.
In this tutorial, you’ll create an internal notification that alerts your team when someone submits the Electric Car Loan form.
This exercise uses a built-in form and template from the Kbank demo site, with no coding needed.
What you’ll learn
By the end of this walkthrough, you’ll know how to:
- Create a notification email.
- Assign it to a specific form.
- Add internal recipients.
- Test that the email sends correctly and contains the data you need.
Before you start
Make sure you’ve logged into the Kbank demo site as an editor or administrator.
Step-by-step: Set up a form notification
Create and send a notification in an interactive walkthrough
Not a fan of reading? Fast-forward with our interactive demo that directly walks you through creating your own notification, step by actionable step.
Ensure you access the video in full screen mode to make the most out of its interactive features.
Not interested? That’s okay. Continue reading to learn the full details of the process. You can even try it out on your Training website to get most of this guide.
1. Create a new notification
- In the Configuration > Notifications app, create a New notification.
- Configure the notification properties:
- Notification name: Electric Car Loan Form Submission
- Event type: Form submission
- Forms: Request Electric Car Loan
Make sure to connect your notification to the correct form.
2. Define recipients and select a template
- Under the Delivery section, add the following:
- Recipients: administrator (e.g. your test admin account) and linda@kbank.localhost (a teammate)
- Notification template: General email template
- Sender email address: kbank@localhost.local

This part of the process ensures that key team members receive the email notification and that it goes out from the right sending domain (@localhost.local).
Note: General email template is the only template usable for email notifications in the Kbank demo. Your live site may have branded options.
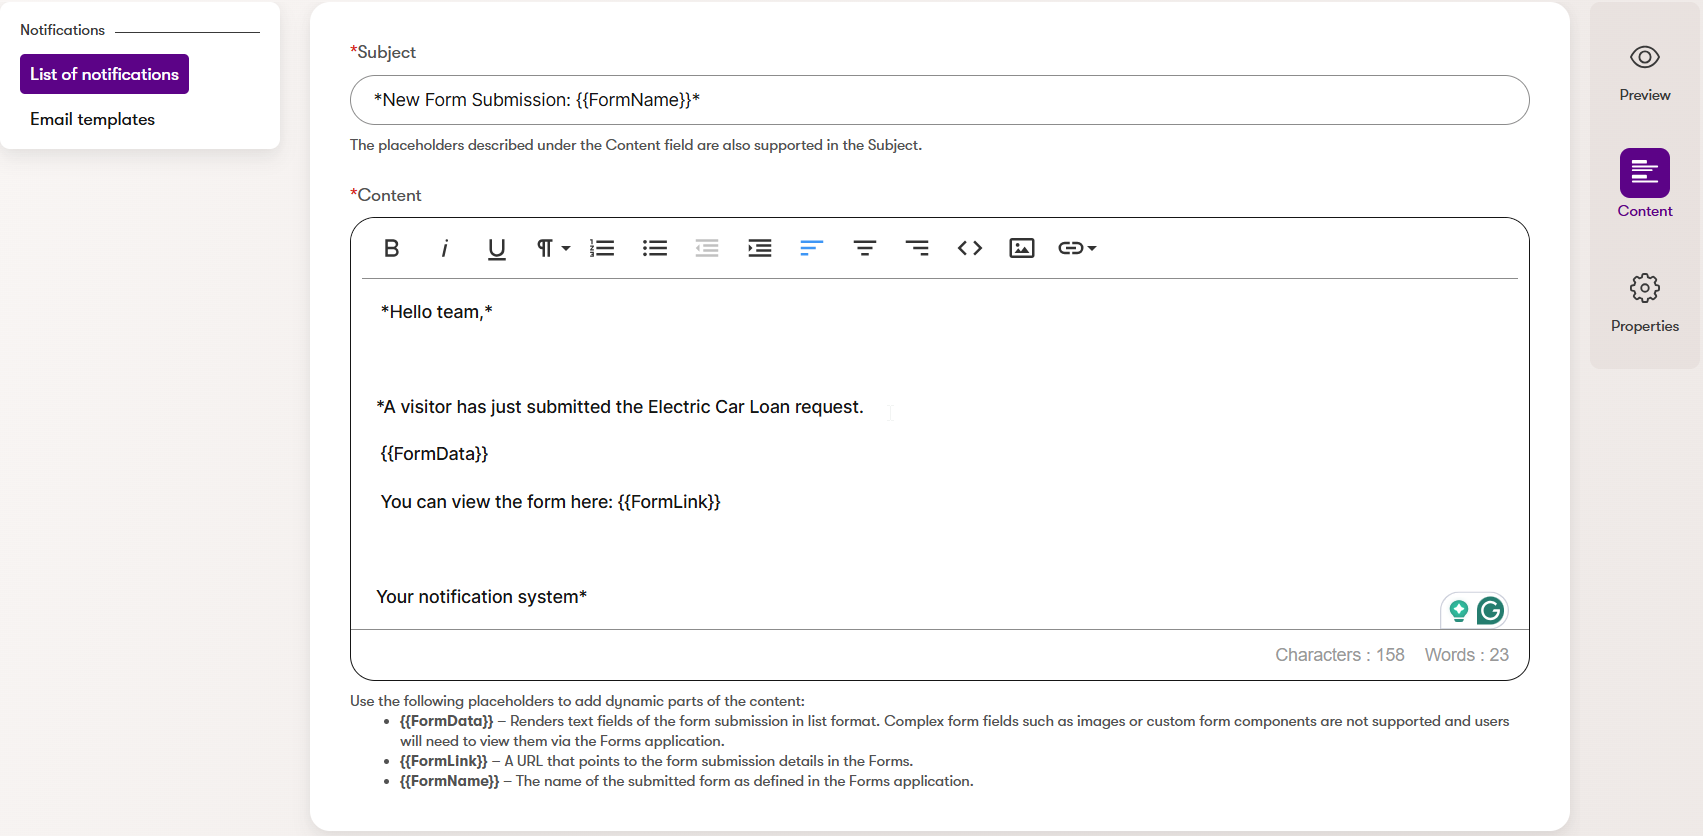
3. Compose your message
Now it’s time to write the subject line and body of the email. You can use macros to include dynamic content, like the form name and the visitor’s input.
Subject:
New Form Submission:{{FormName}}Body:
Hello team,
A visitor has just submitted the Electric Car Loan request. {{FormData}}
You can view the form here: {{FormLink}}
Your notification system
This message will display the actual submitted data and include a link (though in the Kbank demo, this link may not be functional – more on that below).
In the Kbank demo, the link filled in for the {{FormLink}} placeholder may not lead anywhere. That’s an expected behaviour because Kbank is a sandboxed demo environment. In a real-life application, this link would take you or your recipient directly to the submitted form in the admin interface.
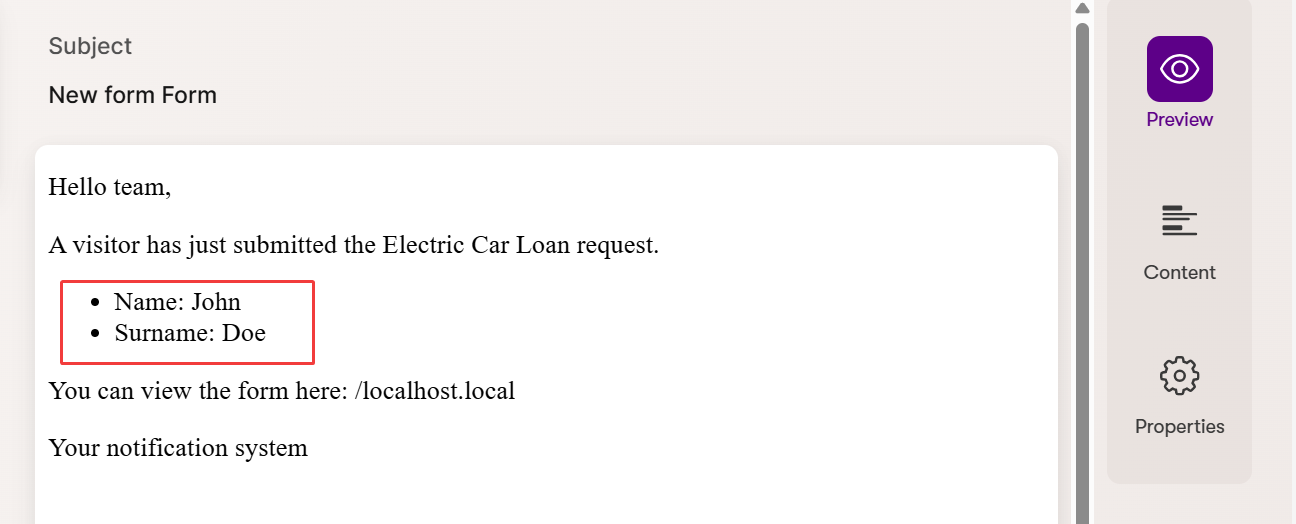
4. Save and preview your notification
- Save the email notification draft.
- Preview your notification, and if you’re happy with the result, let’s get to testing.
Note that Xperience by Kentico adds a placeholder contact name for the demo visitor to help you visualize what the notification data will look like. The preview of your notification may therefore look something like this:
Time to test
Let’s verify that the notification works as expected.
Submit the form
- Open a private (Incognito) browser window.
- Go to the Electric Car Loan page.
- Fill out the form at the bottom of the page to test-apply for a loan for an electric car.
- Close the private browser window.
Check the result
The Kbank demo website is not connected to any SMTP server, so your test email will be marked as Waiting or similar, but the hosted training environment will not send it to any real-life email address.
You can, however, open such an email and check its contents.
- Return to the Kbank admin interface.
- Go to Configuration and open the Email queue app.
- Open the most recent email sent to Linda or to the test user you’ve specified.
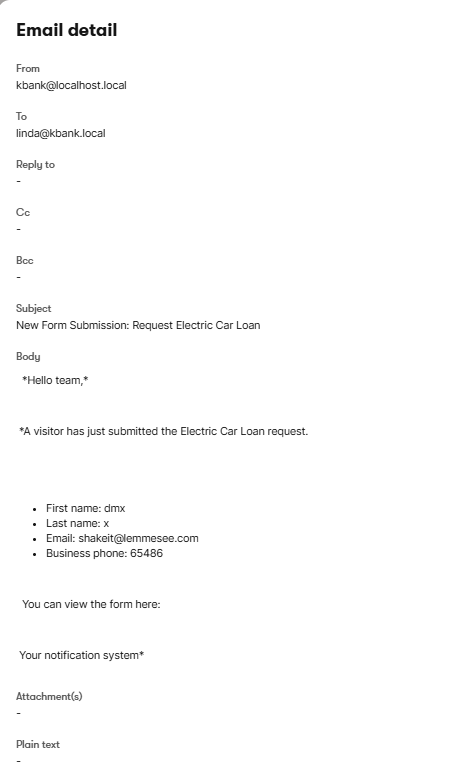
Review the following:
- Does the subject line show the correct form name?
- Does the body contain the form data?
- Were the correct recipients notified? (Ensure the message went to everyone you listed in the Recipients section.)
If all checks out, then congratulations! You’ve just built your first successful internal notification in Xperience by Kentico.
Wrap-up
You’ve created a fully working internal notification tied to a form submission – no developer required.
Notifications like this can help your team stay responsive, informed, and aligned with incoming interest from your website. The faster your team can react, the better you can stay on top of the customer’s needs and the more likely you are to increase the number of conversions. A looked-after customer is a happy customer, after all.
Now that you’ve got the basics, you can:
- Set up notifications for other forms.
- Customize the content to fit your processes.
- Add or remove recipients depending on the use case.
Feeling confident? Try creating a notification for a different form – like Newsletter signup or Contact sales – thus tailoring the message to your team’s needs.