
Create a newsletter email and template in Email Builder
Creating marketing emails often feels more complicated than it should be. You have to worry about HTML quirks, ensuring emails display correctly across all kinds of inboxes, devices, and operating systems. It’s a lot, especially if you always need a developer’s help.
That’s why Xperience includes the Email Builder: a no-code email editing tool that helps you create professional, responsive emails without writing a single line of code. Developers create the reusable building blocks called components once, and from then on, you can simply drag and drop them into place.
The result? You can create your emails faster. It’s easy to use and everybody who knows Page Builder, so you don’t run into bottlenecks. And since the Email Builder aims to build once, reuse everywhere, it asks for less back-and-forth with the dev team.
Email Builder components
As an editor, you don’t need to write any code. Developers prepare building blocks like templates, sections, and widgets to put your emails together piece by piece.
It’s as easy as building castles out of Lego bricks: choose a template, drop in content blocks, and create an email to share your big, bold marketing message.
Here’s a quick look at the building blocks you’ll use:
Sections Sections divide the layout of your email into logical parts. Each section can hold one or more widgets in one or more email widget zones. For example, you might add a section for your header (and header image), another for the main content, and a final one for the footer.
Widgets
Widgets are content blocks you drag into your email, such as text areas, images, buttons, and more. You can mix and match them to build your content.
- Templates
Templates allow you to save the structure, layout, and other email configurations of your email to reuse it for other emails as many times as you need. You can create and save a template preset that suits your campaign, then adjust the layout and content to match your message.
Now, let’s put all this theory into practice.
Create your first marketing newsletter
Imagine you’re creating a simple newsletter email for Kbank’s upcoming summer event—a fun-filled gathering for colleagues to connect, relax, and celebrate the season. The email should capture the event’s playful tone while remaining clean and professional.
Before you can start sending newsletters, your team needs to set up a way how your users subscribe to your newsletters. If you want to get a feel for what setting it up looks like, the following video walks you through adding subscription form and additional subscription pages.
Are you ready?
You’ll use Email Builder to structure and style the message. If you’re excited to put your very own newsletter creation skills to the test, then let’s jump right in!
Step 1: Start a new email
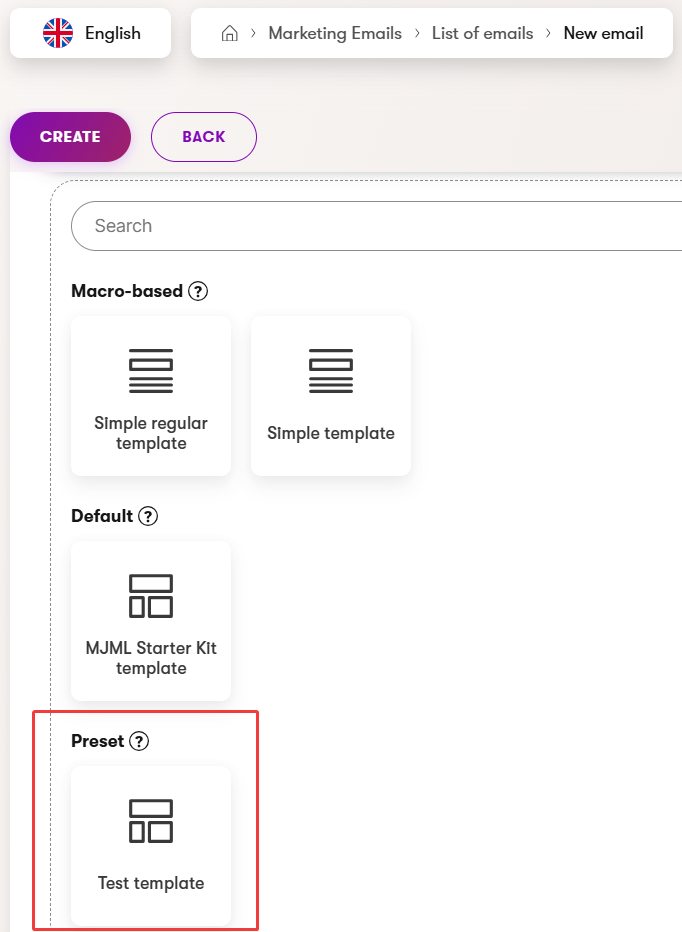
- Go to the Marketing emails channel and create New email.
- Fill in the Email name: Kbank summer bash
- Select:
- Email purpose: Regular
- Content type: Simple email
- Continue to save your choices.
- Select Email template: MJML Starter Kit template and Create your new email.
Step 2: Add sections and widgets
- New email draft opens in the Content tab by default. Fill in the email metadata:
- Subject: Kbank Summer Bash Is Here!
- Preview text: Get your goodies at Kbank’s big summer bash
- Save your changes and switch to the Email Builder view.
- In the Email Builder, you’ll see a blank layout with an empty section already in place.
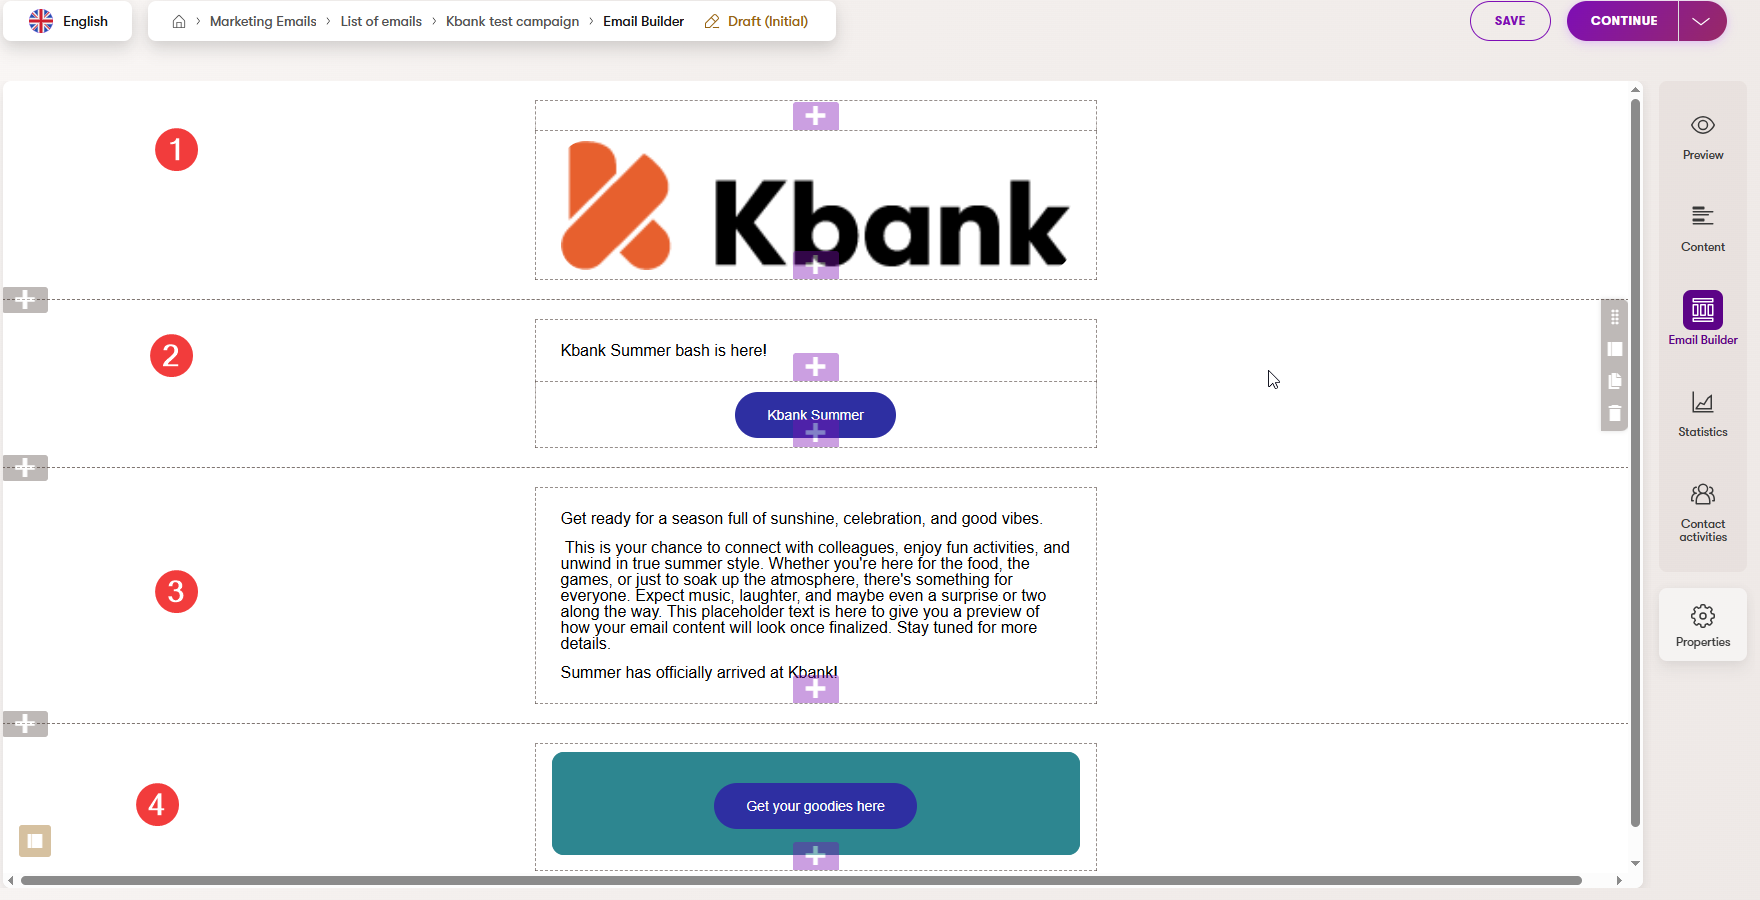
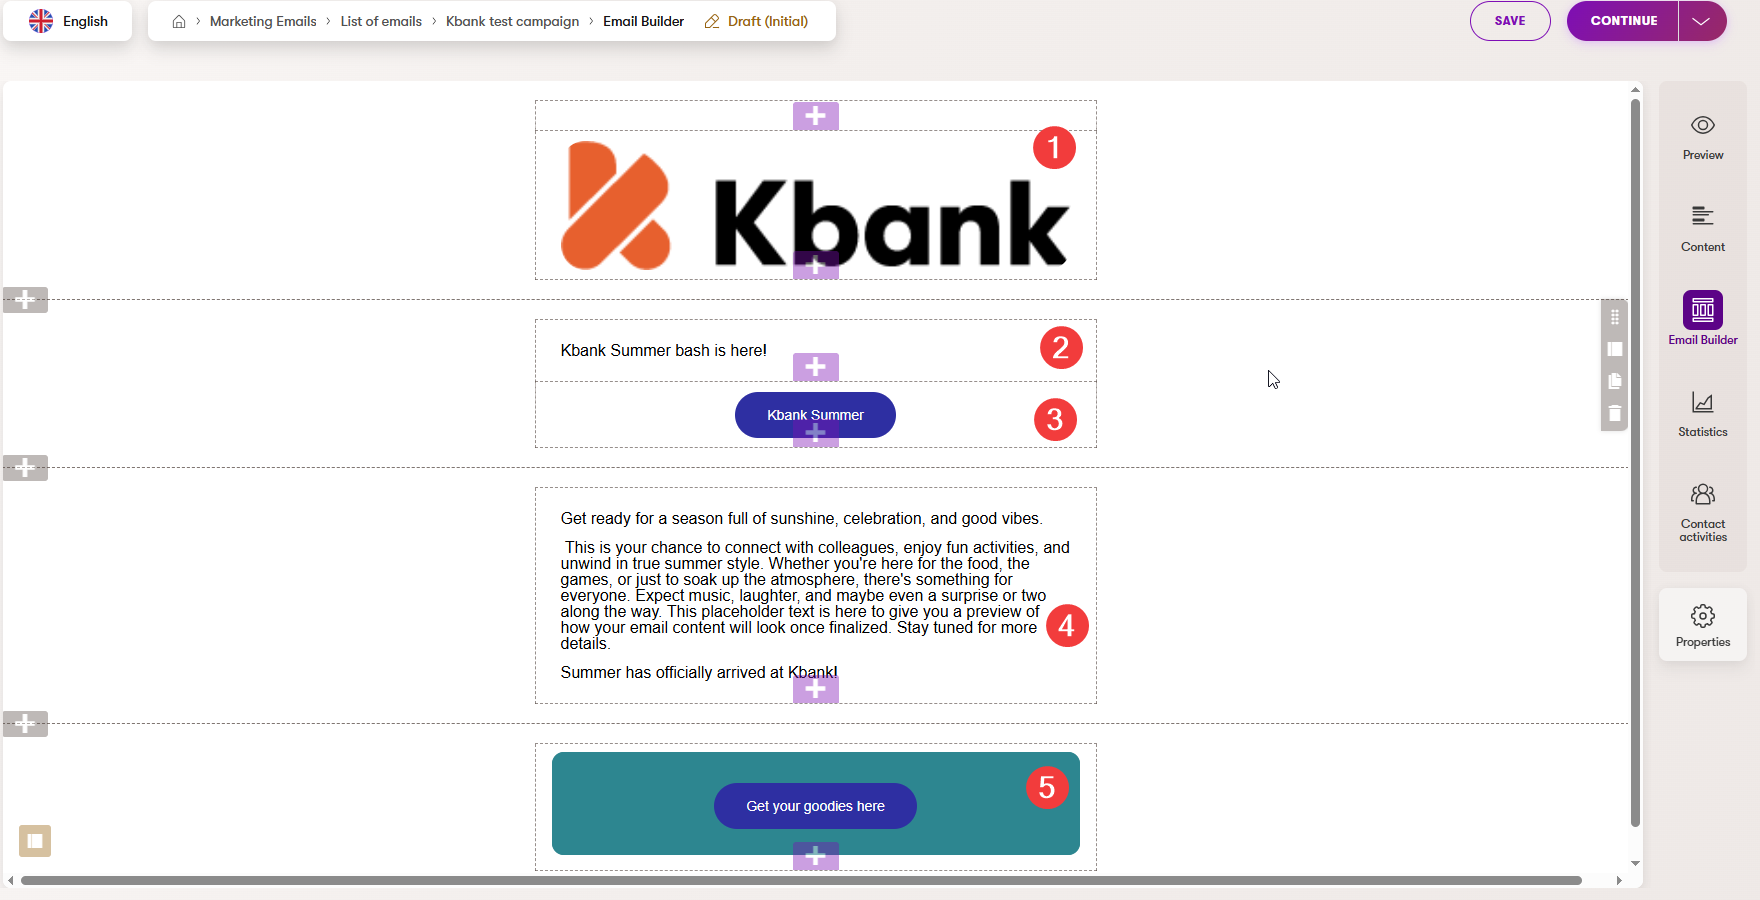
- Use the “+” (Add section) gray button on the left side to create the layout of the email. Let’s add three more Full-width sections - one for the header image, one for the email headline and first call to action, one section for the main content, and one for the CTA button, which can guide users to your website, landing page, or special offers.
- Add widgets to your sections:
- Into the top section, add Image widget for the company logo.
- In widget properties, Select existing content item.
- Switch to the Brand Assets workspace, add the Kbank logo image, Select, and then Apply to save the asset.
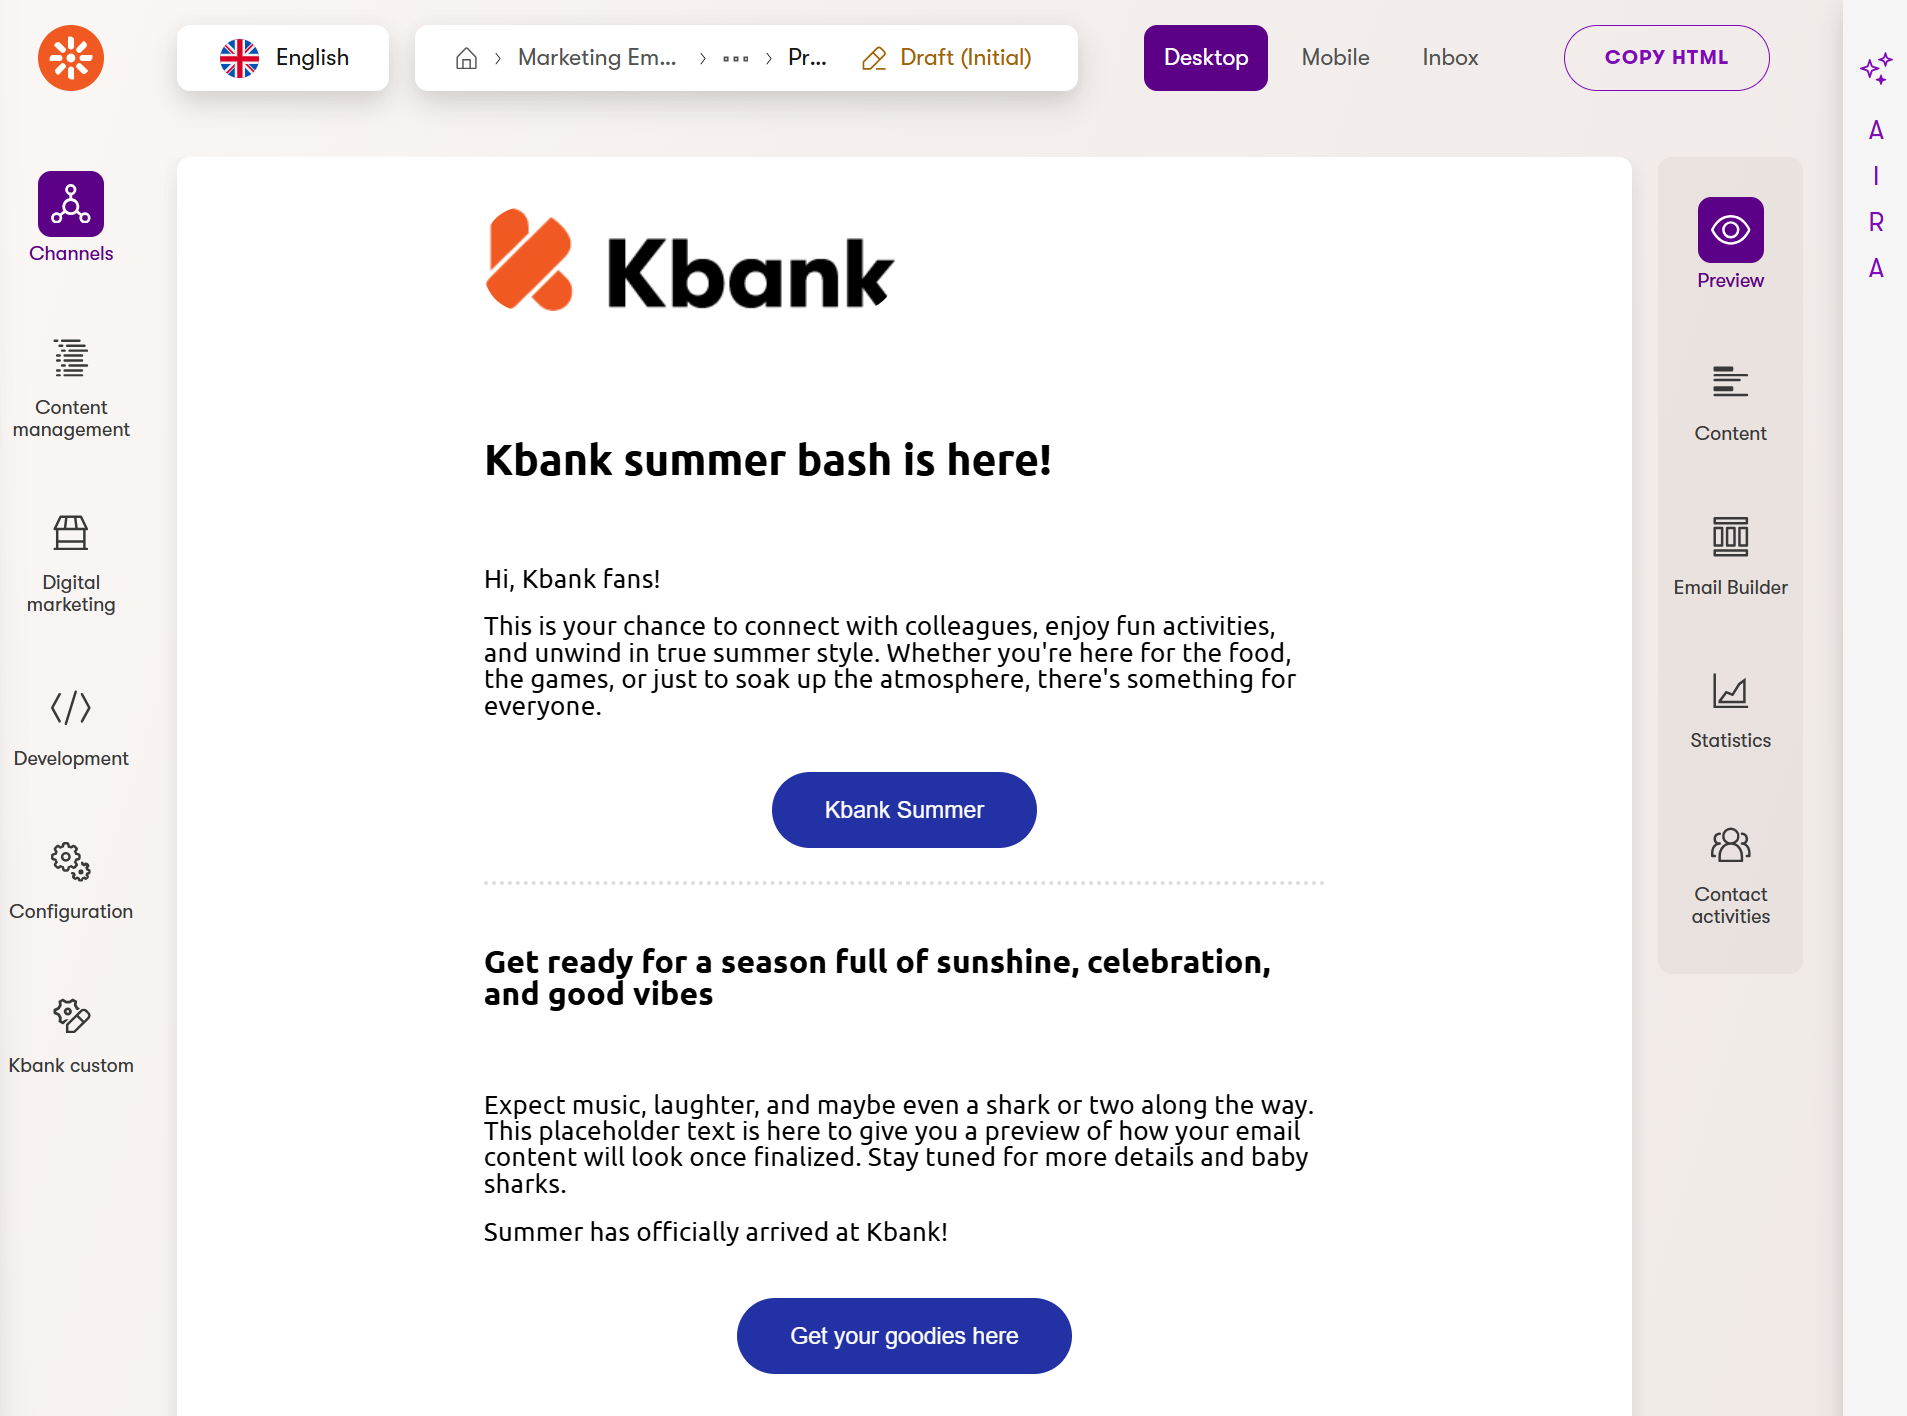
- In the section section, add your email headline and content using the Text widgets:
- Headline: Get ready for a season full of sunshine, celebration, and good vibes
- Set the headline to Heading 1.
- Add a Button widget to the section, and adjust the properties:
- Button text: Kbank summer
- URL: https://www.kentico.com
- Set the horizontal alignment to HorizontalAlignment.Center.
- Add Text widget to add the email body: Get ready for a season full of sunshine, celebration, and good vibes Hi, Kbank fans! This is your chance to connect with colleagues, enjoy fun activities, and unwind in true summer style. Whether you’re here for the food, the games, or just to soak up the atmosphere, there’s something for everyone. Expect music, laughter, and maybe even a shark or two along the way. This placeholder text is here to give you a preview of how your email content will look once finalized. Stay tuned for more details and baby sharks. Summer has officially arrived at Kbank!
- Copy the Kbank summer Button widget the last section, and adjust the properties:
- Button text: Get your goodies here
- URL: https://www.kentico.com
- Set the horizontal alignment to HorizontalAlignment.Center.
- Into the top section, add Image widget for the company logo.
Keep the number of sections to a minimum to avoid overwhelming your layout. Keep your content clear and focused. Short paragraphs and simple but eye-catching headlines work best for email.
Tip: Try using the Text widget’s properties to, for example, change the headline to Heading 1.
Step 3: Improve the email
Let’s see if you’ve grasped the basics of creating email with Email Builder. Here’s a challenge:
Can you turn your email to look like the following?
Use fewer sections, Text, Button, and Divider widgets in the email body. Set the logo width to 250.
A note on subject lines Before you send your email, be sure to write a strong subject line. It’s the first thing your readers will see and can make a big difference. Stay within your brand guidelines and:
- Be clear and specific.
- Add a sense of urgency or curiosity.
- Keep it under 50 characters if possible.
Step 4: Preview your email
- Select Preview tab on the right to see how your email will look on Desktop and Mobile.
- In the Inbox tab, preview the From, Subject and Preview text fields.
- Now is a good moment to double-check:
- Any spelling and grammar errors? Off-brand communication style?
- Is the image loading correctly for different devices?
- Do button links correctly work?
Step 5: Schedule or send your email
- In the Properties tab, define Sender and recipients:
- Sender: Kbank team
- Send to: Newsletter recipient list
- Save
- Review and send
- Either select Schedule to set a send time.
- Or Send now to deliver your email immediately.
Marketing Emails channel in Kbank is not connected to any SMTP server, the emails are not sent, and that’s why you won’t be able to view the email statistics.
Turn your newsletter into a reusable template
Now that you’ve sent your first newsletter, you might be thinking, “I’ll need to send something like this again.” Chances are that you’re right, and the good news is that you don’t need to start from scratch next time.
In this section, you’ll learn how to save your newsletter as a template so you can reuse the layout and structure for future emails.
Why save it as a template?
Templates help you:
- Save time by reusing the same structure.
- Keep your emails consistent in layout and branding.
- Avoid repetitive work like adding the logo or footer every time.
If your emails usually follow a similar pattern, templates are your best friend.
Save your newsletter email as a preset template
Let’s turn your one-off newsletter email into a handy template you can use again and again.
Step 1: Find your sent newsletter
- Go to the Marketing emails app.
- Find the Kbank summer bash newsletter email in List of emails.
Step 2: Save the email as a template
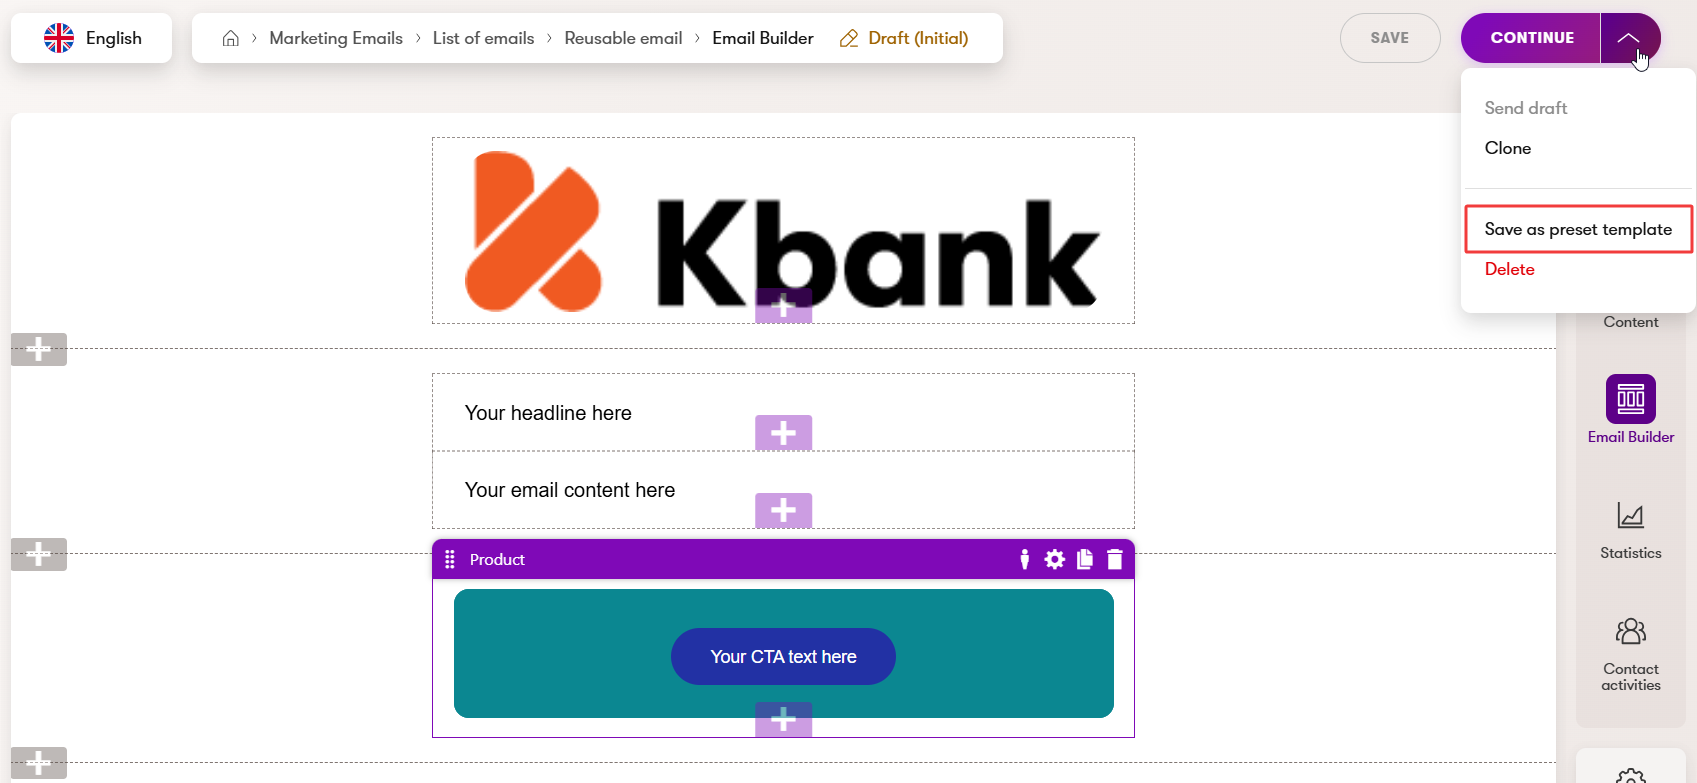
- Open the email, and switch from the Content tab to the Email Builder tab. You can save the email as a preset only from there.
- Navigate to the Send draft button and choose Save as preset template from the menu.
- Fill in preset template properties:
- Name: Kbank quarterly bash newsletter
- Description: Kbank quarterly bash newsletter - to be sent out to Kbank coffee-drinkers club members each quarter.
- Icon: cup
- Save the template.
This template is now available to use the next time you create an email. You can verify it’s availability in the Preset templates app.
Step 3: Build a clean, reusable layout
Let’s create a new version of the newsletter, this time with a reusable layout. You’ll build it like before but with more flexibility in mind.
- Create a new email the same way you did in the first part of this guide, but this time, focus on layout rather than content.
- Add these building blocks:
- Image widget for company logo
- Placeholder text areas:
- Text widget for headline: Your headline here
- Text widget for email content: Your email content here
- A footer section - add the Product widget to include a link to a product page from the page tree, and include a CTA button placeholder:
- Product page: Personal banking -> Current account
- Product page button text: Your CTA text here
- Apply changes and Save them.
- When you Save as preset template, it should look similar to the following:
Step 4: Save your layout as a template
- Use the Save as template button once your layout is ready.
- Choose a clear name, like Newsletter with logo and footer.
- Optionally, add a description to remind others what it’s for.
Step 5: Use your new template
Next time you create an email, why not use the template you saved?
Here’s the simplified flow:
- Create new in the Marketing emails app.
- Email name: Kbank winter bash
- Email purpose: Regular
- Content type: Simple email
- Continue to choose Email template.
- In Preset templates, find Newsletter with logo and footer.
- Create a new email from the preset template you created.
Now, you can jump straight into building strong content without worrying about the layout each time, and let preset templates help you scale your email marketing while staying on-brand.
Wrap up
First, you’ve learned the basic components of the Email Builder and got a hands-on demonstration of how easy it is to create and send a newsletter email with these building blocks.
In the second part of this guide, you built on this knowledge and created your own email template to simplify your workflow and speed up email creation in the Marketing Emails channel.