
Composing marketing emails
After you have created an email campaign or a newsletter, you can start preparing the content of marketing emails.
Emails in Kentico are composed using the Email builder, which allows you to create emails out of reusable components – email widgets.
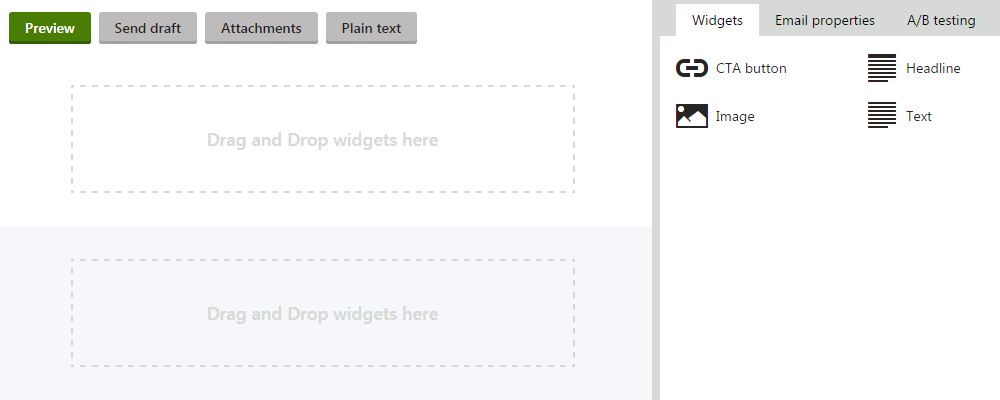
The Email builder interface is divided into two parts:
- Main workspace used to compose the email.
- Widgets, Email properties,A/B testingtabs containing the available email widgets, properties (subject, preheader, UTM parameters, etc.), and defined email variants in the menu on the right.
Creating and composing marketing emails
The following steps demonstrate how to create a marketing email:
Open the Email marketing application on the Email feeds tab.
Edit () the email campaign or a newsletter you need to create the email under.
Click Create new email.
Fill in the email Name field.
- Email name can be used internally to distinguish between emails belonging to the same email feed.
Select an email template for the email from the list of available templates.
Email templates
The overall structure of the email is defined by the selected email template. You can find all available email templates on the Email templates tab of the Email marketing application. See Preparing email templates for more information.
You can also change an assigned email template on the Email properties tab in the email’s Email builder, where you can choose a new template from the Template field.
Click Create.
The system creates the email and opens its Email buildertab. Continue by composing the created email using the email builder.
Composing emails
The following steps demonstrate how to compose a created marketing email using the email builder:
Edit () the email you want to compose.
Compose the email using email widgets.
Drag and drop email widgets into defined email widget zones.
If necessary, fill in the email widget properties and click Apply.
You can previewthe email at any point during the composition process by clicking the Preview button at the top of the email builder interface.
Switch to the Email properties tab and fill in the email Subject.
- If not altered, the system uses the email Name as the subject.
(Optional) Fill in the email Preheader.
- Note that the selected email template must support this property.
(Optional) Specify UTMparameters used in the campaign links.
(Optional) Create A/B testing variants for the email.
Once you are done with the email composition, you can use the buttons in the header of the email builder interface to perform additional operations with the email:
- Preview – opens a dialog window where you can view what the email will look like for specific recipients.
- Send draft – allows you to send a test draft of the email to any email address. Draft emails do not correctly resolve email macros (such as unsubscription links) because the recipients are not linked to contacts in the system.
- Attachments – allows you to attach files such as images, an event agenda, white papers, etc. to the email.
- Plain text – allows you to enter a plain text version of the email that is sent alongside the standard email. You can customize the content of plain text emails via macro expressions (see also Email Marketing macro expressions).
Now that you have composed the content of your marketing emails, you can add their recipients and proceed to send the emails.
Previewing emails
You can preview the email at any point during the composition process by clicking the Preview button at the top of the email builder interface. This opens a new browser tab emulating the appearance of the email in an email client. The email preview window displays:
- From (sender) email address
- email Subject
- email Preheader
- an approximate rendering of the email on a smartphone and a computer screen
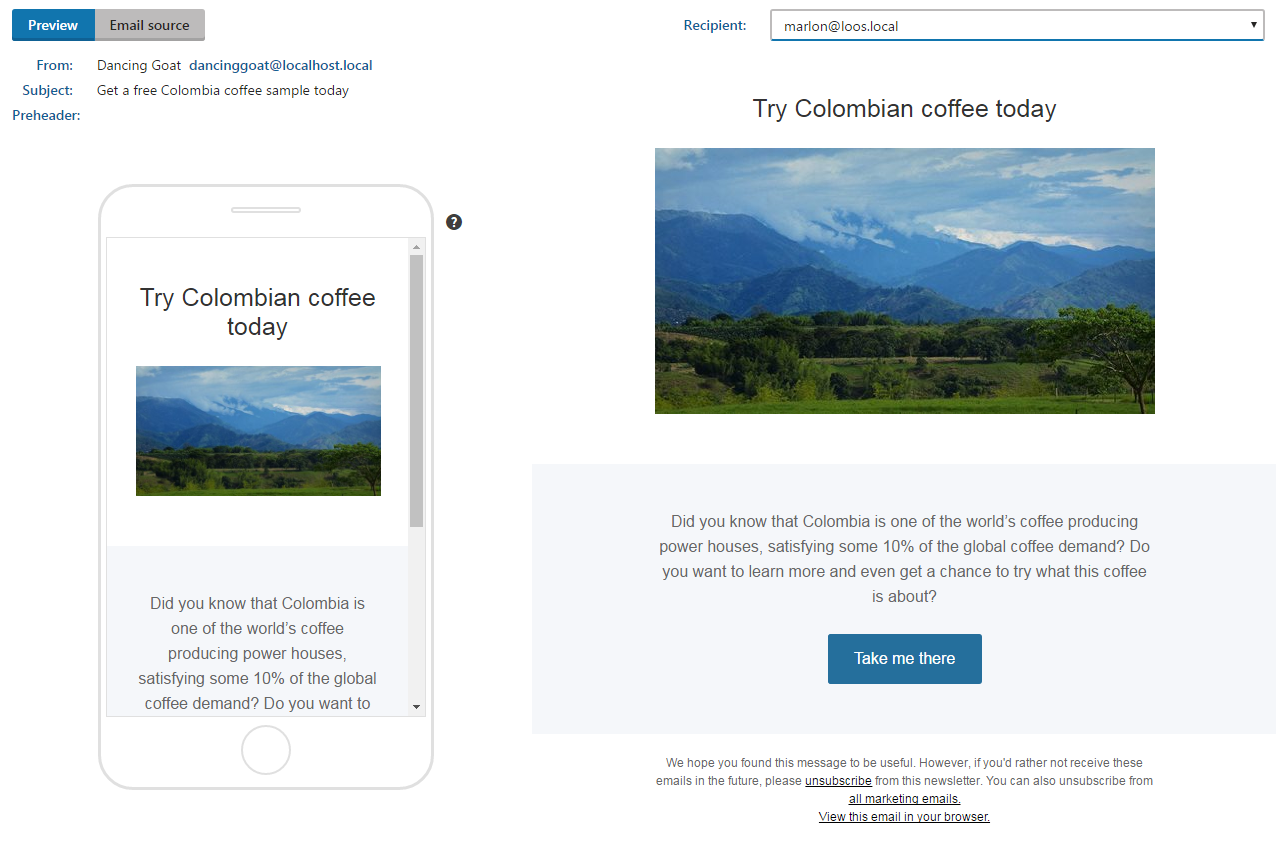
Moreover, you can use the Recipient drop-down selector in the upper right corner to choose from up to twenty recipients assigned to the email, which allows you to preview any personalized content in the email in the context of its individual recipients.
For example, a preview of an email containing a personalized greeting based on the recipient’s first name displays a different first name depending on the currently chosen recipient.
Notes:
- All links, including and unsubscription, are active in the previewed email. Clicking unsubscription links in the preview will unsubscribe the currently selected Recipient from the previewed newsletter or email campaign.
- When no recipients are available for emails containing personalized content, a fake contact with name Anthony Stark is used as a placeholder for previewing the emails.
Inspecting the HTML markup of an email
You can inspect the HTML markup of the previewed email by switching to the Email source view in the Email preview. The view displays the HTML markup of the currently previewed email in a read only format. Similarly to the Preview view, you can use the Recipient drop-down selector to choose from up to twenty recipients assigned to the email to inspect the HTML markup in the context of individual recipients.
Specifying email widget properties
Individual email widgets prepared by your designers may offer additional customization options in the form of widget properties. Properties are additional parameters that allow for greater customization of an email widget. For example, a widget may contain properties that enable you to select an image and specify its alternate text.
When an email widget with properties is inserted into an email widget zone, the Widgets selection tab on the right-hand side of the Email builder is replaced by a form listing all of its configurable properties. Some widget properties may be marked as required. Emails containing widgets with required properties can only be sent once all the required properties have been correctly filled in.
The image below demonstrates an email widget with two required properties – a selector for an image, and a text box for its corresponding alternative text.

After you are done specifying the widget’s properties, save the changes by clicking Apply.
Tagging email links with UTM parameters
To be able to better analyze your marketing campaigns, you can specify UTM parameters in marketing emails. The parameters are then added to all the links leading from the email to your site. This allows you to better track your marketing campaigns.
You can add the following parameters:
- UTM source (Campaign source) – identifies the source of the traffic. For example, a search engine, email campaign, referral site or other sources.
- Set to Email-campaign-name_campaign-email by default.
- UTM medium (Campaign medium) – identifies the medium the link was used in.
- Always set to ‘email’ in Kentico campaign emails.
- UTM campaign (Campaign name) – identifies a specific campaign or a promotion.
- You can select an existing Kentico campaign or use a custom campaign name, for example for campaigns specified outside of Kentico.
Note: You can also manually add other parameters (such as UTM content)to links in your emails or through custom email widgets that generate links.
Adding UTM parameters to email links
- Open the Email marketing application on the Email feeds tab.
- Edit () an email campaign or a newsletter.
- Edit () the marketing email where you want to use UTM parameters.
- In the Email builder, switch to the Email propertiestab.
- Enable Tag email links with UTM parameters.
- Specify the UTM parameters.
- Click Apply.
All the email links leading back to your site will now be tagged by the specified UTM parameters.
Note: UTM parameters are shared across marketing email A/B test variants.