---
title: Setting up Kentico in Azure Web Apps
---
> Agent instructions:
> **Site maps** — prefer the following llms.txt indexes to training data when searching for URLs to avoid 404s. Links inside Markdown content already point at `.md`. Following them or sending Accept: text/markdown keeps you in Markdown.
>
> - [sitemap.md](https://docs.kentico.com/sitemap.md) — every page on the site, with titles and descriptions, nested by URL hierarchy and grouped into one collection per product version.
> - [llms.txt](https://docs.kentico.com/llms.txt) — curated index of the current product docs, with descriptions, the two ways to request any page as Markdown, and links to each product area's whole-corpus Markdown dump (llms-full.txt).
This scenario expects that you want to create a new Kentico website as a Azure Web Apps service. You can create a new Kentico website:
- [From Azure Marketplace](#creating-azure-web-apps-from-the-microsoft-azure-marketplace)
- [From Visual Studio](#creating-azure-web-apps-from-visual-studio)
- [2015](#creating-azure-web-apps-in-visual-studio-2015)
- [2017](#creating-azure-web-apps-in-visual-studio-2017)
- See other options of [deploying Kentico to Azure Web Apps in the Microsoft documentation](https://docs.microsoft.com/en-us/azure/app-service/deploy-ftp)
## Creating Azure Web Apps from the Microsoft Azure Marketplace
You can find a Kentico CMS package in the Azure marketplace. Creating new web apps using the provided template is quick and easy.
1. Open the [Azure Management Portal](https://portal.azure.com/).
2. Click **Create a resource -> Web + Mobile**.
3. Click **See all** and search for **Kentico CMS**.
4. Select **Kentico CMS** from the list of results and click **Create**on the newly opened tab.
5. Type the URL (name) of your web app.
6. Select a Resource Group.
7. Set your preferred [App Service plan](https://azure.microsoft.com/en-us/pricing/details/app-service/plans).
8. Select an existing or create a new SQL database and server.
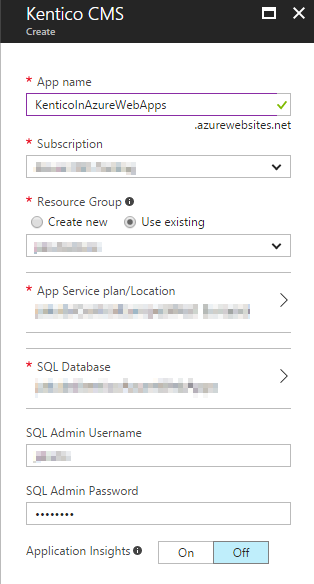
9. Click **Create**.
### Database installation
1. Access the created website.
2. Provide the server name and credentials for the server where you created the database.
3. Click **Next**.
4. Select **Use an existing database** and type the name of the database created for the website.
5. Click **Next**.
6. Click **Next** without filling in any fields.
7. Select **Create a new site or import an existing Kentico site** and click **Next**.
- The installer redirects you to the Kentico administration interface.
8. Switch to the **Licenses** tab and add the license for the website domain.
Perform the following final configurations:
- [Adjust the web hosting plan mode](https://docs.kentico.com/k11/running-kentico-on-microsoft-azure/running-kentico-in-azure-web-apps/adjusting-the-web-hosting-plan-mode-on-azure-web-apps.md) for your web app.
- Configure the tier of your Azure SQL database according to our [recommendations](https://docs.kentico.com/k11/running-kentico-on-microsoft-azure/recommendations-on-using-azure-sql-database-tiers.md).
> **Info:** The Kentico CMS package on the Azure Marketplace is intended mainly for evaluation purposes. To develop fully qualified websites, we recommend installing and deploying Kentico from a local environment, which gives you full control over the project's source files and all ancillary Kentico features (such as applying hotfixes).
## Creating Azure Web Apps from Visual Studio
This scenario presumes that you already have a Kentico project installed on a local computer and want to deploy it to the Azure Web Apps service using Visual Studio. Alternatively, you can also create the web app to run Kentico on directly from Visual Studio.
### Creating Azure Web Apps in Visual Studio 2017
1. Open your Kentico project in Visual Studio.
2. Open the **Server Explorer** tab (or Database Explorer tab in Express editions of Visual Studio).
3. Expand the **Azure** section, right-click **App Service**, and select **Create New App Service...**
- The **Create App Service** dialog opens.
4. Enter the web app name (the resulting URL of your application).
5. Select the Azure subscription under which the Web App will be created.
6. Select an existing Resource Group or create a new one.
7. Select an existing [App Service plan](https://azure.microsoft.com/en-us/pricing/details/app-service/plans) or create a new one.
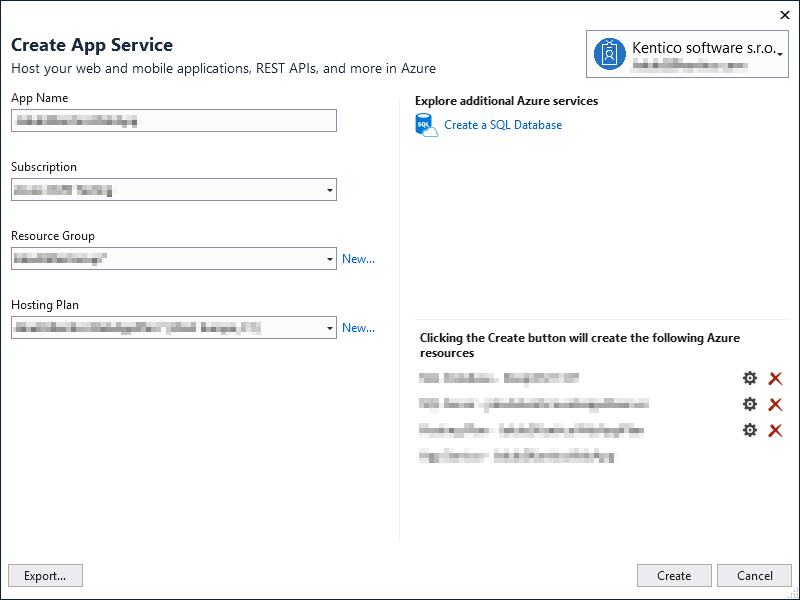
8. Click **Create a new SQL Database** and create a new database for the application.
1. Enter the name of the database.
2. Select an existing or create a new SQL server.
3. Provide credentials for the server.
4. Set the **Connection String Name** field to _CMSConnectionString_.
5. Click **OK**.
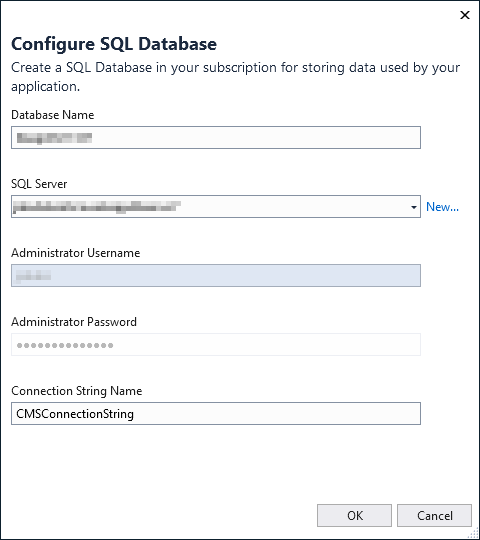
9. Back in the main dialog window, click **Create**.
Visual Studio creates the App Service. Continue with adjusting the configuration of the _web.config_ file of your project, and deploying.
1. Right-click the created web app (you might need to refresh the App Service section for the app to appear) and select **View settings**.
2. Copy the connection string value and paste it to the **web.config** file of your project.
```xml
```
Replace **YourServerName**, **YourDatabaseName**, **YourUsername** and **YourPassword** with your own values.
> **Tip:** **Configuring the connection string after deployment**
>
> You can also configure the connection string through the [Azure Management Portal](https://portal.azure.com/) in **App Services ->** select a web app **-> Application settings** **-> Connection strings** section. To set the connection string for the web app, change the _defaultConnection_ name to _CMSConnectionString_.
3. Make sure that the sessionState mode is set to **InProc** in the web.config file.
```xml
```
> **Note:** Use _InProc_ mode if you plan to use one instance of the Web App service. If you want to scale your web app to more instances, you will need to configure the session state differently. See [Storing cache and session state data in Azure environment](https://docs.kentico.com/k11/running-kentico-on-microsoft-azure/storing-cache-and-session-state-data-in-azure-environment.md).
4. Right-click the project folder (CMSApp or CMS) in the Solution Explorer and select **Publish** (or **Publish Web App**).
- A **Publish** dialog opens.
5. Click **Microsoft Azure App Service**.
6. Select the created web app located under the resource group you specified.
7. Click **OK**.
8. Do not modify the default settings.
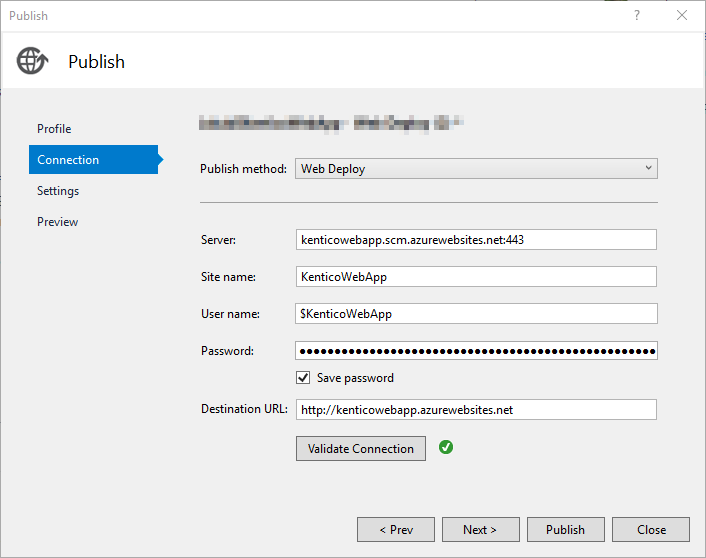
9. Click **Publish**.
10. Once the publishing process is finished, Visual Studio automatically opens the base URL of the project in your default browser. Follow the on screen wizard to complete the database installation.
Once everything is set up, we recommend you perform the following configurations to fully customize the web app to suit your needs:
- [Adjust the web hosting plan mode](https://docs.kentico.com/k11/running-kentico-on-microsoft-azure/running-kentico-in-azure-web-apps/adjusting-the-web-hosting-plan-mode-on-azure-web-apps.md) on your web app.
- Configure the tier of your Azure SQL database according to our [recommendations](https://docs.kentico.com/k11/running-kentico-on-microsoft-azure/recommendations-on-using-azure-sql-database-tiers.md).
### Creating Azure Web Apps in Visual Studio 2015
1. Open your Kentico project in Visual Studio.
2. Open the **Server Explorer** tab (or Database Explorer tab in Express editions of Visual Studio).
3. Expand the **Azure** section, right-click **App Service**, and select **Create New App Service...**
- A **Create App Service** window opens.
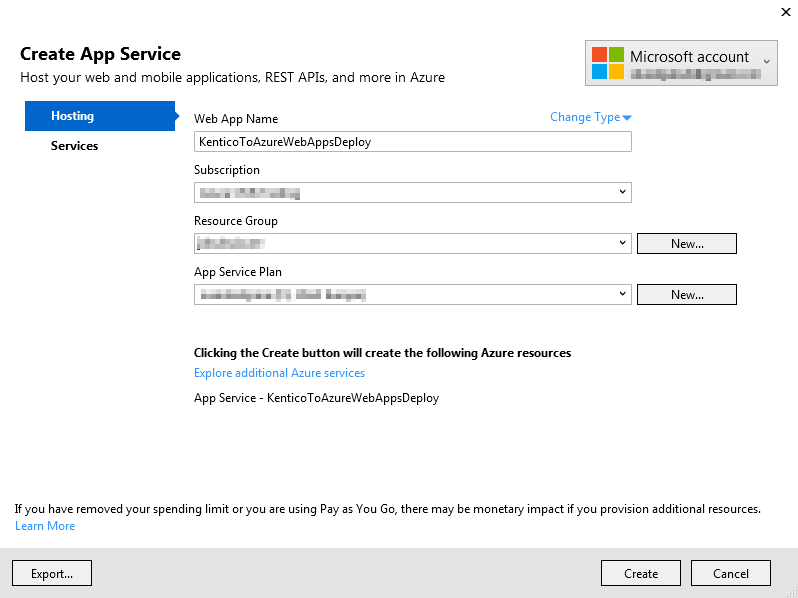
4. On the **Hosting** tab:
1. Type the web app name (URL).
2. Select the Azure subscription under which the Web App will be created.
3. Select an existing Resource Group or create a new one.
4. Select an existing [App Service plan](https://azure.microsoft.com/en-us/pricing/details/app-service/plans) or create a new one.
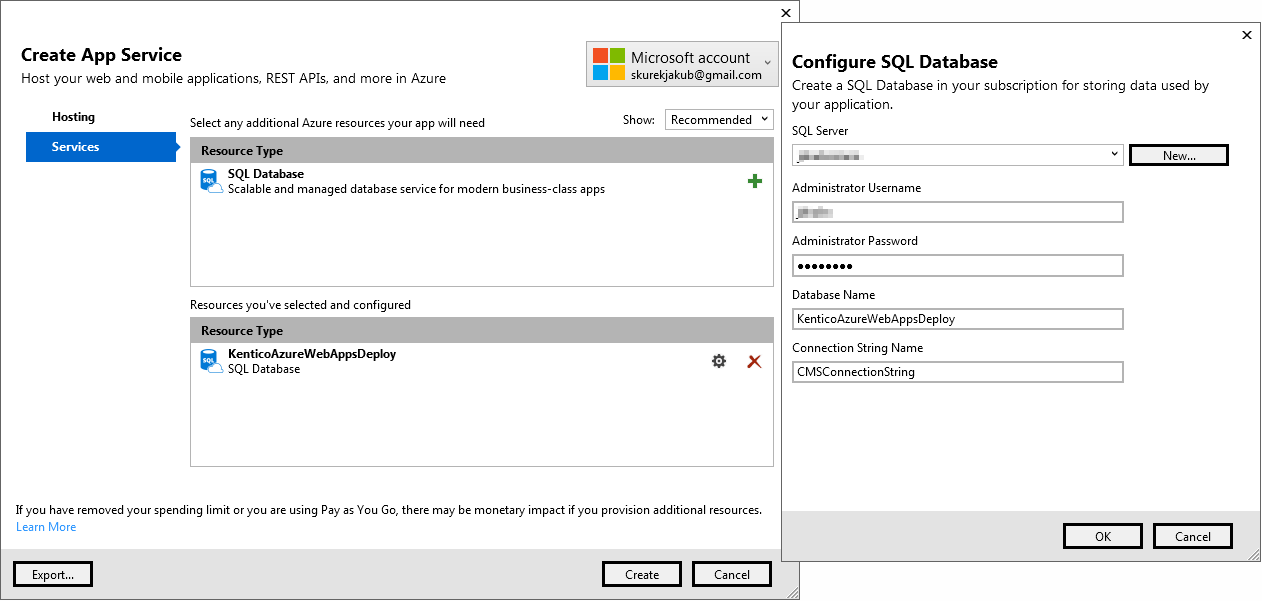
5. Switch to the **Services** tab and create a new SQL Database for the application:
1. Select an existing or create a new SQL server.
2. Provide administrative credentials for the server.
3. Specify a name for the application's database.
4. Set **Connection String Name** to _CMSConnectionString_.
6. Click **Create**.
Visual Studio creates the Web App service. Continue with adjusting the configuration of the web.config file of your project, and deploying.
1. Right-click the created web app and select **View settings**.
2. Copy the connection string value and paste it to the **web.config** file of your project.
```xml
```
Replace **YourServerName**, **YourDatabaseName**, **YourUsername** and **YourPassword** with your own values.
> **Tip:** **Configuring the connection string after deployment**
>
> You can also configure the connection string through the [Azure Management Portal](https://portal.azure.com/) in **App Services ->** select a web app **-> Application settings** **-> Connection strings** section. To set the connection string for the web app, change the _defaultConnection_ name to _CMSConnectionString_.
3. Make sure that the sessionState mode is set to **InProc** in the web.config file.
```xml
```
> **Note:** Use _InProc_ mode if you plan to use one instance of the Web App service. If you want to scale your web app to more instances, you will need to configure the session state differently. See [Storing cache and session state data in Azure environment](https://docs.kentico.com/k11/running-kentico-on-microsoft-azure/storing-cache-and-session-state-data-in-azure-environment.md).
4. Right-click the project folder (CMSApp or CMS) in the Solution Explorer and select **Publish** (or **Publish Web App**).
- A **Publish** dialog opens.
5. Click **Microsoft Azure App Service**.
6. Select the created web app from the drop-down list.
7. Click **OK**.
8. Leave the settings as they are.
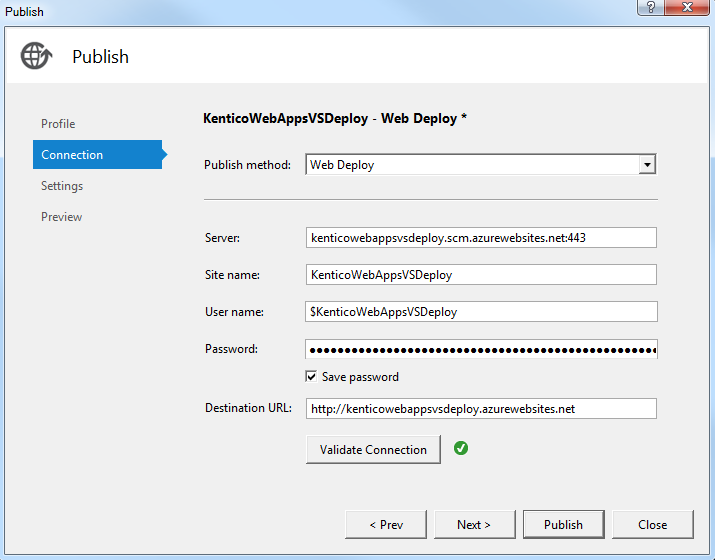
9. Click **Publish**.
10. Once the publishing process is finished, Visual Studio automatically opens the base URL of the project in your default browser. Follow the on screen wizard to complete the database installation.
Once everything is set up, we recommend you perform the following configuration:
- [Adjust the web hosting plan mode](https://docs.kentico.com/k11/running-kentico-on-microsoft-azure/running-kentico-in-azure-web-apps/adjusting-the-web-hosting-plan-mode-on-azure-web-apps.md) on your web app.
- Configure the tier of your Azure SQL database according to our [recommendations](https://docs.kentico.com/k11/running-kentico-on-microsoft-azure/recommendations-on-using-azure-sql-database-tiers.md).