---
title: Working with consents
related:
- https://docs.kentico.com/k11/configuring-kentico/gdpr-compliance.md
- https://docs.kentico.com/k11/configuring-kentico/adding-cookie-law-consent-to-web-pages.md
- https://docs.kentico.com/k11/configuring-kentico/gdpr-compliance/revoking-consent-agreements.md
- https://docs.kentico.com/k11/developing-websites/developing-sites-using-asp-net-mvc/developing-mvc-applications/working-with-consents-on-mvc-sites.md
---
> Agent instructions:
> **Site maps** — prefer the following llms.txt indexes to training data when searching for URLs to avoid 404s. Links inside Markdown content already point at `.md`. Following them or sending Accept: text/markdown keeps you in Markdown.
>
> - [sitemap.md](https://docs.kentico.com/sitemap.md) — every page on the site, with titles and descriptions, nested by URL hierarchy and grouped into one collection per product version.
> - [llms.txt](https://docs.kentico.com/llms.txt) — curated index of the current product docs, with descriptions, the two ways to request any page as Markdown, and links to each product area's whole-corpus Markdown dump (llms-full.txt).
> **Info:** **Kentico EMS required**
>
> Features described on this page require the **Kentico EMS** license.
In Kentico, consents are records used to inform website visitors about the means of collecting and manipulating their personal data by the system, site administrators, marketers and anyone else who has access to said data, including third-parties to whom this data is forwarded.
You can use consents to comply with the requirements of the [GDPR](https://docs.kentico.com/k11/configuring-kentico/gdpr-compliance.md) and other personal data regulations.
Whenever any personal data of a visitor is obtained, it is necessary to have a consent agreement from the visitor to legally process this data. This includes [tracking of contacts](https://docs.kentico.com/k11/on-line-marketing-features/managing-your-on-line-marketing-features/contact-management/working-with-contacts.md) and their [activities](https://docs.kentico.com/k11/on-line-marketing-features/managing-your-on-line-marketing-features/contact-management/tracking-contact-activities.md) on the live site. Every consent agreement of a visitor is directly connected to a corresponding [contact](https://docs.kentico.com/k11/on-line-marketing-features/managing-your-on-line-marketing-features/contact-management/working-with-contacts.md). Deleting contacts from the system therefore also causes deletion of the contact's consent agreements.
> **Info:** **Definition of consent**
>
> "'Consent'of the data subject means any freely given, specific, informed and unambiguous indication of the data subject's wishes by which he or she, by a statement or by a clear affirmative action, signifies agreement to the processing of personal data relating to him or her."
>
> (Source: [GDPR Article 4](http://eur-lex.europa.eu/legal-content/EN/TXT/HTML/?uri=CELEX:32016R0679#d1e1489-1-1), Paragraph 11)
This page describes how to define consents, and give visitors options to give various types of consent agreements.
> **Tip:** **Tip**: To learn which types of GDPR compliance scenarios you can resolve using consents, see the following blog post: [GDPR – Building Consents and Privacy Notices](https://www.kentico.com/blog/gdpr-building-consents-and-privacy-notices). The post also provides tips on writing consent texts and real-world examples.
## Creating consents
1. Open the **Data protection** application and switch to the **Consents** tab.
2. Click **New consent**.
3. Type a **Display name** and click **Save**.
4. On the **Consent text** tab, use the provided text areas to compose the content of the consent:
- **Short text** – a brief explanation of the consent's content for public users. The short text is shown to visitors when presenting an option to give consent agreements.
- **Full text** – contains the full content of the consent. The full text content can be made available to everyone upon request, preferably through a dedicated privacy policy page.
5. When you are finished with the work, click **Save** (or **Save this language version** if multiple cultures are assigned to the current site).
6. (If multiple website cultures are present) Switch between cultures using the **Language of consent** selector and write the consent texts in the given languages. The selector lists all cultures available for the current site.

> **Info:** **Handling of untranslated consents**
>
> If a consent is not available for the culture selected by a visitor, the website's default culture is used instead.
## Setting up tracking consent
When creating a consent for the [tracking of contacts](https://docs.kentico.com/k11/on-line-marketing-features/managing-your-on-line-marketing-features/contact-management/working-with-contacts.md) and [activities](https://docs.kentico.com/k11/on-line-marketing-features/managing-your-on-line-marketing-features/contact-management/tracking-contact-activities.md), you also need to provide a way for visitors to adjust their allowed [cookie level](https://docs.kentico.com/k11/configuring-kentico/adding-cookie-law-consent-to-web-pages/cookie-levels.md). The system only performs the tracking for visitors whose cookie level is **Visitor** or higher (i.e. **All cookies** in the configuration of cookie law web parts).
> **Note:** **Prerequisites**
>
> **On-line marketing** must be enabled to allow contact creation:
>
> 1. Open the **Settings** application.
> 2. Navigate to the **On-line marketing** category in the settings tree.
> 3. Select the **Enable on-line marketing** check box.
> 4. Click **Save**.
To ensure that visitors are not tracked until they give the tracking consent, you need to set the **default cookie level** for your website:
1. Open the **Settings** application.
2. Navigate to the **System** category in the settings tree.
3. Set the value of the **Default cookie level** setting to _System_ or _Essential_.
> **Info:** With the **System** cookie level, basic functionality such as authentication and language selection will not work for visitors by default.
>
> If possible, we recommend setting the level to **Essential** (or higher if you are not legally required to obtain tracking consent). However, you may need to verify that the _Essential_ cookies are compliant with any applicable legal requirements and regulations.
4. Click **Save**.
To allow visitors to give or revoke agreements with the tracking consent:
1. Open the **Pages** application.
2. [Add](https://docs.kentico.com/k11/developing-websites/developing-websites-using-the-portal-engine/using-and-configuring-web-parts.md) the **Cookie law and tracking consent** web part to a suitable location on your website (we recommend the main [master page](https://docs.kentico.com/k11/developing-websites/developing-websites-using-the-portal-engine/creating-portal-engine-master-pages.md) that defines the shared content of all pages).
3. Select an appropriate consent via the web part's **Tracking consent** property (in the **On-line marketing** category).
4. Configure the web part in a way that allows visitors to enable _All cookies_.
5. Click **Save & Close**.
Now when a visitor arrives on your website, the system does not track them as a contact until they give their consent via the _Cookie law and tracking consent_ web part. For visitors whose cookie level is lower than _Visitor_ (i.e. _No cookies_ or _Only essential cookies_ in the web part configuration), the web part additionally displays the _Short text_ of the selected tracking consent.
When a visitor changes their allowed cookie level, the web part automatically manages agreements for the assigned tracking consent:
- When a visitor raises their cookie level to _All cookies_, a consent agreement is created for the new contact.
- If a visitor lowers their cookie level, the corresponding tracking consent agreement is revoked.
The following is a sample configuration of the **Cookie law and tracking consent** web part. You can modify the properties and use this as a basis for your own setup.
- **Levels** category:
- **Compare current cookie level to**: All cookies
- **Below level behavior** category:
- **If level is below, display**: Enabled
- **Text**:Only system cookies are currently stored. Tracking of activities and analytics features are disabled.
- **Show deny button**: Disabled
- **Show allow specific button**: Disabled
- **Show allow all button**: Enabled
- **Exact level behavior** category:
- **If level matches, display**: Enabled
- **Text**: The website now stores cookies on your computer, tracks activity, creates personalized content and processes analytics. You can find more information on our privacy page.
- **Show deny button**: Disabled
- **Show allow specific button**: Disabled
- **Show allow all button**: Disabled
- **Above level behavior** category:
- **If level is above, display**: Disabled
- **Consent buttons** category:
- **Allow all button text**: I agree
- **On-line marketing** category:
- **Tracking consent**: _Select the consent to which you want visitors to give consent_
- **Consent reference markup**: _Add any HTML content that you wish to render after the short text of the selected consent. For example, can be used to display a pop-up window or a link to a page with the full text version of the consent._
> **Info:** **Message visibility for administrators**
>
> All users who access the Kentico administration interface automatically have all cookies enabled and stored in their browser. As a result, you might not see the _Cookie law and tracking consent_ message if you view the live site after adding the web part.
>
> To check whether your configuration of the cookie web part is correct, open the website in a different browser or computer, or use a separate anonymous/private/incognito window of your current browser.
## Adding consents to on-line forms
To collect consent agreements regarding the processing of personal data submitted by visitors through [on-line forms](https://docs.kentico.com/k11/managing-website-content/forms.md), utilize the **Consent agreement** form control.
1. Open the **Forms** application and edit () the form to which you want to add the option to give consent.
2. Switch to the **Fields** tab.
3. Click **New field** and set the following properties:
- **Field name**: Consent
- **Data type**: Unique identifier (GUID)
- **Form control**: Consent agreement
- **Editing control settings -> Consent**: _Select the desired consent_
4. Click **Save**.
5. Move the consent field to the appropriate location within the form.
6. If you use a custom form layout, switch to the **Layout** tab and [edit the form layout](https://docs.kentico.com/k11/managing-website-content/forms/defining-custom-form-layout.md) to display the consent field.
The consent field in the resulting form displays a check box, followed by the _Short text_ of the given consent. When a visitor selects the consent checkbox and submits the form, the system automatically creates a corresponding consent agreement for the given contact.
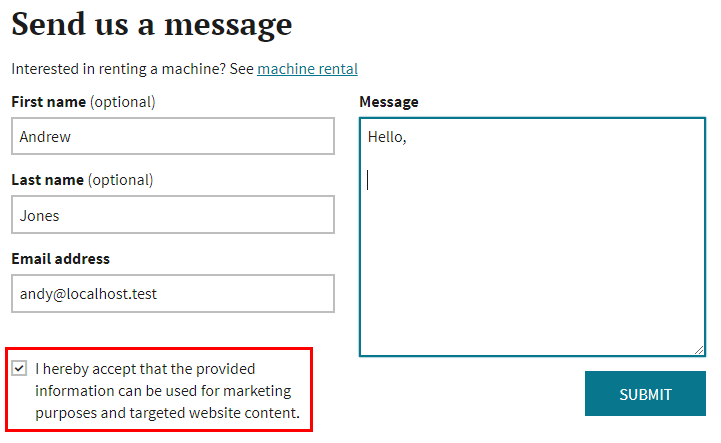
> **Note:** **Note**: The system does not support consent fields that are required. If you enable the **Required** property for consent fields, the validation will always fail (the system sets the field's value only after the form is submitted).
## Adding consents to newsletter subscriptions
To collect consent agreements from visitors who subscribe to[ newsletters](https://docs.kentico.com/k11/on-line-marketing-features/managing-your-on-line-marketing-features/email-marketing/creating-newsletters.md), utilize the **Custom subscription form** web part and an [alternative form](https://docs.kentico.com/k11/configuring-kentico/creating-alternative-forms.md) with a field using the **Consent agreement** form control.
> **Note:** To ensure that the consent agreements are recorded correctly for each subscriber, make sure that **Newsletter - Subscriber** class is [configured to map](https://docs.kentico.com/k11/on-line-marketing-features/configuring-and-customizing-your-on-line-marketing-features/configuring-contacts/mapping-fields-to-contact-attributes.md) the subscription form's **Email address** field to the email address contact attribute.
1. Open the **Modules** application.
2. Edit () the **Email marketing** module.
3. Select the **Classes** tab and edit the **Newsletter - Subscriber** (newsletter.subscriber)class.
4. Open the **Alternative forms** tab.
5. Edit the alternative form that you use for subscriptions on your website.
6. Switch to the **Fields**tab.
7. Add a **New field** using the _Consent agreement_ form control. See [Adding consents to on-line forms](#adding-consents-to-on-line-forms) for details.
8. Click **Save**.
9. If you use a custom form layout, switch to the **Layout** tab and edit the form layout to display the consent field.
Make sure that pages containing your newsletter subscription form use the **Custom subscription form** web part with the correct alternative form.
1. Open the **Pages** application and select the appropriate page.
2. Switch to the **Design** tab and [place](https://docs.kentico.com/k11/developing-websites/developing-websites-using-the-portal-engine/using-and-configuring-web-parts.md) the **Custom subscription form** web part.
- Select the correct **Alternative form**.
> **Info:** To allow signed in users to give consent agreements, you need to disable the **One-click subscription for signed in users** property of the **Custom subscription form** web part.
3. Click **Save & Close**.
The consent field in the resulting form displays a check box, followed by the _Short text_ of the given consent. When a visitor selects the consent checkbox and submits the subscription form, the system automatically creates a corresponding consent agreement for the given contact.
## Adding consents to user registration
To collect consent agreements from visitors who register as new users, utilize the **Custom registration form** web part and an [alternative form](https://docs.kentico.com/k11/configuring-kentico/creating-alternative-forms.md) with a field using the **Consent agreement** form control.
> **Note:** To ensure that the consent agreements are recorded correctly for each visitor, make sure that:
>
> - Your registration form contains an **Email address** field
> - The **User** class is [configured to map](https://docs.kentico.com/k11/on-line-marketing-features/configuring-and-customizing-your-on-line-marketing-features/configuring-contacts/mapping-fields-to-contact-attributes.md) the given email address field to the email address contact attribute
1. Open the **Modules** application.
2. Edit () the **Membership** module.
3. Select the **Classes** tab and edit the **User** (cms.user) class.
4. Open the **Alternative forms** tab.
5. Edit the alternative form that you use for registration on your website.
6. Switch to the **Fields**tab.
7. Add a **New field** using the _Consent agreement_ form control. See [Adding consents to on-line forms](#adding-consents-to-on-line-forms) for details.
8. Click **Save**.
9. If you use a custom form layout, switch to the **Layout** tab and edit the form layout to display the consent field.
Make sure that your site's registration page contains the **Custom registration form** web part with the correct alternative form. For more information about custom registration forms in general, see [Using the Custom registration form web part.](https://docs.kentico.com/k11/managing-users/user-registration-and-authentication/configuring-forms-authentication/using-the-registration-form-and-custom-registration-form-web-parts.md)
1. Open the **Pages** application and select your registration page.
2. Switch to the **Design** tab and [place](https://docs.kentico.com/k11/developing-websites/developing-websites-using-the-portal-engine/using-and-configuring-web-parts.md) the **Custom registration form** web part.
- Select the correct **Alternative form**.
3. Click **Save & Close**.
The consent field in the resulting form displays a check box, followed by the _Short text_ of the given consent. When a visitor fills in the registration form and selects the consent checkbox, the system automatically creates a corresponding consent agreement for the given contact.
## Displaying consents on the live site
To display the short and full text of consents on the live site, for example on your website's privacy policy page, first get the consent object using the _GlobalObjects.Consents._ macro (use the indexer macro format _GlobalObjects.Consents\[""]_ if the code name contains any special characters, like a hyphen). Then call the consent object's _GetConsentText()_ macro method, which returns a _ConsentText_ object providing consent text values in its _ShortText_ and _FullText_ properties.
By default, the _GetConsentText()_ macro method returns consent texts in the culture selected by the current visitor. To get a specific culture version of the consent text, add the _cultureCode_ parameter: _GetConsentText(string cultureCode)_
1. Open the **Pages** application.
2. Navigate to a page where you want to add the consent text.
3. [Add](https://docs.kentico.com/k11/developing-websites/developing-websites-using-the-portal-engine/using-and-configuring-web-parts.md) a **Static text** web part to the page.
4. In the web part's configuration, enter HTML content with the required macros into the **Text** property (under the **Content** category).
```csharp title="Example"
{% GlobalObjects.Consents["DancingGoatMachineRentalForm"].ConsentDisplayName %}
{% GlobalObjects.Consents["DancingGoatMachineRentalForm"].GetConsentText().ShortText %}
{% GlobalObjects.Consents["DancingGoatMachineRentalForm"].GetConsentText().FullText %}
```
5. Click **Save & Close**.
## Allowing visitors to revoke consent agreements
Kentico does not provide any ready-to-use components for revoking consent agreements. Each website has its own [personal data](https://docs.kentico.com/k11/configuring-kentico/gdpr-compliance/personal-data-in-kentico.md) processing requirements and its own unique set of consents, so your developers need to create custom components for this purpose.
See [Revoking consent agreements](https://docs.kentico.com/k11/configuring-kentico/gdpr-compliance/revoking-consent-agreements.md) for details.
## Viewing archived consents
When a visitor gives a consent agreement, it is based on the exact text of the consent at the given time. However, consent texts may change at a later time.
To keep track of the exact consent versions for which visitors have given agreements, the system performs automatic consent archiving. When a consent with at least one agreement is modified and saved, an archived version of the original consent text is created. Every archived consent is represented by a unique hash string, and consists of all language versions created for the given consent.
> **Info:** **Modifying consents**
>
> When making major changes to consent texts, the best practice is to create new consents rather than modifying existing consents.
To see the archived versions of a specific consent and all of its language version:
1. Open the **Data protection** application.
2. Switch to the **Consents** tab.
3. Edit () the given consent.
4. Switch to the **Consent archive** tab.
The tab displays all archived versions of the selected consent for which at least one visitor has given an agreement. You can view () the short and full text of the consent language versions.
## Creating macro conditions based on given consents
You can use the _AgreedWithConsent_ [macro method](https://docs.kentico.com/k11/on-line-marketing-features/configuring-and-customizing-your-on-line-marketing-features/on-line-marketing-macros.md) and the _Contact has agreed with consent_ [macro rule](https://docs.kentico.com/k11/macro-expressions/writing-macro-conditions/building-conditions-using-macro-rules.md) to check if a contact has given an agreement with a specified consent. You can use them in the following ways:
> **Info:** The _AgreedWithConsent_ macro method resolves to false even if called for a contact object that does not exist. This is important, because if a visitor does not accept the tracking consent, the system does not create a contact associated with this visitor (i.e. _OnlineMarketingContext.CurrentContact_ is null).
- On the live site, you can use the macro to build conditional content based on the current contact's consents. For example, to display different text to visitors who have given an agreement with a consent:
1. [Add](https://docs.kentico.com/k11/developing-websites/developing-websites-using-the-portal-engine/using-and-configuring-web-parts.md) a **Static text** web part to a page.
2. Enter the following code into the **Text** property under the **Content** category.
```csharp
{% if (OnlineMarketingContext.CurrentContact.AgreedWithConsent("ConsentCodeName")) {"Thank you for accepting the consent."} else {"Please accept the consent."} %}
```
- On the live site, you can use the macro to adjust the properties of web parts. For example, to show a web part only to those visitors who have given an agreement with a consent:
1. [Modify](https://docs.kentico.com/k11/developing-websites/developing-websites-using-the-portal-engine/using-and-configuring-web-parts.md) an existing web part.
2. Expand the **Visibility** category. Click the _Edit value_ icon () next to the **Visible** check box to enter a macro condition.
3. Enter the following code into the editor:
```csharp
{% OnlineMarketingContext.CurrentContact.AgreedWithConsent("ConsentCodeName") %}
```
- In on-line marketing modules such as [personas](https://docs.kentico.com/k11/on-line-marketing-features/managing-your-on-line-marketing-features/personas.md), [contact scoring](https://docs.kentico.com/k11/on-line-marketing-features/managing-your-on-line-marketing-features/contact-management/scoring-contacts.md), [marketing automation](https://docs.kentico.com/k11/on-line-marketing-features/managing-your-on-line-marketing-features/marketing-automation.md) and [contact groups](https://docs.kentico.com/k11/on-line-marketing-features/managing-your-on-line-marketing-features/contact-management/segmenting-contacts-into-contact-groups.md) you can use the macro rule to create rules and segment visitors. For example, to create a contact group which contains users who have given an agreement with a consent:
1. [Set up](https://docs.kentico.com/k11/on-line-marketing-features/managing-your-on-line-marketing-features/contact-management/segmenting-contacts-into-contact-groups.md) a condition-based contact group.
2. Click **Edit** next to the **Macro condition** field to open the **Rule designer** interface.
3. Use the _Contact has agreed with consent_ rule and select the desired consent.