
Email channel management
Email license requirements
The license tier required for email features depends on the size of the email channels that you use:
- Email microchannels – available for all license tiers
- Standard size email channels – require the Advanced license tier
To learn more, see the description of the Channel size property.
Email channels are a dedicated medium of communication between you and your audience. An Xperience project may contain multiple email channels, focusing on different content strategies, languages and audience engagement techniques. For example, you can have separate email channels dedicated to marketing and supporting different products or services offered by your company, each with a different tone and style.
Channels allow for a clean separation of your organization’s emails. Every email channel has its own application in the Xperience administration, where marketers create and send emails.
The defining property of every email channel is a sending domain, which represents your company or brand, and is used in all sender addresses for the channel’s emails.
Create and configure email channels
- Open the Channel management application in Xperience.
- Select New channel.
- Fill in the channel properties:
Channel name – the name of the channel displayed in Xperience.
(Optional) Identifiers – specify the code name if you wish to use a code name different than the pre-filled value.
- Channel code names must be unique across all channels (of any type).
- In projects intended for SaaS deployment (created with the
--cloudparameter), only code names with alphanumeric characters are allowed.
Channel type – select Email as the channel type.
Channel size – channels are available in two sizes:
- Standard channel – may contain an unlimited number of email items. Only available in the Advanced license tier.
- Microchannel – available in all license tiers, but limited to 5 emails per microchannel. The limit restricts the maximum number of email content items allowed in the microchannel, but not how many times these emails can be sent to recipients. Each email can link an unlimited number of reusable content items.
Content language – the language of all emails in the channel.
Sending domain – the domain associated with the channel. This domain is used for the channel’s sender addresses, and must be unique across all email channels.
Email service domain – the domain used in various system links in the channel’s emails (click tracking links, the email open tracking pixel, asset URLs, subscription and unsubscription URLs). The specified domain must host an Xperience by Kentico application connected to the database where this email channel is configured. The most common setup is to use the domain of a related website channel. Alternatively, you can use the domain hosting the Xperience application where you manage your emails (if the application is publicly accessible).
Email service domain format
If the target application runs under a port different than 80 or with a specific URL path, both must be specified in the domain name. Do not include the URL scheme (http or https).
- Select Save.
The email channel is now ready. If you need to configure an existing channel, open the channel again via the Channel management application and edit the values on the General tab.
After you add a channel, the system automatically creates a new application matching the channel’s name in the Channels category of the administration’s application list. This is the application where users can create and view the channel’s emails.
For applications deployed in the SaaS environment, you also need to add the channel in Xperience Portal. See Email channels in the SaaS environment.
Change channel size of existing channels
You can freely change between the microchannel and standard channel size of existing channels via the General tab. Additionally, changing standard channels to microchannels does not cause any data loss in case the converted channel exceeds microchannel limits. However, you will receive a license violation warning if the resulting channel or item count oversteps the limits of your license for that particular channel type.
Set up emails in multiple languages
Each email channel only supports one language (unlike pages in website channels or content items). Therefore, if you wish to send emails in a different language, you need to create a new email channel with a unique Sending domain for each language variant.
Add allowed content types
Every email in Xperience uses a specific content type. The content type defines the fields that users can edit when writing emails.
To create emails under a channel, you need to prepare suitable content types and allow them for the channel:
- Open the Channel management application in Xperience.
- Select your email channel.
- On the Allowed content types tab, Select content types.
- Select or clear the checkboxes to choose which content types you want to make available in the channel.
- Select Save.
Add sender addresses
Every email has a sender name and address that recipients see in their inbox. In Xperience, you prepare sender addresses in advance for each email channel. When creating emails, users can choose from a list of the given channel’s sender addresses.
To add a sender address for an email channel:
Open the Channel management application in Xperience.
Select your email channel.
On the Sender addresses tab, select Add sender address.
Fill in the sender address properties:
- Sender name – the name of the email sender.
- Sender email address – the “From” address that recipients see in their inbox. The domain part of all sender addresses must match the sending domain of the email channel. The address must be unique across all senders under the email channel.
Select Save.
Email domains in private cloud environments
Configure sending and service domains programmatically
Programmatic configuration of email channel domains is only supported in private cloud environments.
For applications deployed in the SaaS environment, this configuration is done automatically by the infrastructure after you add an email channel and set its domains in Xperience Portal (see Email channels in the SaaS environment).
The sending and service domains of your email channels can be configured programmatically via the EmailChannelDomainOptions class using ASP.NET configuration providers. This configuration is prioritized over the channel domain values set via the Xperience administration interface.
For example, when configured via appsettings.json:
{
  "EmailChannelDomains": {
    "DomainOverrides": {
      "AcmeEmails": {
        "SendingDomain": "mysendingdomain.com",
        "ServiceDomain": "myservicedomain.com"
      }
    }
  },
  ...
}
Where AcmeEmails is the code name of the channel to configure.
using CMS.Websites;

var builder = WebApplication.CreateBuilder(args);

// Apply the configuration from appsettings.json
builder.Services.Configure<EmailChannelDomainOptions>(builder.Configuration.GetSection("EmailChannelDomains"));
For channels not configured via application settings, the values specified via the administration interface are used.
Domains for different application environments
You can use the options pattern to set different domains per environment by introducing corresponding appsettings.environment.json files. The following example uses different sending and service domains when running the project under the Development environment.
{
  "EmailChannelDomains": {
    "DomainOverrides": {
      "AcmeEmails": {
        "SendingDomain": "localtest.com",
        "ServiceDomain": "localhost"
      }
    }
  }
}
Email channels in the SaaS environment
Email types
Xperience distinguishes between two different types of emails:
- Emails created using an email channel application – Used in digital marketing, campaigns, etc. These use the channel’s custom sending domain that you configure in this section.
- System and notification emails – emails sent by Xperience system features (user invitations, password resets, notifications, etc.). These use a separate system email domain as described on the Email configuration page.
Make sure to configure the appropriate domain type for your use case.
Note on non-production environments: In non-production environments (QA, UAT, staging), email channel service domains may be configured to auto-generated domains instead of your custom domains. This is normal and expected behavior; email functionality works correctly, and the service domains route email requests (tracking, unsubscription, etc.) to the appropriate environment. When you add custom email domains, they are only used for your production environments.
Add email channels in Xperience Portal
For applications deployed in the SaaS environment, you need to add your channels in Xperience Portal after you create them in the Xperience administration:
- Open the Channels and Domains → Channels application in Xperience Portal.
- Select Add channel.
- Set the channel properties:
- Display name – enter a name for the channel that will be displayed in Xperience Portal.
- Code name – copy the exact code name of the email channel from the Channel management application in the Xperience administration.
- Channel type – Email
- Channel size – select the same channel size as in the Channel management application in the Xperience administration.
- Select Add channel.
After you add an email channel, the system automatically starts configuring the sending and service domains for the deployed applications. This process may take up to several minutes. During this time you can continue configuring other channels and domains.
Once you perform all required changes to channels and domains and after the configuration is completed by the system, select the Apply changes button in the information ribbon at the top of the interface and perform a final review of the changes you are about to apply. Applying these changes triggers a restart of the affected applications.
You may need to manually refresh the current page for the Apply changes button to appear in the information ribbon.
When the configuration is finished, the email channel uses automatically generated Default domains unless you add suitable custom domains for the channel in production or staging environments.
Manage email channel domains in Xperience Portal
Email channels in Xperience Portal use the following basic domain types:
- Default – a default sending and service domain is generated for every email channel and environment. Default domains are replaced when you add a custom domain.
- Custom – custom domains added for the PROD or STG environment.
and two different kinds of domains:
- Sending domain () – the domain used for the channel’s sender addresses.
- Must be unique across all email channels.
- Emails are always sent via Twilio SendGrid. See SendGrid integration for more information.
- Service domain () – the domain name used as the base of various system URLs in the channel’s emails (click tracking links, the email open tracking pixel, asset URLs, subscription and unsubscription URLs).
- Do not include a URL path, port number or URL scheme in the service domain.
- The service domain does NOT need to match your website’s primary domain. Any domain that your Xperience application handles requests for can serve as a service domain.
- Best practice: If your emails are primarily related to a specific website channel, use that channel’s primary domain as the service domain.
Email domain examples
The following examples demonstrate different approaches to configuring email channel domains and their respective advantages and disadvantages.
Private cloud deployment with a unified domain strategy
- Website channel domain:
yourbrand.com - Administration domain:
admin.yourbrand.com - Email channel sending domain:
yourbrand.com - Email channel service domain:
yourbrand.com
This approach uses the same domain for both the website channel and email service domain.
|
Advantages |
Disadvantages |
|
Simplified configuration – fewer domains to manage and maintain. |
Limited CDN flexibility – cannot apply different caching or security rules specifically for email traffic (tracking pixels, click tracking, unsubscription links) versus website traffic. |
|
Unified branding – all links in emails (tracking, unsubscription, assets) use the same domain as your website, reinforcing brand consistency. |
Shared firewall rules – cannot isolate email service requests from general website traffic for security purposes. |
|
Easier DNS management – requires fewer DNS records. |
Potential analytics confusion – email-related requests (open tracking, click tracking) appear in the same domain analytics as regular website visits. |
Private cloud deployment with a dedicated email service domain
- Website channel domain:
yourbrand.com - Administration domain:
admin.yourbrand.com - Email channel sending domain:
yourbrand.com - Email channel service domain:
email.yourbrand.com
This approach uses a dedicated subdomain for email service functionality while keeping the sending domain aligned with your main website.
|
Advantages |
Disadvantages |
|
Fine-grained infrastructure control – enables separate caching policies and server configurations for email service traffic versus website content. |
Additional DNS configuration – requires managing and maintaining DNS records for the email service subdomain. |
|
Enhanced security – allows dedicated firewall rules and rate limiting specifically for email service requests. |
Slightly more complex setup – needs configuration of both sending and service domains. |
|
Clearer traffic separation – email tracking and service requests (open tracking, click tracking, unsubscription) are isolated from main website analytics. |
Links use different domain – unsubscription and tracking links in emails show |
|
Flexible infrastructure – email service domain can have configurations optimized for email functionality (e.g., different cache rules, geographic routing). |
SaaS environment with a unified domain strategy
- Website channel domain:
shop.yourbrand.com(custom domain) - Administration domain:
prod-yourbrand.xperience-sites.com(default SaaS domain) - Email channel sending domain:
shop.yourbrand.com(custom domain, managed in Xperience Portal) - Email channel service domain:
shop.yourbrand.com(custom domain, managed in Xperience Portal)
This approach uses the same custom domain for both the website channel and email service domain, providing a unified brand experience.
|
Advantages |
Disadvantages |
|
Unified branding – all links in emails (tracking, unsubscription, assets) use the same domain as your website, reinforcing brand consistency. |
Shared traffic – email service requests are mixed with general website traffic via Cloudflare CDN. |
|
Simpler domain management – fewer custom domains to configure and validate in Xperience Portal. |
Potential analytics confusion – email-related requests (open tracking, click tracking) appear in the same domain analytics as regular website visits. |
|
Managed by Xperience Portal – domain configuration and DNS validation handled through Xperience Portal, with automatic SendGrid integration. |
|
|
Recognizable links – recipients see familiar domain names in all email links. |
SaaS environment with a dedicated email service domain
- Website channel domain:
shop.yourbrand.com(custom domain) - Administration domain:
prod-yourbrand.xperience-sites.com(default SaaS domain) - Email channel sending domain:
shop.yourbrand.com(custom domain, managed in Xperience Portal) - Email channel service domain:
email.yourbrand.com(custom domain, managed in Xperience Portal)
This approach uses a dedicated subdomain for email service functionality while maintaining brand consistency for the sending domain.
|
Advantages |
Disadvantages |
|
Clearer traffic separation – email tracking and service requests (open tracking, click tracking, unsubscription) are isolated from main website analytics. |
Additional DNS configuration – requires managing and maintaining DNS records for the email service subdomain in your DNS registrar. |
|
Managed by Xperience Portal – all domain configuration and DNS validation handled through Xperience Portal, with automatic SendGrid integration. |
Slightly more complex setup – needs validation of both sending and service domains through Xperience Portal. |
|
Links use different domain – unsubscription and tracking links in emails show |
Add custom email channel domains
To set a custom domain for an email channel, select Add domain in Xperience Portal and set the corresponding DNS records in the DNS registry of your domain provider.
- As a user with the Tenant administrator or DevOps Engineer role, open the Channels and Domains → Channels application in Xperience Portal.
- Select the Domains () action for the chosen email channel.
- Select Add domain.
- Select Standard (recommended) as the domain creation method.
- Choose the Environment (custom domains are only supported for production or staging environments).
- Choose the Domain kind (Email sending domain or Service domain).
- Enter the custom Domain name and select Next.
- Xperience Portal displays the DNS records for your domain. Use the Copy () action to copy these records to your DNS registrar.
- In your DNS registrar’s control panel, add the copied DNS records. After you have successfully configured the DNS records with your registrar, return to Xperience Portal.
- See Configure DNS records for custom domains for detailed instructions on configuring DNS records with popular providers.
- Confirm that you have configured the DNS records by selecting Confirm. The system then validates your DNS configuration and creates the domain.
- Note that DNS propagation can take up to 15 minutes, so the validation may require additional time to complete.
- If validation fails for internal reasons, select Retry to start another validation attempt.
- If the validation fails due to DNS configuration issues, Xperience Portal displays the DNS records again. Verify the records are correctly configured in your DNS registrar, then select Validate to retry.
- An auto-renewing SSL/TLS digital certificate is automatically created for the new domain when the validation finishes successfully.
- After successful validation, Xperience Portal displays “Domain has been created.” You can now:
- Continue to add additional domains for the channel, or
- Select Back to Domains to return to the domains list.
The system then automatically configures the new domain settings for the deployed applications. This process may take up to several minutes. During this time you can continue configuring other channels and domains. You do not need to (and cannot) configure the channel’s domain in the Xperience administration.
Once you perform all required changes to channels and domains and after the configuration is completed by the system, select the Apply changes button in the information ribbon at the top of the interface and perform a final review of the changes you are about to apply. Applying these changes triggers a restart of the affected applications.
You may need to manually refresh the current page for the Apply changes button to appear in the information ribbon.
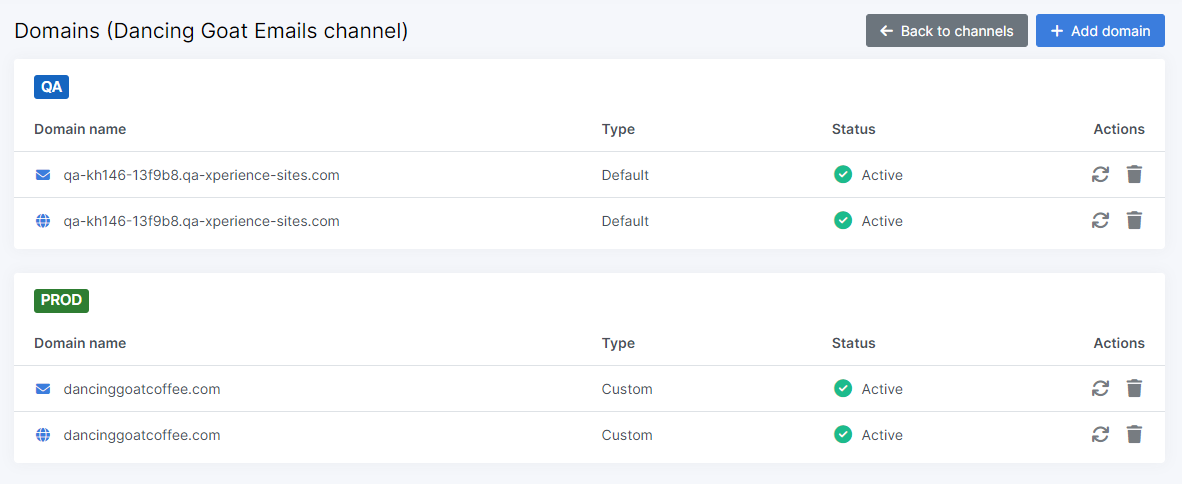
Domain status
You can check the status of a channel’s domains in the Channels and Domains → Channels application in Xperience Portal. Select the Domains () action for a specific channel.
- In progress – The domain is being created.
- Validating – DNS records are being validated.
- Apply changes pending – The domain is ready but awaiting application of changes.
- Validation failed – The DNS records are configured incorrectly, or the configuration has not yet been propagated through the DNS servers.
- Active – The domain is active and working. Each email channel can only have one Active sending domain and one Active service domain. Adding a new custom domain that reaches the Active status replaces the previous Active domain of the given kind.
Revalidate custom domains
Revalidating a custom domain is useful when DNS records were changed, DNS propagation took longer than expected, or domain status remains in a failed state.
To revalidate a custom domain in Xperience Portal:
- Open the Channels and Domains → Channels application in Xperience Portal.
- Select the Domains () action for the related website channel.
- Next to the domain whose validation failed, select Continue () to open the domain configuration step.
- Select Validate again.
- Wait for validation to complete and confirm that the domain status changes to Active.
If validation repeatedly fails even after verifying DNS records, contact Kentico support.
View DNS records of custom domains
You can view DNS records for any custom domain in the Xperience Portal:
- Open the Channels and Domains → Channels application in Xperience Portal with a Tenant administrator or DevOps Engineer role.
- Select the Domains () action for the related channel.
- Select the DNS records () action.

You can now see the DNS records for the domain. You can copy the values and use them, for example, with a new registrar.
Configure DNS records of custom domains
For detailed step-by-step guidance on configuring DNS records with your domain provider, see Configure DNS records for custom domains. This page includes:
- Full step-by-step instructions for Azure App Service DNS configuration
- Instructions for AWS Route 53, Cloudflare, and other popular DNS providers
- Troubleshooting tips and best practices
- DNS propagation information and validation guidance