Page Builder
Page Builder provides a user-friendly interface where non-technical users can manage content using configurable widgets prepared by the developers.
Use Page Builder when you want to allow editors to create visually captivating pages and experiment with the design and layout. To learn more about scenarios suitable for the feature, see Content modeling.

To start using Page Builder:
- Enable the Page Builder feature
- Create pages with editable areas
- Implement and register widgets
- Implement and register sections (layouts for widgets)
Page Builder components
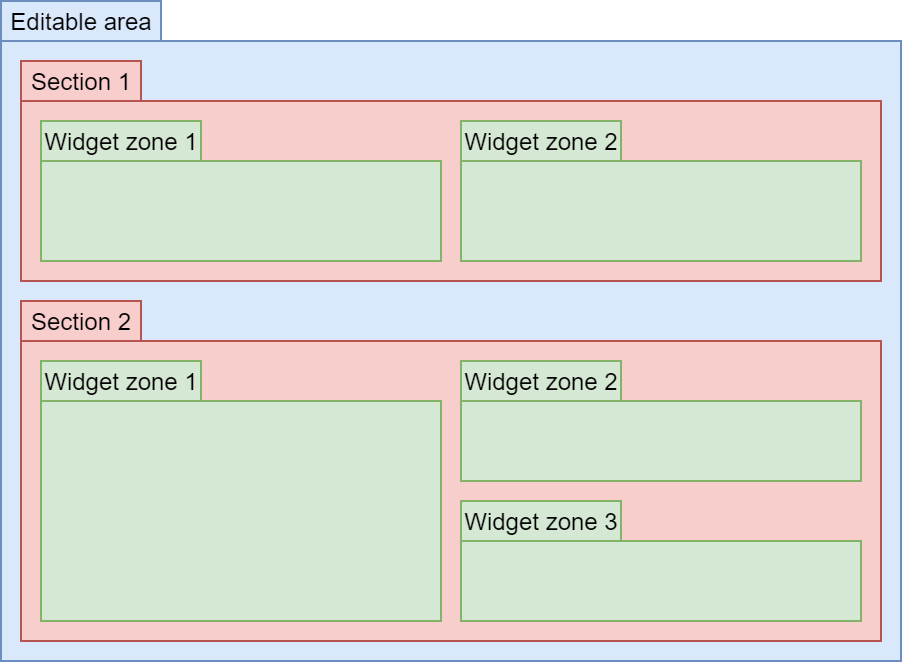
The Page Builder framework consists of several components, which fit together in the following hierarchy. Additionally, widget zones can contain any number of widgets.

Editable areas
Editable areas are the top-level layout component and contain one or more sections. You can learn how to add editable areas to a view on the Create pages with editable areas page.
Sections
Page sections specify the visual layout of widget zones. They represent reusable pieces of markup that can store an arbitrary number of widget zones – areas where content creators place widgets. Sections are fully customizable, and as a developer, you have absolute freedom in the way you set each section’s layout. See Sections for Page Builder to learn how to implement and customize page sections.
Widget zones
Widget zones are components that allow content editors to insert widgets using the plus button. Widget zones are defined in the views of sections.
Widgets
Widgets are reusable components that can be easily manipulated by content editors and other non-technical users. Widgets give non-technical users more power and flexibility when adjusting page content, in addition to basic editing of text and images. By working with widgets, users can decide which components are placed on pages and where. You can learn more about widget development and customization on the Widgets for Page Builder page. The default system widgets are listed on the Reference - Default Page Builder widgets page.
Enable the Page Builder feature
To use Page Builder, you need to enable it as a feature in your Xperience project.
Open your Xperience project in Visual Studio.
Enable the Page Builder feature by performing the following calls in your application’s startup class.
Within
AddKentico, callUsePageBuilder.Add the content types you want to use Page Builder with into
PageBuilderOptions.ContentTypeNames. You can use theCONTENT_TYPE_NAMEproperty from generated classes to access the content type identifier.Make sure your middleware pipeline reflects the sample below.
C#Program.csusing Kentico.Web.Mvc; using Kentico.Content.Web.Mvc; using Kentico.PageBuilder.Web.Mvc; WebApplicationBuilder builder = WebApplication.CreateBuilder(args); ... builder.Services.AddKentico(features => { features.UsePageBuilder(new PageBuilderOptions { ContentTypeNames = new[] { // Enables Page Builder for content types using their generated classes LandingPage.CONTENT_TYPE_NAME, ContactsPage.CONTENT_TYPE_NAME } }); }); builder.Services.AddControllersWithViews(); ... // Middleware pipeline configuration WebApplication app = builder.Build(); app.InitKentico(); app.UseStaticFiles(); app.UseKentico(); ... app.Kentico().MapRoutes();
(Optional) Edit the project’s Views\_ViewImports.cshtml file (or a more specific file, depending on your configuration) and add a using statement for the
Kentico.PageBuilder.Web.Mvcnamespace (together with any other frequently used namespaces).The namespace allows you to easily access Page Builder extension methods in the code of your views.
Alternatively, you can add using statements for the namespace directly in the code of individual views.
cshtml_ViewImports.cshtml@using Kentico.Web.Mvc @using Kentico.PageBuilder.Web.MvcSome extension methods from the Page Builder API are also provided as ASP.NET Core Tag Helpers. See Reference - Tag Helpers for details. You can include Tag Helpers in your _ViewImports.cshtml files using the
@addTagHelperdirective (in the same manner as adding using statements). This makes the included Tag Helpers available within all views that fall under the corresponding _ViewImports.cshtml file in the hierarchy.cshtml_ViewImports.cshtml@* Adds all Tag Helpers from the Kentico.Content.Web.Mvc assembly *@ @addTagHelper *, Kentico.Content.Web.Mvc
The basic Page Builder feature is now enabled. You can prepare pages with editable areas in your project and start developing widgets and sections.
Page Builder security
Content Security Policy
Content Security Policy (CSP) is a security policy implemented by all modern browsers that provides an additional layer of security to detect and mitigate certain types of attacks, including cross site scripting (XSS).
CSP is currently supported in Xperience by Kentico with certain limitations. It is possible to use CSP on certain pages, but any HTML document that includes any of the following:
- Page Builder content
- Widgets rendered in code (including the Form widget)
requires enabling unsafe-eval and unsafe-inline CSP attributes, which needs to be considered carefully.