
Customer journeys
Features described on this page require the Xperience by Kentico Advanced license tier.
Customer journeys offer a unified view of contact interactions with your content. You can define key stages in a journey, representing the sequence of steps a contact must complete to achieve a successful conversion and set conditions for their progression through the stages. The resulting visualization allows you to gain insights into how contacts move through the journey.
For example, you can build a journey that connects an initial visit of a landing page to submitting a particular form.
To learn more about the concept of customer journeys in depth, see our dedicated series of guides.
Campaigns
Campaigns provide a central location for creating, coordinating, running and evaluating marketing campaigns.
Every campaign is centered on a customer journey, which represents the campaign’s goals and expected path of the target audience. Use campaigns to tie together a customer journey with all related content assets, such as pages, emails and forms.
Create a customer journey
A customer journey is a sequence of steps performed by contacts, where each step is represented by a stage.
Stages represent key steps in the customer journey, such as visiting a specific page or submitting a form. They help you track contact progression, which enables you to analyze contact interactions with your content.
- Open the Customer journeys application in Xperience.
- Select New journey.
- (Optional) Edit () the automatically generated journey name.

- In the Journey Builder view mode, select New stage to create a stage:
- Fill in the following properties:
- Stage name – the name of the stage displayed in Xperience.
- (Optional) Stage KPI – the target number of contacts that you expect to reach this specific stage. The KPI (key performance indicator) can be used to assess the success of a particular stage in the customer journey. The KPI for the final stage can serve as a measure of overall success, reflecting how many contacts completed the full process.
- Conditions – determines the conditions that contacts must meet to advance to this stage. See conditions to learn more.
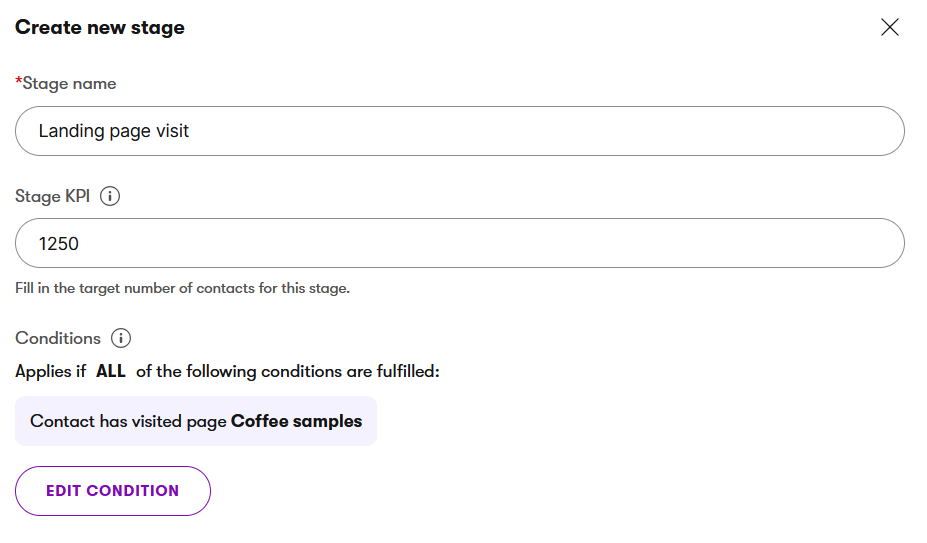
- Apply the stage configuration.
- Fill in the following properties:
- You can now iteratively add more stages to your customer journey. The maximum number of stages in a customer journey is 10.
- Once you have created all stages of the journey, select Save to create the customer journey.
The journey will begin calculating once you save it. It may take up to a few minutes, depending on the number of contacts being evaluated.
When you edit an existing customer journey, it automatically begins recalculating once you save the changes.
Conditions
For a contact to complete the entire customer journey and achieve a successful conversion, they must meet the conditions of each stage in the exact order defined by the journey. Since stage conditions are based on specific activities performed by the contact at a given time (such as visiting a page or submitting a form), the journey progresses sequentially. A contact can only reach a stage if they have fulfilled its condition as well as all conditions of the previous stages in the correct sequence.
When building the conditions which contacts must meet to advance to a particular stage:
- Use the search or select categories to find the appropriate condition.
- For the set of conditions, you can select if Any or All of the conditions need to be fulfilled.
To ensure high accuracy of your customer journey, make sure your developers set up detailed activity logging. Insufficient logging can lead to incomplete data, misinterpretations, and skewed calculations, affecting future decision-making and performance insights.
Customer journey results
To view the results of a customer journey:
- Open the Customer journeys application in Xperience.
- Select the journey whose results you want to view.
- Select the Journey view mode to see the results.
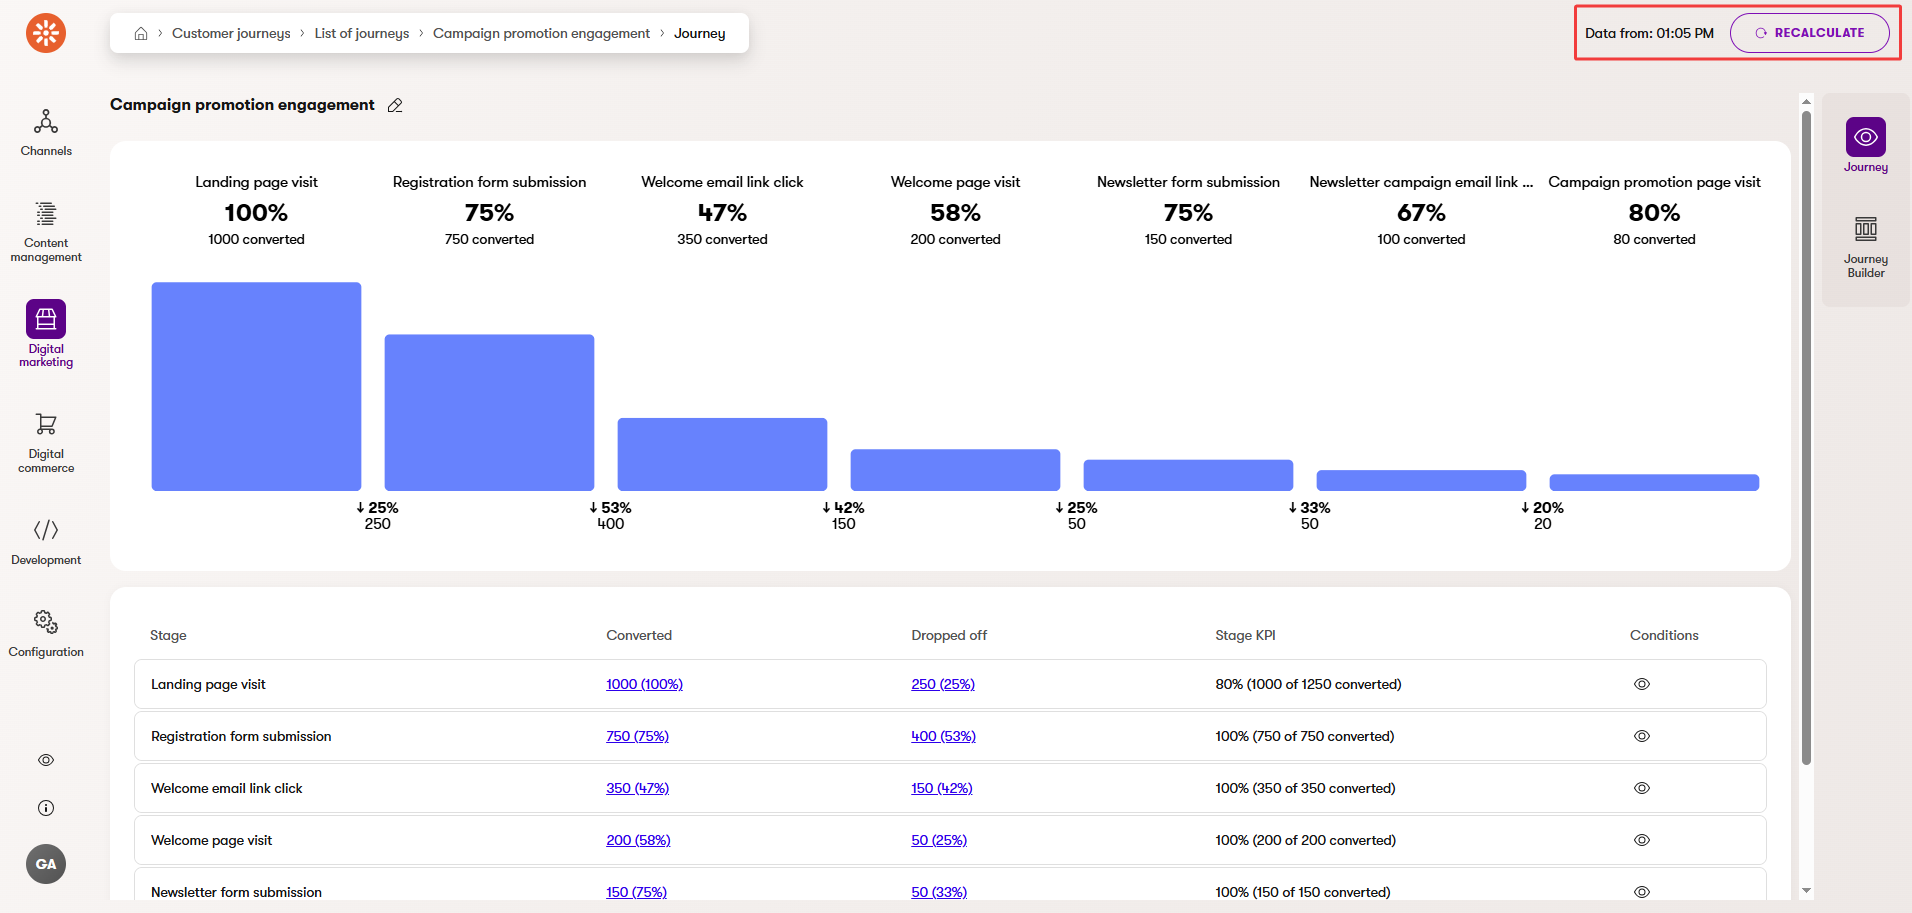
- (Optional) Set the time range filter to narrow down the displayed journey results. The filter selects contacts who met the condition of the first stage within the chosen period. The journey then shows how these contacts progressed through all subsequent stages, even if the conditions of later stages were fulfilled outside the selected time range.
For campaign journeys, the filter range is limited to the interval between the campaign’s start and end time.
For each stage in the graph, you can view the number of contacts who converted and met the conditions to advance to the stage. Between two stages, you can see the number of contacts who dropped off as they didn’t meet the conditions to continue to the next stage.
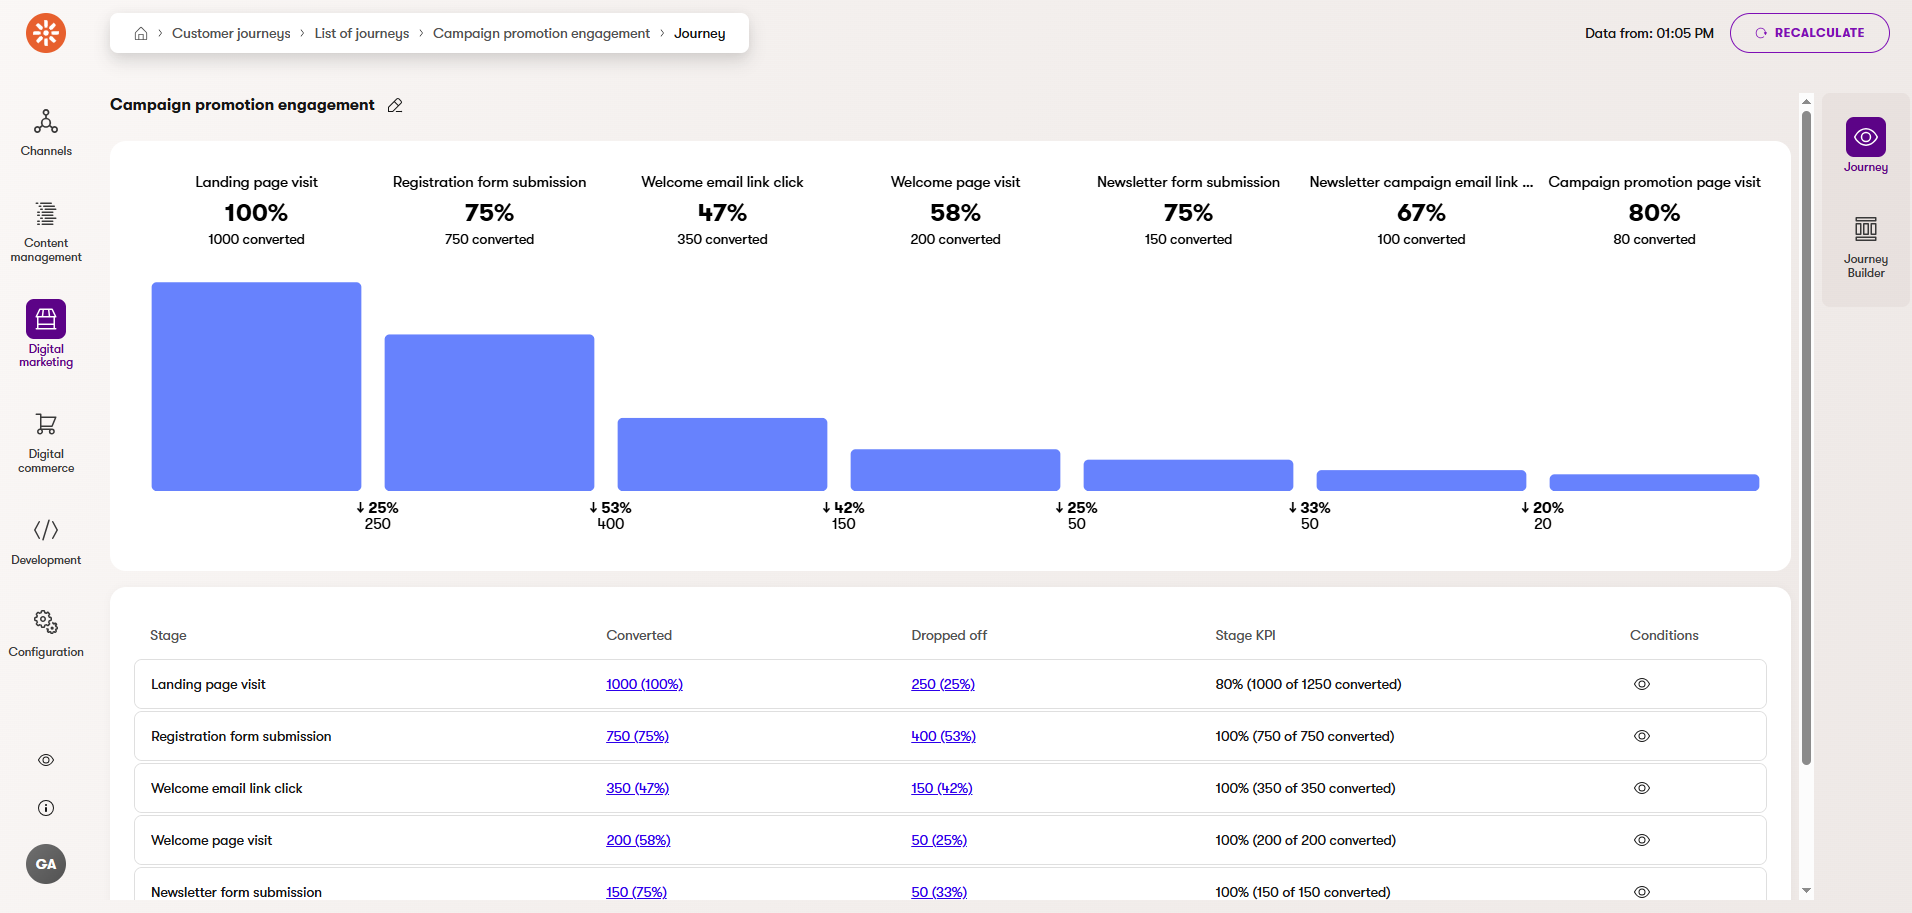
Additionally, you can find the following information in the list of stages below the graph:
- Stage – the display name of the stage
- Converted – the number and percentage of contacts from the previous stage who met the conditions to advance to this stage
- Dropped off – the number and percentage of the contacts who did not meet the conditions to advance to the next stage
- Stage KPI – the number and percentage of the contacts who reached the stage compared to the set KPI
- Conditions – the list of conditions that contacts must meet to advance to this stage
Campaign journey results
For customer journeys that are linked to a campaign, only conversions that occurred between the campaign’s start and end time are included in the journey results. If the campaign’s start or end time is not set, the journey data does not have time boundaries in the given direction.
When a campaign’s start or end time is changed, the journey is automatically recalculated and the results are updated according to the new boundaries.
View converted and dropped off contacts
To gain insights from a journey manually, you can view which contacts converted or dropped off at each stage by selecting the corresponding numbers in the journey results.
To view more information about a specific contact from the converted or dropped off list, open () the contact details.


Customer journey insights
You can use AIRA in-product guidance directly in the Xperience by Kentico administration interface to explore your journeys further. Customer journey insights offer you information on which contact groups are present in journeys and how they progress through each stage. This helps you compare the performance of contact groups, explore audience behavior, and identify opportunities to improve engagement strategies. See AIRA documentation for more information.
If the Customer Journey Optimization Specialist agent is enabled, AIRA uses the agent for providing actionable recommendations to improve conversion rates at drop-off points in your journeys.
Recalculate a customer journey
Customer journey results are calculated upon saving stages in the Journey Builder, reflecting the state of contacts at the time of calculation. The data is not automatically updated according to contact activity that occurs after the calculation.
You can manually update the results at any time by selecting the Recalculate button in the Journey view mode to incorporate new contacts or those who have progressed to later stages of the journey. The calculation of a journey may take up to a few minutes, depending on the number of contacts being evaluated.
Time the recalculation
If your application is hosting a live website, do not run the recalculation during the site’s peak traffic hours, as recalculation of the data can be a resource-intensive process that may reduce the application’s performance.
Schedule automatic recalculation
If you want to keep the journey results up to date, you can schedule an automatic recalculation of a journey.
First, your administrators need to configure and enable the Scheduled customer journey recalculation scheduled task.
Then, to enable the automatic recalculation for a customer journey:
- Open the Customer journeys application.
- Select the journey whose results you want to recalculate automatically.
- In the Journey Builder view mode, enable the Scheduled recalculation property.
- Save the changes.
The system will now periodically recalculate the journey according to the configuration of the scheduled task.
All newly created journeys will now have the Scheduled recalculation property selected by default as long as the Scheduled customer journey recalculation scheduled task is enabled.
Once you no longer need to keep the results of a journey automatically up to date, we recommend disabling the Scheduled recalculation property. Having too many journeys scheduled for recalculation may impact system performance.
Upon recalculation, contacts which no longer meet the conditions are removed from the corresponding stages. Recalculating the customer journey keeps the data up to date, reflecting only those contacts who currently match the inclusion criteria.
Between journey calculations, contact merging may cause minor inconsistencies in the results. These inconsistencies are resolved when the journey is recalculated, ensuring the most accurate data.