Content hub
Content hub is a workspace-scoped application that provides a way for users to create, store, manage, and publish content across multiple channels. Each piece of content is stored in the hub as a reusable content item.
Content items are universal and reusable across channels (website, email, headless). Each item belongs to a single workspace and represents a piece of structured content defined by a content type. For example, testimonials, author details, FAQ sections, and other elements used by your project. See Content modeling for more information about the recommended information architecture of projects.
Content items are useful for numerous scenarios:
- Content reusability
- Separation of structured content from the presentation layer
- Multichannel content distribution
- Headless scenarios
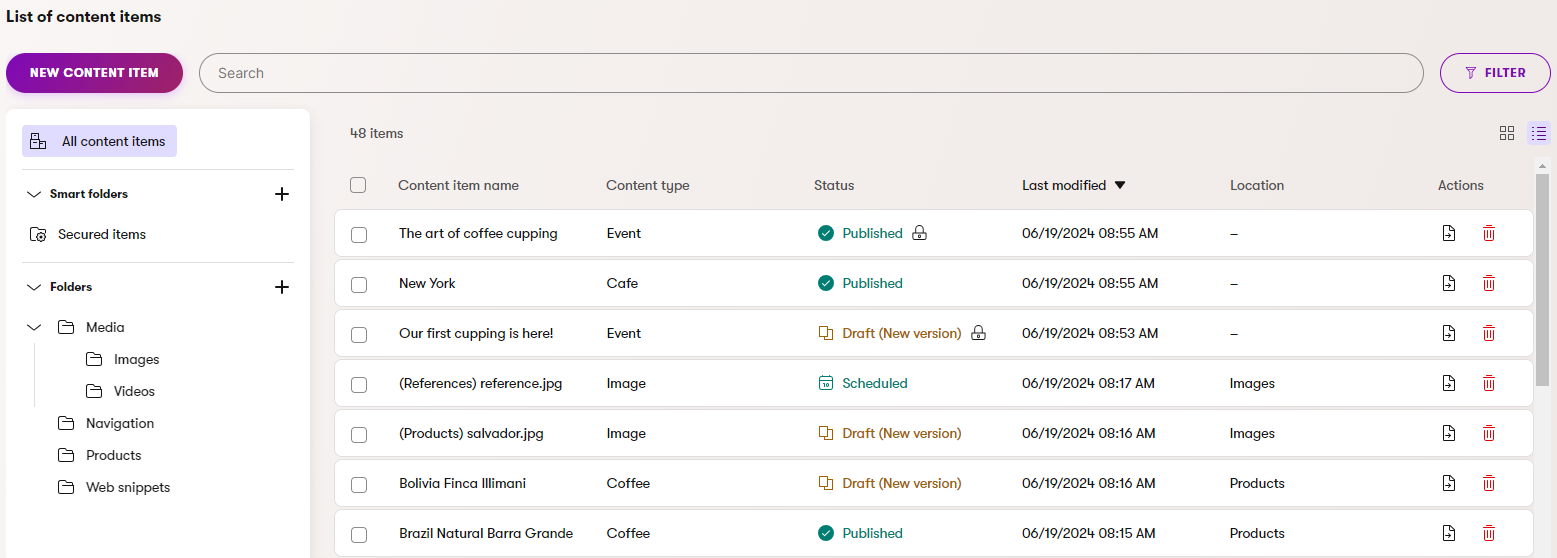
The content hub UI allows you to view all content items in the system:
Switch between workspaces
In case you have access to multiple workspaces you can switch between them using the workspace switcher located in the header bar.
Content hub folders
Content hub allows you to create folders that help organize and efficiently navigate through content items. The following types of folders are available:
Smart folders
Smart folders provide a dynamic way to organize and filter content items. Each smart folder is based on a filtering condition, such as “items modified in the last 7 days”, “items with the Draft status”, “items with the Acme tag”, etc. The condition is evaluated dynamically, so items move in and out of smart folders as their fields and metadata change. A single content item can belong into any number of smart folders.
Smart folders can be used to organize content items in the administration interface, and also to dynamically control content delivery and filter content in your channels (e.g., on the live website).
Create smart folders
To create a smart folder:
Select the Create new smart folder () button in the top-right corner of the Smart folders section in the left-side panel.
Choose whether to Enable dynamic content delivery for the smart folder.
- See Enable content delivery for smart folders for detailed information.
- If you’re not sure, you can enable content delivery at any point after you create the folder.
Set up the folder’s filter conditions.
Select Continue.
Enter a Smart folder name.
Select Save.
Alternatively, you can Save any filter applied to the content hub listing as a new smart folder.
Note that the smart folder only saves the Filter conditions. Search inputs are not reflected by the new smart folder.
When you select a smart folder in the left-side panel, the listing displays all content items that currently match the folder’s filter conditions. In addition to the Content hub application, smart folders are also available in all content item selectors throughout the system.
Clone smart folders
When creating new smart folders, you can save time by reusing the filter conditions of an existing folder.
- Expand the Menu actions () next to the original folder.
- Select Clone.
- Choose whether to Enable dynamic content delivery for the new folder.
- Select Clone in the confirmation dialog.
You can then adjust the new folder’s condition as required.
Edit smart folders
You can adjust a smart folder’s filter conditions at any time:
- Select the smart folder in the left-side panel.
- Select the Filter button or any filter summary item displayed in the Applied filters section above the listing.
- Change the filter conditions as required.
- Select Apply.
- Check the results in the listing and select Save changes.
To change a folder’s name, expand the Menu actions () next to the folder and select Rename.
Enable content delivery for smart folders
Dynamic content delivery allows developers to retrieve content items matching a smart folder’s filter criteria. This gives you the power to control which items are delivered by editing the filter conditions of smart folders directly in the Content hub UI, without needing to adjust code.
Note that smart folders with dynamic content delivery have the following limitations on their filter conditions:
- Content type – most content delivery scenarios will be limited to a specific content type or content types that share a reusable field schema. This means that the final content delivered through the smart folder may not include items from all selected content types. Consult your project’s developers if you are not sure.
- Status, Requires authentication, Last modified – these filter options are not supported for smart folders with dynamic content delivery. Retrieval of content based on published status or authentication requirements is controlled by developers, and the Last modified value is not intended for public use outside of the administration interface.
The order and maximum number of retrieved items is controlled by developers, and you cannot configure these parameters through a smart folder’s filter conditions or other settings.
To enable dynamic content delivery for a smart folder:
- When creating new smart folders, select the Enable dynamic content delivery option at the top of the filter conditions.
- For existing folders, expand the Menu actions () next to the folder and select Enable dynamic content delivery.
Be careful when editing or deleting items that are included in a smart folder with dynamic content delivery. Changes may affect how the content is displayed in your channels.
You cannot disable content delivery for a smart folder after you choose to enable it. If necessary, you can clone the folder to create a new copy without dynamic content delivery – expand the Menu actions () next to the folder and select Clone.
Select smart folders in content
When editing content, you may encounter fields that allow you to select a smart folder (depending on your project’s content model). For example, you could find smart folder selectors among the fields of content items and pages, or in the Page Builder when configuring the properties of a widget.
After you select a folder, developers can then use the field to retrieve content items from the selected smart folder and display or otherwise use them in the related channel.
Content folders
Content folders may be disabled or enabled for your project. If the folders are not available and you wish to use them, contact your administrators or see the Content hub configuration documentation.
You can use a hierarchy of content folders to catalogue content items. Folders can greatly help you organize and efficiently navigate through content items in the administration interface, particularly when your project contains a large number of items.
Unlike with smart folders, content items are placed into content folders manually, and each item can only be located in one content folder.
The purpose of content folders is only to help organize content items in the administration, and they cannot be used to control content delivery.
- To add a content folder, use the Create new folder () button in the top-right corner of the folder tree.
- The system supports up to 20 levels of subfolders.
- Expand the Menu actions () next to folders if you wish to:
- Rename a folder
- Add a new subfolder
- Delete a folder
- Move a folder under a different folder or workspace (together with all subfolders and contained items)
- View a folder’s Properties (identifiers, created and last modified timestamps, other metadata)
- If you select a folder in the tree, the listing on the right only displays items located directly in the given folder. You can use the search function to find items, including subfolders.
- To access the full list of all content items in the current workspace (from all folders), select All content items above the folder tree.
- When creating content items, you can choose the folder Location for each new item.
- You can move items between content folders or workspaces at any time using the Move () action.
Configure Content hub listing
You can customize your Content hub listing by changing the order of columns and selecting which ones to display. These settings are saved in your local storage and won’t affect other users. To configure the listing:
- Select the cogwheel () icon available in the Content hub’s listing.
- Select which columns you want to see and their order.
- You can drag and drop the columns to reorder them and either show or hide them using the eye () icon or by directly selecting the columns.
- Save your changes.
Create content items
- Select New content item.
- Enter a Content item name which identifies the content item in the admin UI.
- If content folders are enabled, select the Location for the new content item.
- Choose the Content type of the new content item.
- Select Continue.
- Enter the values required by the selected content type.
- Save the new content item, which creates a draft version of the item in the current workspace.
Directly publish items
You can directly Publish new items to make them available for your audience (either immediately or at a scheduled time). See Publish content items to learn more.
If the item has fields linking to other reusable content items, the cascade publishing dialog opens when publishing. You can view all linked content items you have access to, that are currently not published, and select them for publishing together with the main item.
The content item is now created.
Upload files
You can upload files to content items of certain content types to create content item assets. Content item assets can store various types of files, for example, photos, pictures, sound files, videos, package files, presentations, or documents. You can reuse assets stored in the Content hub throughout the system.
Upload a single file
To upload a file to the Content hub:
- Open the Content hub application.
- Select New content item.
- Select a content type that has an Content item asset field.
- Search for content types named Image, Media, File, Asset, etc. The name of the content type depends on your project configuration.
- Enter the values of the content type fields and upload a file via the uploader.
- Save the new asset.
The asset is now created in the current workspace and needs to be published before it is publicly available.
Mass asset upload
To make uploading a large number of files easier, your administrators can configure mass asset upload for your project. You can then upload multiple files in a single bulk and automatically convert them to content item assets of a configured content type.
- Upload the files either by selecting New content item -> Upload files or by drag and dropping them to the Content hub. The upload starts automatically.
- If content folders are enabled, the files are uploaded into the currently selected folder.
- If you cancel a mass upload in progress, the already successfully uploaded files stay in the system.
- After a successful upload, edit () the created content items if necessary and enter additional values required by the content type. The names of the created content item assets are automatically generated from the uploaded file names.
The assets are now created in the current workspace and need to be published before they become publicly available.
Download files
If you need to access or modify a file previously uploaded to the Content hub, you can download it from a content item asset.
To download a file from a content item asset:
Open the Content hub application.
Select a content item asset.
- Use the search bar, filter or folders to find content items.
Download () the asset.
The asset is now downloaded to your device.
Find content items
The Content hub will often contain a large number of items. The search bar allows you to find items with a name or content type matching the entered text in the current workspace.
The listing displays only items in the current workspace. If you have access to multiple workspaces, you can switch between them using the workspace switcher located at the top left of the Content Hub interface.
If you select a folder in the tree, the listing only displays items located directly in the given folder. You can use the search function to find items, including subfolders.
You can also Filter the list of content items to display only selected content types, items with specific statuses, items containing specific tags, or items with authentication requirements.
Edit content items
- Select the content item you want to edit.
- Use the search bar, filter or folders to find content items.
- If you have multiple languages set up, select the language in which you want to edit the content item from the language switcher.
- Make sure the content item is in the Draft status or another custom workflow step.
- When a content item is Published or Scheduled, select Edit content item to transition it to the Draft step and enable editing and publishing of the item.
- When a content item is Unpublished, select Create new version to move the item to the Draft step.
- When a content item is Published or Scheduled, select Edit content item to transition it to the Draft step and enable editing and publishing of the item.
- Edit the fields of the content item.
- Save the updated content.
Move content items
Possible side effects of moving content items
Moving content items may affect what you and other editors are allowed to do with them.
Consult with your administrator if you are unsure about how moving content items may affect other editors. Moving items to a workspace with different permissions could result in other editors losing access to or being unable to work with the moved items.
You can move content items into a content folder or a different workspace. The action is available both for individual items in the list, and as a mass action after selecting multiple items.
To move content items:
- Open the Content hub application.
- Select the content items you want to move.
- Use the search bar, filter or folders to find content items.
- Select the Move () action.
- Select the workspace or content folder where you want to move the items.
- Move the content items.
The content items are now moved to the new location.
Link content items
Content items may support linking other items to create nested hierarchies. For example, a content item representing a medical practitioners office can link to other content items representing employed doctors, patient testimonials, and so on. These relationships are determined by the content model used by your project.
- Edit a content item that supports referencing other content items.
- You can choose existing content items to link via Select existing in any workspace you have access to, or create a completely new content item using Create new.
- Save the changes.
The content items are now linked to the edited item. Each linked item also respects its status – it may not be immediately active upon being linked. Linked items can be published together with the main item using Cascade publishing. To learn how the life cycle influences linked items, see Content items life cycle.
Add tags to content items
Depending on the configuration of your project, content items may support taxonomies and tags.
- Edit a content item that has a field with the tag selector.
- Select tags that describe the content item.
- Save the changes.
The selected tags are now stored with the content item. Developers can use the information to display content based on tags.
Optimize image assets
To help ensure that the images you use on your live site are properly optimized, your administrators can enable automatic image optimization. However, you can also manually optimize any image asset in the Content hub by changing the format of the image or reduce its size by adjusting image quality.
- Edit a content item asset that contains an image.
- Adjust the image ().
- Change the Image format or Quality of the image.
- Image format – while some formats like WEBP and AVIF are better suited for most modern web browsers, they may be incompatible with some legacy browsers (e.g., Internet Explorer). If you’re not sure about which image formats to use in your project, ask your project administrators.
- Quality – the overall quality of the image. While higher quality retains more image details, lowering the quality reduces the file size.
- Quality selection is unavailable for image formats that use lossless compression, like PNG.
If you notice undesired compression artifacts in the optimized image, try increasing the quality until the artifacts are no longer visible. - You can preview the outcome of your adjustments on the image in the Adjusted image info section.
- Save the changes.
Xperience preserves all original images in the background. Therefore, whenever you make a new adjustment to an image, optimizations are always applied to the original file. For example, when you change the quality of an image from 70% to 50%, the image is compressed as if you were changing the quality from 100%.
View content item details
Switching to the Properties tab of an edited content item displays various information about it, such as its name, content type, and culture.
Track usage of content items
Even if your project contains thousands of content items, you can keep track where each content item is linked and in what channels it is displayed. Tracking usage of a content item is useful to see what impact editing or deleting the item would have. For example, you can check whether the content item you are about to delete is used in published content and whether deleting the item may break that content.
- Edit a content item.
- Navigate to the Usage tab to view where the selected content item is used. Switch between the two view modes in the menu on the right:
- In reusable content – list of reusable items which directly link to the selected item.
- In channels – list of channel items (for example pages or emails) which display the selected content item. The selected item can be linked directly in the channel item, or indirectly through other reusable items. In the In reusable content column, you can see the name of the reusable item that is the direct parent of the selected item, if the selected item is linked through another reusable item.
Tracking limitations
The system does not track or display usage of content items through smart folders. If you use smart folders to dynamically link content items or deliver content to channels, we recommend manually checking the content of such folders before you delete or significantly edit content items that could be related.
Similarly, the usage of content items in notifications is not tracked by the system. You should manually check whether a content item is used in notification emails before making any significant edits or deletions.
Publish content items
Content items must be published before they can be delivered to your audience through various types of channels. For example, a website channel’s pages only display published content on the live site.
You can publish items under the following conditions:
- If the item’s content type is under workflow, the item must be in the last step of the workflow, or you need to belong to a role with full control for the given workflow (this allows you to publish items from any step).
- For items that are not under workflow, the item must be in the Draft step.
To publish a content item:
- Open the Content hub application.
- Select a content item that has recently been edited and is in the Draft status, or a workflow step from which you are allowed to publish the item.
- Use the search bar, filter or folders to find content items.
- Publish the content item. For items under workflow, select Change workflow step and choose the Schedule / Publish step.
- Choose when you want to publish the item:
- Publish now
- Schedule publish – select a date and time in the future. The system will automatically publish the item at the given time (see Scheduled publishing).
- Select Confirm.
- If the item has fields linking to other reusable content items, the cascade publishing dialog opens.
Once published, the item is available for use within individual channels. When you edit a published content item, a new draft version is created. The item’s last Published version remains public.
Scheduled publishing
When publishing content items, you can choose to postpone the publish action to a later time. Select the Schedule publish option while publishing, and then pick a date and time when you want the system to automatically publish the item.
Once an item is Scheduled, it can no longer be edited (like a Published item). However, the item is not available for your audience until it actually becomes published.
If you need to edit a scheduled item, you have the following options:
- Select the Edit content item action – cancels the scheduled publish and moves the item to the first step in the item’s workflow cycle (Draft).
- Expand the Edit content item menu and select Cancel scheduled publish – cancels the scheduled publish and moves the item to the final step in the item’s workflow cycle (Draft for items without workflow).
Scheduled publish timing
We cannot guarantee that items will be published exactly at the scheduled time. The system checks if there are items scheduled to be published once per minute. If there’s a significant volume of content scheduled to be published at the same time, there may be a delay before all items are published (up to several minutes when publishing many thousands of items).
During the publishing process, reusable content items are always published before pages to ensure that content is displayed consistently.
Mass publishing
To publish multiple content items at once:
- Open the Content hub application.
- Select the checkboxes on the left side of the list to choose the content items you want to publish.
- Select Publish under the search bar.
The Publish selected content items? confirmation dialog opens. Items can only be published if they fulfill the following requirements:
- Items under workflow must be in the last step of the workflow, or you need to belong to a role with full control for the given workflow (this allows you to publish items from any step). Items without workflow must be in the Draft step.
- You must be allowed to publish the item under the item’s workflow restrictions for roles.
- The item must be translated in the currently selected language.
If any of the selected items do not fulfill the requirements for publishing, they are listed in the dialog. You can directly edit () items in the list to make adjustments and move items to a publishable state.
To confirm the mass publish, select Publish or Continue (appears if Cascade publishing of linked items is possible for any of the published items).
Cascade publishing
When publishing (or scheduling the publish for) content items with fields linking to other reusable content items, the cascade publishing dialog opens. Here you can view all content items that are associated with the item you’re about to publish, but are currently not published. If you are publishing multiple items using mass publishing, the dialog displays linked items for all published items (in this case, the main published items are not listed).
You can select linked items to be published together with the main items. Linked items that currently do not fulfill the requirements for publishing are displayed, but cannot be selected. Leaving linked items unpublished may lead to missing data or other issues in the content of the published items.
Cascade scheduled publishing
If you are scheduling an item to be published, any linked items that you select in the cascade publishing dialog are scheduled to be published at the same time as the main item. This overwrites the publish time for any linked items that are already scheduled to be published.
Linked items that are scheduled to be unpublished at a time before the new scheduled publish date cannot be selected in the cascade publishing dialog.
Cascade publishing is available when publishing all types of content, including: reusable content items in Content hub, pages, emails, and headless items.
Together with the main items, cascade publishing allows you to publish reusable content items linked in the following ways:
- through the fields of an item, page or email in the Content view of the respective application
- recursively through the fields of another linked item
- linked on pages through Page Builder widget properties using the Combined content selector form component
Cascade publishing does not support publishing of:
- related pages linked through fields with the Pages data type
- headless items linked through fields with the Headless items data type
- pages linked through Page Builder widget properties using Page selector and Combined content selector form components
- pages or content item assets inserted or linked in rich text editor fields
Revert content items to published status
After creating a new version of a content item, the item goes through a new editing cycle with the Draft step and optionally other custom workflow steps.
At any time before the new version is published, you can revert the item back to the last Published status. All changes made in any workflow step will be lost.
- Open the Content hub application.
- Select a content item that has been edited.
- Use the search bar, filter or folders to find content items.
- Expand the Publish or Change workflow step menu.
- Select Revert to published to revert the changes.
The item is now reverted to its Published status.
Translate content items
Before you can translate individual content items in your project into other languages, you need to set those up in the Languages application. For detailed info on how to configure multiple languages in Xperience see Languages.
Afterwards you can start to translate and create language variants of your items:
Open the Content hub application.
In the header bar, open the language switcher.
The language switcher is available only if two or more languages are set up.
Select the language to translate content into.
- Tip: You can see what languages a content item is translated into in the Languages column.
Select the content item to translate.
Untranslated content items are visually marked by the Not translated () status.
Enter the translated name of the content item. You can now choose one of the following options:
- Copy content from another language is the preselected option. By default, the closest language in the fallback chain is preselected. You can choose a different language from the drop-down list. This option lets you prefill the content item fields with the content available in the chosen language. If a linked content item does not have a translated or published version, a warning will be displayed, and a fallback language variant of the item will be used.
- Create empty content item allows you to create an empty content item with blank fields. Linked content items need to be re-linked, and files need to be re-uploaded into the new language variant of the translated content item.
Select Continue.
Enter the translated values of the content item’s fields.
Save the translated content item.
You have now successfully translated the content item. Note that the particular language variant is now only a Draft and so won’t be accessible on the live site until you publish it. Until you do so, the language variant in the fallback language will be displayed.
Secure content items
Secured content items require that the consumer (e.g., a site visitor) is signed in before the content item is displayed.
To secure content items:
- Open the Content hub application.
- Select the content item you want to secure.
- Use the search bar, filter or folders to find content items.
- Switch to the Properties tab.
- Set the content item’s security configuration.
- Requires authentication – only visitors signed in to the website can access the item.
- Select Save.
Secured content items show a lock icon when listed in various places in the Xperience admin UI.
Note that secured content items are only available for website channel pages, where the system can identify which users are authenticated. Secured items are not included in the content of emails or headless items (even if selected in the fields of such items).
See Secure pages to learn how to secure individual pages or entire sections of website channels.
Unpublish content items
An unpublished content item is not available for use by any channels, but you can still access it from the administration.
To unpublish a content item:
- Open the Content hub application.
- Select a content item you want to unpublish.
- You can only unpublish content items that are already published or scheduled to be published in the future.
- Use the search bar, filter or folders to find content items.
- Expand the Edit content item menu and select Unpublish options.
- Choose when you want to unpublish the item:
- Unpublish now
- Schedule unpublish – select a date and time in the future. If the item is scheduled to be published, the unpublish time must always be set after the publish time. The system will automatically unpublish the item at the given time.
- Select Confirm.
Once an item is Unpublished, it is no longer available.
To edit or re-publish an unpublished content item, select Create new version for the content item. This creates a new version of the item in the Draft step.
Change scheduled unpublish options
If you wish to cancel scheduled unpublishing for an item, expand the item’s Edit content item menu and select Cancel scheduled unpublish. To change the unpublish date and time, use the same approach to cancel the scheduled unpublish and then schedule it again.
For items that have a scheduled unpublish time while they are still scheduled for publishing, canceling the scheduled publish (or editing the item) also automatically cancels the scheduled unpublish.
Delete content items
Deleting a content item is a non-reversible action. Once you delete the item, it cannot be recovered.
- Open the Content hub application.
- Locate the content item you want to delete.
- Use the search bar, filter or folders to find content items.
- Delete () the content item.
- If the deleted content item is used in other content, you may want to check the usage of the item and edit all content where it is used.
- Tip: You can quickly see whether a content item is used by checking the In use column of the content item listing.
The content item is now permanently deleted.
To delete multiple items at once, select the items in the list and use the Delete button under the search bar.
Content items life cycle
Content items can transition through the following statuses:
- Draft (Initial) / Draft (New version)
- Custom workflow step (the item is being edited, “between” the Draft and Published status)
- Scheduled (will be automatically published at a selected date and time in the future)
- Published
- Unpublished
- Not translated
Each status changes the behavior of the item in the system.
Generally, items in the Draft (Initial) status are only shown in content previews, e.g., in page previews of website channels or email previews. In live content, only Published content items are shown. When you edit a Published item and move it to Draft (New version), the published content remains the active (main) version shown live until replaced by the new draft. Unpublished items can only be found in the Content hub application. Finally, Not translated items do not exist in the currently selected language. See the following diagram:
The same general behavior also applies to linked content items. A content item in the Draft status linked to a content item in the Published status will only show up in content previews (not in live content) until it transitions to Published.
The following flowchart demonstrates available status transitions:
Advanced scenarios
This section looks at a couple of example scenarios and explains how they can be influenced by statuses.
- Create smart folders
- Clone smart folders
- Edit smart folders
- Enable content delivery for smart folders
- Select smart folders in content
- Content item with linked items
- Creating new drafts of published (linked) content items
- Content item assets
- Publishing a content item containing non-published content items
- Publishing a content item containing items with a new draft version
Content item with linked items
Scenario: I have a content item with multiple linked content items. How does the status of the linked items impact my main item?
The status is evaluated independently for each content item. Linked content items that are in the Draft (Initial) status will not be shown as part of the main content item. For example, an FAQ section will be missing all linked “FAQ” content items that are in the Draft (Initial) status.
See the following diagram for an illustration:
Linked item 2 (Draft new version) contains a published version that the system uses instead. However, Linked item 3 has never been published before and therefore has no version that the system can use for live content.
Creating new drafts of published (linked) content items
Scenario: I have a published content item (that may or may not be linked by other items) and create a new draft version of it. How does this affect the published data?
Creating new drafts of published items doesn’t interfere with existing public items at all. The draft version is stored in the background and when eventually promoted, silently replaces the current published version.
Content item assets
Scenario: I have content item assets linked from a content item. How does the status of the asset affect the integrity of the main content item?
Same as with regular content items, the status of content item assets is evaluated independently. Initial draft versions (i.e., newly created, never before published) will not be shown in live content until Published. Draft versions of published assets only replace the current public version when the entire item transitions to Published. Unpublished assets are not shown in the content of other content items.
Publishing a content item containing non-published content items
Scenario: I have a draft content item A which includes another draft content item B. How does the draft status of the included content item B affect the publishing of content item A?
When publishing a content item which links to content items that are not published, all of the content items can be published at once using cascade publishing.
Publishing a content item containing items with a new draft version
Scenario: I have a draft of an item that includes another linked item. Even though there’s a new version of the linked item, I want to publish the first item with the older (currently published) version of the linked item. How does the draft status of the linked item affect publishing of the first item?
When trying to publish a content item which includes content items with a new draft version, you can select which content items to publish along with it. You can choose not to publish the linked item, which means the currently published version of the item will be used, until the new version is published.