User management
This page describes user management specific to Xperience by Kentico projects. For management of users within Xperience Portal projects, see Xperience Portal.
User accounts are required to access the Xperience administration. After signing in, users can work with the available features – manage website content, set up digital marketing and data protection functionality, design forms, etc.
Table of contents:
Default user accounts
The system contains the following user accounts by default:
- Administrator – the initial administrator account that can perform any action.
- Public – represents an anonymous visitor. Present in the system but not visible or editable in user management UIs.
Manage users
Users are classified into two groups:
- Live site users (members) – regular visitors that register on a live site managed by Xperience. See Registration and authentication to learn how to work with these users.
- Admin UI users – users that have access to the administration UI and directly interface with Xperience (e.g., content creators, administrators, marketers).
You can invite new admin UI users and manage user accounts via the Users application.
Select New user to add a new user, or select an existing user in the list to edit their details.
The user listing also allows you to perform the following actions:
- Delete () user accounts.
- Enable/Disable user accounts. Account status can be seen in the Status column.
- Resend invitation emails. Only available for users with the Invited or Invitation expired status.
Invite users
Prerequisite
User invitations are done via email. Your application must have an email client (for example an SMTP server or SendGrid) configured for system emails. For more information, see Email configuration.
When inviting new users, you need to enter the user’s email address and assign them a system role.
Invited users receive a notification email containing a URL that allows them to finish the registration process. The email message content and metadata can be customized to better suit your desired language and tone.
Edit users
To edit a user, select the row that represents them in the listing. When editing users, you can modify the following properties:
- User name – the name used when signing in. Cannot contain white space or special characters. The user name must be unique across all users in the system.
- First, Last name – the names of the person using the account.
- Email – the email address connected with the account.
- Role – one of the two predefined system roles associated with the account.
- Enabled – indicates if the user account is active, allowing the user to sign in.
Import users
If you wish to import or migrate users from another system or external source, developers can leverage the user API.
When creating users, be sure to set the UserInfo.UserAdministrationAccess property to true, which is required for users to access the administration interface and be displayed in the Users application.
To transfer users from an older version of Xperience, you can use the Kentico Migration Tool.
User passwords
Passwords are a critical part of any authentication process. Users must set their password when they finalize their registration into the system.
Password policy
The system can be configured to use a password policy, which means that new passwords entered by users are validated according to a certain set of requirements. Passwords that do not meet the specified conditions are rejected. See Password options to learn how to set password policies.
Default admin UI password policy
By default, Xperience sets the following requirements for passwords:
- At least 8 characters
- At least one uppercase character, lowercase character, a digit, and non-alphanumeric character
The policy is applied:
- When newly invited users choose a password for their account on the registration page.
- In all parts of the administration interface where a new password can be entered. Most commonly, this is the Account → Password tab opened when selecting your account icon in the admin UI.
- When resetting user passwords via Forgotten password on the Xperience administration sign in page.
Password storage format
The system stores user passwords in the database in an encrypted format, using the PBKDF2 key derivation standard. A cryptographic function is applied to the original password input (with a salt).
Change password
After signing in to the administration, any user can change their own account’s password. Editing passwords is not possible for other users.
- Select your account menu and open the Account page.
- Switch to the Password tab.
- Enter your current password and the new one.
- Select Save.
You now need to use the new password when signing in.
Reset password
Prerequisite
The password reset process uses emails. Your application must have an email client (for example an SMTP server or SendGrid) configured for system emails. For more information, see Email configuration.
If editors or other administration interface users forget their password, they may reset it, provided they have access to the email address specified for their account. They can do so via the Forgotten password link on the administration sign-in page.
Password reset requires email approval from the affected user. When submitting a password reset request, users must enter their email address. The request affects only the user account with the corresponding email address. If the entered email address does not match any registered user, no email gets sent.
The password reset email content and metadata can be customized to better suit your desired language and tone. See the Notifications documentation to learn more.
The main security benefits of this approach are:
- Passwords are not directly included in the email, so they cannot be read by potential attackers.
- The reset links are only valid temporarily. The validity period can be set via
AdminIdentityOptions.EmailOptions.LinkExpiration. See LinkExpiration. - After someone uses a password reset link and completes the password reset, it becomes invalid and cannot be accessed again.
Multi-factor authentication
The Xperience administration supports multi-factor authentication (MFA), which adds an extra layer of security to the sign-in process. With MFA, users need to verify their identity by providing a passcode in addition to the basic username and password. This MFA feature only applies to the administration’s built-in forms authentication (external authentication providers have their own MFA features and configuration).
To sign in with MFA enabled, users need an authenticator app that supports the Time-based One-time Password (TOTP) algorithm. For example, Google Authenticator or Microsoft Authenticator.
The authenticator application must be compatible with RFC 6238.
Enable MFA
Multi-factor authentication can be enabled and configured by developers in the application’s code. To learn more, see MultiFactorAuthenticationOptions.
MFA authentication process
Initial MFA setup
Once MFA is enabled for your application, you need to go through the following steps when signing in for the first time or when registering a new account:
Enter your username and password.
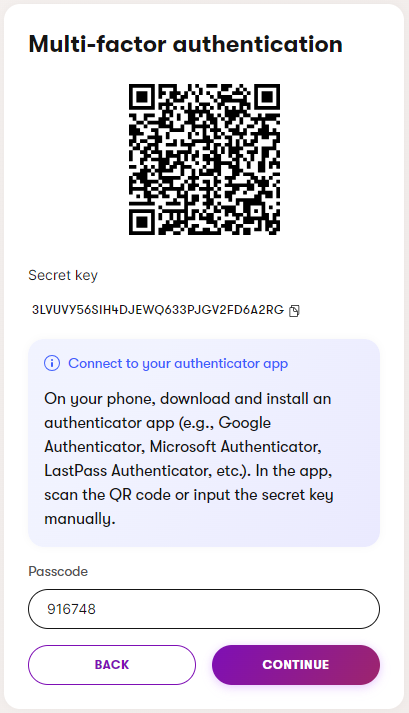
The system verifies the credentials and displays a Multi-factor authentication setup page.

Link the Xperience application into your preferred TOTP authenticator app using one of the following options:
- Scan the displayed QR code
- Manually enter the Secret key into the app
Generate an MFA passcode in the authenticator app.
- Passcodes for the Xperience MFA feature are 6 digits long and have a validity period of 30 seconds.
Enter the passcode into the Xperience MFA page.
The system displays a Recovery code. Save the recovery code in a secure location.
- The recovery code can be used once to sign in without providing an MFA passcode. This allows you to reset MFA authentication for your user account if you lose access to your authenticator.
Continue into the Xperience administration.
MFA sign-in
After you have set up MFA for your account, subsequent sign-ins are simpler and only consist of the following steps:
- Enter your username and password.
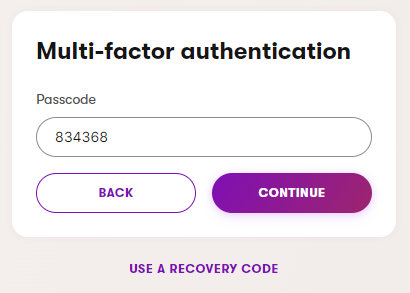
- Generate an MFA passcode in your authenticator app and enter it into the sign-in form
- Alternatively, you can sign in using the one-time recovery code.

Reset multi-factor authentication for individual users
Prerequisite
The multi-factor authentication reset process uses notification emails. Your application must have an email client (for example an SMTP server or SendGrid) configured for system emails. For more information, see Email configuration.
If you lose access to your authenticator app, you need to reset your MFA secret key:
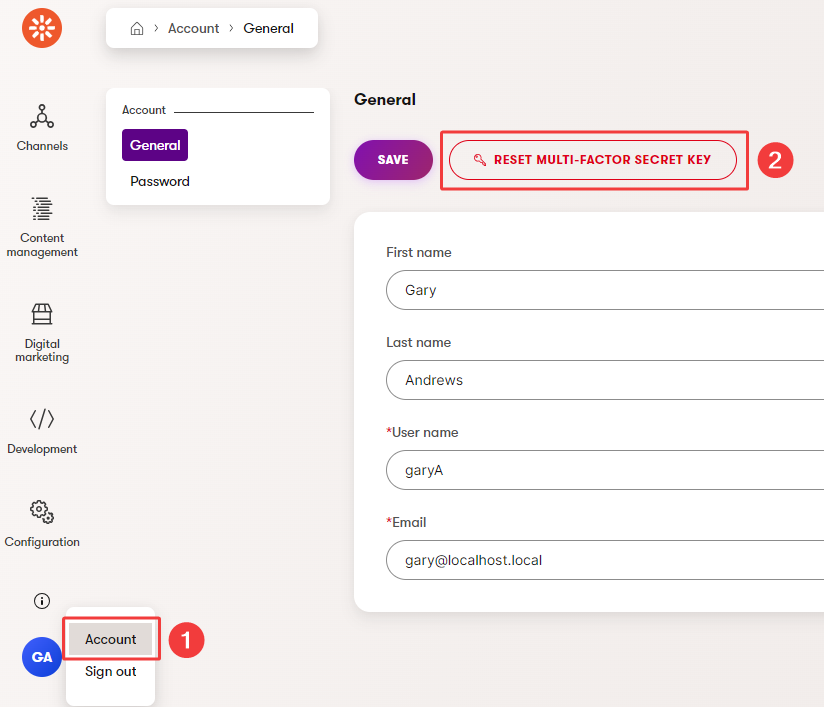
- Sign in to the Xperience administration using your one-time recovery code.
- Open the Account application.
- Select Reset multi-factor secret key on your account’s General tab.

- Select Reset in the confirmation dialog.
The system sends an email with a link that allows you to repeat the MFA setup and connect a new authenticator app.
- MFA reset links are only valid temporarily. The validity period can be set via
AdminIdentityOptions.EmailOptions.LinkExpiration. See LinkExpiration. - MFA reset links are invalidated after a successful MFA reset.
If you do not have a valid recovery code, the only option is to contact an administrator with permissions to manage users in Xperience. Such administrators can reset the MFA secret key for any user account:
- Open the Users application.
- Select the user whose MFA secret key you want to reset.
- Select Reset multi-factor secret key on the General tab.
- Select Reset in the confirmation dialog.
The system sends the MFA reset email to the given user’s email address.
The content of the MFA reset email can be customized in the Notifications application.
When a user’s MFA secret key is reset, authentication is disabled for the account (for security reasons). The account is unblocked only after the user sets up MFA again via the link in the reset email.
Account lockout
Attackers may try to compromise user accounts through brute force, for example by repeatedly attempting to sign in with common password variants. The Xperience administration provides an account lockout mechanism to protect against such attacks (in addition to features like Multi-factor authentication).
By default, the system locks accounts after 5 consecutive failed attempts to sign in. Authentication for the locked account is then blocked for 5 minutes.
Configure account lockout
The account lockout functionality can be adjusted by developers in the application’s code. To learn more, see Lockout options.
Unlock accounts
When a user’s account is locked, the system sends a notification to the user’s email address. This notification contains a link that allows the user to immediately unlock their account. The content of the notification email can be customized to suit your desired language and design in the Notifications application.
Account unlock links are only valid temporarily and become invalidated after the account is successfully unlocked. The validity period can be set via AdminIdentityOptions.EmailOptions.LinkExpiration. See LinkExpiration.
Accounts are also automatically unlocked if a user resets their password.