
Cross-site tracking
Preview feature
The cross-site tracking feature is currently in preview mode. Expect the feature to be updated and modified significantly in upcoming versions, including breaking changes.
What should you do with this feature?
- DO try out this feature, for example, using the sample Dancing Goat project template or other demo sites.
- DO feel free to share your feedback with the Kentico Product team.
- DON’T use this feature in a production environment or invest heavily into development based on the current state.
Websites running as channels in Xperience by Kentico can track visitors as contacts and log their activities. Cross-site tracking allows you extend these features to other websites that you own. The feature can be used with websites on any version of Xperience, as well as sites running completely without Xperience.
For example, you can utilize cross-site tracking for the following types of websites:
- Microsites that support your main Xperience website.
- Related sites running on an older version of Xperience that you cannot or do not wish to upgrade.
- In general, any interconnected site that shares visitors with your Xperience website.
Prerequisites
To use cross-site tracking, you must have at least one site managed as a website channel in Xperience. Every external site that you wish to track needs to be registered in the system, and linked to a specific website channel.
Your main Xperience website and all external sites must:
- Run on HTTPS with valid trusted certificates.
- Have unique domain names, without an application path or port number. This is necessary to allow external sites to communicate with logging endpoints in the main application, and ensure Cross-origin resource sharing for logging requests.
Cross-site tracking relies on third-party cookies. As a result, tracking on external sites may not work for a significant number of visitors. Even if a visitor gives consent to be tracked, their browser may be configured to block third-party cookies. For optimal cross-site tracking coverage, run your external sites on subdomains of the main Xperience website (for example, domain.com for the main site and shop.domain.com for an external site).
To comply with personal data protection policies that apply to most website, you need to prepare a tracking consent, and implement functionality on your external sites to allow visitors to give consent agreements.
How cross-site tracking works
Cross-site tracking is performed through client-side scripts, which communicate with the Xperience application hosting the main website via designated endpoints. The scripts are added to tracked sites by copying an initial snippet from the Xperience administration, and then need to be extended by web developers to provide consent functionality and logging of activities beyond basic page visits.
The following table summarizes how contacts are created and tracked, assuming that visitors have given consent to be tracked:
|
Visitor journey |
Contact tracking |
|
Main site → External site |
When a new visitor arrives on the main Xperience website, the system stores the contact in the CurrentContact browser cookie. If the visitor later opens a tracked external site, the same cookie is used to track the contact and converted to third-party mode. |
|
External site → Main site |
If a new visitor arrives on a tracked external site without first visiting the main Xperience website, a new contact is created and stored in the CrossSiteContact third-party cookie. If the visitor later goes to the main website, the CrossSiteContact cookie is replaced by the standard CurrentContact cookie. The visitor is tracked as a single contact, which merges all data available from both the main and external site. |
|
Multiple external sites |
If you have multiple tracked external sites, visitors are tracked as separate contacts for every external site. This means that a single visitor is represented by multiple contacts, each with their own activities and consent agreements. The system merges the contacts and the collected data if the visitor goes to the main Xperience website. |
Identify contacts from external sites
If you need to detect or segment contacts who were tracked on an external site, set up a contact group with the Contact has visited a page with a specific URL in the last X days condition, and use the external site’s domain name as the URL value.
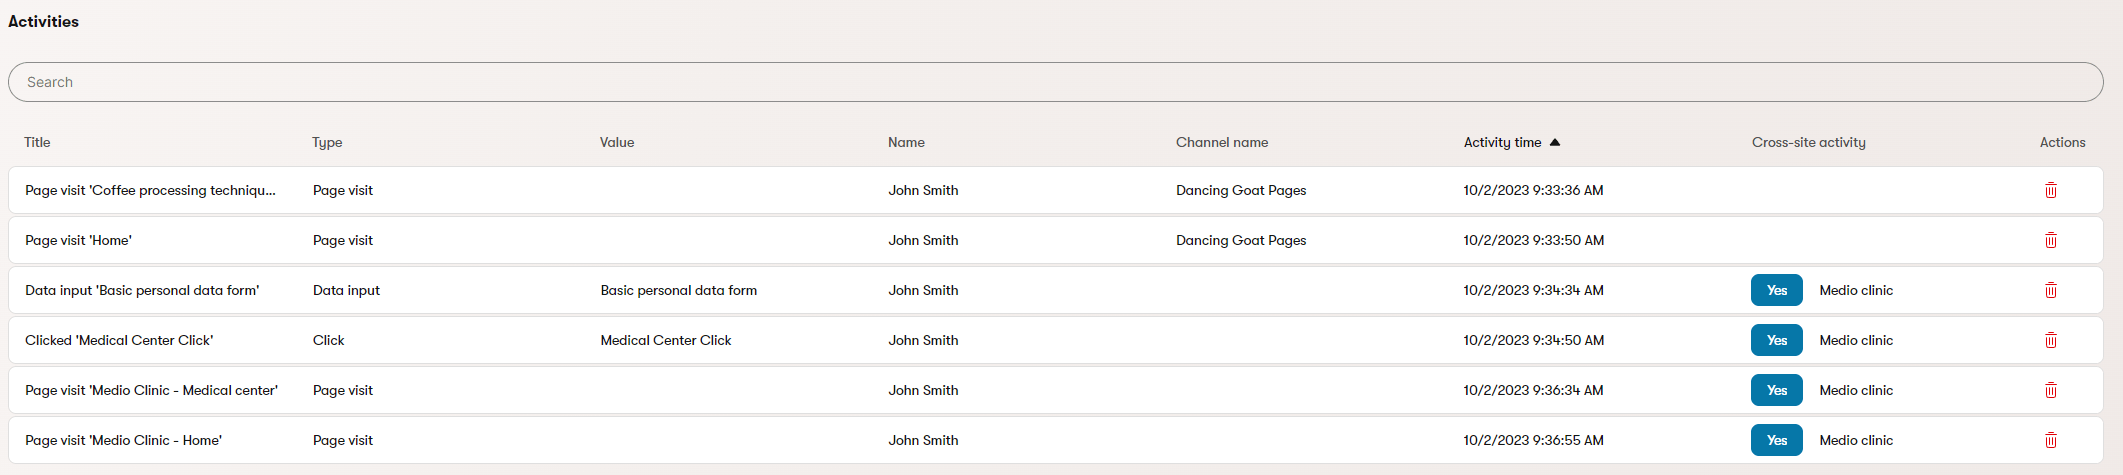
When viewing the activity logs in the Xperience Contact management application (both the overall log and the logs for individual contacts), activities from external sites appear with the Cross-site activity flag and the name of the external site.
Set up cross-site tracking
- Enable the cross-site tracking feature for your Xperience application
- Register external sites that you wish to track in Xperience
- Add a tracking snippet to the tracked sites
Enable the cross-site tracking feature
To start tracking contacts and activities on external sites, you need to enable the cross-site tracking feature for the application hosting your main Xperience website. The feature registers endpoints that receive and process cross-site tracking requests.
Open your project in Visual Studio and edit the Program.cs file.
Enable the activity tracking feature by calling the
UseCrossSiteTrackingmethod of theIFeaturesBuilderdelegate (pass the delegate as an argument toAddKentico).Create a
CrossSiteTrackingOptionsobject and populate itsConsentSettingsproperty with anIEnumerablecollection ofCrossSiteTrackingConsentOptionsobjects.Add a
CrossSiteTrackingConsentOptionsobject for every website channel that you wish to link with one or more tracked external sites. For each object, set the following properties:WebsiteChannelName– the code name of the website channel that you use to manage your main site in Xperience.ConsentName– the code name of the consent required for contacts to be tracked on external sites. Assign the same consent that you use for contact tracking on your main site.AgreeCookieLevel– the cookie level set for visitors who accept the cross-site tracking consent on an external site. To allow tracking, set the Visitor cookie level or higher.
Pass the
CrossSiteTrackingOptionsobject as the parameter of theUseCrossSiteTrackingmethod.C#Program.csusing Kentico.CrossSiteTracking.Web.Mvc; using Kentico.OnlineMarketing.Web.Mvc; using Kentico.Web.Mvc; var builder = WebApplication.CreateBuilder(args); ... builder.Services.AddKentico(features => { features.UseCrossSiteTracking(new CrossSiteTrackingOptions { // Sets the consent and cookie level options for cross-site tracking ConsentSettings = new [] { // Add cross-site tracking options for individual website channels new CrossSiteTrackingConsentOptions { WebsiteChannelName = "WebsiteChannel1", ConsentName = "TrackingConsentCodeName", AgreeCookieLevel = CookieLevel.Visitor.Level }, new CrossSiteTrackingConsentOptions { WebsiteChannelName = "WebsiteChannel2", ConsentName = "TrackingConsentCodeName", AgreeCookieLevel = CookieLevel.Visitor.Level } } }); });
Enabling the UseCrossSiteTracking feature registers endpoints that allow the application to process contact and activity tracking requests from external sites.
Manage tracked sites
You need to register all external websites that you wish to cover by the cross-site tracking functionality:
- Open the Cross-site tracking application in the Xperience administration.
- Select New tracked website.
- Fill in the tracked site’s properties:
Tracked website name – the name of the site displayed in the Xperience administration.
(Optional) Identifiers – specify the code name if you wish to use a code name different than the pre-filled value.
Tracked website URL – the base URL of the tracked website. Enter a valid URL using the HTTPS scheme, without a URL path component or trailing slash. For example: https://sub.domain.com
Description – allows you to add information about the tracked site. Only displayed to other editors in the Xperience administration.
Website channel – select the website channel representing the main Xperience website to which the external site will be linked.
What is the purpose of the linked website channel?
All cross-site tracking requests from the external site will be sent to endpoints on the domain of the selected website channel.
Additionally, cookies that store contact data are shared only between the external site and the main Xperience site that is linked. Having the correct website channel selected is necessary to ensure that contacts moving from the external site to the main site (or vice versa) are recognized correctly and merged if required.
Enabled – indicates if contact and activity tracking is active for the site. Can be disabled or enabled at any time.
- Select Save.
The system generates and displays a Code snippet, which you need to add to the HTML code of pages on the tracked site.
Add the tracking snippet
Cross-site tracking works through client scripts that send logging requests from external sites. You need to add a code snippet containing the required scripts to every tracked website:
- Open the Cross-site tracking application in the Xperience administration.
- Select the tracked site.
- Copy the Code snippet displayed for the tracked site.
- Paste the snippet into the
<head>tag of the tracked site’s HTML code.- Place the script into a code section or layout that is shared by all pages that you wish to track.
- If you are pasting the tracking snippet into a JavaScript application with specific syntax requirements (e.g., NextJS), you may need to adjust the script. For example, replace
\(backslash) with\\(double backslash) within quotes or a template literal.
Domain name in the tracking snippet
The tracking snippet contains the domain of the website channel linked to the tracked site.
If your website channel’s domain changes or if you deploy your sites to multiple environments running on different domains (QA, Staging, Production, etc.), you need to refresh the snippet in the Cross-site tracking application, and copy it again to the tracked site’s code.
The scripts included in the initial tracking snippet start logging the site’s contacts and their Page visit activities. You can find the resulting data in the Contact management application within the Xperience application. Activities logged from external sites appear with the Cross-site activity flag and the name of the external site.
Continue by extending the scripts according to your tracking requirements. Provide consent functionality and implement logging of additional activities to utilize all the cross site tracking capabilities.
Implement tracking consent
To comply with personal data protection policies that apply to most websites, you need to prepare a consent and allow visitors to give consent agreements.
- Create a tracking consent or adjust an existing one in the Xperience Data protection application.
- See Consent management for more information.
- Use the same tracking consent for both your main Xperience site and all external sites.
- Make sure the consent text describes tracking and personal data usage for both your main site and all external sites.
- Verify that the prepared tracking consent is assigned via
CrossSiteTrackingConsentOptionswhen enabling the cross-site tracking feature for your Xperience application.
This configuration ensures that tracking consent agreements and the corresponding cookie level are shared and automatically set when visitors from an external site go to your main site. Likewise, if a visitor revokes their tracking consent agreement on any of the sites, tracking is disabled everywhere, and the visitor’s selected cookie level is lowered to the site’s default.
Consent management on external sites
After preparing a tracking consent for your sites, extend the scripts in the initial tracking snippet and build an interface to allow visitors to manage their consent agreements.
Consent functionality can be implemented by calling the following functions in your scripts:
Set the default tracking options:
JSkxt('consentdefault', { // Enables or disables logging of contacts and their activities by all Xperience scripts on the external site allow_tracking: false, // Enables or disables collection of contact data via the 'Data input' activity on the external site allow_datainput: false });Update the tracking options – overrides the default tracking options for subsequent scripts called within the request:
JSkxt('updateconsent', { allow_tracking: true, allow_datainput: true });Get the text of consents from Xperience:
JSkxt('consentdata', { codeName: 'TrackingConsentCodeName', languageName: 'en', // Code name of the language in which you want to load the consent texts callback: consentData => { var consentShortText = consentData.shortText; var consentFullText = consentData.fullText; } });Check whether the current contact has given a consent agreement:
JSkxt('consentcontactstatus', { codeName: 'TrackingConsentCodeName', callback: consentStatus => { if (consentStatus.isAgreed) { ... } } });Add a consent agreement for the current contact:
JSkxt('consentagree', { codeName: 'TrackingConsentCodeName', callback: () => { kxt('updateconsent', { allow_tracking: true, allow_datainput: true }); ... } });Revoke a consent agreement for the current contact:
JSkxt('consentrevoke', { codeName: 'TrackingConsentCodeName', callback: () => { kxt('updateconsent', { allow_tracking: false, allow_datainput: false }); ... } });
The following steps outline the general process for setting up tracking consent on external sites:
- Disable all tracking by default.
- Only enable tracking by default if you are certain that you do not need to comply with any data protection regulations.
- Display an interface (e.g. a banner with buttons) that allows visitors to read the consent text, and give or revoke tracking consent agreements.
- Check whether the current contact has given an agreement with the tracking consent.
- The most basic option is to check during the processing of every request, before calling any cross-site tracking logging scripts.
- You can use a third-party consent management tool to collect consent agreements, store them in a more persistent way, and check their status. Such consent tools can be centralized and shared by all your sites.
- If the contact has agreed to be tracked, enable tracking via the
kxt('updateconsent')function. - Handle error states to provide information and a better user experience to visitors in cases where a problem occurs with the consent functionality.
Adjust and expand the process based on your requirements and available tools.
<head>
...
<script type="text/javascript">
(function (w, d, s, e, n) {
w.XperienceTrackerName = n;
w[n] = w[n] || function () {
(w[n].q = w[n].q || []).push(arguments);
};
var scriptElement = d.createElement(s);
var scriptSection = d.getElementsByTagName(s)[0];
scriptElement.async = 1;
scriptElement.src = e.replace(/\/+$/, '') + '/Kentico.Resource/CrossSiteTracking/Logger.js';
scriptSection.parentNode.insertBefore(scriptElement, scriptSection);
w[n]('init', { mainSiteUrl: e, document: d, window: w });
})(window, document, 'script', 'https://domain.com', 'kxt');
// Disables all tracking by default
kxt('consentdefault', {
allow_tracking: false,
allow_datainput: false
});
// Retrieves and displays the consent text
kxt('consentdata', {
codeName: 'TrackingConsentCodeName',
languageName: 'en',
callback: consentData => {
document.getElementById('lblConsentText').innerHTML = consentData.shortText;
}
});
// Enables tracking if the current contact has agreed with the consent
kxt('consentcontactstatus', {
codeName: 'TrackingConsentCodeName',
callback: consentStatus => {
if (consentStatus.isAgreed) {
  kxt('updateconsent', {
      allow_tracking: true,
      allow_datainput: true
  });
}
}
});
// Logs a page visit activity (if tracking is enabled for the current contact)
kxt('pagevisit');
// Click handler that creates a consent agreement for the current contact
var trackingConsentAgree = function trackingConsentAgree() {
kxt('consentagree', {
codeName: 'TrackingConsentCodeName',
callback: () => {
// Enables tracking for any subsequent logging scripts
kxt('updateconsent', {
allow_tracking: true,
allow_datainput: true
});
}
});
}
// Click handler that revokes the tracking consent agreement for the current contact
var trackingConsentRevoke = function trackingConsentRevoke() {
kxt('consentrevoke', {
codeName: 'TrackingConsentCodeName',
callback: () => {
// Disables tracking for any subsequent logging scripts
kxt('updateconsent', {
allow_tracking: false,
allow_datainput: false
});
}
});
}
</script>
</head>
...
<label id="lblConsentText"></label>
<button id="btnConsentAgree" onclick="trackingConsentAgree();">Agree to be tracked</button>
<button id="btnConsentRevoke" onclick="trackingConsentRevoke();">Revoke tracking consent</button>
Log cross-site activities
Cross-site tracking allows you to log the following types of activities on external sites:
Page visit (logging included in the initial tracking snippet)
JS// Logs a page visit activity for the current page kxt('pagevisit'); // Logs a page visit with customized activity properties kxt('pagevisit', { title: 'Custom page title', persona: admin, developer url: 'https://custom.url/', referrer: 'https://custom-referrer.url/' });Click – represents a “click” action performed by the visitor. For example, log this activity within the click handler of a button or CTA link that you wish to track.
JS// Logs a click activity kxt('click', { // Set a unique label for every click target, so you can identify the activities in Xperience // The maximum label length is 250 characters label: 'Home page CTA button' }); // Logs a click with customized activity properties kxt('click', { label: 'Home page CTA button', url: 'https://custom.url/', referrer: 'https://custom-referrer.url/' });Custom activities – you can log any custom activities defined in your main Xperience application. The title of the logged activity in Xperience is the name of the custom activity type with the logged
valueas a suffix.JS// Logs a custom activity kxt('customactivity', { // The 'type' parameter must match the code name of the custom activity type type: 'custom_loan_calculator', value: 'value' }); // Logs a custom activity with customized properties kxt('customactivity', { type: 'custom_loan_calculator', value: 'value', url: 'https://custom.url/', referrer: 'https://custom-referrer.url/' });Data input – see the section below for details.
You can optionally add error state handling to your activity logging calls. This allows you to record data for debugging and auditing purposes, or otherwise adjust your web application when a problem occurs while logging cross-site activities.
Data input
The Data input activity allows you to update the data of contacts using information submitted by visitors via HTML form inputs.
Consent requirements
To update contact data through Data input activities, the consent tracking options for the current request must have the allow_datainput option set to true.
The consent tracking options allow you to separately control consent for general activity logging (allow_tracking) and personal data processing (allow_datainput).
Before collecting contact data through a form, you need to map individual form inputs to Xperience contact fields. The mappings determine where individual form input values are saved for the contact.
The following contact fields are available:
- ContactEmail
- Note: For security reasons, the Data input activity cannot be used to change a contact’s existing email value. If the contact already has an email address stored in Xperience that doesn’t match the new email value, the Data input activity and all related field updates are performed for a different contact. Either an existing contact that matches the submitted email value is used, or a new contact is created.
- ContactFirstName
- ContactMiddleName
- ContactLastName
- ContactBirthday
- ContactMobilePhone (Private phone in the Contact management application)
- ContactBusinessPhone
- ContactCompanyName
- ContactJobTitle
- ContactAddress1
- ContactCity
- ContactZIP
- ContactCountry (accepts 3 letter ISO country codes)
- ContactState (accepts 2 letter state codes, currently only USA state codes (ANSI) are supported)
- ContactNotes
To perform the mapping, call kxt('configurecontactfieldmapping') directly after the tracking snippet initialization script, and provide a dictionary matching the names of form inputs to contact fields. The mappings are shared for all data input activities and forms processed within the given request.
// Maps form inputs to contact fields
kxt('configurecontactfieldmapping', {
    FirstName: 'ContactFirstName',
    LastName: 'ContactLastName',
    EmailAddress: 'ContactEmail'
});

...

<form>
    <input type="text" name="FirstName" />
    <input type="text" name="LastName" />
    <input type="text" name="EmailAddress" />
    ...
</form>
Once your field mappings are configured, log the activity by calling kxt('datainput'), for example in the submit handler of a form:
// Logs a Data input activity
kxt('datainput', {
    // Specify the HTML DOM object of the form element from which data is collected
    formElement: document.getElementById('formElement'),
    // Set a unique label, so you can identify the activities in Xperience
    // The maximum label length is 250 characters
    label: 'Personal data form'
});

// Logs a Data input with customized activity properties
kxt('datainput', {
    formElement: document.getElementById('formElement'),
    label: 'Personal data form',
    url: 'https://custom.url/',
    referrer: 'https://custom-referrer.url/'
});

// Logs a Data input activity with customized values for contact fields
// If required, you can post-process the submitted form values or manually specify your own values
// Specify contact fields and values using the 'fields' parameter, instead of setting the 'formElement'
// This usage does NOT require or use the configured mapping of form inputs to contact fields
kxt('datainput', {
    fields: [
        { fieldName: 'ContactFirstName', value: 'John' },
        { fieldName: 'ContactLastName', value: 'Smith' },
        { fieldName: 'ContactCountry', value: 'USA' },
        { fieldName: 'ContactNotes', value: 'This is a VIP customer.' }
    ],
    label: 'Personal data form'
});
You can view the collected contact data in the Xperience Contact management application and use it to build contact group conditions.
<head>
    ...
    <script type="text/javascript">
        (function (w, d, s, e, n) {
            w.XperienceTrackerName = n;
            w[n] = w[n] || function () {
                (w[n].q = w[n].q || []).push(arguments);
            };
            var scriptElement = d.createElement(s);
            var scriptSection = d.getElementsByTagName(s)[0];
            scriptElement.async = 1;
            scriptElement.src = e.replace(/\/+$/, '') + '/Kentico.Resource/CrossSiteTracking/Logger.js';
            scriptSection.parentNode.insertBefore(scriptElement, scriptSection);
            w[n]('init', { mainSiteUrl: e, document: d, window: w });
        })(window, document, 'script', 'https://domain.com', 'kxt');

        // Maps form inputs to contact fields
        kxt('configurecontactfieldmapping', {
            FirstName: 'ContactFirstName',
            LastName: 'ContactLastName',
            EmailAddress: 'ContactEmail'
        });

        ...

        // Form submit handler that logs the Data input activity and updates the contact's fields
        var handleFormSubmit = function handleFormSubmit(event) {
            kxt('datainput', {
                formElement: document.getElementById('formElement'),
                label: 'Personal data form'
            });
        }
   </script>
</head>

...

<form id="formElement" method="post" onsubmit="handleFormSubmit()" >
    <input type="text" name="FirstName" />
    <input type="text" name="LastName" />
    <input type="text" name="EmailAddress" />
    <input type="submit" name="submit" value="Submit" />
</form>
Handle error states
Most of the kxt cross-site tracking functions used for consent management and activity logging provide an optional onerror callback.
By handling onerror callbacks, you can display information and offer a better user experience to visitors in cases where an error or other problem prevents the cross-site tracking functionality from working. For example, a common scenario is when the visitor’s browser blocks third-party cookies.
The onerror callbacks have an error argument holding the following data:
type– one of the following values:error_bad_response– when the cross-site tracking request returns an unsuccessful response (HTTP status outside the 200-299 range).error_cookies_blocked– when the visitor’s browser blocks cookies required for cross-site tracking.error_other– when another unexpected error occurs during the processing of the cross-site tracking request.
detail– contains the full HTTP response object that was returned with an error state (for Bad response errors) or text describing the error reason (for other errors).
When the onerror callback is triggered, the function does not execute its standard callback.
// Enables tracking if the current contact has agreed with the consent
kxt('consentcontactstatus', {
    codeName: 'TrackingConsentCodeName',
    callback: consentStatus => {
        if (consentStatus.isAgreed) {
            kxt('updateconsent', {
                allow_tracking: true,
                allow_datainput: true
            });
        }
    },
    // Displays a warning message or logs a console error if the consent status cannot be checked
    'onerror': (error) => {
        if (error.type === 'error_bad_response') {
            error.detail.text().then(text => console.log('Bad response:', error.detail, 'response body:', text));
        }
        if (error.type === 'error_cookies_blocked') {
            document.getElementById('lblConsentWarning').innerHTML = 'Your browser currently blocks cookies and you cannot give tracking consent.';
        }
        if (error.type === 'error_other') {
            console.log('Unexpected error:', error.detail);
        }
    }
});

// Click handler that creates a consent agreement for the current contact
var trackingConsentAgree = function trackingConsentAgree() {
    kxt('consentagree', {
        codeName: 'TrackingConsentCodeName',
        callback: () => {
            // Enables tracking for any subsequent logging scripts
            kxt('updateconsent', {
                allow_tracking: true,
                allow_datainput: true
            });
        },
        // Displays a warning message and/or logs a console error if the consent agreement cannot be created
        'onerror': (error) => {
            if (error.type === 'error_bad_response') {
                error.detail.text().then(text => console.log('Bad response:', error.detail, 'response body:', text));
                document.getElementById('lblConsentWarning').innerHTML = 'An error occurred while processing your tracking consent agreement.';
            }
            if (error.type === 'error_cookies_blocked') {
                document.getElementById('lblConsentWarning').innerHTML = 'Your browser currently blocks cookies and you cannot give tracking consent.';
            }
            if (error.type === 'error_other') {
                console.log('Unexpected error:', error.detail);
                document.getElementById('lblConsentWarning').innerHTML = 'An error occurred while processing your tracking consent agreement.';
            }
        }
    });
}
Avoid tracking script conflicts
If you encounter script conflicts with the kxt cross-site tracking function (for example when using custom or third-party JavaScript libraries), you can rename the function within the parameters of the tracking snippet initialization script:
(function (w, d, s, e, n) {
    w.XperienceTrackerName = n;
    w[n] = w[n] || function () {
        (w[n].q = w[n].q || []).push(arguments);
    };
    var scriptElement = d.createElement(s);
    var scriptSection = d.getElementsByTagName(s)[0];
    scriptElement.async = 1;
    scriptElement.src = e.replace(/\/+$/, '') + '/Kentico.Resource/CrossSiteTracking/Logger.js';
    scriptSection.parentNode.insertBefore(scriptElement, scriptSection);
    w[n]('init', { mainSiteUrl: e, document: d, window: w });
})(window, document, 'script', 'https://domain.com', 'customtracker'); // Changes the tracking function name to 'customtracker'

// Disables all tracking by default
customtracker('consentdefault', {
    allow_tracking: false,
    allow_datainput: false
});

...