
Administration - External authentication
The Xperience by Kentico administration interface supports authentication via external identity and authentication providers. Identity providers are used to centralize user and role management across multiple services and to provide a unified sign-in experience for particular sets of users – often referred to as single sign-on (SSO).
You can use any identity provider that best fits your needs, be it Microsoft Entra ID (formerly known as Azure Active Directory), Auth0, Okta, Duo or any other platform that is OAuth/OIDC-compliant.
This page provides detailed instructions for the set up of Entra ID, Auth0 and Okta, though other providers can be set up in a similar manner. Refer to the documentation of a particular provider to learn about the specific details for setting up the given integration.
Only one external authentication provider can be enabled at a time – combining multiple providers is not supported.
Microsoft Entra ID
Entra ID is an identity service that provides single sign-on, multifactor authentication, and conditional access. You can configure Xperience to use Entra ID with the OpenID Connect (OIDC) protocol for SSO purposes.
The following instructions show how to set up Entra ID authentication using the authorization code token grant flow.
First, register your application in your Entra ID tenant:
- Open your Entra ID tenant in Microsoft Entra.
- Switch to Applications → App registrations and register your Xperience application.
- Add a sign-in redirect URI that specifies where Entra ID redirects users after successful authentication.
- This is the URL that Entra ID sends information to when a user signs in. This route is called a callback route or redirect URI. The callback route isn’t seen by the user, and it’s not the user’s final destination. It’s just one step in the authentication redirect flow. The redirect URI must be a free route in the application. For example:
https://<domain>/admin-oidc
- This is the URL that Entra ID sends information to when a user signs in. This route is called a callback route or redirect URI. The callback route isn’t seen by the user, and it’s not the user’s final destination. It’s just one step in the authentication redirect flow. The redirect URI must be a free route in the application. For example:
- Add credentials (certificate or secret) for your application:
- Navigate to your app registration in Entra ID and switch to the Certificates & secrets tab.
- Choose one of the following:
- Upload a certificate (Microsoft recommends certificates for production applications). See Using certificates for more information.
- Add a client secret.
- Add claims to ensure the token obtained by the Xperience application contains values that can be mapped to user objects representing the Entra ID user in Xperience:
- Switch to the Token configuration tab.
- Select Add optional claim.
- Choose the ID token type and select the following fields:
- email – mapped to the user’s Email
- family_name – mapped to the user’s Last name
- given_name – mapped to the user’s First name
- preferred_username – mapped to the user’s Username
- Select Add. For more information about claims and their mapping to Xperience objects, see Claims mapping and transformations.
The application is now registered and configured in Entra ID. Now, you need to connect your Xperience application to the Entra ID application registration:
Install the Microsoft.Identity.Web NuGet package to your project.
Edit the Program.cs application configuration class. The following configuration authenticates with a certificate, which Microsoft recommends for production applications. To use a client secret instead, see the note below.
C#Entra ID configurationusing System.Security.Claims; using Microsoft.AspNetCore.Authentication.Cookies; using Microsoft.AspNetCore.Authentication.OpenIdConnect; using Microsoft.AspNetCore.Builder; using Microsoft.AspNetCore.Http; using Microsoft.Identity.Web; using Kentico.Membership; ... var builder = WebApplication.CreateBuilder(args); ... builder.Services.AddAdminExternalAuthenticationProvider( builder => builder.AddMicrosoftIdentityWebApp(options => { // Your Entra ID tenant options.Domain = ""; // Your tenant ID - found on the Overview tab of your application registration in Entra ID options.TenantId = "ffffffff-ffff-ffff-fff-ffffffffffff"; // Your application ID - found on the Overview tab of your application registration in Entra ID options.ClientId = "ffffffff-ffff-ffff-fff-ffffffffffff"; // The authorization server to use (login.microsoftonline.com unless using a custom one) options.Instance = "https://login.microsoftonline.com/"; // The callback path must match the redirect URI specified when configuring the application in Entra ID options.CallbackPath = new PathString("/admin-oidc"); // Sets the response type for the Authorization Code Flow options.ResponseType = OpenIdConnectResponseType.Code; // Add a certificate to prove your application's identity options.ClientCertificates = new List<CertificateDescription> { // Replace the examples of certificate descriptions with your own // Certificate from Azure Key Vault CertificateDescription.FromKeyVault("https://keyvault-name.vault.azure.net/", "certificate-name"), // Certificate from a local file CertificateDescription.FromPath("path_to_certificate.pfx","certificate_password") }; }) // Required for certificate credentials .EnableTokenAcquisitionToCallDownstreamApi() .AddInMemoryTokenCaches(), options => { // Sets cookies as the sign in scheme options.SignInScheme = CookieAuthenticationDefaults.AuthenticationScheme; // Sets OIDC as the authentication method options.AuthenticateScheme = OpenIdConnectDefaults.AuthenticationScheme; } );The
EnableTokenAcquisitionToCallDownstreamApiandAddInMemoryTokenCachescalls are required when authenticating with certificate credentials. Without them, sign-in fails with the error AADSTS7000218. For more information about this configuration, see Microsoft’s web app that calls web APIs documentation.Authenticating with a client secret
A client secret is simpler to set up but less secure than a certificate. The secret is shared and can be leaked, prefer a certificate for production deployments. If you authenticate with a client secret instead, set
options.ClientSecretand omit theEnableTokenAcquisitionToCallDownstreamApiandAddInMemoryTokenCachescalls, which the client secret flow does not require:C#Client secret credentialsbuilder.Services.AddAdminExternalAuthenticationProvider( builder => builder.AddMicrosoftIdentityWebApp(options => { // ... // Secret ID generated for a client secret options.ClientSecret = "ffffffff-ffff-ffff-fff-ffffffffffff"; }), // ... );
The Xperience application is now set up to use Entra ID. If you run the application and navigate to the admin UI sign-in page, the external provider is now the only available sign-in method.

Selecting Sign in redirects users to the Entra ID authorization server, where they can authenticate using their existing credentials. If you wish to maintain the default forms authentication in parallel with external authentication, see Sign-in page behavior.
When a user signs in for the first time, a corresponding user object is created in the system, and the application maps claims from the received token to the corresponding properties of the user object (First name, Last name, Username, and Email). The system is, by default, configured to only run this mapping once when a user first signs in and the object that represents them is created. To change the synchronization frequency for this data, see User data synchronization frequency.
Additionally, newly created users don’t have any assigned roles and therefore lack the permissions to access and work with applications in the admin UI. To manage role assignments for Entra ID users, you have the following options:
- Synchronize role assignments from Entra ID to Xperience
- Manually assign roles to Entra ID users (for example, using existing accounts or via event handlers)
Synchronize roles
Xperience supports the synchronization of role assignments from Entra ID. However, only assignments to roles that already exist in the system are synchronized. The system doesn’t automatically create new roles based on data received from Entra ID.
To enable the synchronization of role assignments from Entra ID:
- Configure user-role assignments for the application in Entra ID.
- Create the desired roles in Xperience and define their permissions.
The role Code name must match the Value parameter (what is sent as part of the “roles” claim) specified for the corresponding Entra ID App role. For example, for an App role with the following properties:
- Display name: Content editors
- Allowed member types: Users/Groups
- Value: contenteditors
- Description: Members of the content editing team for our Xperience projects.the Xperience application must contain a role with the contenteditors code name. Otherwise, the role assignment will not synchronize.
See Role management to learn how to create roles and assign permissions in the system.
- Configure user data synchronization frequency to either
FirstLoginorAlways, depending on your requirements, to ensure role assignments are propagated to Xperience. See User data synchronization frequency.
When a user signs in, the system maps their Entra ID role assignments to roles defined in Xperience.
Grant the Administrator role via Entra ID
The Administrator role is a default system role that cannot be modified or deleted. The system requires at least one user with this role assigned to exist in the system at all times. If you need to ensure the role can be granted to users via Entra ID (for example, if you wish to discontinue the default administrator account):
- Create a new Entra ID App role with the following properties:
- Display name: Xperience administrator
- Allowed member types: Users/Groups
- Value: administrator
- Description: Role granting the highest privilege for the Xperience administration interface
- Add the desired users to the role.
- If you are making this change after Entra ID has already been set up (and users may, as a result, already have accounts in Xperience), make sure to change the user data synchronization frequency to
Alwaysto ensure the role is granted to users the next time they sign in.
- If you are making this change after Entra ID has already been set up (and users may, as a result, already have accounts in Xperience), make sure to change the user data synchronization frequency to
You can now grant the administrator role via Entra ID.
Security considerations
See General security considerations for an overview of recommended security practices related to external authentication provider configuration and management.
For security practices related to Entra ID specifically, refer to Identity management best practices and other Microsoft sources.
Auth0
Auth0 is an authentication and authorization platform that provides identity management solutions for applications. It allows developers to authenticate, authorize, and secure access for their applications and APIs by implementing various authentication methods such as social login, single sign-on, multi-factor authentication, and more. Auth0 also provides features for user management, token generation, and security.
You can configure Xperience to use Auth0 with the OpenID Connect (OIDC) protocol for SSO purposes.
First, create a new application for your Xperience project in Auth0:
- Open your Auth0 management dashboard.
- Switch to Applications and register your Xperience application with the Regular web application application type.
- Open the application configuration and add a callback URL that specifies where Auth0 redirects users after successful authentication.
- This is the URL that Auth0 sends information to when a user signs in. This route is called a callback route or redirect URI. The callback route isn’t seen by the user, and it’s not the user’s final destination. It’s just one step in the authentication redirect flow. The redirect URI must be a free route in the application. For example:
https://<domain>/admin-oidc
- This is the URL that Auth0 sends information to when a user signs in. This route is called a callback route or redirect URI. The callback route isn’t seen by the user, and it’s not the user’s final destination. It’s just one step in the authentication redirect flow. The redirect URI must be a free route in the application. For example:
The application is registered and configured in Auth0. Now, you need to connect your Xperience application to the Auth0 application registration:
Install the Microsoft.Identity.Web NuGet package to your project.
Edit the Program.cs application configuration class and add the following:
C#Auth0 configurationusing System.Security.Claims; using Microsoft.AspNetCore.Authentication.Cookies; using Microsoft.AspNetCore.Authentication.OpenIdConnect; using Microsoft.AspNetCore.Builder; using Microsoft.AspNetCore.Http; using Microsoft.Identity.Web; using Kentico.Membership; ... var builder = WebApplication.CreateBuilder(args); ... builder.Services.AddAdminExternalAuthenticationProvider(authBuilder => authBuilder.AddOpenIdConnect(options => { // Authorization server URL options.Authority = "https://<authority>.auth0.com"; // The client identifier assigned to your Auth0 application options.ClientId = "<client identifier>"; // The secret generated for your Auth0 application options.ClientSecret = "<client secret>"; options.ClaimsIssuer = "Auth0"; // The callback path must match the callback URL specified when configuring the application in Auth0 options.CallbackPath = new PathString("/admin-oidc"); // Requests email claims to be included in ID tokens received by the application // Required to synchronize user email addresses options.Scope.Add("email"); options.ResponseType = OpenIdConnectResponseType.CodeIdToken; options.SignInScheme = AdminIdentityConstants.EXTERNAL_SCHEME; }), options => { // Sets the authentication scheme to OIDC options.AuthenticateScheme = OpenIdConnectDefaults.AuthenticationScheme; /* When creating the user account in Xperience, the system is by default configured to read the UserName value from the "preferred_username" claim. However, Auth0 does not by default send the "preferred_username" claim as part of the user information. This configuration uses the value stored under "nickname" as the username instead. This is only for illustration and you can use any other claim you prefer, but note that all users must have the value populated (the field is required for user creation). For more information, see the 'Claims mapping and transformations' section on this page. */ options.UserNameClaimName = "nickname"; } );Storing application secrets
We do not recommend storing application secrets (
ClientSecretproperty) directly in code or application configuration files (e.g., appsettings.json). See Securely store application secrets for recommendations.
The Xperience application is now set up. If you run the application and navigate to the admin UI sign-in page, the external provider is now the only available sign-in method.
Selecting Sign in redirects users to the Auth0 authorization server, where they can authenticate using their existing credentials. If you wish to maintain the default forms authentication in parallel with external authentication, see Sign-in page behavior.
When a user signs in for the first time, a corresponding user object is created in the system and the application maps claims from the received ID token to the corresponding properties of the user object (First name, Last name, Username, and Email). By default, the system is configured to only run this mapping once when the user first signs in and the object that represents them is created. To change the synchronization frequency for this data, see User data synchronization frequency.
Additionally, newly created users don’t have assigned roles and therefore lack the permissions to access and work with applications in the admin UI. To manage role assignments for Auth0 users, you have the following options:
- Synchronize role assignments from Auth0 to Xperience
- Manually assign roles to external users (for example, using existing accounts or via event handlers)
Synchronize roles
Xperience supports the synchronization of role assignments from Auth0. However, only assignments to roles that already exist in the system are synchronized. The system doesn’t automatically create new roles based on data received from the external provider.
To enable the synchronization of role assignments from Auth0:
Configure user-role assignments for the application in Auth0.
Create the roles to map onto in Xperience and define their permissions.
The role Code name must match the Name of the corresponding role in Auth0. For example, for an Auth0 role with the following properties:
- Name: Acme.ContentEditors
- Description: Members of the content editing team for our Xperience projects.the Xperience application must contain a role with the Acme.ContentEditors code name. Otherwise, the role assignment will not be synchronized.
See Role management to learn how to create roles and assign permissions in the system.
Configure user data synchronization frequency to either
FirstLoginorAlways, depending on your requirements, to ensure role assignments are propagated to Xperience. See User data synchronization frequency.Add the
groupsscope to your Auth0 configuration:C#authBuilder.AddOpenIdConnect("OpenIdConnect", options => { // Authorization server URL options.Authority = "https://<auhority>.auth0.com"; options.ClientId = ""; options.ClientSecret = ""; options.ClaimsIssuer = "Auth0"; options.CallbackPath = new PathString("/admin-oidc"); // Requests email claims to be included in ID tokens received by the application // Required to synchronize user email addresses options.Scope.Add("email"); // Requests role claims to be included in ID tokens received by the application options.Scope.Add("groups"); options.ResponseType = OpenIdConnectResponseType.CodeIdToken; options.SignInScheme = AdminIdentityConstants.EXTERNAL_SCHEME; }),
Now, when a user signs in, the system maps their Auth0 roles assignments to roles defined in Xperience.
Grant the Administrator role via Auth0
The Administrator role is a default system role that cannot be modified or deleted. The system requires at least one user with this role assigned to exist in the system at all times. If you need to ensure the role can be granted to users via Auth0 (for example, if you wish to discontinue the default administrator account):
- Create a new Auth0 role with the following properties:
- Name: Administrator
- Description: Role granting the highest privilege for the Xperience administration interface
- Add the desired users to the role.
- If you are making this change after Auth0 has already been set up (and users may, as a result, already have accounts in Xperience), make sure to change the user data synchronization frequency to
Alwaysto ensure the role is granted to users the next time they sign in.
- If you are making this change after Auth0 has already been set up (and users may, as a result, already have accounts in Xperience), make sure to change the user data synchronization frequency to
You can now grant the administrator role via Auth0.
Security considerations
See General security considerations for an overview of recommended security practices related to external authentication provider configuration and management.
For security practices related to Auth0 specifically, refer to the official provider documentation, such as General usage and operations best practices.
Okta
Okta is a cloud-based identity and access management platform that provides a secure way for organizations to manage and authenticate users for their applications and services. It offers a range of features, including single sign-on, multi-factor authentication, user provisioning, API access management, and more.
You can configure Xperience to use Okta with the OpenID Connect (OIDC) protocol for SSO purposes. First, register your application in Okta:
- Open the Okta dashboard.
- Add an app integration with the following configuration:
- Sign-in method: OpenID Connect (OIDC)
- Application type: Web Application
- Grant type – select the following:
- Authorization code
- Implicit (hybrid)
- Add a sign-in redirect URI that specifies where Okta redirects users after successful authentication.
- This is the URL that Okta sends information to when a user signs in. This route is called a callback route or redirect URI. The callback route isn’t seen by the user, and it’s not the user’s final destination. It’s just one step in the authentication redirect flow. The redirect URI must be a free route in the application. For example:
https://<domain>/admin-oidc
- This is the URL that Okta sends information to when a user signs in. This route is called a callback route or redirect URI. The callback route isn’t seen by the user, and it’s not the user’s final destination. It’s just one step in the authentication redirect flow. The redirect URI must be a free route in the application. For example:
The application is registered and configured in Okta. Now, you need to connect your Xperience application to the Okta application registration:
Install the Microsoft.Identity.Web NuGet package to your project.
Edit the Program.cs application configuration class and add the following:
C#Okta configurationusing System.Security.Claims; using Microsoft.AspNetCore.Authentication.Cookies; using Microsoft.AspNetCore.Authentication.OpenIdConnect; using Microsoft.AspNetCore.Builder; using Microsoft.AspNetCore.Http; using Microsoft.Identity.Web; using Kentico.Membership; ... var builder = WebApplication.CreateBuilder(args); ... builder.Services.AddAdminExternalAuthenticationProvider(authBuilder => authBuilder.AddOpenIdConnect(options => { options.Authority = "https://<authority>.okta.com"; // The client identifier assigned to your Auth0 application options.ClientId = "<client identifier>"; // The secret generated for your Auth0 application options.ClientSecret = "<client secret>"; options.ClaimsIssuer = "Okta"; options.CallbackPath = new PathString("/admin-oidc"); // Requests email claims to be included in ID tokens received by the application // Required to synchronize user email addresses options.Scope.Add("email"); options.ResponseType = OpenIdConnectResponseType.CodeIdToken; options.SignInScheme = AdminIdentityConstants.EXTERNAL_SCHEME; }), options => { options.AuthenticateScheme = OpenIdConnectDefaults.AuthenticationScheme; } );Storing application secrets
We do not recommend storing application secrets (
ClientSecretproperty) directly in code or application configuration files (e.g., appsettings.json). See Securely store application secrets for recommendations.
The Xperience application is now set up to use Okta. If you run the application and navigate to the admin UI sign-in page, the external provider is now the only available sign-in method.
Selecting Sign in redirects users to the Okta authorization server, where they can authenticate using their existing credentials. If you wish to maintain the default forms authentication in parallel with external authentication, see Sign-in page behavior.
When a user signs in for the first time, a corresponding user object is created in the system, and the application maps claims from the received ID token to the corresponding properties of the user object (First name, Last name, Username, and Email). The system is, by default, configured to only run this mapping once when the user first signs in and the object that represents them is created. To change the synchronization frequency for this data, see User data synchronization frequency.
Additionally, newly created users don’t have assigned roles and therefore lack the permissions to access and work with applications in the admin UI. To manage role assignments for Okta users, you have the following options:
- Synchronize role assignments from Okta to Xperience
- Manually assign roles to Okta users (for example, using existing accounts or via event handlers)
Synchronize roles
Xperience supports the synchronization of role assignments from Okta. However, only assignments to roles that already exist in the system are synchronized. The system doesn’t automatically create new roles based on data received from Okta.
To enable the synchronization of role assignments from Okta, first prepare your Xperience instance:
Create the roles to map onto in Xperience and define their permissions.
- See Role management to learn how to create roles and assign permissions in the system.
- Note the code name of each created role. You will need to use it in Okta.
Map role claims by adding the following line to the external provider registration in Program.cs:
options.RoleClaimName = "XperienceAdminRoles"Configure user data synchronization frequency to either
FirstLoginorAlways, to ensure role assignments are propagated to Xperience. See User data synchronization frequency for details.C#Map role claims and set synchronization frequencybuilder.Services.AddAdminExternalAuthenticationProvider(authBuilder => authBuilder.AddOpenIdConnect(options => { // Okta configuration }), // Configures Xperience behavior with relation to the external authentication provider options => { // Specifies that role claims are available under 'XperienceAdminRoles' options.RoleClaimName = "XperienceAdminRoles"; // Xperience synchronizes the user account with data from the external provider every time a user signs in options.UserSynchronizationFrequency = UserSynchronizationFrequency.Always; } );
Next, switch to Okta and prepare the Xperience application registration for role synchronization:
- Add a a new custom attribute to your Xperience application’s user profile. You will later populate this attribute with the collection of roles that you want users assigned to a particular Okta group to have in Xperience:
- From the Okta dashboard, go to Directory → Profile editor and edit the user profile belonging to your Xperience application registration.
- Add a user profile attribute with the following properties:
- Data type: string array
- Display name: XperienceAdminRoles – the display name must match the claim name mapped to
RoleClaimNamein Program.cs - Mutability: READ_WRITE
- Group Priority: Combine values across groups
- Add users to groups in Okta.
- Open the Xperience application registration in Okta, switch to the Assignments tab, and under Filters select Groups.
- Edit (blue pencil icon) each group and add the code names of roles you want members of the group to have in Xperience using the custom XperienceAdminRoles attribute.
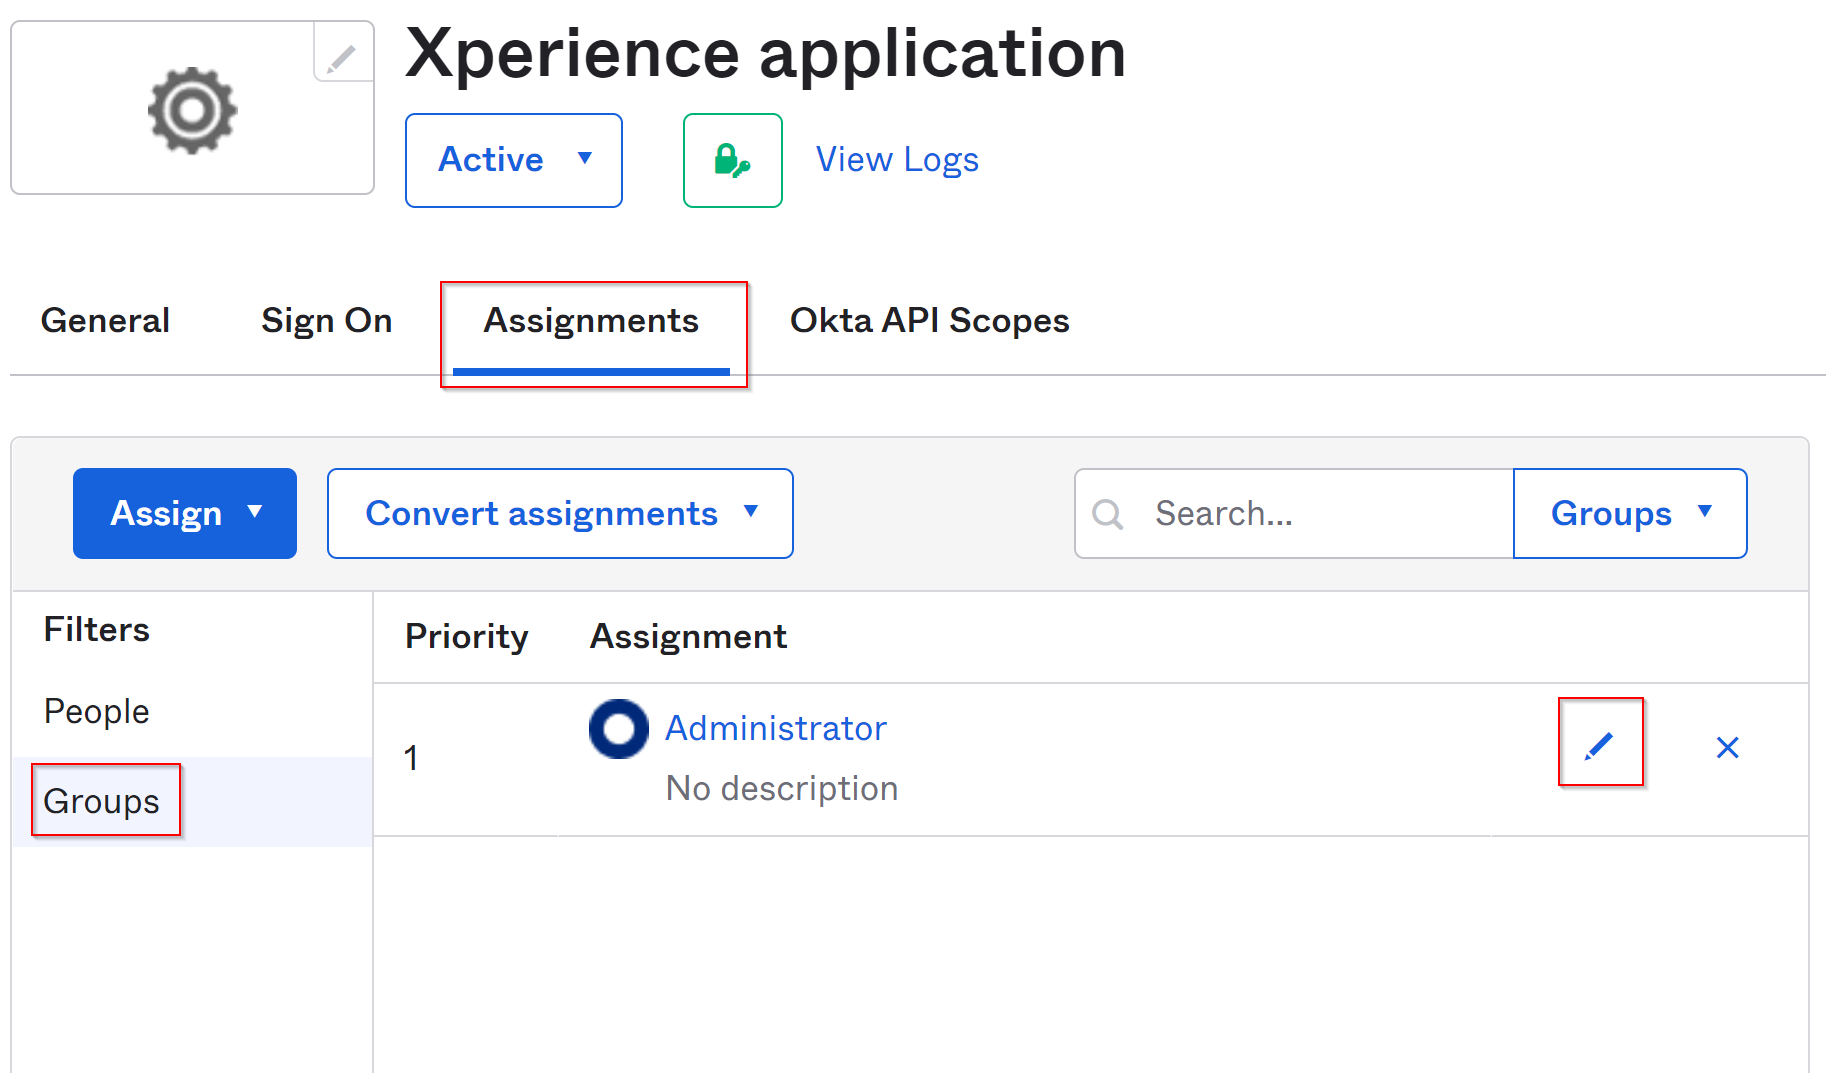
- When users sign-in via Okta, Xperience assigns the set of roles specified for their group. See the following diagram for an example scenario:
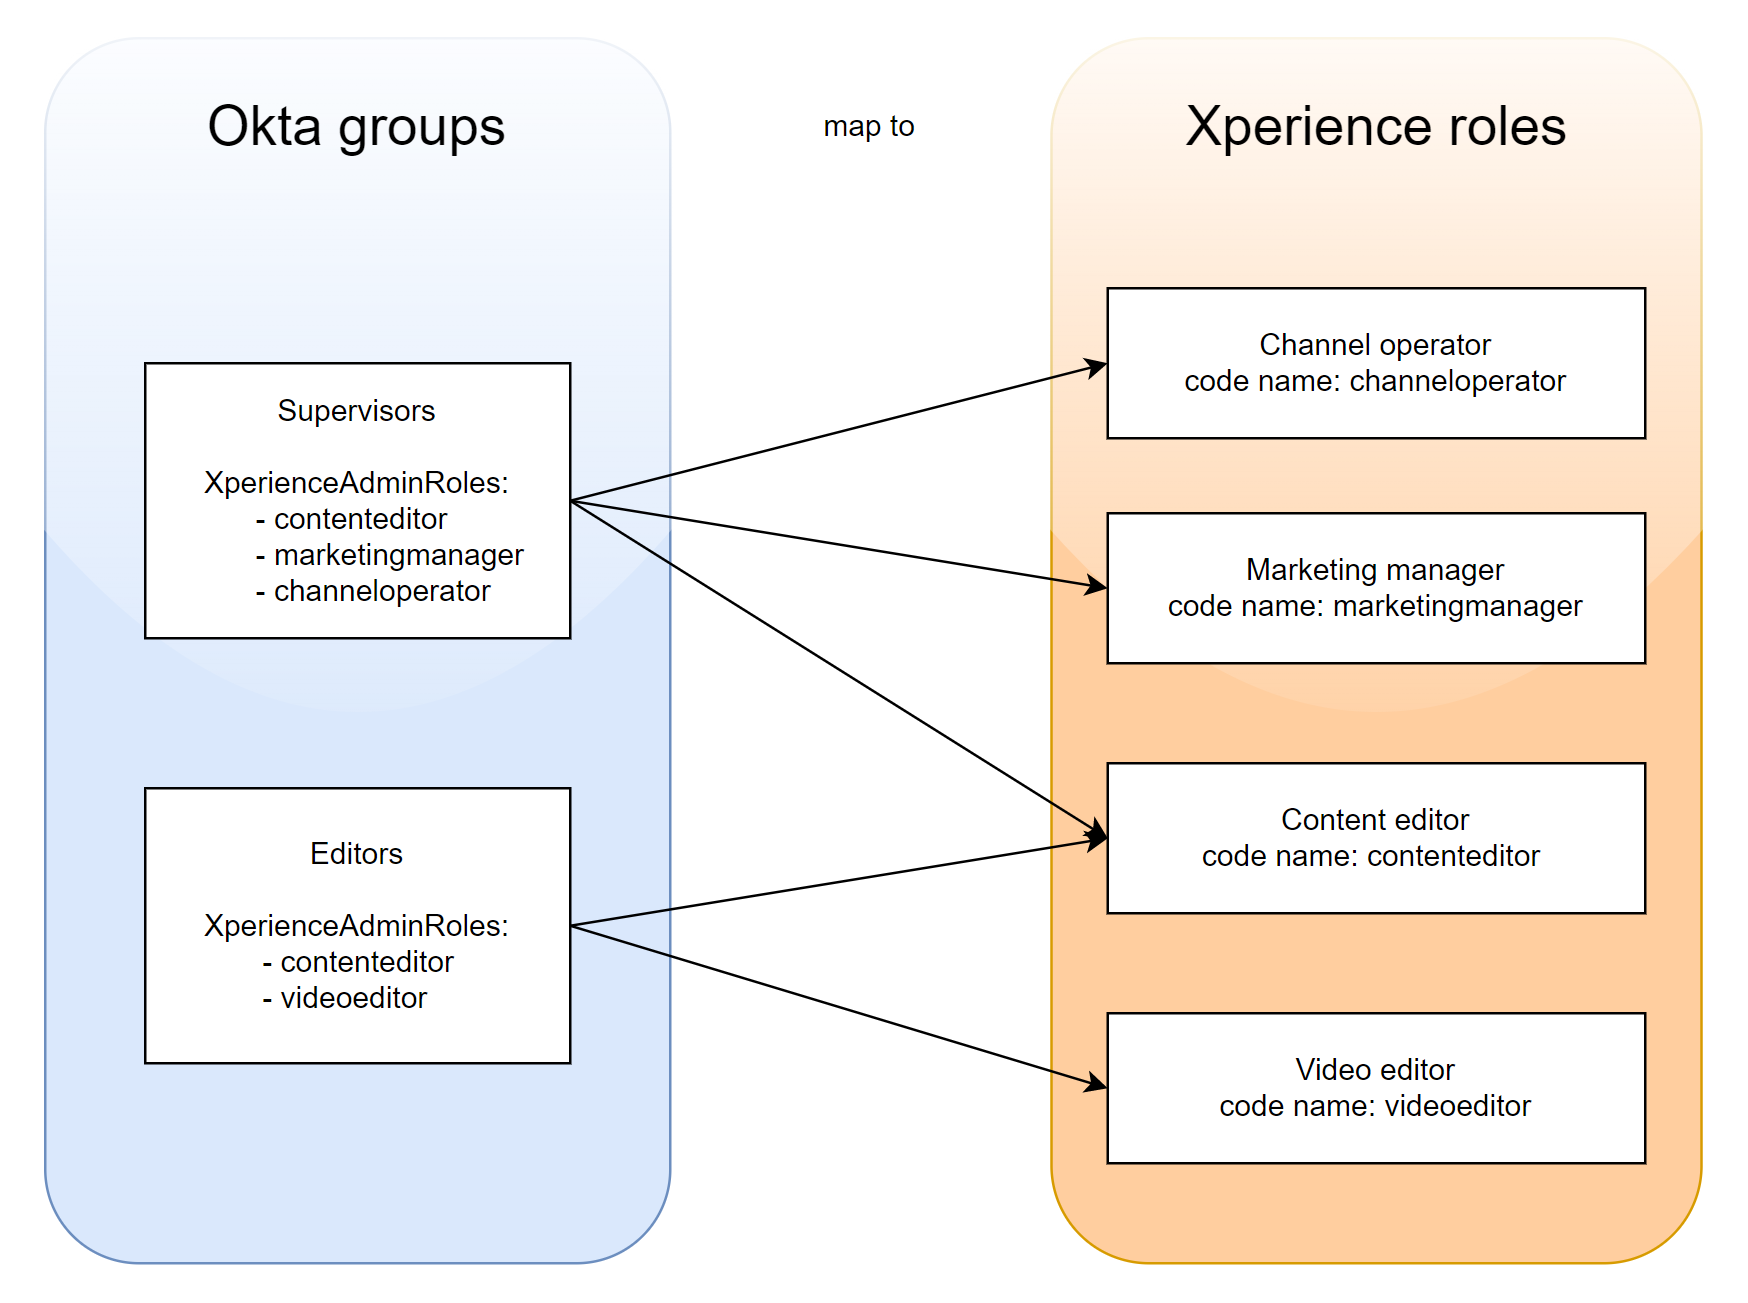
- Edit (blue pencil icon) each group and add the code names of roles you want members of the group to have in Xperience using the custom XperienceAdminRoles attribute.
When users sign in, the system maps their Okta roles assignments to roles defined in Xperience.
Grant the Administrator role via Okta
The Administrator role is a default system role that cannot be modified or deleted. The system requires at least one user with this role assigned to exist in the system at all times. If you need to ensure the role can be granted to users via Okta (for example, if you wish to discontinue the default administrator account):
- Open the Xperience application registration in Okta, switch to the Assignments tab, and under Filters select Groups.
- Edit (blue pencil icon) a group and add Administrator to the XperienceAdminRoles attribute.
- If you are making this change after Okta has already been set up (and users may, as a result, already have accounts in Xperience), make sure to have user data synchronization frequency set to
Alwaysto ensure the role is granted the next time users sign in.
- If you are making this change after Okta has already been set up (and users may, as a result, already have accounts in Xperience), make sure to have user data synchronization frequency set to
All users from the modified group now have administrator privileges when they sign in.
Security considerations
See General security considerations for an overview of recommended security practices related to external authentication provider configuration and management.
User data synchronization frequency
The system allows you to configure the rate at which user information is synchronized with the external authentication provider. By default, user data is only taken when a user first signs in and their user account is created. However, this behavior can be changed via the UserSynchronizationFrequency option configurable within the AddAdminExternalAuthenticationProvider method:
builder.Services.AddAdminExternalAuthenticationProvider(
    builder => builder.AddMicrosoftIdentityWebApp(options =>
    {
        // External authentication provider configuration (Entra ID in this example)
    }),
    // Configures Xperience behavior with relation to the external authentication provider
    options =>
    {
        // Xperience synchronizes the user account with data from the external provider every time a user signs in
        options.UserSynchronizationFrequency = UserSynchronizationFrequency.Always;
    }
);
The following synchronization options are available:
|
Frequency |
Description |
|
|
Default behavior. Uses received user data to create an account for users signing in for the first time and never updates the information again. Does not synchronize role assignments. |
|
|
Uses received user data to create an account for users signing in for the first time and never updates the information again. Synchronizes role assignments once during account creation. |
|
|
Uses received user data to create an account for users signing in for the first time. Synchronizes user data and role assignments every time a user signs in. |
Xperience synchronizes the following user data from the external provider:
- First name
- Last name
- Username
- Roles – only when synchronization is set to
FirstLoginorAlways.
What data is synchronized to each property can be changed via AdminExternalAuthenticationProviderOptions. See Claims mapping and transformations.
User account invalidation or lockout
If you wish to prevent a user from accessing the Xperience admin UI or completely delete their account:
- In your identity provider, remove the user from the role or group assigned to the Xperience application registration (or restrict their account in some other way as permitted by the provider)
- In the Xperience admin UI, open the Users application and Disable (via → Disable) or Delete () the user’s account.
The user is now prevented from accessing the admin UI.
Claims mapping and transformations
Claims are key-value pairs that contain verified information about a user. In the OIDC authentication flow, claims are sent by the identity provider within ID Tokens. Generally, these tokens are processed by the application and the information mapped to some internal representation of a user. In Xperience, this is the UserInfo object.
To facilitate working with claims, use the ClaimTypes class that provides the most common OIDC-compliant claim key identifiers in an easily accessible format. For example, ClaimTypes.Email resolves to the name of a key under which the user’s email should be stored in the ID token received by the application.
By default, Xperience uses the following mapping for the admin UI user object, defined via AdminExternalAuthenticationProviderOptions:
|
UserInfo property |
Options property |
Claim key |
Description |
|
Username |
UserNameClaimName |
“preferred_username” |
The username is used to identify external user accounts and must be unique within the system. If this claim is not present in the information returned from the identity provider, the system cannot create the corresponding user account and logs an exception. |
|
FirstName |
FirstNameClaimName |
ClaimTypes.GivenName |
The first (given) name. If this claim is not present in the information returned from the identity provider, the property remains empty. |
|
LastName |
LastNameClaimName |
ClaimTypes.Surname |
The family name. If this claim is not present in the information returned from the identity provider, the property remains empty. |
|
|
EmailClaimName |
ClaimTypes.Email |
The user’s email. If this claim is not present in the information returned from the identity provider, the property remains empty. |
Role claims are mapped to the UserRoleInfo binding object type.
|
Options property |
Claim key |
Description |
|
RoleClaimName |
ClaimTypes.Roles |
Contains roles assigned to the user via the external provider. The values must match the code names of roles already present in the target Xperience instance. |
If the external provider does not send a property under one these known claims, or you want to map a custom claim to one of the properties, you can modify the default mapping via AdminExternalAuthenticationProviderOptions within the identity provider registration:
builder.Services.AddAdminExternalAuthenticationProvider(
    builder => builder.AddMicrosoftIdentityWebApp(options =>
    {
        // External authentication provider configuration (Entra ID in this example)
    }),
    // Configures Xperience behavior with relation to the external authentication provider
    options =>
    {
        // Maps a different claim to the user name
        options.UserNameClaimName = "my_custom_claim";
    }
);
Mapping claims to other default or custom properties of the user object is not supported.
Additionally, you may wish to implement claims transformations to leverage existing claims. Claims transformation is the process of modifying or adding to the claims within an identity token, before it is passed to the application for processing.
This process can be used to add additional information to a user’s identity token, to change the format of the claims, or to filter out unnecessary claims. For example, you can modify role assignments from your implemented identity provider to have them match roles already present in Xperience. In other words, you can reuse existing assignments and save yourself the effort of setting up user groups specifically for Xperience.
See the following example for illustration. The code extends the set of a user’s claims with an additional claim for the Administrator role based on whether the user is in the Acme.Administrator role:
using System.Security.Claims;
using System.Threading.Tasks;

using Microsoft.AspNetCore.Authentication;
using Microsoft.Extensions.Options;

using Kentico.Membership;

public class MyClaimsTransformation : IClaimsTransformation
{
    private readonly IOptions<AdminExternalAuthenticationProviderOptions> externalProviderOptions;

    public MyClaimsTransformation(IOptions<AdminExternalAuthenticationProviderOptions> externalProviderOptions)
    {
        this.externalProviderOptions = externalProviderOptions;
    }

    public Task<ClaimsPrincipal> TransformAsync(ClaimsPrincipal principal)
    {
        ClaimsIdentity claimsIdentity = new ClaimsIdentity();

        // Gets the roles claim key as configured for the application
        var claimType = externalProviderOptions.Value.RoleClaimName;

        // Adds the 'Administrator' role claim to users with the 'Acme.Administrator' claim
        if (principal.HasClaim(claim => (claim.Type == claimType) && (claim.Value == "Acme.Administrator")))
        {
            claimsIdentity.AddClaim(new Claim(claimType, "Administrator"));
        }

        principal.AddIdentity(claimsIdentity);
        return Task.FromResult(principal);
    }
}
Register the transformation to the application’s IoC container. All registered transformations are applied automatically at runtime:
builder.Services.AddTransient<IClaimsTransformation, MyClaimsTransformation>();
Sign-in page behavior
The sign-in page into the Xperience admin UI by default only offers authentication via an external provider, if one is registered via AddAdminExternalAuthenticationProvider. The default forms authentication sign-in method is completely hidden. If you wish to change this behavior, you can do so via the AdminAuthenticationMode enum. The following options are available:
|
Mode |
Description |
|
PrioritizeExternal |
If the application detects an external authentication provider registration for the administration interface, the administration sign-in page shows the external provider as the only available authentication option. If no external provider is registered, the sign-in page offers the default forms authentication instead. Additionally, when PrioritizeExternal is set and an identity provider is registered for your application, you cannot directly invite new users via the Users application. |
|
MaintainForms |
If the application detects an external authentication provider registration for the administration interface, the administration sign-in page shows the external provider authentication in addition to the default forms authentication option. This allows you to have both sign-in options available. If no external provider is registered, the sign-in page offers the default forms authentication instead. |
To change the behavior, use the AdminIdentityOptions object.
using Microsoft.AspNetCore.Builder;
using Microsoft.Extensions.DependencyInjection;

using Kentico.Membership;

var builder = WebApplication.CreateBuilder(args);

...

builder.Services.Configure<AdminIdentityOptions>(options =>
{
    options.AuthenticationOptions.Mode = AdminAuthenticationMode.MaintainForms;
});
General security considerations
When configuring external authentication for your projects, keep in mind the following practices and recommendations.
Use HTTPS
Always communicate with the external provider using HTTPS to reduce the probability of a third-party obtaining unencrypted sensitive information about your application and users. This generally applies when configuring callback/redirect URIs as well as additional features such as sign-out redirects for your application on the provider’s end.
Configure two-factor authentication in your external provider
Two-factor authentication (2FA) is an additional layer of security that provides an extra level of protection beyond just a password. The benefits of 2FA include:
- Increased security: By requiring a second form of authentication, 2FA makes it much more difficult for hackers to gain access to an account. Even if a hacker obtains a user’s password, they would still need to have access to the second factor, such as a security token, in order to gain access. This reduces the risk of account takeover and helps protect against phishing and other types of attacks.
- Compliance: In some cases, two-factor authentication is required by regulatory compliance, such as payment card industry (PCI) and healthcare industries.
- Cost-effectiveness: Two-factor authentication can be relatively inexpensive to implement and maintain. 2FA solutions can be set up without significant infrastructure changes or the need for specialized hardware.
Use a separate application registration per physical application
Always make sure to register and configure a new application in your provider’s dashboard for each separate project you plan to integrate with an external provider. This approach provides the following benefits:
- Isolation of access: You allow for more granular control over access to each application. For example, if a client secret for one application is compromised, it would not affect the other applications.
- Least Privilege: You can assign only the minimal set of permission that each application requires and therefore reduce the risk of privilege escalation.
- Auditing and tracking: It is easier to track and audit access to each application. This can help identify and investigate suspicious activity.
- Easy Revocation: It is easier to revoke or modify the access of one application while keeping the access of other applications intact.
Use hybrid authentication flow when possible
Most providers offer two OIDC-compliant authentication flows: hybrid and implicit.
The hybrid authentication flow exposes less sensitive information to the client, preferring to exchange important information over the back-end (machine-to-machine). This method is generally more secure, because sensitive user data never touches the client and cannot be accessed by malicious code that potentially be running there.
On the other hand, the implicit flow returns an access token directly to the client, without the need for an authorization code. The access token is passed in the browser’s redirect URI and is therefore less secure than the hybrid flow since the access token is exposed to the browser. This flow is unavoidable when building applications without a back-end component (such as SPAs).
When configuring external authentication for the Xperience admin UI, always prefer the hybrid flow (the server back-end is always available).
For more specific security practices consult the documentation of your chosen authentication provider.
Securely store application secrets
As a general security best practice, it is not recommended to store application secrets directly in code or application settings. Instead, consider using the following alternatives.
During development
When implementing and testing external authentication locally, use the Secrets Manager utility provided by dotnet. The utility abstracts key management and storage. However, note that keys stored using the manager are not encrypted – use this approach only for local development.
cd "C:\my\xperience\WebApp\"

# Initialize the Secrets Manager
dotnet user-secrets init

# Stores a secret for local development
dotnet user-secrets set "Project:ExternalAuthProvider" "12345"
var builder = WebApplication.CreateBuilder(args);
...
// Reads the secret and stores it in a variable
var externalAuthApiKey = builder.Configuration["Project:ExternalAuthProvider"];
On production
For projects in production, consider the following options: