
Inline editors for Email Builder widgets
Inline editors allow users to enter values for the properties of Email Builder widgets. They can be used as an alternative to the property configuration dialog, or in combination with it.
Unlike the configuration dialog, inline editors provide interactive elements directly in the output of the widget when displayed in the Email Builder’s editing mode. For example, inline editors can range from basic value inputs to more advanced options, such as text areas with rich formatting options. Inline editors are visible only in the Xperience administration interface, but the configured property value then affects the content or appearance of the given widget in the resulting email.
Each inline editor manages only a single widget property. For widgets that have multiple properties, you can add multiple inline editors into the widget’s markup.
By default, the system provides a Rich text inline editor. For other scenarios, you can develop inline editors according to the requirements of your Email Builder widgets.
Inline editors for Page Builder widget properties
This page describes how to work with inline editors for Email Builder widget properties. Inline editors are also available for Page Builder widget properties.
Custom inline editors with links to content items
If you use an inline editor that allows users to add links to content items (other than the default Rich text inline editor), you need to create a custom reference extractor in order to enable usage tracking in the widget property.
Develop inline editors
Inline editors for Email Builder widget properties consist of two main parts:
Additionally, you need to:
- Link scripts and styles required by inline editors in your Email Builder templates
- Add inline editors to the markup of Email Builder widgets.
Razor component
Develop inline editors as ASP.NET Razor components and follow the Blazor development best practices for Email Builder.
Inline editors with MJML components
The markup of inline editors must always be standard HTML, even if your application is configured to use MJML markup for Email Builder components. When placed into widget markup, inline editor components must be wrapped in <mj-text> tags, which allow the HTML to be processed correctly.
Every inline editor must contain the InlineEditor Razor component in its markup. Encapsulate HTML code that provides your inline editor’s interface between the component’s opening and closing tags. Set the following properties for the InlineEditor component:
PropertyName– the name of the widget property managed by the editor.- To populate the value, add a property to the inline editor’s Razor component code which accepts the name of the managed widget property, for example PropertyName. This property must be designated as a razor component property via the
Parameterattribute and marked as required viaEditorRequired.
- To populate the value, add a property to the inline editor’s Razor component code which accepts the name of the managed widget property, for example PropertyName. This property must be designated as a razor component property via the
InlineEditorName– a unique identifier of the inline editor. The same identifier must be used when registering the inline editor in its JavaScript file.
Inline editor wrapping element
The inner HTML code of the inline editor is rendered within a wrapping <div> tag. You can add attributes to this wrapping element by setting additional properties for the InlineEditor component. For example, setting a class="text-editor" property ensures that the wrapping <div> contains a matching class attribute.
@using Kentico.VisualBuilderComponents.Rcl.Components

<InlineEditor PropertyName=@PropertyName InlineEditorName="custom-text-editor" contenteditable="true" data-placeholder-text=@PlaceholderText class="text-editor">
    @Text
</InlineEditor>

@code {
    // Stores the name of the Email Builder widget property managed by the inline editor
    [Parameter, EditorRequired]
    public string PropertyName { get; set; }

    [Parameter]
    public string Text { get; set; }

    [Parameter]
    public string PlaceholderText { get; set; }
}
JavaScript file
In addition to developing a Razor component, you need to register every inline editor using client-side code. Create a JavaScript file, e.g., in the in your project’s ~/wwwroot/EmailBuilder/Admin/InlineEditors/ folder, and add a self-invoking function that registers the inline editor by calling window.kentico.emailBuilder.registerInlineEditor.
Specify the following parameters when calling the registerInlineEditor function:
- The identifier of the inline editor, i.e. the
InlineEditorNamevalue set in theInlineEditorcomponent in the Razor component markup. - An anonymous object with an
initproperty function that is executed whenever the given property editor is loaded. Use this function to run custom JavaScript that modifies the widget’s content or behavior based on the value of the managed property. The function’soptionsparameter is an object that wraps the following properties:editor– the DOM element encapsulating the editorpropertyName– the name of the managed widget propertypropertyValue– the value of the managed widget property
To notify the widget about changes in the managed property value, dispatch a custom event named updateProperty within the init function. The updateProperty event’s data must contain the detail property, with the following values:
value– the new value of the widget propertyname– the name of the widget property- (Optional)
refreshMarkup– bool value that determines whether the event automatically triggers a refresh of the widget’s entire markup from the server. True by default.
// Inline editor script for a basic text input
(function () {
    window.kentico.emailBuilder.registerInlineEditor("custom-text-editor", {
        init: function (options) {
            var editor = options.editor;

            // Add an 'input' event listener to the editor element
            editor.addEventListener("input", function () {
                if (!this.textContent) {
                    // Clears the element when text content is empty
                    this.innerHTML = "";
                }

                // Dispatches a custom event that notifies the widget about changes in the property value
                var event = new CustomEvent("updateProperty", {
                    detail: {
                        name: options.propertyName,
                        value: this.textContent,
                        refreshMarkup: false
                    }
                });
                editor.dispatchEvent(event);
            });
        },
    });
})();
Execute scripts on inline editor events
If you need to execute custom scripts on certain events, you can use additional property functions of the anonymous object defined when registering the inline editor.
// Mandatory:
init: function (options) { ... },
// Optional:
destroy: function (options) { ... },   // Executed when a user deletes a widget containing the inline editor
dragStart: function (options) { ... }, // Executed when a user starts to drag a widget with the inline editor
drop: function (options) { ... }       // Executed when a user successfully drops a widget with the inline editor
Only the editor property is available via the options parameter in the destroy, dragStart, and drop property functions.
The JavaScript file needs to be linked in all Email Builder templates where you wish to use widgets with the given inline editor.
Link styles and scripts for inline editors
Because inline editors display interactive elements within the Xperience administration, you may require additional JavaScript or CSS styles outside of the resulting email content. We recommend storing script and style for your inline editors within files in the ~/wwwroot/EmailBuilder/Admin/InlineEditors/ folder (you can add sub-folders for individual inline editors).
You need to link such files in all Email Builder templates where you wish to use widgets with inline editors:
- CSS files – at the end of your template’s head code.
- JavaScript files – at the end of your template’s body code. This includes the script file containing the editor registration code.
Use EmailContext.BuilderMode conditions to ensure that the file links are only included in the Email Builder’s editing mode.
@using Kentico.EmailBuilder.Web.Mvc
@using Kentico.VisualBuilderComponents.Rcl.Components

@inject IEmailContextAccessor emailContextAccessor

<mj-head>
    ...

    <EmailBuilderStyles />

    @if (emailContextAccessor.GetContext().BuilderMode == EmailBuilderMode.Edit)
    {
        <mj-raw>
            <link href="/EmailBuilder/Admin/InlineEditors/custom-text-editor.css" rel="stylesheet" />
        </mj-raw>
    }
</mj-head>
<mj-body>
    ...

    <EmailBuilderScripts />

    @if (emailContextAccessor.GetContext().BuilderMode == EmailBuilderMode.Edit)
    {
        <mj-raw>
            <script src="/EmailBuilder/Admin/InlineEditors/custom-text-editor.js"></script>
        </mj-raw>
    }
</mj-body>
@using Kentico.EmailBuilder.Web.Mvc
@using Kentico.VisualBuilderComponents.Rcl.Components

@inject IEmailContextAccessor emailContextAccessor

<head>
    ...

    <EmailBuilderStyles />

    @if (emailContextAccessor.GetContext().BuilderMode == EmailBuilderMode.Edit)
    {
        <link href="/EmailBuilder/Admin/InlineEditors/custom-text-editor.css" rel="stylesheet" />
    }
</head>
<body>
    ...

    <EmailBuilderScripts />

    @if (emailContextAccessor.GetContext().BuilderMode == EmailBuilderMode.Edit)
    {
        <script src="/EmailBuilder/Admin/InlineEditors/custom-text-editor.js"></script>
    }
</body>
Avoid linking or executing scripts or styles directly within the markup of your inline editor or widget components. This could lead to duplicated scripts on pages containing multiple widgets that use the same editor.
Add inline editors to widgets
To manage the properties of Email Builder widgets, inline editors need to be added to the markup of your widget Razor components:
- Prepare an
EmailContext.BuilderModecondition that allow you to add the inline editor only when the widget is being displayed in the Email Builder’s editing mode. - Add the inline editor Razor component to the appropriate location in the widget’s markup.
- Use the inline editor component’s properties to pass any required values from the widget, such as the name of the managed widget property and its value.
Widgets with MJML markup
For widgets with MJML markup, inline editor components must always be enclosed in <mj-text> tags, which ensure that the inline editor HTML is processed correctly. - Depending on the purpose of the managed widget property, add its value into the widget content or otherwise use it in the widget’s code.
- Always consider the type of content that you are rendering in the widget markup. For example, properties that return raw HTML values must be rendered as a MarkupString.
@using Kentico.EmailBuilder.Web.Mvc

@* Renders the inline editor for the widget's 'Text' property in the Email Builder's editing mode *@
@if (Email.BuilderMode == EmailBuilderMode.Edit)
{
    <mj-text>
        <TextInlineEditor PropertyName=@nameof(Properties.Text) PlaceholderText="Enter your text here." Text="@Properties?.Text" />
    </mj-text>
} else
{
    @* Displays the edited text value in the email's content (outside of editing mode) *@
    <mj-text>
        @Properties?.Text
    </mj-text>
}

@code {
    private EmailContext _email;

    protected EmailContext Email => _email ??= EmailContextAccessor.GetContext();

    [Inject]
    public IEmailContextAccessor EmailContextAccessor { get; set; }

    [Parameter]
    public TextEmailWidgetProperties Properties { get; set; }
}
The widget now displays your inline editor when working with email content in the Email Builder UI. The content of the widget in the resulting emails is modified according to the property configured through the editor.
Rich text inline editor
This page describes how to work with the rich text editor as an inline editor for Email Builder widget properties.
To learn about other rich text editor scenarios, see:
- Rich text inline editors – using the rich text inline editor for Page Builder widget properties.
- Rich text editor configuration – modifying the editor used by the Xperience administration in general.
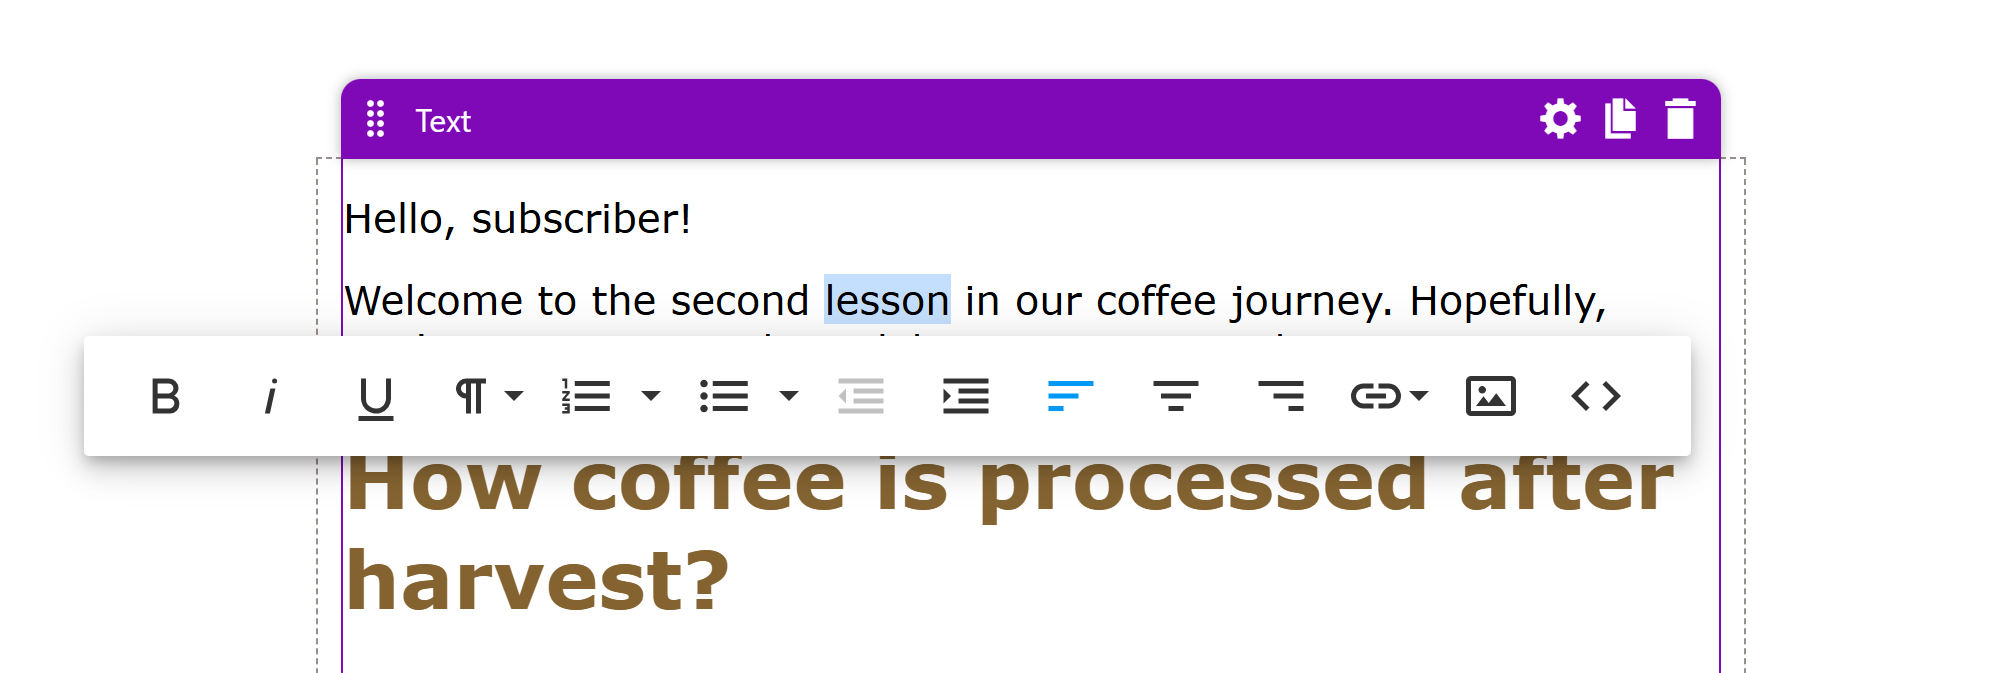
Xperience provides a rich text inline editor for Email Builder widgets that allows users to input content using conventional word processor features. The editor is based on the Froala WYSIWYG editor.
Add the rich text editor to Email Builder widgets
You can add the rich text inline editor to any Email Builder widget that has a string property for storing the content.
- Edit the Razor component markup of the desired widget.
- Prepare an
EmailContext.BuilderModecondition that allows you to add the rich text editor only when the widget is being displayed in the Email Builder’s editing mode. - Insert the
RichTextInlineEditorcomponent (available in theKentico.VisualBuilderComponents.Rcl.Componentsnamespace) to a suitable location.- Set the name of the managed widget property (use the
nameofexpression) into the component’sPropertyNameproperty.
- Set the name of the managed widget property (use the
- Render the output of the managed property as a MarkupString within the widget content (outside of the Email Builder’s editing mode).
@using Kentico.EmailBuilder.Web.Mvc
@using Kentico.VisualBuilderComponents.Rcl.Components

@if (Email.BuilderMode == EmailBuilderMode.Edit)
{
    <mj-text>
        <RichTextInlineEditor PropertyName=@nameof(Properties.Text) />
    </mj-text>
}
else
{
    <mj-text>
        @((MarkupString)Properties?.Text)
    </mj-text>
}
@code {
    private EmailContext _email;

    protected EmailContext Email => _email ??= EmailContextAccessor.GetContext();

    [Inject]
    public IEmailContextAccessor EmailContextAccessor { get; set; }

    [Parameter]
    public TextEmailWidgetProperties Properties { get; set; }
}
@using Kentico.EmailBuilder.Web.Mvc
@using Kentico.VisualBuilderComponents.Rcl.Components

<div>
    @if (Email.BuilderMode == EmailBuilderMode.Edit)
    {
        <p>
            <RichTextInlineEditor PropertyName=@nameof(Properties.Text) />
        </p>
    }
    else {
        <p>
            @((MarkupString)Properties?.Text)
        </p>
    }
</div>

@code {
    private EmailContext _email;

    protected EmailContext Email => _email ??= EmailContextAccessor.GetContext();

    [Inject]
    public IEmailContextAccessor EmailContextAccessor { get; set; }

    [Parameter]
    public TextEmailWidgetProperties Properties { get; set; }
}
The inline editor can now be used to edit the selected property of the desired widget.
Customize the editor toolbars
To provide an improved or modified experience for email content editors, you can customize the toolbar of the rich text editor to display a specific set of buttons and formatting options.
To customize the editor toolbar, you need to:
Define toolbar configurations
Create a JavaScript file for storing Email Builder rich text editor toolbar configurations. For example, you can store toolbar configurations in your project’s ~/wwwroot/EmailBuilder/Admin/RichTextEditorConfigurations/ folder.
In this file, define and register the toolbar options for each configuration as seen in the following code example.
(function (emailBuilder) {
    var richTextEditor = emailBuilder.richTextEditor = emailBuilder.richTextEditor || {};
    var configurations = richTextEditor.configurations = richTextEditor.configurations || {};
    // Overrides the "default" configuration of the rich text inline editor.
    // The below configuration adds the h5 and h6 values to the paragraphFormat,
    // and removes the code value. Also sets the toolbar to be visible without selecting any text.
    configurations["default"] = {
        toolbarVisibleWithoutSelection: true,
        paragraphFormat: {
            N: "Normal",
            H1: "Headline 1",
            H2: "Headline 2",
            H3: "Headline 3",
            H4: "Headline 4",
            H5: "Headline 5",
            H6: "Headline 6",
        },
    };

    // Defines a new configuration for a simple toolbar with only formatting
    // options and disables the inline design of the toolbar
    configurations["simple"] = {
        toolbarButtons: ['paragraphFormat', '|', 'bold', 'italic', 'underline', '|', 'align', 'formatOL', 'formatUL'],
        paragraphFormatSelection: true,
        toolbarInline: false
    };
})(window.kentico.emailBuilder);
Assign configurations to inline editors
You can use the following approaches to assign toolbar configurations to Email Builder rich text inline editors:
- Modify the
defaultconfiguration, and link the related JavaScript file to specific Email Builder templates. - Prepare multiple configurations, link the related JavaScript file in all Email Builder templates, and assign a specific configuration to individual rich text inline editor components.
Add links to your configuration JavaScript files at the end of the body code in your Email Builder templates. Use EmailContext.BuilderMode conditions to ensure that the file links are only included in the Email Builder’s editing mode.
@using Kentico.EmailBuilder.Web.Mvc
@using Kentico.VisualBuilderComponents.Rcl.Components

@inject IEmailContextAccessor emailContextAccessor

<mj-body>
    ...

    <EmailBuilderScripts />

    @if (emailContextAccessor.GetContext().BuilderMode == EmailBuilderMode.Edit)
    {
        <mj-raw>
            <script src="/EmailBuilder/Admin/RichTextEditorConfigurations/EmailBuilderRteConfigurations.js"></script>
        </mj-raw>
    }
</mj-body>
@using Kentico.EmailBuilder.Web.Mvc
@using Kentico.VisualBuilderComponents.Rcl.Components

@inject IEmailContextAccessor emailContextAccessor

<body>
    ...

    <EmailBuilderScripts />

    @if (emailContextAccessor.GetContext().BuilderMode == EmailBuilderMode.Edit)
    {
        <script src="/EmailBuilder/Admin/RichTextEditorConfigurations/EmailBuilderRteConfigurations.js"></script>
    }
</body>
To assign a specific configuration for a RichTextInlineEditor instance in the markup of an Email Builder widget, set the component’s ConfigurationName property to the name of the toolbar configuration. If you do not specify a configuration, the default configuration is used.
<RichTextInlineEditor PropertyName=@nameof(Properties.Text) ConfigurationName="simple" />