
Custom automation steps
Features described on this page require the Xperience by Kentico Advanced license tier.
Xperience by Kentico allows developers to extend marketing automation with custom actions. These actions appear in the Automation Builder UI alongside the built-in steps (Send email, Wait, Condition, etc.) and can be configured by marketers using properties.
Common use cases for custom automation actions include:
- Synchronizing contact data to external CRMs
- Sending notification emails or SMS to internal users
- Enriching contact profiles from third-party data sources
- Logging analytics events to external platforms
Overview
Custom actions are classes that implement specific logic executed when a contact reaches the corresponding step in an automation process. Two patterns are available:
- Actions without configurable properties – inherit from
AutomationAction. Use when the action’s behavior is fully defined in code. - Actions with configurable properties – inherit from
AutomationAction<TProperties>. Use when marketers need to configure the action’s behavior through the Automation Builder UI.
Key points
- Inherit from
AutomationAction(no properties) orAutomationAction<TProperties>(with configurable properties). - Implement the action’s logic by overriding the
Executemethod. - Use the
AutomationProcessContextparameter of theExecutemethod to access contextual data (such as the processed contact), and share data between steps within the process using data containers implementingIAutomationProcessData. - Register actions via the
RegisterAutomationActionassembly attribute.

Create custom actions without properties
To create an action that doesn’t require marketer-configurable settings:
- Create a class inheriting from
AutomationAction. - Override the
Executemethod and implement the action’s logic.- You can access information from the runtime context of the process, including data stored by previous steps.
- Register the action via the
RegisterAutomationActionassembly attribute.
using Microsoft.Extensions.Logging;
using System.Threading;
using System.Threading.Tasks;

using CMS.Automation;
using CMS.ContactManagement;
using Kentico.Xperience.Admin.Base;

using Acme.Automation;

[assembly: RegisterAutomationAction<AuditLogAction>(
    identifier: AuditLogAction.IDENTIFIER,
    displayName: "Log to audit system",
    Description = "Logs an audit event to an external logging service.",
    IconName = Icons.BoxCogwheel)]

namespace Acme.Automation;

public class AuditLogAction : AutomationAction
{
    public const string IDENTIFIER = "Acme.AuditLog";

    private readonly ILogger<AuditLogAction> logger;

    public AuditLogAction(ILogger<AuditLogAction> logger)
    {
        this.logger = logger;
    }

    public override async Task Execute(AutomationProcessContext context, CancellationToken cancellationToken)
    {
        // Gets the processed contact
        ContactInfo contact = await context.GetProcessedObject(cancellationToken);

        // Gets the display name of the current automation process
        var processName = context.Process.DisplayName;

        // Logs an audit event
        // Assumes the application contains an external logging provider that receives events from "Acme" namespaces
        logger.LogInformation("Contact '{ContactFirstName} {ContactLastName}' reached the audit step in process '{ProcessName}'.",
    contact.ContactFirstName, contact.ContactLastName, processName);
    }
}
Marketers can now add the action as a step when designing automation processes. When a contact enters the step, the action’s Execute method runs and the contact moves to the next step.
Create custom actions with properties
To create an action with settings configurable in the Automation Builder UI:
- Create a properties class implementing the
IAutomationActionPropertiesinterface. - Define each property by adding a C# property in the class.
- Assign editing components to define the visual interface for properties in the action’s configuration dialog.
- See Action properties for more information.
- Create an action class inheriting from
AutomationAction<TProperties>, whereTPropertiesis your properties class. - Override the
Executemethod and implement the action’s logic.- The method receives the properties instance populated with values from the action’s configuration.
- You can access information from the runtime context of the process, including data stored by previous steps.
- Register the action via the
RegisterAutomationActionassembly attribute.
using System.Threading;
using System.Threading.Tasks;

using CMS.Automation;
using CMS.ContactManagement;
using CMS.EmailEngine;

using Kentico.Xperience.Admin.Base;
using Kentico.Xperience.Admin.Base.FormAnnotations;

using Acme.Automation;

[assembly: RegisterAutomationAction<EmailNotificationAction>(
    identifier: EmailNotificationAction.IDENTIFIER,
    displayName: "Send email notification",
    Description = "Sends an email with a specified subject and body to a designated recipient.",
    IconName = Icons.MessageMicro)]

namespace Acme.Automation;

public class EmailNotificationActionProperties : IAutomationActionProperties
{
    // Text input for entering the recipient email address
    [TextInputComponent(Label = "Recipient email", Order = 10)]
    // Validation rule to enforce valid email address format
    [EmailValidationRule]
    // The value for this property is required
    [RequiredValidationRule]
    public string RecipientEmail { get; set; }

    // Text input for entering the notification email subject
    // Default value set to "Automation notification"
    [TextInputComponent(Label = "Subject", Order = 20)]
    // The value for this property is required
    [RequiredValidationRule]
    public string Subject { get; set; } = "Automation notification";

    // Rich text editor for entering the notification email body
    [RichTextEditorComponent(Label = "Message body", Order = 30)]
    public string Body { get; set; }
}

public class EmailNotificationAction : AutomationAction<EmailNotificationActionProperties>
{
    public const string IDENTIFIER = "Acme.SendEmailNotification";

    private readonly IEmailService emailService;

    public EmailNotificationAction(IEmailService emailService)
    {
        this.emailService = emailService;
    }

    public override async Task Execute(
        EmailNotificationActionProperties properties,
        AutomationProcessContext context,
        CancellationToken cancellationToken)
    {
        if (string.IsNullOrEmpty(properties.RecipientEmail) || string.IsNullOrEmpty(properties.Subject))
        {
            return;
        }

        // Gets the processed contact
        ContactInfo contact = await context.GetProcessedObject(cancellationToken);

        var body = $"{properties.Body}" +
                   $"<hr>" +
                   $"<h3>Contact details</h3>" +
                   $"Name: {contact.ContactFirstName} {contact.ContactLastName}<br>" +
                   $"Email: {contact.ContactEmail}";

        // Sends the email message
        var message = new EmailMessage
        {
            From = "automation@localhost.local",
            Recipients = properties.RecipientEmail,
            Subject = properties.Subject,
            Body = body
        };

        await emailService.SendEmail(message);
    }
}
Marketers can now add the action as a step when designing automation processes and configure the available properties.
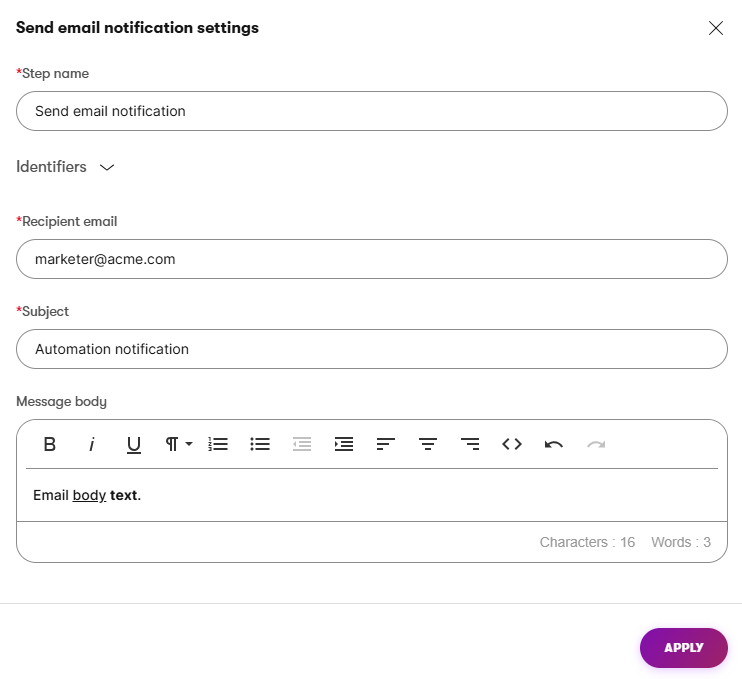
When a contact enters the step, the action’s Execute method runs with the given property values and the contact moves to the next step.
Action properties
Properties define what marketers can configure for each instance of a custom action step. To define properties for an action, create a class implementing the IAutomationActionProperties interface and decorate its properties with editing components (UI form component attributes).
To learn about the available UI form components, see Reference - Admin UI form components. The following are common examples:
TextInputComponent– single-line text inputDropDownComponent– drop-down selection- supports both static options and dynamic options via
IDropDownOptionsProvider
- supports both static options and dynamic options via
CheckBoxComponent– boolean toggleDateTimeInputComponent– date and time pickerRichTextEditorComponent– rich text editor
Only public properties with both a getter and a setter participate in property mapping.
Set default property values
You can set default values for action properties. These values are set when marketers add a new instance of the action to a process.
using Kentico.Xperience.Admin.Base.FormAnnotations;

// ...

// Default value set to "Automation notification"
[TextInputComponent(Label = "Subject", Order = 20)]
public string Subject { get; set; } = "Automation notification";
Customize the step name input
By default, all automation step configuration dialogs include a Step name input. If your properties class defines a property named StepDisplayName, you can configure its form component annotation (label, validation, etc.) to replace the default Step name input.
using Kentico.Xperience.Admin.Base.FormAnnotations;

// ...

// Sets a custom label for the "Step name" property
[TextInputComponent(Label = "Notification step title")]
public string StepDisplayName { get; set; }
You cannot adjust the order of the step name property. The name always appears first in the configuration dialog.
Dynamic drop-down options
Use IDropDownOptionsProvider to populate a DropDownComponent with options resolved at runtime:
using System.Collections.Generic;
using System.Threading.Tasks;

using Kentico.Xperience.Admin.Base.FormAnnotations;

public class CrmSystemOptionsProvider : IDropDownOptionsProvider
{
    public Task<IEnumerable<DropDownOptionItem>> GetOptionItems() =>
        Task.FromResult<IEnumerable<DropDownOptionItem>>(
        [
            new DropDownOptionItem { Value = "crm1", Text = "CRM 1" },
            new DropDownOptionItem { Value = "crm2", Text = "CRM 2" },
            new DropDownOptionItem {
                Value = "crm3",
                Text = "CRM 3",
                Tooltip = "Requires CRM connector configuration. Consult your administrator before use."
            }
        ]);
}
Reference the provider using the DataProviderType parameter on the DropDownComponent attribute:
using Kentico.Xperience.Admin.Base.FormAnnotations;

// ...

[DropDownComponent(
    Label = "CRM system",
    DataProviderType = typeof(CrmSystemOptionsProvider),
    Order = 10)]
public string CrmSystem { get; set; }
Property validation, visibility and UI organization
The following options allow you to further improve the user experience of action configuration dialogs:
- Form categories – organize properties in the configuration dialog using
[FormCategory]attributes. Categories group properties together under labeled sections and supportCollapsibleandIsCollapsedoptions. See Group components into categories for details. - Validation rules – add attributes that enforce restrictions on property values (
RequiredValidationRule,MaxLengthValidationRule, etc.). The system provides a set of default validation rules, and developers can implement custom ones. See UI form component validation rules for details. - Conditional visibility – add attributes that dynamically hide or display properties in the configuration dialog based on the value of another property (
VisibleIfEmpty,VisibleIfTrue, etc.). The system provides a set of default visibility conditions, and developers can implement custom ones. See UI form component visibility conditions for details.
using CMS.Automation;

using Kentico.Xperience.Admin.Base.FormAnnotations;

[FormCategory(Label = "General", Order = 10)]
[FormCategory(Label = "Advanced", Order = 110, Collapsible = true, IsCollapsed = true)]
public class CrmSyncActionProperties : IAutomationActionProperties
{
    // General category

    // Drop-down selector with predefined options
    [DropDownComponent(Label = "CRM System",
        Options = "crm1;CRM 1\ncrm2;CRM 2\ncrm3;CRM 3",
        Order = 11)]
    [RequiredValidationRule]
    public string CrmSystem { get; set; } = "crm1";

    // Checkbox property enabled by default
    [CheckBoxComponent(Label = "Update existing records", Order = 21)]
    public bool UpdateExisting { get; set; } = true;

    // Advanced category

    // Number input with a default value that allows values between 1 and 10
    [NumberInputComponent(Label = "Retry attempts", Order = 111)]
    [MinimumIntegerValueValidationRule(1)]
    [MaximumIntegerValueValidationRule(10)]
    public int RetryAttempts { get; set; } = 3;

    // Note rich text editor visible if 'Update existing records' is enabled
    [RichTextEditorComponent(Label = "Notes", Order = 121)]
    [VisibleIfTrue(nameof(UpdateExisting))]
    public string Notes { get; set; }
}
Action property guidelines
Follow our Property guidelines to keep your action properties organized and easy to work with in the configuration dialog.
Register custom actions
Register custom actions using the RegisterAutomationActionAttribute<TAction> assembly attribute. We recommend placing the attribute at the top of the action’s source file.
Specify the following parameters:
identifier– a unique, stable string identifier for the action. We recommend using a unique prefix in your identifiers to prevent conflicts. For example, include your company’s name as a prefix (Acme.SyncContactAction). Never change this value once the action is deployed and used in automation processes.For easy access and reuse, store the identifier value in the action class within anIDENTIFIERconstant.displayName– the name displayed in the Automation Builder step selector.
You can also set the following optional properties:
IconName– the icon displayed for the action tile in the builder. Use icons from the set of icons starting with the xp- prefix, referenced by the constants in theKentico.Xperience.Admin.Base.Iconsclass.Description– hover text displayed as a tooltip in the Automation Builder step selector.
using CMS.Automation;
using Kentico.Xperience.Admin.Base;

[assembly: RegisterAutomationAction<SyncContactToCrmAction>(
    identifier: SyncContactToCrmAction.IDENTIFIER,
    displayName: "Sync contact to CRM",
    IconName = Icons.ArrowRightTopSquare,
    Description = "Pushes the current contact's data to the external CRM.")]
Once registered, the action appears in the step selection dialog when adding steps in the Automation Builder.
Deleting or unregistering an action that is used in an existing automation process breaks the process. If a process contains an “unknown” action, the Automation Builder UI will not be available to fix or remove the given action step. The process cannot be recovered until all used actions are restored and registered.
Runtime context
The AutomationProcessContext class is provided to the Execute call in every action class and gives access to runtime data and operations. The process context allows you to:
- Access the processed contact
- Access the process name
- Access trigger data
- Share data between automation steps
Access the processed contact
To retrieve the contact that is being processed by the action, call the GetProcessedObject extension method (from the CMS.ContactManagement namespace) on AutomationProcessContext. The method returns a ContactInfo object representing the contact. You can access the object’s properties to get the contact’s data or use the contact API to modify it.
using CMS.Automation;
using CMS.ContactManagement;

// ...

public override async Task Execute(AutomationProcessContext context, CancellationToken cancellationToken)
{
    // Returns the processed ContactInfo
    ContactInfo contact = await context.GetProcessedObject(cancellationToken);

    // Accesses contact properties
    string contactName = contact.ContactDescriptiveName;
    int contactId = contact.ContactID;

    // ...
}
Access the process name
To retrieve the display name of the current automation process, use the Process.DisplayName property of AutomationProcessContext.
using CMS.Automation;

// ...

public override async Task Execute(AutomationProcessContext context, CancellationToken cancellationToken)
{
    // Gets the display name of the current automation process
    string processName = context.Process.DisplayName;

    // ...
}
Access trigger data
Automation processes are started by triggers. The system captures data about the trigger for each instance of a process, and this data can be retrieved and used within the execution of custom actions. For example, when a process is triggered by a form submission, you can access the form and specific form data that was submitted.
Retrieve trigger data using the GetTriggerData<T> method, where T is one of the following built-in trigger data types:
|
Trigger data type |
Properties |
|
|
|
|
|
|
|
|
|
GetTriggerData<T> returns null if the process was not started by the matching trigger. Check the result for null before using the data, or call the following extension methods on AutomationProcessContext to create conditions in your code:
TriggeredByCustomActivityTriggeredByFormSubmissionTriggeredByRegistration
The methods return Task<bool> indicating whether the process was started by the corresponding built-in trigger.
Example - Getting form submission trigger data
The following example shows an action that reacts to a form submission trigger. It reads the FormSubmissionTriggerData, loads the corresponding form record (BizFormItem), and caches the loaded record under a unique cache key based on the form item ID.
using System.Threading;
using System.Threading.Tasks;

using CMS.Automation;
using CMS.DataEngine;
using CMS.Helpers;
using CMS.OnlineForms;
using Kentico.Xperience.Admin.Base;

using Acme.Automation;

[assembly: RegisterAutomationAction<ProcessFormSubmissionAction>(
    identifier: ProcessFormSubmissionAction.IDENTIFIER,
    displayName: "Process form submission",
    Description = "Processes the data submitted by the form submission trigger.",
    IconName = Icons.Form)]

namespace Acme.Automation;

public class ProcessFormSubmissionAction : AutomationAction
{
    public const string IDENTIFIER = "Acme.ProcessFormSubmission";

    private readonly IInfoProvider<BizFormInfo> bizFormInfoProvider;
    private readonly IProgressiveCache progressiveCache;

    public ProcessFormSubmissionAction(
        IInfoProvider<BizFormInfo> bizFormInfoProvider,
        IProgressiveCache progressiveCache)
    {
        this.bizFormInfoProvider = bizFormInfoProvider;
        this.progressiveCache = progressiveCache;
    }

    public override async Task Execute(AutomationProcessContext context, CancellationToken cancellationToken)
    {
        // Only proceeds when the process was triggered by a form submission
        if (!await context.TriggeredByFormSubmission(cancellationToken))
        {
            return;
        }

        // Gets the trigger data captured when the form was submitted
        FormSubmissionTriggerData formData = await context.GetTriggerData<FormSubmissionTriggerData>(cancellationToken);
        if (formData is null)
        {
            return;
        }

        // Loads the submitted form record (cached)
        BizFormItem formItem = await GetFormItem(formData, cancellationToken);
        if (formItem is null)
        {
            return;
        }

        // Processes the submitted form record, e.g. reads its field values
        string email = formItem.GetStringValue("UserEmail", string.Empty);

        // ... custom logic
    }

    // Loads the submitted form record and caches it under a cache key unique to the submitted form and record
    private async Task<BizFormItem> GetFormItem(FormSubmissionTriggerData formData, CancellationToken cancellationToken)
    {
        return await progressiveCache.LoadAsync(async (cacheSettings, cancellationToken) =>
        {
            // Gets the form definition and resolves its class name
            BizFormInfo formInfo = await bizFormInfoProvider.GetAsync(formData.BizFormId, cancellationToken);
            if (formInfo is null)
            {
                // Does not cache when the form definition no longer exists
                cacheSettings.Cached = false;
                return null;
            }

            string formClassName = DataClassInfoProvider.GetDataClassInfo(formInfo.FormClassID).ClassName;

            // Loads the submitted form record by its ID
            BizFormItem formItem = BizFormItemProvider.GetItem(formData.BizFormItemId, formClassName);

            // Does not cache a missing record
            cacheSettings.Cached = formItem != null;

            return formItem;
        },
        // Unique cache key based on the submitted form and record IDs
        new CacheSettings(
            cacheMinutes: 10,
            IDENTIFIER, nameof(GetFormItem), formData.BizFormId, formData.BizFormItemId),
        cancellationToken);
    }
}
Form data cache dependencies
The system does not provide a default cache dependency key for automatic clearing of cached form data. As a workaround, you can use a custom cache key and touch it from a custom event handler. See Cache dependency keys - Form data records.
Share data between automation steps
Custom actions within the same automation process can share typed data using AutomationProcessContext and its SetProcessData<T>(T) and GetProcessData<T>() methods. This allows one action to produce data that a later action consumes, even if wait steps or other actions are between them.
Key characteristics of shared process data:
- Each data type used by actions implements the
IAutomationProcessDatainterface, and is identified by theIdentifierstring property. - Multiple process data types can coexist within the same process (assuming they all have unique identifiers).
- If a process contains multiple instances of the same action that stores data or there are multiple actions storing data of the same type, this data is shared throughout the process and potentially can be overwritten.
If you need to store isolated data for each action instance, include a collection property in your process data type, and store values under unique keys (e.g., based on a value from the action’s instance-specific properties).
- Process data is persisted in the database as JSON, so it survives wait steps, application restarts, and redeployments.
- All
DateTimevalues are automatically serialized and deserialized as UTC.
Handle missing process data
GetProcessData<T> returns null whenever data of type T has not been stored yet or cannot be deserialized (e.g., after a process data class update). Treat a null result as an expected outcome rather than an error. Never assume that the process contains a specific sequence of steps or that steps will always run successfully.
When an action depends on data from a previous step, check for null and log a warning or error before returning. This allows you to detect automation processes that are built in the wrong order or are missing a required step for your intended workflow.
Example - Two-step data sharing
The following example demonstrates a common pattern – one action writes data and a subsequent action reads it.
Process data class
Implement the IAutomationProcessData interface. The Identifier property must be a unique, stable string. We recommend using a unique prefix in your identifiers to prevent conflicts. For example, include your company’s name as a prefix.
using System;

using CMS.Automation;

public class ContactScoreData : IAutomationProcessData
{
    public static string Identifier => "Acme.ContactScoreData";

    public int Score { get; set; }

    public DateTime ScoredAt { get; set; }
}
Action 1 – Calculates and stores a score for the processed contact:
using System;
using System.Threading;
using System.Threading.Tasks;

using CMS.Automation;
using CMS.ContactManagement;
using Kentico.Xperience.Admin.Base;

using Acme.Automation;

[assembly: RegisterAutomationAction<ScoreContactAction>(
    identifier: ScoreContactAction.IDENTIFIER,
    displayName: "Score contact",
    Description = "Calculates and stores a score for the contact.",
    IconName = Icons.StarFull)]

namespace Acme.Automation;

public class ScoreContactAction : AutomationAction
{
    public const string IDENTIFIER = "Acme.ScoreContact";

    // Represents a custom service that calculates a score for a contact based on its activities and properties
    private readonly IContactScoringService scoringService;

    public ScoreContactAction(IContactScoringService scoringService)
    {
        this.scoringService = scoringService;
    }

    public override async Task Execute(AutomationProcessContext context, CancellationToken cancellationToken)
    {
        ContactInfo contact = await context.GetProcessedObject(cancellationToken);

        int score = await scoringService.CalculateScoreAsync(contact, cancellationToken);

        // Stores the score for downstream steps
        await context.SetProcessData(new ContactScoreData
        {
            Score = score,
            ScoredAt = DateTime.UtcNow
        }, cancellationToken);
    }
}
Action 2 – Reads the score stored by earlier steps and performs an action based on its value:
using System.Threading;
using System.Threading.Tasks;

using CMS.Automation;
using CMS.ContactManagement;
using Kentico.Xperience.Admin.Base;

using Microsoft.Extensions.Logging;

using Acme.Automation;

[assembly: RegisterAutomationAction<NotifyByScoreAction>(
    identifier: NotifyByScoreAction.IDENTIFIER,
    displayName: "Notify based on score",
    Description = "Notifies the sales team if the processed contact surpasses a score threshold.",
    IconName = Icons.ArrowSend)]

namespace Acme.Automation;

public class NotifyByScoreAction : AutomationAction
{
    private const int HIGH_SCORE_THRESHOLD = 80;

    // Represents a custom service that sends notifications to the sales team
    private readonly INotificationService notificationService;

    private readonly ILogger<NotifyByScoreAction> logger;

    public NotifyByScoreAction(ILogger<NotifyByScoreAction> logger, INotificationService notificationService)
    {
        this.logger = logger;
        this.notificationService = notificationService;
    }

    public override async Task Execute(AutomationProcessContext context, CancellationToken cancellationToken)
    {
        // Gets the contact score calculated by previous steps from the process data
        ContactScoreData scoreData = await context.GetProcessData<ContactScoreData>(cancellationToken);

        if (scoreData is null)
        {
            logger.LogWarning("No score data found in the process context.");
            return;
        }

        ContactInfo contact = await context.GetProcessedObject(cancellationToken);

        if (scoreData.Score >= HIGH_SCORE_THRESHOLD)
        {
            // High-scoring contact - notify the sales team
            await notificationService.NotifySalesTeamAsync(contact, scoreData.Score, cancellationToken);
            logger.LogInformation("High-scoring contact {ContactName} (score: {Score}) routed to sales.",
                contact.ContactDescriptiveName, scoreData.Score);
        }
        else
        {
            logger.LogInformation("Contact {ContactName} scored {Score}, below threshold.",
                contact.ContactDescriptiveName, scoreData.Score);
        }
    }
}
Best practices
Performance
- Keep the
Executemethod of actions lightweight – automation processes can run for a large number of contacts on high-traffic sites. - If your actions retrieve data from the Xperience database or another source, cache any data that is safe to reuse using
IProgressiveCacheor an equivalent caching mechanism. See Data caching to learn more.- Make sure you set sufficiently unique cache keys and use appropriate cache dependencies.
Execution timeout
Custom actions have a maximum execution time of 2 minutes. If an action does not complete within this limit, the system triggers the CancellationToken passed to the Execute method.
After cancellation is requested, a 30-second grace period begins. Once the grace period expires, the automation process moves to the next step regardless of whether the action has finished. Any operations still running after the grace period continue in the background without blocking the process.
Always propagate the cancellation token to all async calls within your action to ensure timely termination.
Design actions to complete quickly. If long-running operations are unavoidable, enqueue work to an external queue or background service and return from Execute immediately.
Error handling
- If an unhandled exception occurs in
Execute, the action’s execution ends and the contact moves to the next step. - Handle expected errors (API timeouts, network failures) gracefully and log them.
- Always respect the
CancellationTokenparameter – the system cancels execution during application shutdown or when the timeout is reached.
using CMS.Automation;
using CMS.ContactManagement;

using Microsoft.Extensions.Logging;
using System.Net.Http;
using System.Threading;
using System.Threading.Tasks;

public class MyAction(ILogger<MyAction> logger,
                      IExternalAPI externalApi) : AutomationAction()
{
    public override async Task Execute(AutomationProcessContext context, CancellationToken cancellationToken)
    {
        try
        {
            await externalApi.CallAsync(cancellationToken);
        }
        catch (HttpRequestException ex) when (!cancellationToken.IsCancellationRequested)
        {
            logger.LogError(ex, "External API call failed for contact with ID: {ContactId}.",
                (await context.GetProcessedObject(cancellationToken)).ContactID);
        }

        // Remaining Execute code continues
    }
}
Data protection (GDPR)
- If you store personal data (names, emails, phone numbers) within
IAutomationProcessDataimplementations, keep the following in mind:- When a personal data erasure implementation deletes a contact (
ContactInfo), the corresponding automation process history and any stored data is also deleted automatically. - The system does not currently provide a built-in mechanism to export process data as part of data protection “right to portability” workflows.
- When a personal data erasure implementation deletes a contact (
- Avoid persisting personal or sensitive data (non-employee email addresses, API keys, tokens) within action properties.
Updating and versioning actions
- Never change the
identifierof a registered action – doing so breaks all processes that reference the action. - Adding new optional properties to an
IAutomationActionPropertiesclass is safe – they receive default values for existing step configurations. - Removing or renaming properties breaks existing step configurations.
- If you need to remove or replace a property without breaking existing configurations, you can remove the property’s UI form component attribute to hide it in the configuration dialog.
To version an action safely:
- Create a new action class with a new identifier (e.g., with a
_V2suffix), along with a new properties class if required. - Keep the old version registered and functional.
- Instruct marketers to only use the new action version, for example by updating the old version’s display name and description.
- Once all processes using the old action version are disabled and no longer relevant, the old action classes can safely be removed.
When disabling a process, remember that contacts already in the process (including those in Wait steps) will continue progressing through existing steps.
Property guidelines
The following recommendations help you keep your action properties organized and make it easier for marketers to configure actions:
- Group properties into logical categories with class-level
FormCategoryattributes.- Order the categories based on their importance to create clear configuration blocks.
- Set
Label,ExplanationText, andOrdervalues for every UI form component attribute.- Keep
ExplanationTextbrief and practical. Avoid redundant explanations. - Keep property order values consistent with category order and expected editor flow.
- Use
Ordervalues with increments of 100 for categories and increments of 10 for properties to allow future inserts without renumbering.
- Keep
- Property order in the code file should always match the sequence of
Orderproperty values in component attributes. - Place the main UI form component attribute first for each property, above visibility, validation and other attributes.
- If using multiple short visibility attributes, keep them on one line (for example
VisibleIfTrue,VisibleIfEqualTo). - Use multiline formatting for component attributes with multiple or long arguments.
- When setting default property values:
- For properties with collection types, prefer empty collection defaults using collection expressions (for example
= []). - Prefer
string.Emptyinitial string values overnull!for default values if a real default value is not specified.
- For properties with collection types, prefer empty collection defaults using collection expressions (for example
Dependency injection
Actions are resolved from the DI container. Use constructor injection to obtain services:
using Microsoft.Extensions.Logging;
using System.Threading;
using System.Threading.Tasks;

using CMS.Automation;
using CMS.Helpers;

public class MyAction : AutomationAction
{
    private readonly ILogger<MyAction> logger;
    private readonly ICrmClient crmClient;
    private readonly IProgressiveCache cache;

    public MyAction(ILogger<MyAction> logger, ICrmClient crmClient, IProgressiveCache cache)
    {
        this.logger = logger;
        this.crmClient = crmClient;
        this.cache = cache;
    }

    public override async Task Execute(AutomationProcessContext context, CancellationToken cancellationToken)
    {
        // All injected services are available
        // ...
    }
}