
Adding a secured section for partners
Kentico provides a way to create secured site sections that can only be viewed by users who have a valid user name and password. This page describes how to create a logon web page for the purposes of user authentication and registration, as well as a secured page accessible only by logged in users.
Adding the secured partners page
Start by adding a new secured page that requires authentication:
- Open the Pages application and select the root of the content tree (My website).
- Click New ().
- Choose the Page (menu item) document type.
- Type Partners as the Page name and choose the Use existing page template option. Select the Templates with editable regions category and the Simple text page template.
- Click Save to create the page.
- On the Page tab, type the following text into the editable region: This is a secured page for partners.
- Click Save.
- Open the Properties -> Security tab of the Partners document.
- Select Yes for the Requires authentication property in the Access section
- Click Save.
This ensures that only authenticated (logged in) users can access the page.
Creating the logon page
Now build a page where users can sign in to the website and anonymous visitors can register as new users. Use a predefined page template, which you can further customize as needed.
- In the Pages application, select the root of the content tree (My website).
- Click New ().
- Choose the Page (menu item) document type.
- Type Logon as the Page name and choose the Use existing page template option. Select the Membership and security category and the Log-on page with registration form page template.
- Click Save to create the page.
- Drag the Logon page to the end of the content tree.
- Open the Properties -> Navigation tab.
- Clear the Show in navigation and Show in sitemap check boxes.
- Click Save.
Because of the document’s navigation settings, the Logon page does not show up in the website’s menu. You can use this configuration for pages that have a special purpose on the website, but are not part of the regular content.
Setting the website’s logon page
When an anonymous visitor attempts to access a secured page that requires authentication (such as the Partners page on your sample website), the system redirects them to a logon page. By default, websites use the system page that appears when signing into the Kentico administration interface. However, you can configure each website to use its own custom logon page.
- Open the Settings application.
- Select the Security & Membership category in the settings tree.
- Select My website in the Site drop-down menu.
- Clear the Inherit from global settings check box next to the Website logon page URL setting and type in ~/Logon.aspx. This is the relative URL of the logon page that you added to the website.
- Click Save.
The website’s logon page is now ready.
Adding a sign out button to the website
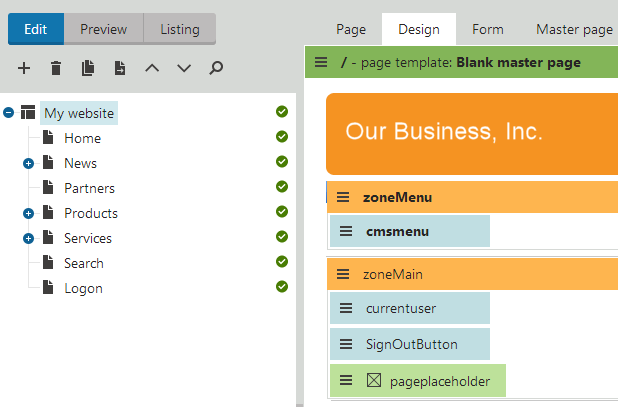
The website now allows users to log in, so you should also provide a way to log out. You can do this by adding the appropriate web parts to the website’s master page.
Open the Pages application.
Select the root of the content tree (My website).
Switch to the Design tab.
Add the following web parts to the zoneMain web part zone and set their properties:
Current userContent before: <div style=“float:right”>Sign out button
Content after: </div>
The <div> tag encloses the Current user and Sign out button web parts and floats them to the right side of the page.
- Set the following order for the web parts in zoneMain (you can drag web parts using your mouse):
- Current user
- Sign out button
- Page placeholder
- Current user
The Sign out button and the web part showing the current user’s name are now visible for signed in users on all pages on the website.
Result - Logging in to the website
Now that you have added the logon page, secured section and sign out button to the website, you can test the new functionality from the perspective of a live site user.
- Open the user menu on the right of the Kentico administration interface header, and select Sign Out.
- Click Partners in the main menu. The page is restricted, so the website redirects you to the logon page.
- Log in as the administrator again or try registering a new account. After you sign in successfully, the site automatically redirects you back to the Partners page.
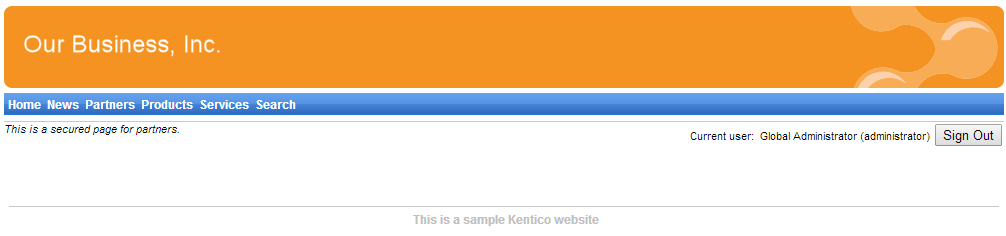
Here you can see the content of the secured page, as well as the name of the current user and the Sign Out button.
Kentico also allows you to display content according to the read permissions of users. For example, you can grant the Read permission for a Gold partners section to members of the Gold partners role, so that only gold partners are able to see the corresponding menu item and page content.
See Configuring permissions in the main documentation for more information.