
Developing the Home page (ASPX)
This page describes how to create the home page of the website. The process consists of the following steps:
- Preparing the ASPX source file
- Registering the page template in the system
- Adding the Home page
- Editing the content of the Home page
- Choosing the website’s home page
Preparing the ASPX source file
- Edit your web project in Visual Studio
- Right-click the CMSTemplates/MySite folder in the Solution Explorer and click Add -> Add New Item.
- Create a Web Form named Home.aspx and check Select master page.
- Click Add and choose the MyMaster.master page from the CMSTemplates/MySite folder.
- Open the home.htm file (from the sample web template) and copy the HTML code from inside the <!-- main content --> section. Paste this code inside the <asp:Content> element of the Home.aspx file.
- Remove the static text content from the page:
- The “Welcome to Our Business, Inc. Web Site…” text inside the table in the <!-- center box --> section
- The “Our Business, Inc. …” text in the <!-- right column --> section
The content of the web form should now match the following:
<asp:Content ID="Content1" ContentPlaceHolderID="plcMain" Runat="Server">
<!-- main content -->
<table style="width:100%;height:500px;border: 0px">
<tr style="vertical-align:top;">
<!-- left column -->
<td style="width:280px" class="HomePageLeftColumn">
</td>
<!-- center column -->
<td style="padding: 3px 5px 0px 5px;width:450px;">
<!-- center box -->
<table cellspacing="0" cellpadding="0" border="0" class="ContainerWithCorners" width="100%">
<tr class="ContainerWithCornersRow">
<td class="ContainerWithCornersTopLeft"> </td>
<td class="ContainerWithCornersTop"> </td>
<td class="ContainerWithCornersTopRight"> </td>
</tr>
<tr>
<td class="ContainerWithCornersLeft"> </td>
<td class="ContainerWithCornersContent" valign="top">
</td>
<td class="ContainerWithCornersRight"> </td>
</tr>
<tr class="ContainerWithCornersRow">
<td class="ContainerWithCornersBottomLeft"> </td>
<td class="ContainerWithCornersBottom"></td>
<td class="ContainerWithCornersBottomRight"> </td>
</tr>
</table>
</td>
<!-- right column -->
<td style="padding: 3px 0px 0px 5px;width:270px">
<!-- text box -->
<table cellpadding="0" cellspacing="0" style="width: 100%;margin-bottom: 10px;" class="Blue">
<tr>
<td class="BoxTitle">Contact us
</td>
</tr>
<tr>
<td class="BoxArea">
</td>
</tr>
</table>
</td>
</tr>
</table>
<!-- /main content -->
</asp:Content>
Replace the text with editable regions so that content editors can manage the page in the Kentico administration interface.
Modify the code of the table in the <!-- center box --> section according to the following:
<!-- center box --> <table cellspacing="0" cellpadding="0" border="0" class="ContainerWithCorners" style="width: 100%;"> <tr class="ContainerWithCornersRow"> <td class="ContainerWithCornersTopLeft"> </td> <td class="ContainerWithCornersTop"> </td> <td class="ContainerWithCornersTopRight"> </td> </tr> <tr> <td class="ContainerWithCornersLeft"> </td> <td class="ContainerWithCornersContent" valign="top"> <cms:CMSPagePlaceholder ID="plcZone" runat="server"> <LayoutTemplate> <cms:CMSWebPartZone ID="zoneMain" runat="server" /> </LayoutTemplate> </cms:CMSPagePlaceholder> </td> <td class="ContainerWithCornersRight"> </td> </tr> <tr class="ContainerWithCornersRow"> <td class="ContainerWithCornersBottomLeft"> </td> <td class="ContainerWithCornersBottom"></td> <td class="ContainerWithCornersBottomRight"> </td> </tr> </table>The CMSPagePlaceholder control (added to the center cell of the middle row) defines an area of the page that users can modify through their browser. Later, you will configure this area to allow content editors to customize the design of the Home page.
Switch to the Design tab and drag a CMSEditableRegion control from the toolbox into the bottom cell of the table on the right of the page.
Set the following properties of the CMSEditableRegion control:
- ID: txtRight
- DialogHeight: 280
- RegionTitle: Right content
- RegionType: HtmlEditor
Switch to the code behind of the home page (Home.aspx.cs) and add a reference to the CMS.UIControls namespace:
using CMS.UIControls;Change the class definition so that it inherits from the TemplatePage class:
public partial class CMSTemplates_MySite_Home : TemplatePageSave the home page files.
Registering the page template in the system
The source files of the home page are ready. Now you need to register the home page template in Kentico.
- Open Kentico in a web browser and log in to the administration interface (default username administrator with an empty password).
- Open the Page templates application.
- Click … next to the New template button and select New category.
- Type My website into the Category display name field.
- Click Save.
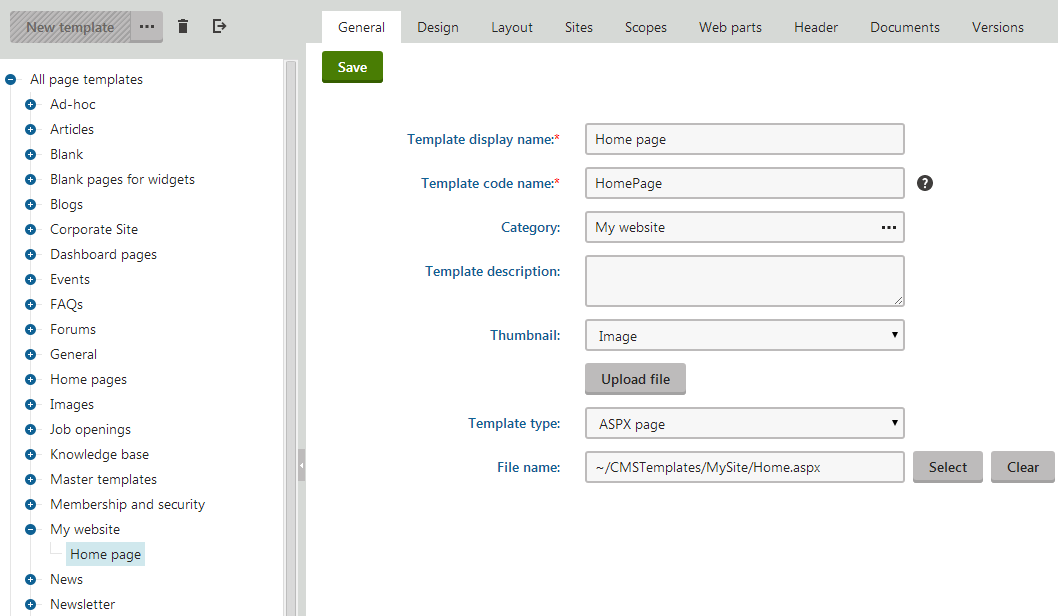
- Click New template and type Home page into the Template display name field.
- Click Save.
- Set the following values on the General tab:
- Template type: ASPX + Portal page
- File name: ~/CMSTemplates/MySite/Home.aspx
- Click Save.
- Switch to the Sites tab and assign the page template to My website.
Adding the Home page
- Open the Pages application.
- Select the root of the content tree (My website).
- Click New ().
- Choose the Page (menu item) page type.
- Type in Home as the Page name and choose the Use existing page template option. Select the My website category and the Home page template.
- Click Save to create the page.
Editing the content of the Home page
With the Home page selected, switch to the Design tab. Here you can see the editable area that you defined in the code of the page template.
Right-click the header of the zoneMain zone and select Configure in the menu.
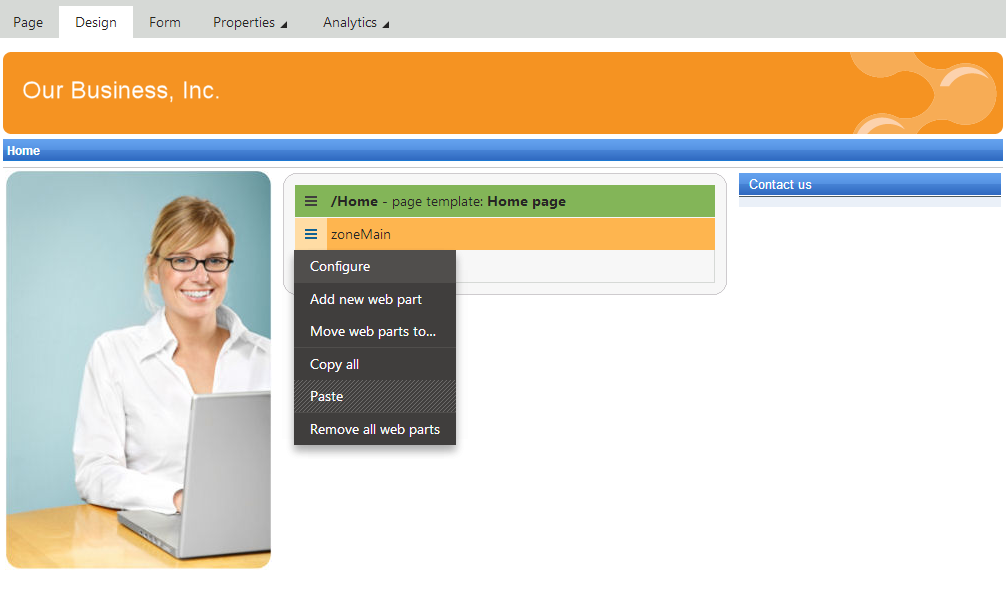
Switch the value of the Widget zone type property from None to Customization by page editor and click Save & Close.
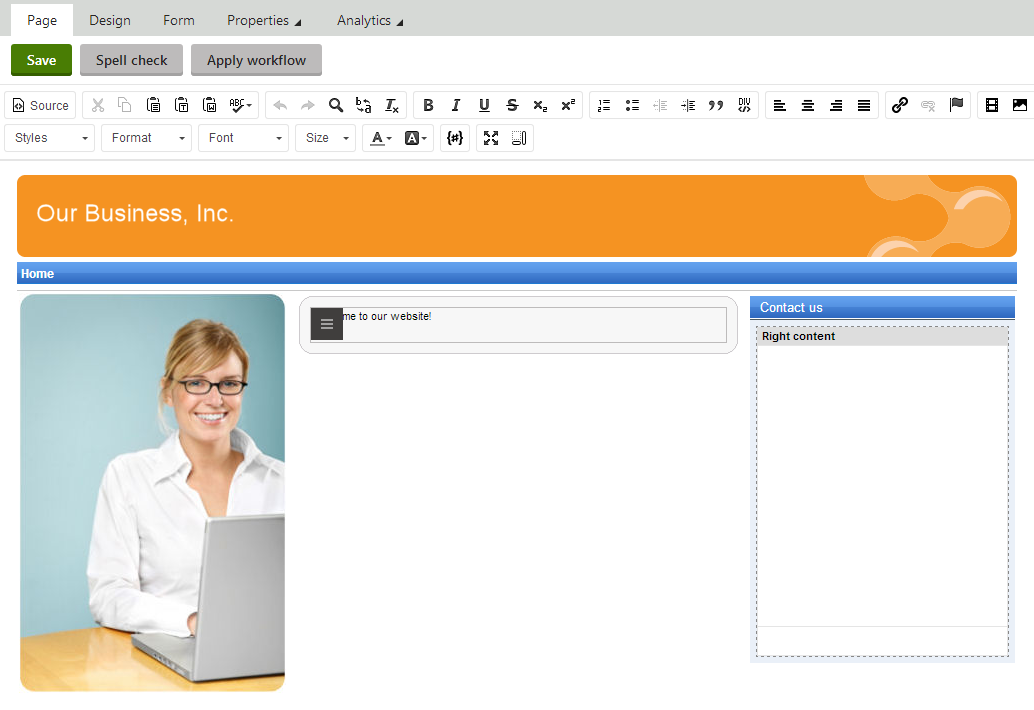
Open the Page tab, expand the widget zone’s menu () and click Add new widget.
- Select the General -> Text widget.
- Click Select.
- Type Welcome to our website! into the Text property
- Click Save & Close.
You can modify the design of the page directly through the browser by adding and configuring widgets. This approach can be useful once the website has some more content or features to be displayed.
- Type the following text into the Right content editable region: Call 800 111 2222
- Click Save. You always need to click Save to confirm changes made to the text of editable regions or widget content on the Page tab.
Switch to Preview mode to see how the home page of your website appears to visitors.
Choosing the website’s home page
When a visitor arrives at the root URL of the website (i.e. its domain name, for example http://www.example.com), the system needs to know which page to display as the home page.
To set the path of the website’s default home page:
- Open the Settings application.
- Select the Content category in the settings tree.
- Select My website in the Site drop-down.
- Clear the Inherit from global settings check box next to the Default alias path setting.
- Type in /Home, which is the alias path of your new home page.
- Click Save.

When visitors access the website without specifying the URL of a particular page, the system automatically displays the Home page.