
Module: Custom modules: custom settings
3 of 9 Pages
Build the global settings UI
You have created a custom module and class representing custom settings. However, at this point, administrators or editors still cannot manage the settings from the administration dashboard.
Let’s develop some UI pages for them.
Admin UI localization
Note that the custom pages created in this example are not localized. For guidance on how to localize Admin UI for your solution and your custom UI pages, see our Admin UI localization documentation. For an example implementation, check out the finished branch of our Training guides repository and look for the SeoSettingsEditPage.
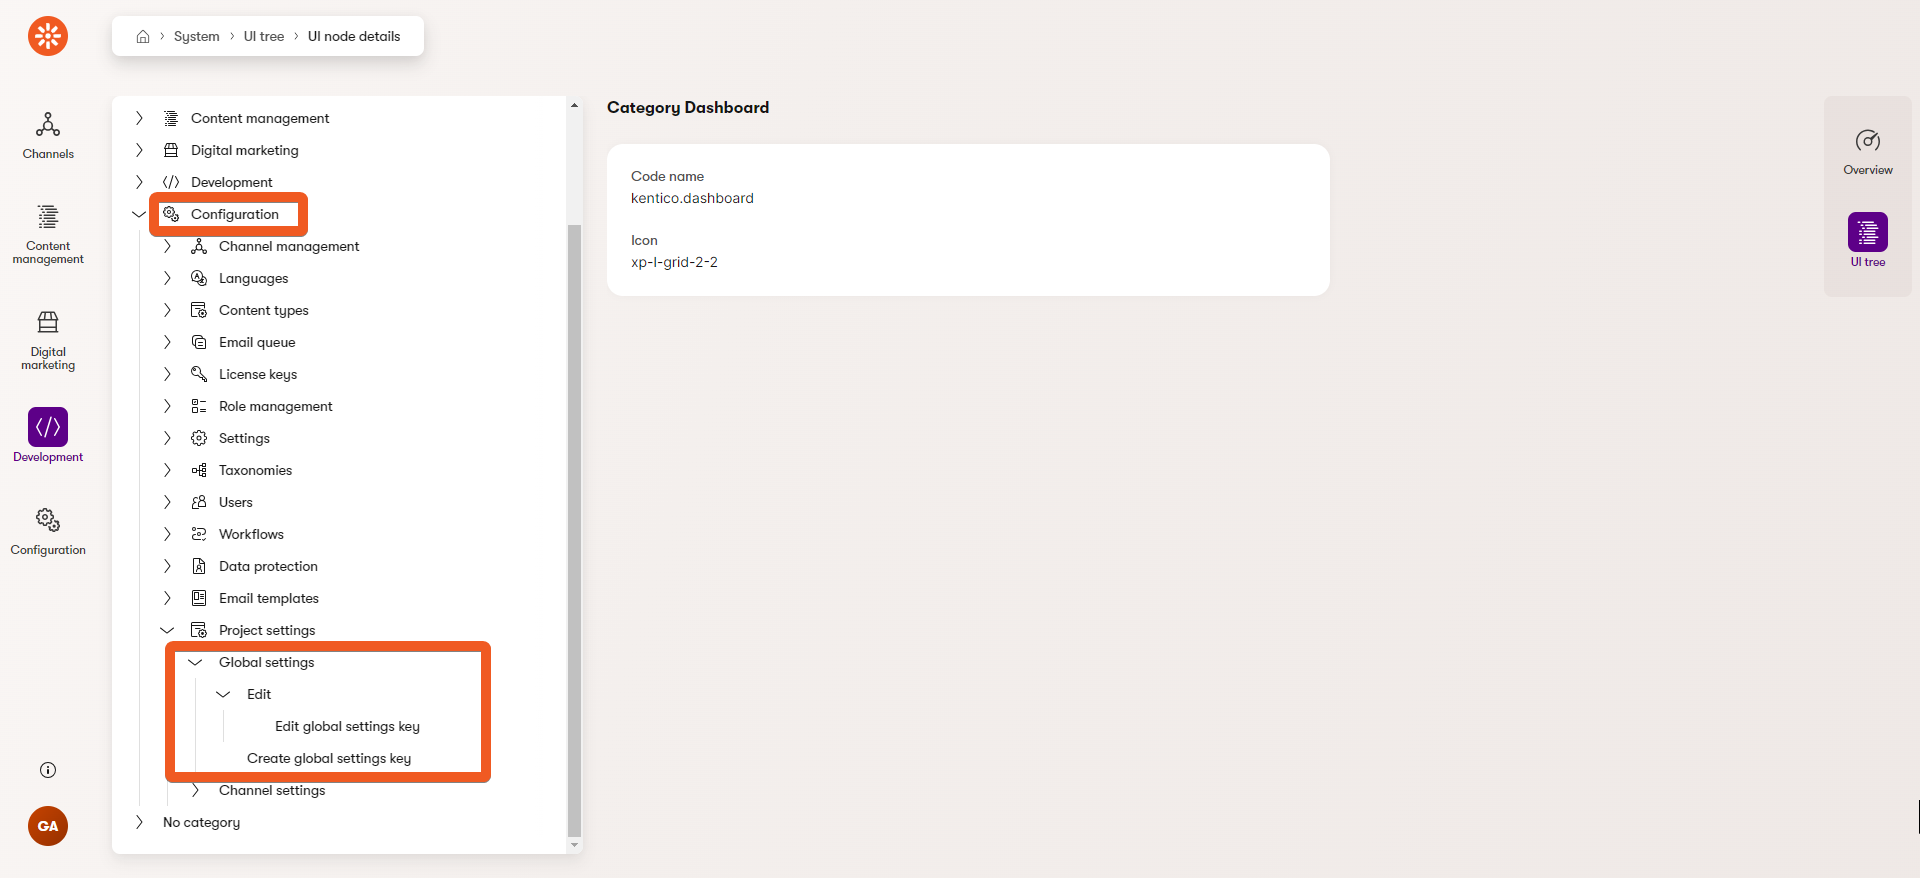
The pages will have the following structure in the UI tree:
- Under the Configuration category, we will have a Project settings application.
- Under the application, there will be a listing of Global settings.
- From the Global settings page, the user can:
- edit a specific setting - through the Edit section holding an Edit global settings key page.
- create a new setting - through the Create global settings key page.
Create the application page
Store customization files separately
We recommend storing any files customizing the Xperience administration separate from the channel-specific files. In our Training guides repository and this series, we use the TrainingGuides.Admin project for this purpose.
If you are using the main branch of our repository and your solution does not contain this project yet, you can follow the steps in the Set up the project section of the cookie consent guide to define it.
If you are working with more of an enterprise-sized solution, our guide about utilizing Clean architecture in Xperience projects may be interesting to you.
In your source code, navigate to your administration customization project (e.g., TrainingGuides.Admin).
Create the following folder structure: Pages/ProjectSettings.
We recommend matching the folder name with the name of your custom module.
In the ProjectSettings folder, create a new class file, ProjectSettingsApplication.cs.
Implement your custom UI application page:
using Kentico.Xperience.Admin.Base;
using Kentico.Xperience.Admin.Base.UIPages;
using TrainingGuides.Admin.ProjectSettings;

// Register the UI application pages - see a links and more details in the info box below.
[assembly: UIApplication(
    identifier: ProjectSettingsApplication.IDENTIFIER,
    type: typeof(ProjectSettingsApplication),
    slug: "project-settings",
    name: "Project settings",
    category: BaseApplicationCategories.CONFIGURATION,
    icon: Icons.BoxCogwheel,
    templateName: TemplateNames.SECTION_LAYOUT)]

namespace TrainingGuides.Admin.ProjectSettings;

// The class must inherit from the ApplicationPage base class.
public class ProjectSettingsApplication : ApplicationPage
{
    public const string IDENTIFIER = "TrainingGuides.ProjectSettingsApplication";
}
Registration and category
Read more about registration parameters in our documentation.
Each UI application page has to be registered under a category. In this example we use Configuration - one of the pre-defined categories in Xperience.
Optionally, you can also create and register your own custom categories.
Permissions
Each application in the Xperience administration needs to declare the set of permissions it actively evaluates.
Our custom module will support viewing, creating, deleting and updating instances of the GlobalSettingsKey class. Let’s add the default system permissions, VIEW, CREATE, DELETE and UPDATE, by decorating the ProjectSettingsApplication class with the UIPermission attributes.
Later on you can further restrict actions (page commands) or UI pages access within the application, using any permission from this set.
The permissions correspond with those assigned to roles in the Role management application.
You can also use any custom permissions that exist in your system or have an application page without any permission requirements. Learn more about permissions.
...
using CMS.Membership;
...
[UIPermission(SystemPermissions.VIEW)]
[UIPermission(SystemPermissions.CREATE)]
[UIPermission(SystemPermissions.DELETE)]
[UIPermission(SystemPermissions.UPDATE)]
public class ProjectSettingsApplication : ApplicationPage
...
See the full ProjectSettingsApplication.cs file in our Training guides repository for your reference.
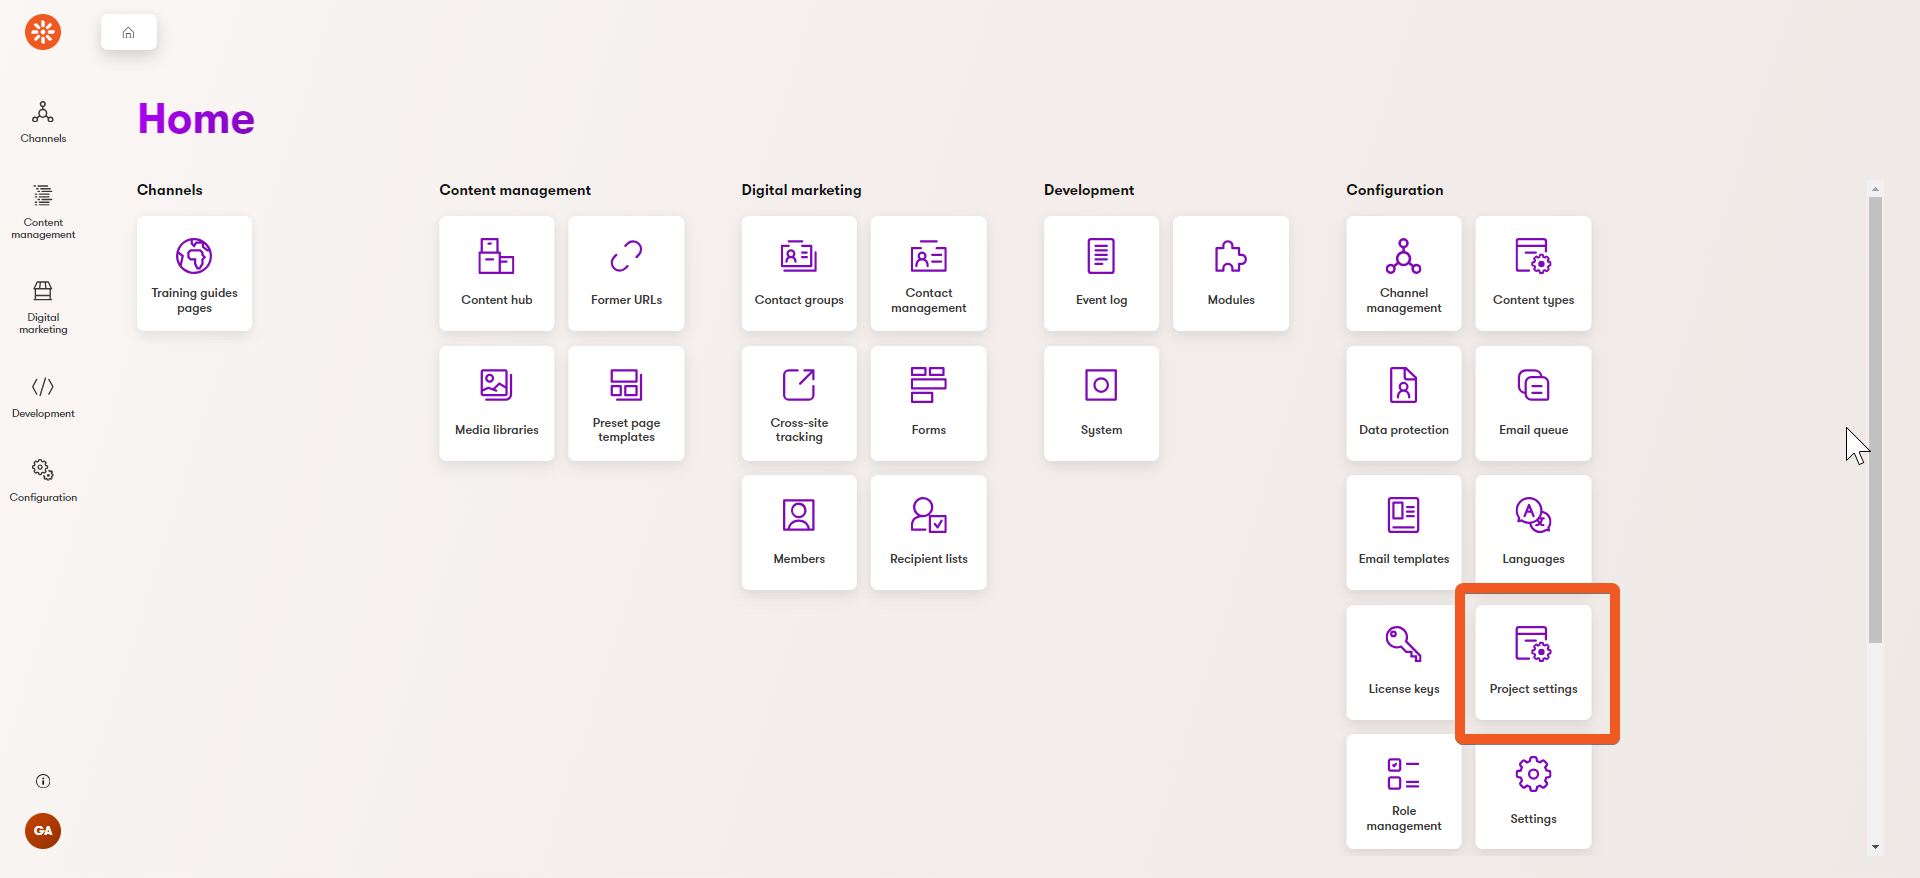
Now if you run your solution, you should be able to see your new Project settings application in the Xperience administration under Configuration.
Define the listing page
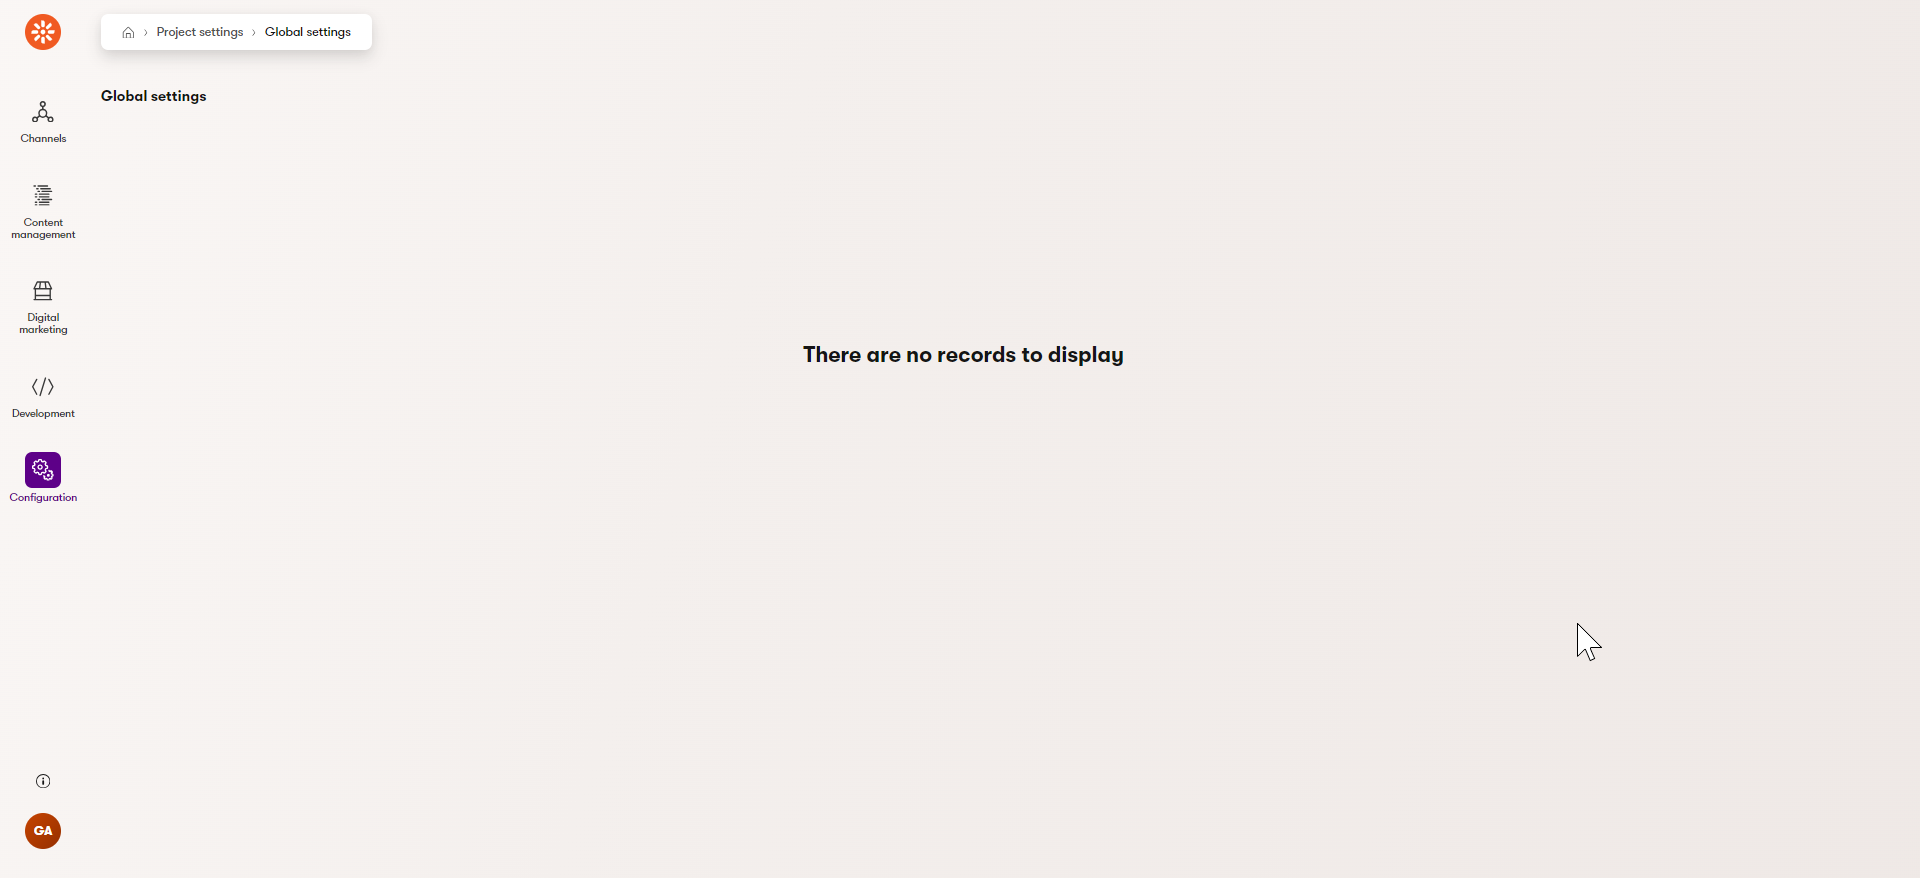
Your application is now accessible in the Xperience administration, but if you open it, you will see an empty page right now.
Instead, we want to show a list of available project settings, with an option to perform basic CRUD operations (for the users with sufficient permissions).
Let’s create a listing page and its underlying edit and create pages.
- Create a ProjectSettings/GlobalSettings folder - let’s keep all our GlobalSettingsKey-related pages in one place.
- In the GlobalSettings folder, create a new class file, GlobalSettingsListingPage.cs.
- Implement a UI page using the Listing UI page template.
Register the page as a child of
ProjectSettingsApplicationcreated in the previous section.Decorate the
Deletemethod override with thePageCommandattribute to restrict the action to users with permission to delete.Learn more about page commands and permissions in our documentation.
C#GlobalSettingsListingPage.csusing Kentico.Xperience.Admin.Base; using TrainingGuides.ProjectSettings; using TrainingGuides.Admin.ProjectSettings; using TrainingGuides.Admin.ProjectSettings.GlobalSettings; using CMS.Membership; [assembly: UIPage( parentType: typeof(ProjectSettingsApplication), slug: "global-settings", uiPageType: typeof(GlobalSettingsListingPage), name: "Global settings", templateName: TemplateNames.LISTING, order: 0)] namespace TrainingGuides.Admin.ProjectSettings.GlobalSettings; // The class has to inherit from ListingPage. public class GlobalSettingsListingPage : ListingPage { protected override string ObjectType => GlobalSettingsKeyInfo.OBJECT_TYPE; public override async Task ConfigurePage() { // Determine which columns of your GlobalSettingsKeyInfo objects to show the user in the list view. PageConfiguration.ColumnConfigurations .AddColumn(nameof(GlobalSettingsKeyInfo.GlobalSettingsKeyDisplayName), "Name") .AddColumn(nameof(GlobalSettingsKeyInfo.GlobalSettingsKeyValue), "Value") .AddColumn(nameof(GlobalSettingsKeyInfo.GlobalSettingsKeyNote), "Note") .AddColumn(nameof(GlobalSettingsKeyInfo.GlobalSettingsKeyName), "Codename"); // Add a "New settings" button at the top. This will navigate the user to a "create" page. // We will define it in the next section. PageConfiguration.HeaderActions.AddLink<GlobalSettingsCreatePage>("New setting"); // Add an "Edit" row action. This will navigate the user to a "edit" section for a specific instance of GlobalSettingsKeyInfo object. // We will define it in the next section. PageConfiguration.AddEditRowAction<GlobalSettingsEditSection>(); // Define a "Delete" action for the user with sufficient permissions to remove an existing setting. PageConfiguration.TableActions .AddDeleteAction(nameof(Delete)); await base.ConfigurePage(); } // Ensure only a user with permissions to delete can perform the delete action. [PageCommand(Permission = SystemPermissions.DELETE)] public override Task<ICommandResponse<RowActionResult>> Delete(int id) => base.Delete(id); }
Read more about listing page template and it’s options in our documentation.
If you copy-pasted the code sample above, note that the GlobalSettingsListingPage class references GlobalSettingsCreatePage and GlobalSettingsEditSection - classes that don’t exist yet. We will create them in the next section.
If you wish, comment out the two lines of code for now. When you visit the Project settings application in your administration, you should see an empty listing page, similar to this:
Define create and edit pages
Both create and edit pages for GlobalSettingsKeyInfo objects will utilize the GlobalSettingsKeyEdit UI form you created earlier.
Edit page
When the user goes to edit a specific instance of the GlobalSettingsKey class, their URL should contain the ID of the object that the user is currently editing, e.g., ~/admin/project-settings/global-settings/2/edit
We first need to create an edit section page to ensure a desired tree structure and correct routing. Subsequently, we will make the edit page a child of the edit section page.
Find more details in the first section of this documentation page.
In the GlobalSettings folder, create a new class file, GlobalSettingsEditSection.cs.
Implement the
GlobalSettingsEditSectionclass, utilizing thePARAMETERIZED_SLUGparameter.C#GlobalSettingsEditSection.csusing Kentico.Xperience.Admin.Base; using TrainingGuides.ProjectSettings; using TrainingGuides.Admin.ProjectSettings.GlobalSettings; // Register the UI page as child of GlobalSettingsListingPage. [assembly: UIPage( parentType: typeof(GlobalSettingsListingPage), slug: PageParameterConstants.PARAMETERIZED_SLUG, uiPageType: typeof(GlobalSettingsEditSection), name: "Edit", templateName: TemplateNames.SECTION_LAYOUT, order: 10)] namespace TrainingGuides.Admin.ProjectSettings.GlobalSettings; // Inherit from EditSectionPage and specify the type of object edited public class GlobalSettingsEditSection : EditSectionPage<GlobalSettingsKeyInfo> { }In the GlobalSettings folder, create a new class file, GlobalSettingsEditPage.cs.
Implement your edit page:
C#GlobalSettingsEditPage.csusing Kentico.Xperience.Admin.Base; using TrainingGuides.ProjectSettings; using TrainingGuides.Admin.ProjectSettings.GlobalSettings; using Kentico.Xperience.Admin.Base.Forms; // Register page as a child of GlobalSettingsEditSection [assembly: UIPage( parentType: typeof(GlobalSettingsEditSection), slug: "edit", uiPageType: typeof(GlobalSettingsEditPage), name: "Edit global settings key", templateName: TemplateNames.EDIT, order: 0)] namespace TrainingGuides.Admin.ProjectSettings.GlobalSettings; public class GlobalSettingsEditPage : InfoEditPage<GlobalSettingsKeyInfo> { [PageParameter(typeof(IntPageModelBinder))] public override int ObjectId { get; set; } public GlobalSettingsEditPage(IFormComponentMapper formComponentMapper, IFormDataBinder formDataBinder) : base(formComponentMapper, formDataBinder) { } public override Task ConfigurePage() { // Assign your 'GlobalSettingsKeyEdit' UI form code name to the page. The assignment is case-insensitive. PageConfiguration.UIFormName = "globalsettingskeyedit"; return base.ConfigurePage(); } }
Create page
In the GlobalSettings folder, create a new class file, GlobalSettingsCreatePage.cs.
Implement the page using the
CreatePagebase class.C#GlobalSettingsCreatePage.csusing Kentico.Xperience.Admin.Base; using TrainingGuides.ProjectSettings; using TrainingGuides.Admin.ProjectSettings.GlobalSettings; using Kentico.Xperience.Admin.Base.Forms; // Register page as a child of GlobalSettingsListingPage created above. [assembly: UIPage( parentType: typeof(GlobalSettingsListingPage), slug: "create", uiPageType: typeof(GlobalSettingsCreatePage), name: "Create global settings key", templateName: TemplateNames.EDIT, order: 20)] namespace TrainingGuides.Admin.ProjectSettings.GlobalSettings; // Specify the entity which this page will create (GlobalSettingsKeyInfo) // and the page to redirect to after the entity has been cerated (GlobalSettingsEdit page) public class GlobalSettingsCreatePage : CreatePage<GlobalSettingsKeyInfo, GlobalSettingsEditPage> { public GlobalSettingsCreatePage(IFormComponentMapper formComponentMapper, IFormDataBinder formDataBinder, IPageLinkGenerator pageLinkGenerator) : base(formComponentMapper, formDataBinder, pageLinkGenerator) { } public override Task ConfigurePage() { // Assign your 'GlobalSettingsKeyEdit' UI form code name to the page. The assignment is case-insensitive. PageConfiguration.UIFormName = "globalsettingskeyedit"; return base.ConfigurePage(); } }
Learn more about the edit UI page template and it’s options here.
To see another edit page example implementation take a look at our Add a custom field to the Contact profile guide.
Build your solution and navigate to System → UI tree in the Xperience administration. If you have followed along with our example, you should be able to see your new pages in a UI tree structure:

When you navigate to your new Project settings application, you should now be able to create, view, edit, and delete custom settings, like in this video:
If you still only see an empty listing page with no New setting button, make sure you uncommented the lines in the GlobalSettingsListingPage, referencing GlobalSettingsCreatePage and GlobalSettingsEditSection.