
Module: Contact management
30 of 44 Pages
Configure form properties and after-submission behavior
After you create a form or when editing an existing form, you can define the following properties by selecting General in the options panel on the right:
|
Property |
Description |
|
Form name |
Used in the administration and when adding forms to pages via the Forms widget. New forms have an automatically generated name based on the current date and time, for example: Form (2022-12-02_12:00) |
|
Code name |
An identifier of the form. Used internally by the system and by developers. Changes of the form code name will break existing forms placed onto pages via the Form widget. You need to reselect the form in these widgets after the change. |
|
Table name |
The database table storing the collected submissions. Used by developers. |
|
Class name |
A globally unique identifier of the form. Used by developers. The class name is updated automatically whenever the form’s code name is changed. Such changes break any existing code files generated for the form. Developers need to update or regenerate the code. |
|
Overwrite existing contact information with submitted data |
If selected, form submissions by known contacts update already collected contact information. If disabled, only empty contact attributes are filled. |
Select Save to confirm any changes.
Actions after form submission
There are several possible actions that can occur after a user submits a form on the live site – Display text, Redirect to page, Redirect to URL. The action is configured when placing individual forms onto a website channel page.
Form submission notifications
The system can be configured to send notifications to selected administration users whenever a visitor on the live site submits a particular form. See Form submission notifications.
Automation and autoresponders
You can enable a basic form autoresponder or set up advanced email automation. This allows you to automatically send one or more email messages to every user who submits the form.
Email field requirement
To send autoresponder emails or automated email follow-ups, the form must contain a field that allows users to submit their email address. The autoresponder can only be enabled if a form field is mapped to the Email contact attribute in the Form Builder.
Autoresponders
When editing a form in the Forms application, select Autoresponder in the options panel on the right. To send a simple autoresponder email, select one of the following Autoresponder options:
- Select email – sends an email prepared in an email channel application in the Xperience administration. This option is recommended for most scenarios. See Emails for more information.
- Custom – for scenarios that require advanced or dynamic autoresponder content. Sends a custom autoresponder email prepared by developers, with any required content, including values that the user entered into the form. Note that the system does not track statistics for custom form autoresponder emails.
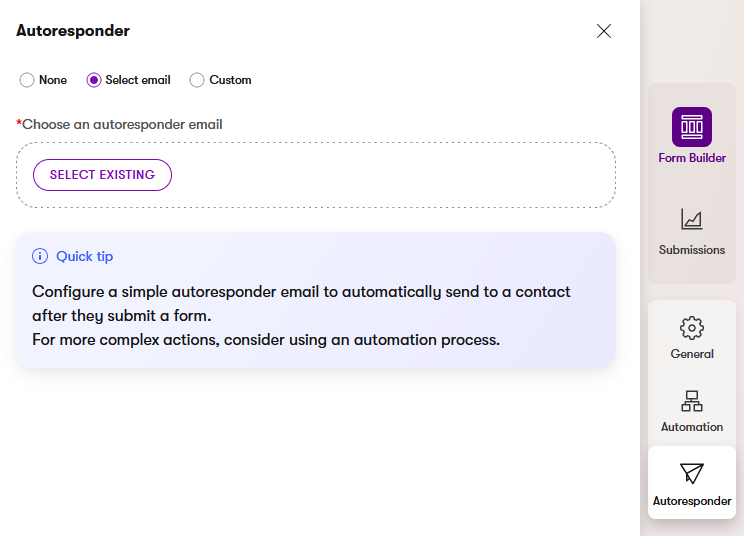
Select Save to confirm any changes.
Automation processes
If you wish to set up a more advanced email scenario when a form is submitted, you can create an automation process in the Forms application via the Automation tab in the options panel on the right. This allows you to send a series of multiple emails, add waiting intervals, or send different emails based on conditions.

Once completed and enabled, the automation process is then triggered for any user who submits the form.
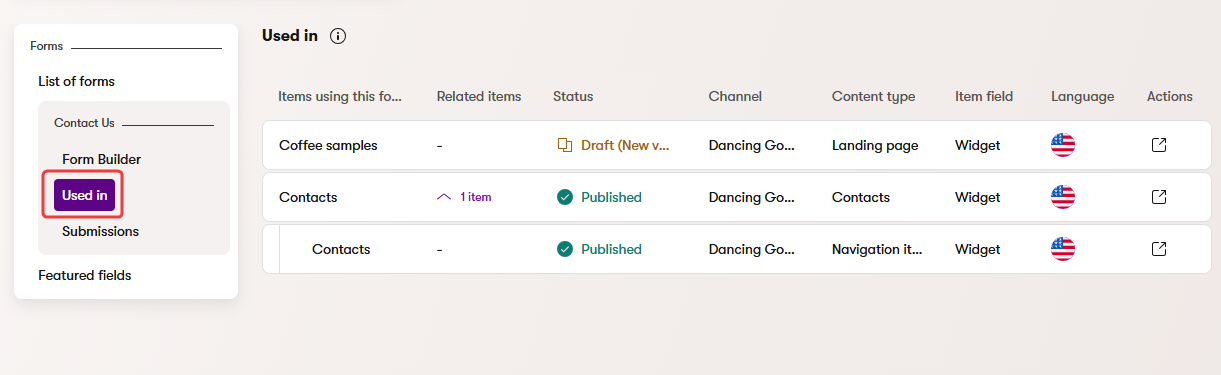
Track usage of forms
The Content reuse locator feature helps you track where each form is displayed. This can be useful if you are considering deleting a form or making significant changes, particularly if your project contains a large number of pages with forms.
- Open the Forms application.
- The In use column in the form listing indicates whether a form is displayed on at least one page.
- Select the form you want to track.
- Navigate to the Used in tab.
The tab displays a list of all pages that use this form in their Page Builder content (via the Form widget). You can expand the Related items column for the listed pages to view any content items or pages that reference the given page and use the form indirectly.
Tracking limitations
Form usage tracking does not include:
- Pages that render the form directly in their code
- Form submission notifications
- Campaigns that use the form as an asset
- Automation processes triggered by the form’s submission (to see a list, switch to the Form Builder tab and select the Automation view mode)
- Automation processes containing custom components with properties that select forms
Synchronize forms
Xperience allows you to easily transfer forms and their field configuration from one instance of Xperience by Kentico to another.
Currently, form synchronization does not include:
- Form submission data
- Autoresponder settings of the form
- Automation processes related to the form
- Form submission notifications
- Visibility configuration of featured form fields
For detailed information and instructions, see Content sync.
Segment contacts based on form submissions
You can use forms to segment your contacts. For example, you can build a contact group for visitors who have submitted the Contact Us form.
