
Module: Contact management
39 of 44 Pages
Analyze and customize automation processes
Features described on this page require the Xperience by Kentico Advanced license tier.
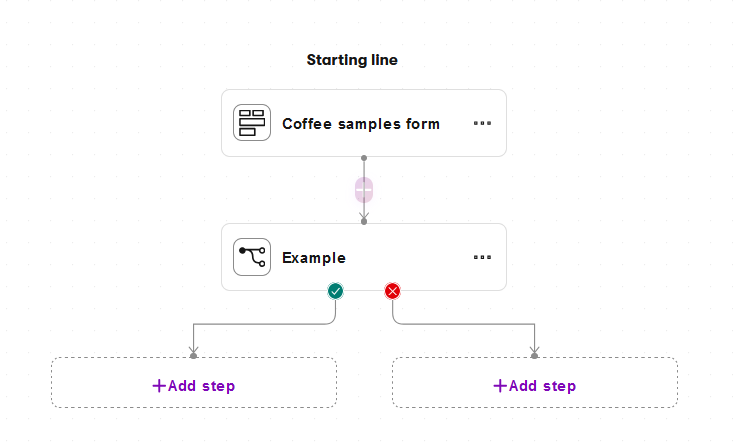
Automation allows you to set up processes that dynamically interact with your audience (contacts). Each process consists of steps that perform a specific marketing action, such as sending an email. You design the steps within each process using a visual Automation Builder interface.
Once enabled, automation processes run for individual contacts who meet the trigger conditions. These contacts then move through the steps in the process.
In the current version, you can use automation to set up advanced email follow-ups when a form is submitted or when a visitor registers as a member. With automation, you can send a series of multiple emails, add waiting intervals, or send different emails based on conditions.
Create an automation process
Open the Automation application in Xperience.
Select New process.
Fill in the following properties:
- Process name – the name of the process displayed in Xperience.
- Process recurrence – determines if the process is allowed to run repeatedly for the same contact. See Automation process recurrence to learn about the available options.
Save the process. You will be redirected to the Automation Builder.

Within the builder, you can edit the steps of the automation process.
Once you finish designing the process, select Enable. This allows the process to trigger and run for contacts who meet the trigger conditions.
Creating processes from forms
You can also create automation processes directly from the Forms application. This automatically sets the given form as the trigger for the process. See Automation processes in the forms documentation.
Automation process recurrence
Automation processes can run repeatedly in the following ways:
- Always – Runs whenever a contact meets the trigger conditions, even if the process is already running for the same contact. Use with caution, as this may result in unwanted actions, such as contacts receiving the same email multiple times.
- Only once – Runs once when a contact meets the trigger conditions, and never repeats for the same contact.
- If not already running – Runs whenever a contact meets the trigger conditions, but only if the process isn’t currently running for the same contact. Runs repeatedly if a contact meets the trigger conditions again after completing the process. For this type of recurrence to occur, the contact must be in the Finish step.
Triggers
Triggers determine when the process runs for contacts. In the current version, the following types of triggers are available:
- Form – Starts the process when a form is submitted.
- Registration – Starts the process after a visitor registers as a member. The trigger occurs only after the member becomes active (enabled), for example after confirming the registration when using double opt-in via email confirmation. See Member registration automation scenarios for detailed information. This trigger type cannot be selected if the process already contains an Email step configured to send an email with the Form autoresponder purpose (such processes require a Form trigger).
- Custom activity – Starts the process when the selected custom activity is logged.
- Custom – Developer-created triggers that start processes based on specific events. The available custom triggers depend on your project’s implementation (consult your developers to learn more). See Custom automation triggers for technical details.
Steps
When adding a step, the Select step type dialog groups the available step types into Steps and Conditions categories. Use the category tabs or the search box to find the step type you need.
An automation process can contain the following types of steps:
Trigger – Fixed first step that determines when the process runs. A process can only have one trigger. See Triggers.
Send email – Sends an email from an email channel. The following email purposes are supported:
- Form autoresponder – for scenarios where the process is triggered by an email subscription form. Use a form autoresponder email to send the double opt-in link used to confirm the subscription. Typically, this is the first email sent by the automation process.
- Automation – for all other emails sent as part of the automation process.
Wait – Contacts remain in this step for a selected time interval or until a specific date, before continuing to the next step.
Log custom activity – Logs the selected custom activity. Another automation process can be set up to trigger based on the logged activity.
Set contact field value – Allows you to change the value of the selected field for the processed contact. Currently, you can set a single fixed value for all contacts who pass through the step. For example, you can use this together with custom fields to set a status flag for contacts.
Customize the field selection
The fields available for the step are taken from the Set contact field value step UI form located under the Contact management - Contact system class. If you want to set the values of custom contact fields using this step, you need to add them to the UI form.
Field editor field settings are applied to the field value input shown in the step’s configuration, with these exceptions:
- The default fields cannot be deleted from this UI form.
- Marking fields as required or disabled is not supported and does not manifest in the automation step’s selector.
- The order of the fields will not reflect in the step’s selector. The order is alphabetical by default.
- AI features are not supported in this UI form.
- Fields without a database column are not supported in this UI form.
Rule-based condition – Splits the process into true and false branches based on a specified condition. You build the condition in the step configuration UI using a set of predefined rules based on contact attributes and activities.
Finish – Represents the end of the process (either successful or not). A process may contain multiple Finish steps. For processes with If not already running recurrence, contacts must be in this step for the process to start again.
Custom – Developer-created steps that perform project-specific logic. The available custom steps depend on your project’s implementation (consult your developers to learn more). See Custom automation steps for technical details. Two kinds are available:
- Custom actions – perform an operation, such as synchronizing data to an external system or sending a notification
- Custom conditions – branch the process into true and false paths based on project-specific logic.
Rule-based conditions
When building the condition for Rule-based condition steps within an automation process:
- Use the search or select categories to find the appropriate condition.
- Conditions are organized together within condition groups.
- Select Add condition group to create multiple groups. A selector appears above the groups where you can choose if Any or All of the condition groups need to be fulfilled.
- To add individual conditions to a group, select Add another condition.
- For each group, you can select if Any or All of the conditions need to be fulfilled.
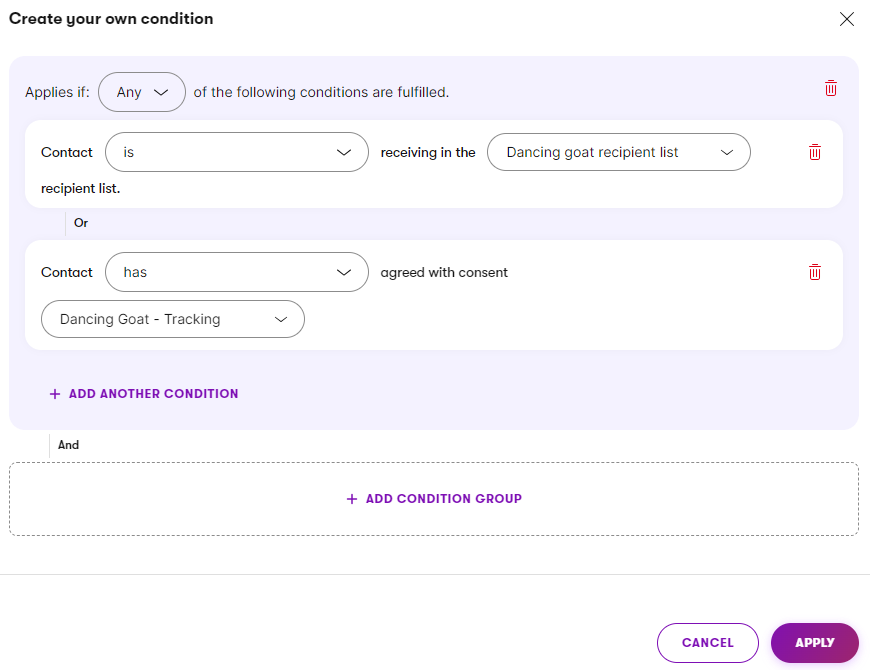
When adding the Contact field value is empty condition for a custom field which uses a custom data type, make sure your project’s developers have set up the empty value for custom fields.
Automation process analytics
On the Statistics view of individual automation processes, you can view contact statistics for individual steps:
- – how many contacts have passed through the step.
- – how many contacts are currently waiting in the step. Only available for Wait steps.
The statistics are updated every 30 minutes. You can manually refresh the statistics on demand using the Refresh button.
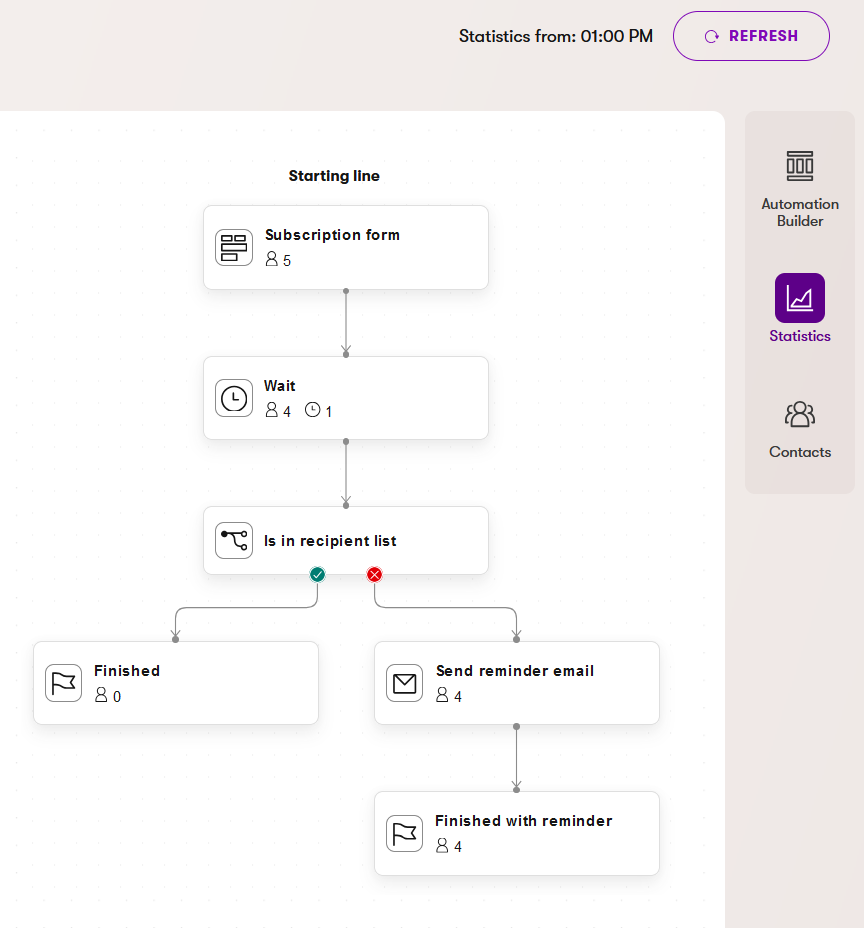
You can also view a list of contacts who triggered the process on the Contacts view. For each contact, the list provides additional information, such as the contact’s current step. A single contact may appear in the list multiple times if repeated runs are allowed by the recurrence setting of the process.