
Module: Contact management
29 of 44 Pages
Create and edit forms
You can create new forms in the Forms application:
- Open the Forms application.
- Select New form.
The system creates a new form and opens the Form Builder.
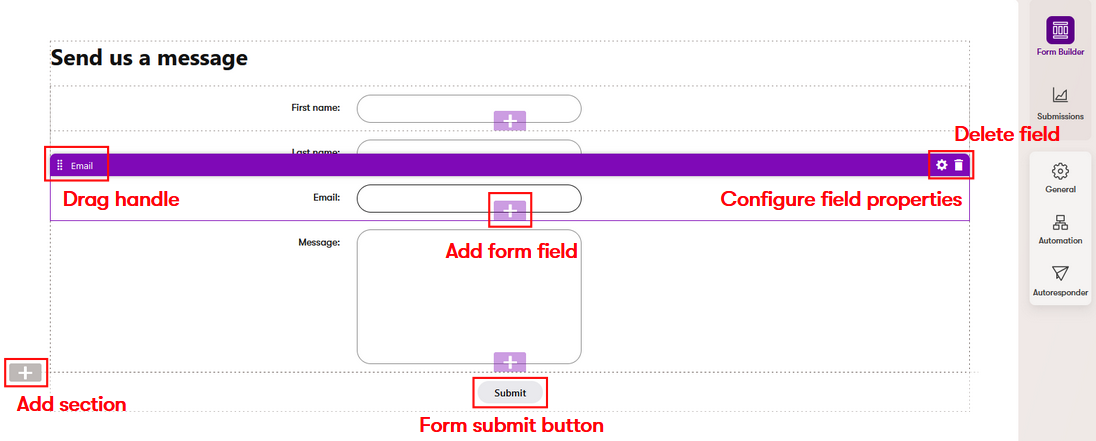
Form Builder is a graphical interface for designing forms in Xperience. Editors modify the overall form layout, add various types of fields, and adjust their position in the form. The resulting form appears as it will display on the live site.
Using Form Builder, editors can:
In addition to the Form Builder interface, the system allows you to:
- Access form submissions collected from users
- Configure general form properties and behavior
- Choose actions that occur after the form is submitted
- Configure notifications about form submissions for administration users
- Set up autoresponders or advanced email automation after form submission
- Track usage of forms
- Synchronize forms
- Configure form properties and after-submission behavior
Set form layout
The layout of a form is composed of sections. Each section contains one or more zones to which you can add fields.
The system provides a Default section that organizes fields in a basic single-column layout. The project’s developers may prepare additional types of sections that allow you to create more advanced form layouts.
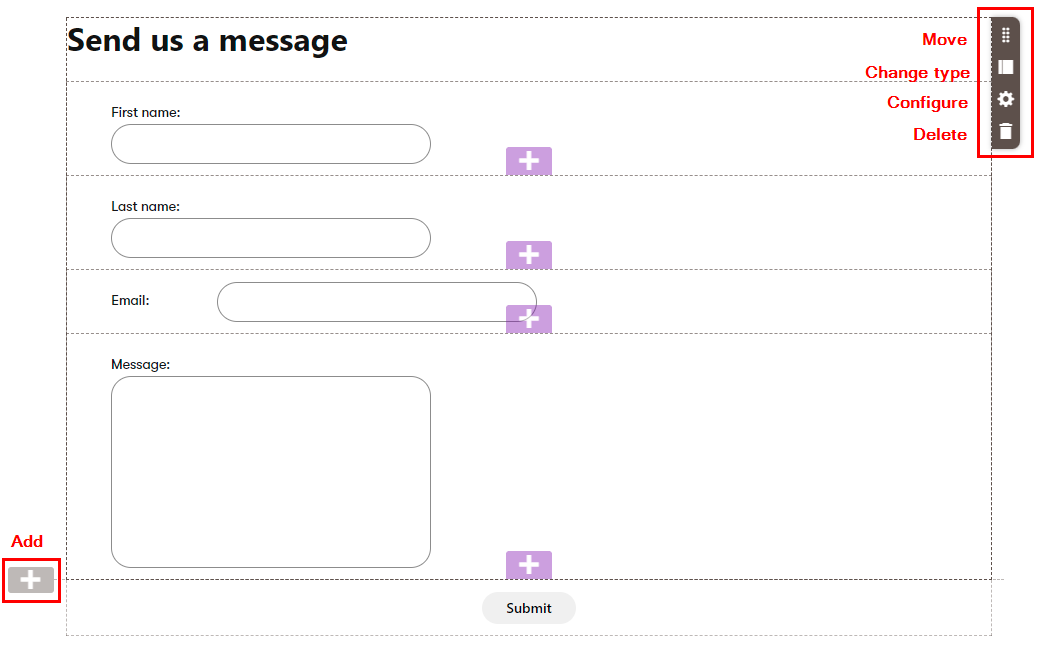
To edit the layout of a form, add or adjust sections using gray UI elements:
- Add section – select a gray plus button located on the left to insert a new section. The list of available section types depends on the implementation of your project.
- Move section – hover over a section and drag it by the handle among the section buttons on the right.
- Change section type – you can change the type of a section to adjust the form’s layout. Hover over the section you want to modify, select the Change section type button, and select the section type you wish to use.
- Configure section – opens a dialog where you can set values for properties that affect the content, appearance, or behavior of the section. The Configure button is only available for sections with configurable properties. Check with your project’s administrators or developers for more information about the available section types and their properties.
- Delete section – hover over the section you want to remove and select the delete button on the right. This also deletes all form fields in the section, which can lead to a loss of data in existing forms.
Changes made to sections are saved automatically. After creating the required form layout through sections, you can move fields between the resulting zones.
Add fields
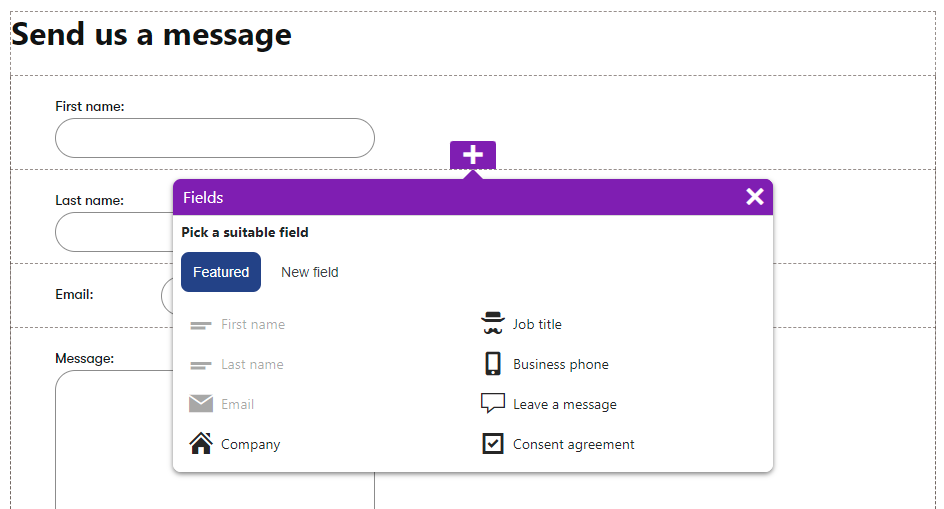
Select the purple plus buttons in the form editing area to add new fields. The Fields dialog opens, which allows you to add fields from two categories:
- Featured – offers fields frequently included in forms, preconfigured for easy and quick use. Many featured fields automatically map the submitted information to the contact representing the visitor in the system (for visitors who give consent). See the contact attribute mapping section for more details.
- New field – allows editors to select a basic field type and configure the field from scratch. Information collected by these fields is not automatically used by the system (unless configured otherwise), but can be accessed in the form’s submissions.
The form saves automatically each time a new field is added.
After creating a new field, we recommend setting an appropriate Name property based on the field’s purpose. By default, the Name is generated based on the type of the selected field. Changing the value later once the form starts collecting data can be problematic.
See Field properties for details.
Hide featured fields
If any of the featured fields are not relevant for your forms, you can hide them from the Fields dialog that appears when adding new form fields:
- Switch to the Featured fields tab in the left-side navigation menu of the Forms application.
- Toggle the Visibility in forms switcher for the corresponding featured fields.
Field properties
Fields in the form are configurable. You can change a field’s label, tooltip, default value, and other properties depending on the field type via the properties dialog.
- Select the field you wish to configure.
- Open the properties dialog by selecting configure ().
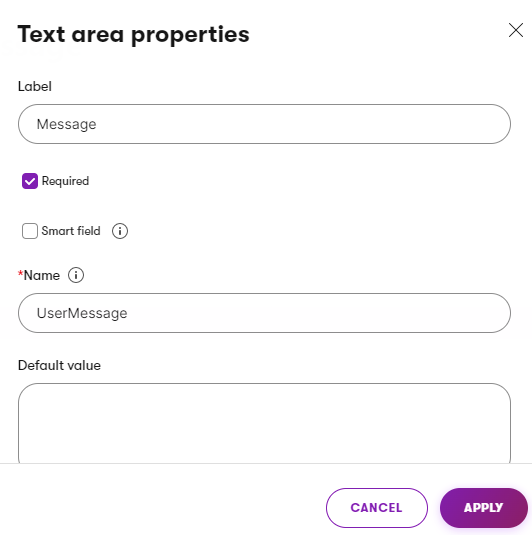
- Select Apply to save your changes.
Smart fields
You can configure fields to behave as “smart fields”, which means they are only displayed on repeated views of a form as a replacement for other fields that the visitor has already filled in. For more information, see Use smart fields in forms.
Map form submission to contact attributes
Xperience can use the information collected via forms to update contacts representing website visitors in the system. If a visitor submits a form, the system automatically transfers the entered values into the data of a matching contact (for visitors who give consent). You can also use the same approach to update the data of existing contacts when a visitor provides new information.
Mapping links a form field to a specific contact attribute. You control how form fields are mapped via the Mapped to contact attribute field property.
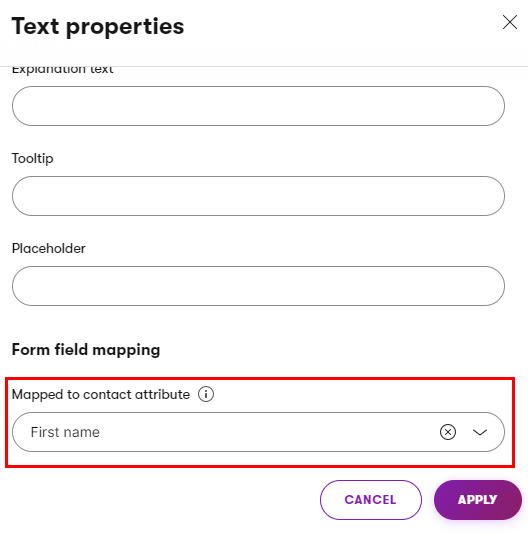
For example, if the form has a field where users enter their email address, you can map this field to the Email contact attribute. When a user submits the form, the system automatically saves the field’s value as the email address of the contact representing the given user.
Contact mapping and featured fields
Certain featured fields are preconfigured to map to the corresponding contact attribute (e.g., First name, Last name, Email). The mapping can be changed. You can view and modify the field’s configuration using the properties dialog.
Contact email changes
If you have the Overwrite existing contact information with submitted data option enabled on the form’s General tab, it is possible for visitors to change their contact information by submitting data into mapped fields. However, because a contact’s email address is its main identifier in Xperience, the system does not allow the email to be changed based on data submitted through forms.
If you have a form field mapped to the Email contact attribute, and a visitor submits a different value than the associated contact’s current email address, all related field updates are performed for a different contact. Either an existing contact that matches the submitted email value is used, or a new contact is created.
In these cases, the given visitor’s associated contact remains unchanged, but all subsequent actions, such as logging of the Form submission activity and triggering of automation processes, are done for the “other” contact that matches the submitted email address.
Field visibility
Form Builder allows you to configure when and how form fields are displayed to users. Fields can either be always visible, hidden, or have conditional visibility. Visibility conditions are always based on the value of another reference field in the form. For example, a “Company name” field can be configured to only appear when users select “Business” in a preceding “Account type” field. This helps keep forms clean and relevant for individual users.
To set the visibility of fields in Form Builder:
- Select the field whose visibility you want to configure.
- Open the properties dialog by selecting configure ().
- Navigate down to the Visibility section.
- Select one of the available options:
- Always – the field is always visible. This is the default state for all fields.
- Conditional – the field is displayed based on a selected reference field and condition. This option is not offered for the first field in the form (since no reference fields are available).
- Hidden – the field is never displayed in the form on the live site. Hidden fields allow you to remove a field from the form while preserving the field’s data in existing form submissions. Hidden fields can also be used by developers to set form values programmatically.
- For the Conditional option, continue with the following configuration:
- Select a Reference field. This field’s value is checked by the visibility condition.
- The reference field must always be placed “above” the field with the condition. If your form has an advanced layout, e.g., with multiple columns, you may need to consult with your project’s developers to understand the order of fields.
- Select a Condition (Equal to, Contains, Is empty, etc.).
- The available conditions depend on the type of the reference field.
- Each form field can only have one visibility condition.
- Enter the Value against which the reference field will be evaluated (the Value input is not provided for some conditions, such as Is empty).
The value is not case-sensitive. For example, an Equal to condition with a Value set to “copilot” is fulfilled even if the input in the reference field is “coPilot”.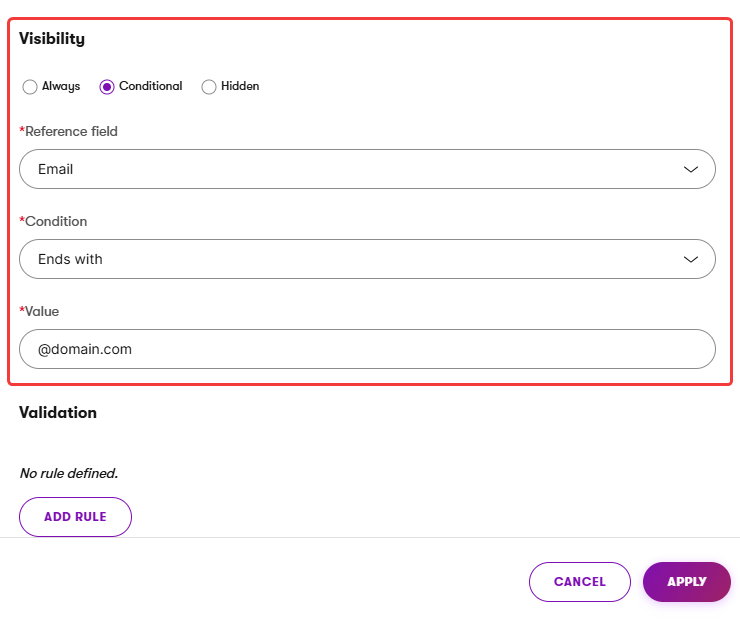
- Select a Reference field. This field’s value is checked by the visibility condition.
- Select Apply to save your changes.
The Form Builder interface displays the following icons to indicate field visibility:
- for fields with Conditional visibility
- for hidden fields
The field’s visibility configuration is now applied when users view the form on the live site. If using Conditional visibility, the field only appears when the reference field fulfills the given condition.
Behavior of fields hidden by visibility conditions
When a field’s visibility condition is not met, the field is not rendered anywhere in the form’s output code (there is no hidden input).
Validation does not occur for hidden fields.
If a field is visible when the form is initially displayed, but later becomes hidden before the form is submitted, any data entered into the field is not included. The form submission instead stores an empty value (for non-required fields) or the field’s default value (for required fields).
Field validation
Validation rules restrict which values can be submitted into form fields. For example, validation can limit the maximum number of characters or the maximum numerical value a user can enter into a field.
Validation of empty values
The system skips the evaluation of validation rules for form fields that are submitted with an unfilled value. If you wish to enforce user input for a particular field, mark it as Required in the field’s properties dialog.
To add validation rules to fields in Form Builder:
- Select a field.
- Open the properties dialog by selecting configure ().
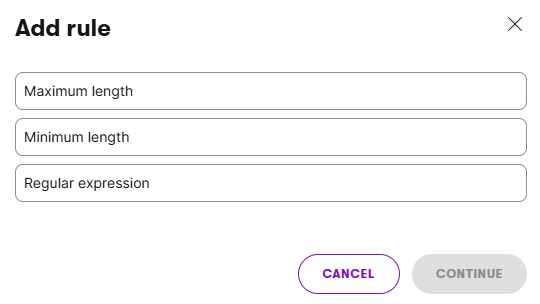
- Navigate down to the Validation section and select Add rule.
- Select a rule and Continue.
- The available validation rules depend on the type of the form field.
- The available validation rules depend on the type of the form field.
- Set the validation criteria by filling in the rule’s properties, e.g., the maximum length of the text input.
- (Optional) Enter the Error message text.
- This text is displayed to users when the field’s value does not meet the rule’s requirements. If you leave the message empty, a default one will be generated based on the rule’s current configuration. You can check the generated error message text in the list of applied rules after you Save.
- Save to apply the rule to the field.
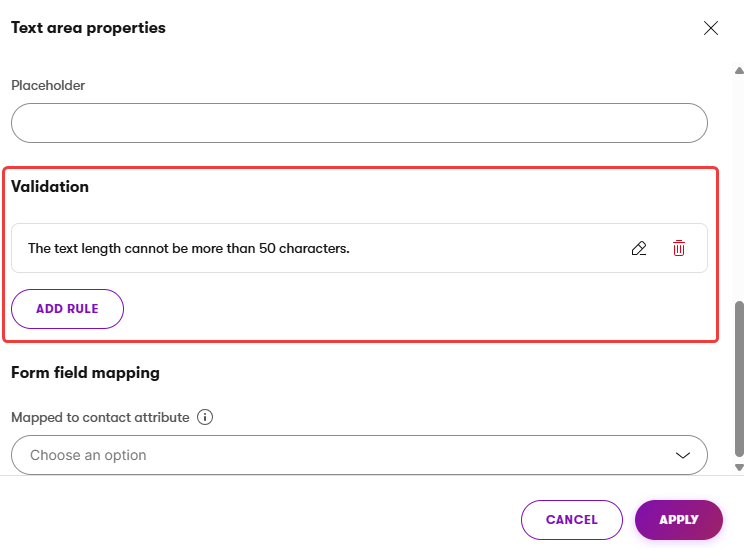
- Repeat the process if you wish to add multiple validation rules for a single field.
- When adding multiple validation rules, be careful not to create contradictory validation criteria that would prevent users from entering any value.
- Select Apply to save your changes.
The added validation requirements are now evaluated whenever a user submits the form. If the input is not valid, the form submission fails and the error message text appears next to the field. The user can adjust the value and submit the form again.
Validation only works for visible fields. Fields that are hidden as a result of their visibility configuration are not validated.
Move and reorder fields
To change the order of existing fields or move them between different zones in the form layout:
- Select a field in the form.
- Drag the field by the handle () or the header that appears when you select a field.
Delete fields
To delete fields from the form:
Removing fields from forms with existing submissions
Removing a field from a form with existing submissions also deletes all data the field gathered over its lifetime.
If you wish to remove a field while preserving its data, you can set the field’s visibility to Hidden.
- Select the field you wish to remove.
- Select the delete () icon in the upper right.
- Confirm the removal via the popup dialog.
Set the submit button text
Every form contains a button that allows users to submit the entered data. The submit button is positioned at the bottom of the form and cannot be moved.
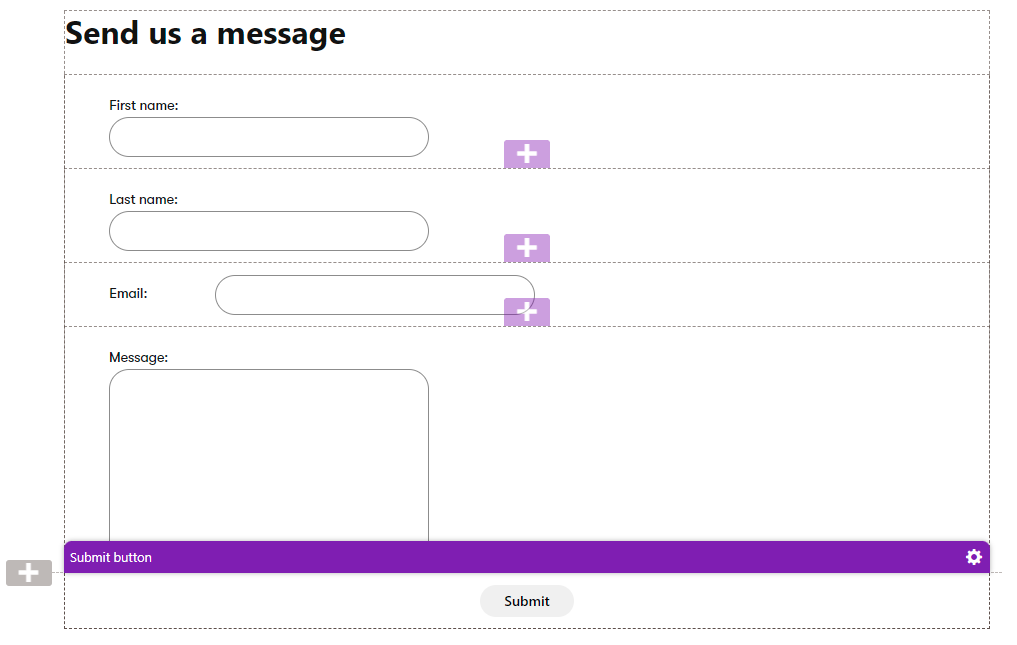
The Form Builder allows editors to change the text of the submit button’s label:
- Hover over the submit button at the bottom of the form.
- Open the button’s properties dialog by selecting configure ().
- Enter the desired text into the Submit button text property.
- Select Apply to save the change.