
Module: Manage content
22 of 24 Pages
Set up and configure a workflow
Workflow defines the lifecycle of content, including pages, reusable content items, headless items and emails. Each workflow has one or more custom steps between the default Draft and Published steps. This allows you to ensure the quality of content by setting up a reviewing and approval process tailored specifically for your organization. The system provides workflow notifications to facilitate smooth movement of items through the workflow.
An example of a simple workflow process is a website that publishes scientific articles. An author writes an article and sends it for approval to an editor who makes corrections and submits the article to the head of the respective department. The head then publishes the page, making it publicly accessible on the website.
Create a workflow
- Open the Workflows application.
- Select the New workflow button.
- Fill in the Workflow name and optionally a code name in the Identifiers section.
- Select Roles with full control – users with these roles are permitted to edit items in all steps within the workflow, move items to the next or previous step, and also directly publish items or send/schedule regular emails from any step.
Workflow roles and other permissions
In addition to the role settings for workflows, the system also checks other relevant permissions when deciding if a user is allowed to edit an item under workflow. Users need the appropriate application-level permission to access the application where the item is managed. For pages, users also need Read and Update page permissions on the page they are working with.
- Save the new workflow.
The workflow is now created and ready to be configured.
Configure the workflow scope
Once a workflow is created, you can define its scope. Each content type can be assigned a single workflow. If a content type is already associated with a workflow, it will be excluded from the available scope options.
- Select the workflow you want to configure.
- Switch to the Scope tab.
- Select content types and choose the types to which you want to apply the workflow. You can pick multiple content types. Types for pages, emails, reusable content and headless items are all supported.
- Save the selected content types.
Upon assigning a workflow to a content type, individual content items do not initiate the workflow automatically. The workflow applies only when an item starts a new editing cycle, which includes new items or new versions of existing published items.
The editing cycle ends when an item reaches the Published step. Existing items in the Draft step do not automatically use the workflow with custom steps until they are published and a new editing cycle starts. There is currently no alternative way to start the newly applied workflow with custom steps.
Configure the workflow steps
Select the workflow you want to configure.
On the Steps tab, select New step.
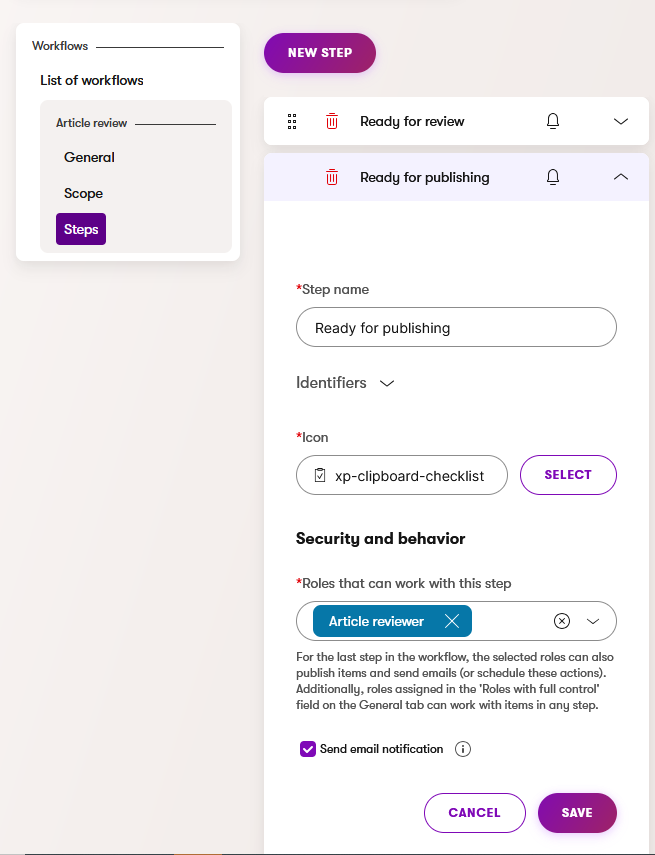
Specify the following values:
- Step name
- (Optional) Identifiers – specify the code name if you wish to use a code name different than the pre-filled value.
- Note: The code names of workflow steps must be unique across all steps in any workflow.
- Icon
- Roles that can work with this step – designates roles that are permitted to edit items in this step and move to the next or previous step. For the final custom step in the workflow, the roles gain the ability to publish items or send/schedule regular emails.
When workflow notifications are enabled for this step, users with roles selected in this field will receive notifications for items they have the Update permission for.
Additionally, roles assigned in the Roles with full control field on the workflow’s General tab can work with items in any step.
Workflow roles and other permissions
In addition to the role settings for workflow steps, the system also checks other relevant permissions when deciding if a user is allowed to edit an item under workflow. Users need the appropriate application-level permission to access the application where the item is managed. For pages, users also need Read and Update page permissions on the page they are working with.
- Send email notifications – clear the checkbox to disable notifications. When enabled, notifications are sent when an item reaches this step.
- The checkbox for the first workflow step also determines whether a notification is sent when an item moves from this step back to the Draft step.
- If you want to enable notifications and your project is deployed in private cloud, make sure that the service domain for notifications is set up for your project. Workflow notifications cannot be sent unless the domain is set up.
Save the step.
Repeat the process for all steps required for your workflow. You can drag steps in the list to change their order.
Workflow notifications
Prerequisite
Make sure that the service domain for notifications is set up in your project. For projects deployed in the Xperience by Kentico SaaS environment, the service domain is configured automatically.
When using workflows in your content editing process, users in various roles need to work with items at different stages of the content lifecycle. Workflow notifications can help users keep track of the work that requires their input. For example, users may wish to be notified when an item transitions to a step that needs their approval or review.
Notifications are available for custom workflow steps and for the Draft step:
- Custom steps: When notifications are enabled for a custom step, a notification email is sent automatically when an item is moved to this step.
- Draft step: Notifications for the Draft step are configured by enabling notifications for the first custom step, and they cannot be set up independently. Draft step notifications are sent when an item is moved back to the Draft step from the first custom step with notifications enabled.
By default, notifications are enabled when adding a new custom step. You can see the list of custom steps configured to send notifications in the Notifications application. Workflow notifications do not cover the Published step. If you need notifications for this step, you can set up custom workflow notifications.
Notification recipients
When an item is moved to a custom step with notifications enabled, a notification email is automatically sent to all users who have the Update permission for the affected item and are also assigned to roles that can work with this step (determined by the Roles that can work with this step field in workflow step configuration). Users with full control do not get automatically notified.
Notifications about the movement of the item back to the Draft step are always sent only to the user who created the item and the user who last modified the item.
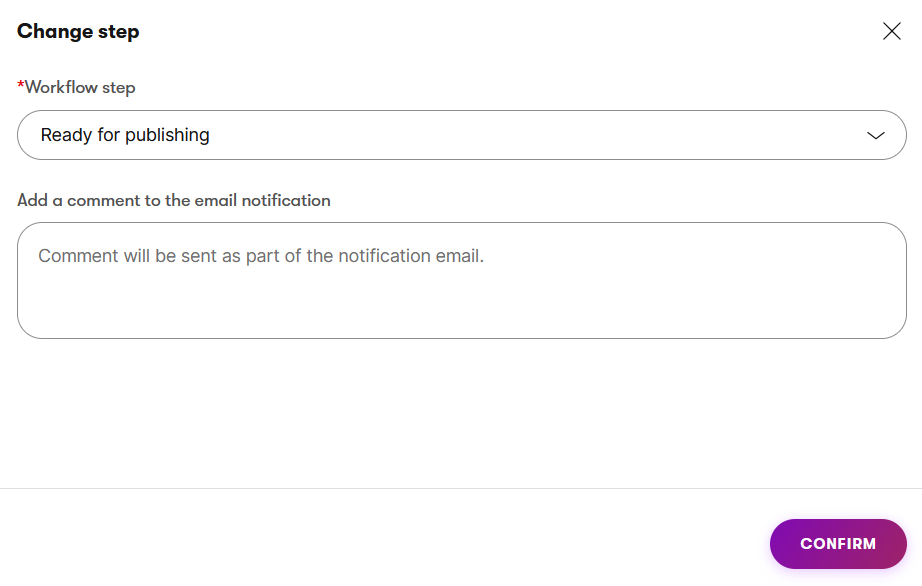
Notification comment
Users can add a comment when moving an item to a step with notifications enabled. The comment is included in the email notification.
Enable workflow notifications
By default, workflow notifications are enabled when creating new custom workflow steps.
To enable notifications for an existing custom workflow step:
- Open the Workflows application.
- Select the workflow that includes the custom step for which you want to enable notifications.
- On the Steps tab, select the step you are interested in.
- Select the Send email notifications checkbox.
- Save the changes.
Edit the content of the workflow notification
You can customize the default content of the email notifications:
Open the Notifications application.
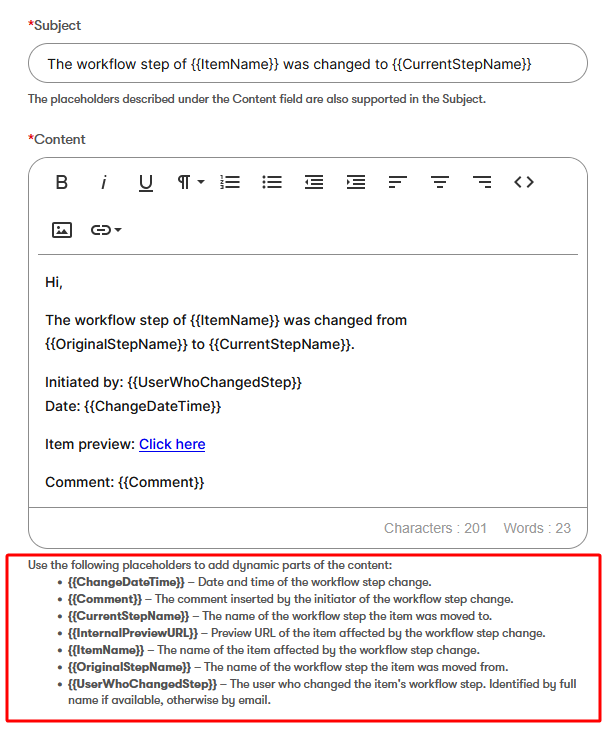
Select the Workflow step change notification and edit the email content.
- You can use the provided content placeholders to add dynamic parts of the content.
{{InternalPreviewURL}}can be utilized to add a link to the item that is moved. The placeholder is optional for workflow notifications.- We do not recommend removing the
{{Comment}}content placeholder, as it inserts the comment added by users when moving an item.
Save the changes.
See all custom workflow steps with notifications enabled
To see all custom workflow steps configured to send a notification when reached:
- Open the Notifications application.
- Select the Workflow step change notification.
- Go to the Properties tab and see Affected workflow steps.
Share a page with external reviewers
When editors want to share a page with reviewers who don’t have access to the administration, they can create a shareable preview URL for this purpose. See Shareable preview URLs for more information.