
Module: Members
2 of 11 Pages
Lay the groundwork for the registration widget
Many websites allow visitors to register and sign in for exclusive access to premium content. You can add this functionality to your website channels in Xperience by Kentico by implementing Members in your site.
Let’s dive into the first step of this process, expanding upon the standard approach by creating a reusable widget that allows members to register via Forms authentication. It also includes an overview of how to apply the same approach to a Sign-in widget.
Integrating the registration form into a widget requires extra complexity compared to using a standard routed MVC view.
The registration widget will allow editors to do the following:
- Easily link to a registration page from components like the Page selector, Combined content selector, and Rich text editor.
- Seamlessly integrate the registration form into relevant pages, such as landing pages for campaigns driving member registration.
- Configure the design of the components, for example, deciding which fields the form should include and defining custom field labels.
However, it requires extra development. The widget uses hidden form fields to make sure its configuration persists through server-side validation.
To see simpler examples using standard MVC routed views for membership functionality, check out the following resources:
- The Xperience by Kentico Community Portal on GitHub.
- The Dancing Goat sample project, available through the
Kentico.Xperience.Templates.NET Templates package.
Examine the requirements
For this guide’s example, imagine you have the following requirements for member registration:
- A visitor can fill out a form to become a member and create an account.
- If a member shares their full name, they can choose the display order.
- Editors can include the registration form in campaign landing pages.
- Editors can specify their own labels for the fields in each language.
- Editors can choose to display the form with only required fields, or to include optional fields.
- When a new member signs up, they get a default member role assigned automatically.
You can extend the member class with custom fields to handle the name order requirement.
All of the requirements regarding editors’ control of the registration forms can be met by making the registration form a widget: editors can place the widget on Page Builder zones in landing pages and use widget properties to configure the labels and fields to display in the registration form.
To meet the role requirement, use Xperience’s built-in Member roles feature. Both the main and finished branches of the Training guides repository already include enabled roles and three member roles extended with custom attributes (see GuidesRole.cs and three roles defined in the CI files, Basic, Insider and Enthusiast).
Enabling and extending member roles is well-covered in our documentation, and we don’t explain the implementation details in this page. However, we do demonstrate how to assign a default role to new members at the time of creation.
Extend the Member class
To start, let’s add custom fields that allow members to configure the order of their full names. While we’re at it, we’ll also add a field to mirror the “favorite coffee” example from our training guide about customizing contacts.
Define the module fields
Navigate to the Modules application in Xperience, and edit the Membership module. Choose Classes → Member → Database columns. Add text fields for the given name, family name, and favorite coffee of your members, along with a boolean field to indicate if the family name should go first.
- Given name
- Field name: GuidesMemberGivenName
- Data type: Text
- Size: 100
- Required: False (disabled)
- Family name
- Field name: GuidesMemberFamilyName
- Data type: Text
- Size: 100
- Required: False (disabled)
- Family name first
- Field name: GuidesMemberFamilyNameFirst
- Data type: Boolean (Yes/No)
- Required: False (disabled)
- Default value: False (disabled)
- Favorite coffee
- Field name: GuidesMemberFavoriteCoffee
- Data type: Text
- Size: 100
- Required: False (disabled)
Now, these custom columns exist in the database. You can read and manipulate them using the GetValue and SetValue methods of a MemberInfo object in code.
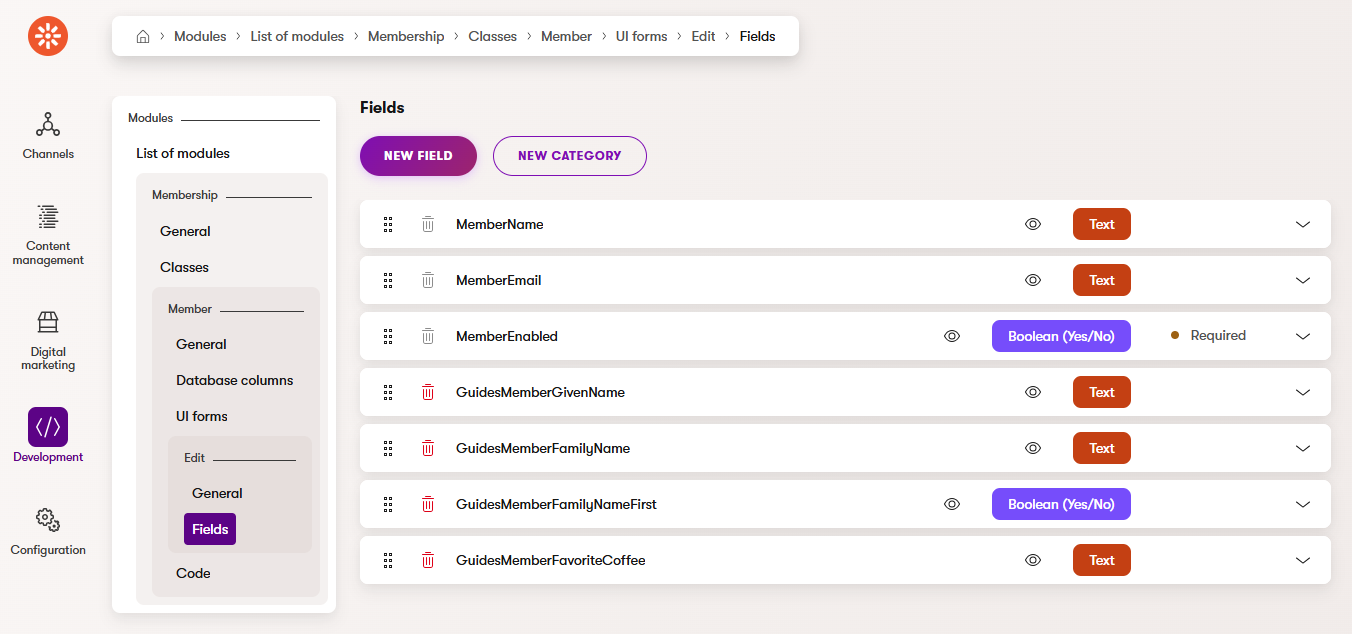
Adjust the UI
While we can access our custom fields in code, they will not show up in the Xperience admin UI without further adjustment.
After defining the fields in the Modules application, switch to the UI forms tab of the Member class and click on the Edit form. On its Fields tab, add a New field for each of the database columns you created previously, defining appropriate captions and form components.
Extend the ApplicationUser class
Xperience comes with a class called ApplicationUser out of the box, which ties the Xperience MemberInfo object to .NET Identity. However, this class is in an assembly and cannot be directly modified.
To add our custom fields and any other functionality, we need to extend this class.
Start by creating a folder called Membership under the Features folder of the TrainingGuides.Web project. Here you can extend ApplicationUser with a new class called GuidesMember, featuring properties for our custom fields.
Then, define methods to map between the custom class and the MemberInfo object from Xperience by Kentico.
using CMS.Membership;
using Kentico.Membership;

namespace TrainingGuides.Web.Features.Membership;

public class GuidesMember : ApplicationUser
{
    public string GivenName { get; set; } = string.Empty;
    public string FamilyName { get; set; } = string.Empty;
    public bool FamilyNameFirst { get; set; } = false;
    public string FullName =>
        (GivenName, FamilyName) switch
        {
            ("", "") => string.Empty,
            (string given, "") => given,
            ("", string family) => family,
            (string given, string family) =>
                FamilyNameFirst ? $"{family} {given}" : $"{given} {family}",
            (null, null) or _ => string.Empty,
        };

    public string FavoriteCoffee { get; set; } = string.Empty;
    public DateTime Created { get; set; }

    public override void MapToMemberInfo(MemberInfo target)
    {
        if (target is null)
        {
            throw new ArgumentNullException(nameof(target));
        }

        /*
         * base.MapToMemberInfo will set target.MemberPassword every time
         * however we do not want to set it if PasswordHash is null,
         * and this stores the original so we can revert it
         */
        string originalPasswordHash = target.MemberPassword;

        base.MapToMemberInfo(target);

        if (PasswordHash is null)
        {
            target.MemberPassword = originalPasswordHash;
        }

        _ = target.SetValue("GuidesMemberGivenName", GivenName);
        _ = target.SetValue("GuidesMemberFamilyName", FamilyName);
        _ = target.SetValue("GuidesMemberFamilyNameFirst", FamilyNameFirst);
        _ = target.SetValue("GuidesMemberFavoriteCoffee", FavoriteCoffee);
    }

    public override void MapFromMemberInfo(MemberInfo source)
    {
        base.MapFromMemberInfo(source);

        GivenName = source.GetValue("GuidesMemberGivenName", string.Empty);
        FamilyName = source.GetValue("GuidesMemberFamilyName", string.Empty);
        FamilyNameFirst = source.GetValue("GuidesMemberFamilyNameFirst", false);
        FavoriteCoffee = source.GetValue("GuidesMemberFavoriteCoffee", string.Empty);
        Created = source.MemberCreated;
    }

    public static GuidesMember FromMemberInfo(MemberInfo memberInfo)
    {
        var guidesMember = new GuidesMember();
        guidesMember.MapFromMemberInfo(memberInfo);

        return guidesMember;
    }
}

public static class MemberInfoExtensions
{
    public static GuidesMember AsGuidesMember(this MemberInfo member) =>
        GuidesMember.FromMemberInfo(member);
}
Set up Identity
Now, to enable .NET Identity, we need to Configure registration and authentication.
The code below will enable usage of our custom GuidesMember as well as the custom GuidesRole.
using Kentico.Membership;
using Microsoft.AspNetCore.Identity;
...
var builder = WebApplication.CreateBuilder(args);
...
builder.Services
    .AddIdentity<GuidesMember, GuidesRole>(options =>
    {
        options.SignIn.RequireConfirmedEmail = false; // Change this to true once you implement email confirmation as a part of the registration process.
        options.User.RequireUniqueEmail = true;
    })
    .AddUserStore<ApplicationUserStore<GuidesMember>>()
    .AddRoleStore<ApplicationRoleStore<GuidesRole>>()
    .AddUserManager<UserManager<GuidesMember>>()
    .AddRoleManager<RoleManager<GuidesRole>>()
    .AddSignInManager<SignInManager<GuidesMember>>()
    .AddDefaultTokenProviders();
...
builder.Services.AddAuthorization();
...
// After calling InitKentico and UseStaticFiles
// Make sure to call the middleware in this order
// Note that some of these lines are already present in a different order in the main branch.
app.UseCookiePolicy();
app.UseAuthentication();
app.UseKentico();
app.UseAuthorization();
...
Differences in the finished branch code
If you look at the code in the finished branch of our repository, you’ll notice additional calls, such as AddDefaultTokenProviders and ConfigureApplicationCookie.
These relate to other adjacent functionality like restricted content and email confirmation as a part of the registration process. You can find working examples of many identity features in the repository, and guides about some of them later in this series.
Create a service
To contain functionality related to membership operations, such as creating and managing members, let’s make a service.
Create a Services folder under the Membership folder in your project and add an IMembershipService interface.
namespace TrainingGuides.Web.Features.Membership.Services;

/// <summary>
/// Interface for membership services.
/// </summary>
public interface IMembershipService
{

}
Then, add a class to hold implementations of these members, and register the implementation.
namespace TrainingGuides.Web.Features.Membership.Services;

public class MembershipService : IMembershipService
{

}
using TrainingGuides.Web.Features.Membership.Services;
...
public static void AddTrainingGuidesServices(this IServiceCollection services)
{
    ...
    services.AddScoped<IMembershipService, MembershipService>();
    ...

}
Make sure to register your service as scoped; some crucial parts of .NET Identity are scoped services, and we’ll want to utilize them in our code.
We’ll expand this service as needed throughout the guide, but for now let’s move on to the widget.
Consider your region’s data protection laws
Since Member objects in Xperience contain personally identifiable information about the humans they represent, real-life implementations of member registration may need to include a consent to store that data if your company does business in a region with laws governing data protection.
It is likely that this consent will need to be separate and have distinct verbiage from consents related to contact tracking, such as the cookie consents from the Data protection series.
Managing consents alongside members is outside the scope of this example, but you can find information about working with consents in the Xperience by Kentico documentation.