Module: Work with website content
6 of 27 Pages
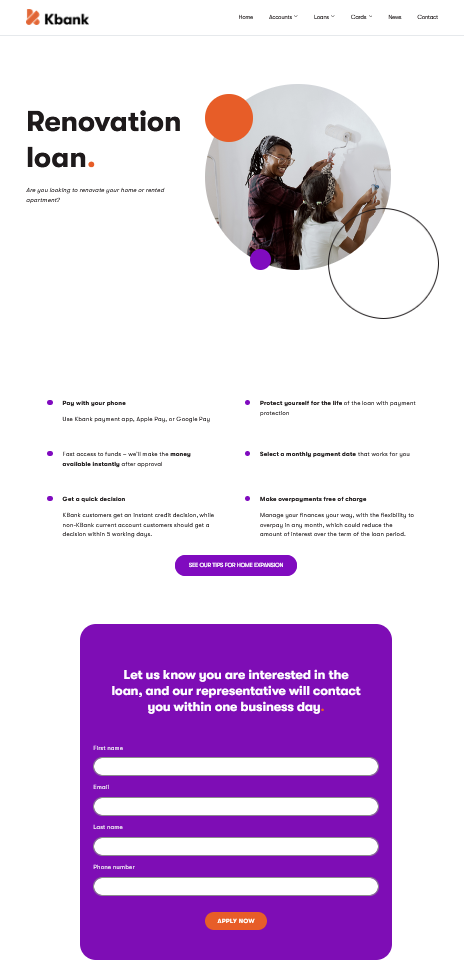
Create a new campaign page
Learn step-by-step how to create a campaign page from scratch.
This sample shows how to create a landing page from scratch, add widgets, and populate them with content, including an online form.
Do you know what it’s like working with Xperience by Kentico? Try our Kbank demo website and get a hands-on experience. And if you don’t have your demo site, request it through the form at Kentico website and request the Xperience by Kentico – Business Tutorial Kbank demo site. Once you approve the request, we will automatically send you a link to the demo site.
Prepare the landing page
- Go to the Channels application.
- Select Personal Banking → Campaign pages in the content tree and create a New page.
- Pick the Content page content type.
- Fill in the internal Name: Renovation loan.
- Choose the Content (Default) page template
- Save the changes.
Add the widgets
Add a Hero banner
Select the Add widget plus button in the middle of the page and add a Hero banner.
Select the Configure widget to open the Hero banner properties.
Select the Select hero content item option and Create new. Then fill in:
- Content item name: Renovation loan.
- Choose Workspace → Personal Banking.
- Use Continue to save changes.
- Title: Renovation loan.
- Short description: Are you looking to renovate your home or rented apartment?
- Asset/Media → Select existing content item
- Switch to Kbank Global Media Assets Workspace → search for Home rebuild with Kbank loan.
- Save and close the changes.
De-select the Display CTA option.
Apply.
Add product benefits
Add the Multi column section using the grey Add section plus button on the side. Then click the purple plus button in the middle of the editing area and add a Benefit widget.
Select the Configure widget to open the Benefit properties.
Choose the Benefit content items and Only dot options.
Select existing product benefits from the Shared resources Workspace and confirm the choice with Select:
- Mobile phone pay.
- Fast access to funds.
- Payment protection.
- Get a quick decision.
- Payments moved automatically.
- Make overpayments free of charge.
Apply the changes.
Add Call to action
Select the Add widget plus button on the bottom of the Benefit widget and add a CTA button.
Select the Configure widget button to adjust the CTA properties:
- CTA Button text: See our tips for home expansion.
- Target content: Page.
- Target page: Select and choose News → Want more space?
- Confirm with the Select button.
Hit the Apply button to save the changes.
Add a form
Now add another section, but this time choose the Form column.
Add the Page heading widget and Configure it:
- Choose Heading type: H3.
- Insert the Title: Let us know you are interested in the loan, and our representative will contact you within one business day.
- Apply to see the heading.
Add a Form widget using the plus button below the Page heading widget.
Select the Configure widget to open the Form properties.
- Use the Select a form button. To simplify this exercise, choose the First time buyers campaign form.
- Configure After form submission behaviour by filling in the Display a message field with: Thank you for choosing to renovate with Kbank.
- Apply the change.
Save the page and open it in Preview. If you like what it looks like, you can Publish the page.