
Module: Work with multilingual
10 of 18 Pages
Prerequisites for AIRA translations and setup
A little preparation goes a long way toward smooth translation results. Before you start using AIRA, check that your project is ready.
Languages – Make sure that all your desired target languages are added in the Languages application.
This step defines the language variants that AIRA can create for your website. See the documentation on Languages for detailed setup info.Access rights – Check that your user role can access both AIRA configuration and Content hub. If you can’t see those apps, ask your Xperience administrator to grant you access to those spaces.
Tone of voice (optional) – To help AIRA reflect your brand’s personality, define your tone of voice in Configuration → AIRA application → Content generation tab.
For example: Friendly and clear, with a touch of humor.
The Tone of voice field is limited to 256 characters, so you may want to take a bit of time to brainstorm a ToV prompt that is both brief and descriptive.
By preparing these basics, you’ll ensure your translations are as accurate as possible, and aligned with your brand identity from day one.
Setting up automated translations in AIRA
Once your environment is ready, it’s time to configure AIRA for your first translations. This setup defines how AIRA interprets and translates your content and ensures the results sound like your brand.
Like most AI tools, AIRA delivers the best results when you refine your prompts over time. Start with an initial version, review the results, and adjust your prompts based on what you learn. Even slight changes to the translation prompt can make a significant difference.
Set aside some time to fine-tune your translation process and prompts. This will help AIRA better match your brand’s tone and produce more natural translations.
Open the AIRA configuration
Start by going to Configuration → AIRA. Here you’ll find two key areas: one for tone of voice (how your brand speaks) and one for translation settings (how your text gets converted across languages).
Switch to the Content generation tab to review or define your tone of voice. It’s located here and not in the translation settings because AIRA will use the definition you provide in this tab for both content generation and translation purposes. This way you make sure that your messaging is consistent across all markets from the very beginning.
Define tone of voice
Your tone of voice is what gives your brand character. Even automated translations should sound recognizably you.
- Add a short description that captures your messaging style. Example: Professional yet approachable. Clear, concise, and empathetic.
- Save your settings.
Configure translation options
Now it’s time to teach AIRA how to handle your translations.
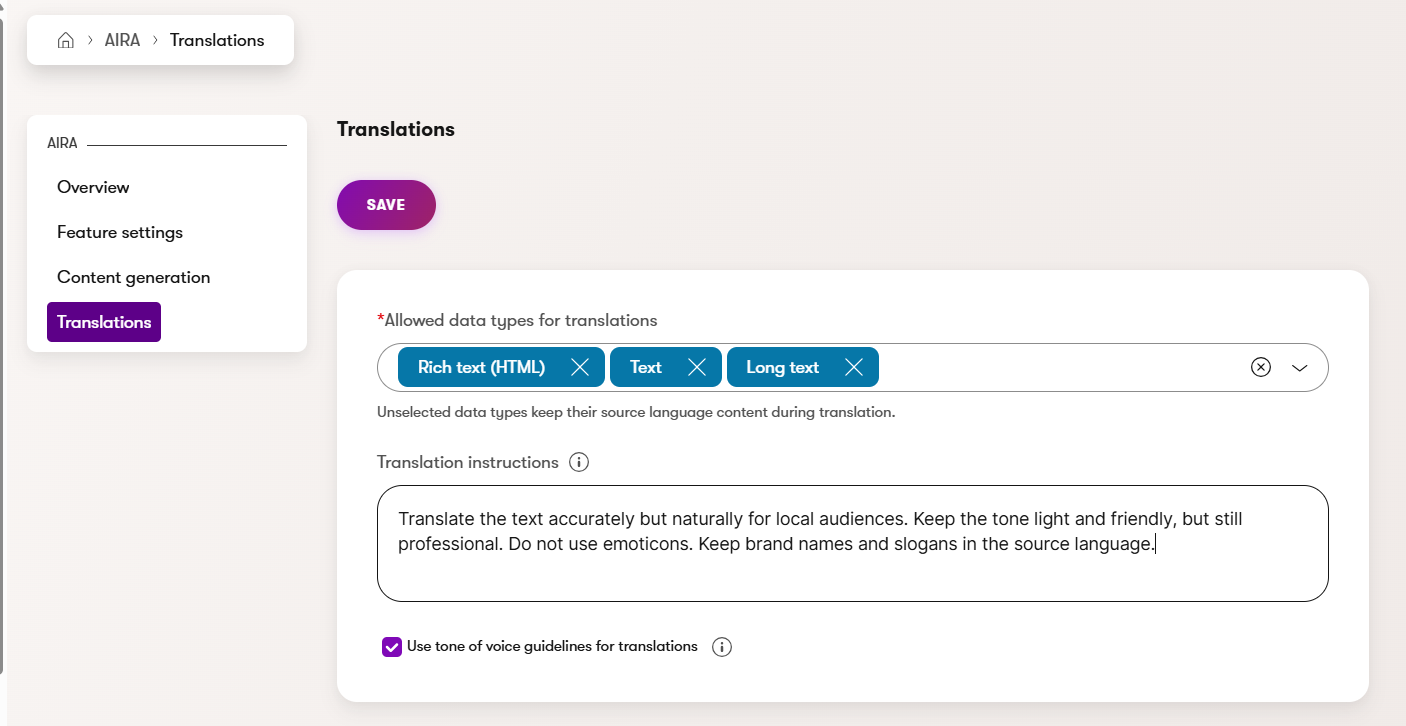
- Go to the Translations tab.
- Choose which data types can be translated:
- Text
- Long text
- Rich text (HTML)
For admins: The available types depend on what your developers have enabled.
- Text
- Create your translation instruction (prompt) – this is the most important specification that tells AIRA exactly what to do.
Think of it as your brand’s “translation brief”. You can mention tone, terminology, words to leave untranslated, or audience details.Example:
Translate the text accurately but naturally for local audiences. Keep the tone light and friendly, but still professional. Do not use emoticons. Keep brand names and slogans in the source language. - Keep the Use tone of voice guidelines for translations option selected if you wish AIRA to use the tone of voice you defined earlier.
- Save your prompt and settings.
- Perform a few test translations to see how your setup behaves and adjust it as needed.
You’ve now built the foundation that tells AIRA how to translate in a way that fits your brand voice. Although you can not adjust the system prompt that powers AIRA translation feature itself, you can still customize it to add your own flavor.