
Developing the Services page (ASPX)
Create a website section for services. The page template used for this section will contain a tree menu on the left and a single editable region.
Preparing the ASPX source file
Edit your web project in Visual Studio
Right-click the CMSTemplates/MySite folder in the Solution Explorer and click Add -> Add New Item.
Create a Web Form named LeftMenuRightText.aspx and check Select master page.
Click Add and choose the MyMaster.master page from the CMSTemplates/MySite folder.
Enter the following HTML layout code into the <asp:Content> element on the page:
 <table style="width: 100%;">
     <tr style="vertical-align: top;">
         <td style="width: 20%;">

         </td>
         <td style="width: 80%;">

         </td>
     </tr>
 </table>
Drag the CMSTreeMenu control into the first table cell and the CMSEditableRegion control into the second cell.
Set the following properties for the controls:
CMSTreeMenu:Property
Value
Description
Path
/{0}/%
Configures the tree menu to display pages starting from the second level of the currently selected path.
MenuItemImageURL
~/app_themes/mysite/images/bullet.gif
Sets the path of the image displayed next to items in the tree menu.
The ~ character represents the root of the website. This relative path ensures that the control displays the image correctly even if the website’s virtual directory name changes.
MenuItemOpenImageURL
~/app_themes/mysite/images/bullet.gif
Specifies the image displayed next to items in the tree menu that belong on the path of the currently selected page.
CMSEditableRegion:
Property
Value
Description
RegionType
HTMLEditor
Determines which type of editing interface the control provides. With this option, the editable region works as a WYSIWYG HTML editor.
DialogHeight
400
Sets the height of the editable region in pixels.
RegionTitle
Main Text
Specifies the title displayed in the header of the editable region on the Page tab of the Pages application in the Kentico administration interface.
Switch to the code behind of the services page (LeftMenuRightText.aspx.cs) and add a reference to the CMS.UIControls namespace:
using CMS.UIControls;Change the class definition so that it inherits from the TemplatePage class:
public partial class CMSTemplates_MySite_LeftMenuRightText : TemplatePageSave the files.
Registering the page template
The source files of the services page are ready. Now you need to register the page template in Kentico.
- Switch to the Kentico administration interface in your browser.
- Open the Page templates application.
- Select the My website category.
- Click New template and type Left menu with right text into the Template display name field.
- Click Save.
- Set the following values on the General tab:
- Template type: ASPX page
- File name: ~/CMSTemplates/MySite/LeftMenuRightText.aspx
- Click Save.
- Switch to the Sites tab and assign the page template to My website.
Adding the services section
Now that the page template is ready, you can start adding pages based on it.
- Open the Pages application.
- Select the root of the content tree (My website).
- Click New ().
- Choose the Page (menu item) page type.
- Type in Services as the Page name and choose the Use existing page template option. Select the My website category and the Left menu with right text page template.
- Click Save to create the page.
The Page tab of the Services page opens, where you can enter text content into the editable region on the right.
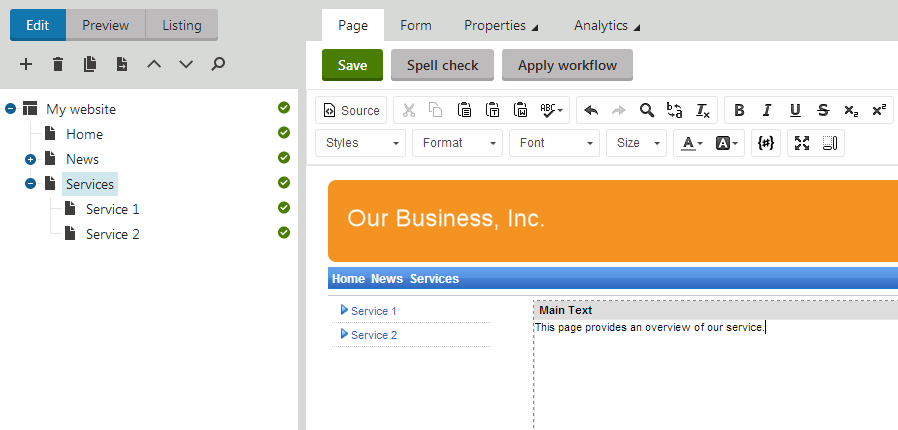
Creating sub-pages
You can use the same page template to add separate pages containing information about individual services under the Services page.
- In the Pages application, select the /Services page.
- Click New ().
- Choose the Page (menu item) page type.
- Type in Service 1 as the Page name and choose the Use existing page template option. Select the My website category and the Left menu with right text page template.
- Click Save and create another and repeat the same process to add any number of pages dedicated to particular services.
All of the service pages use the same template as the main overview page (/Services). The page template provides the tree menu for navigation in the services section and an editable region. The system stores the text of the region separately for every page, so you can enter unique content on each page.