Module: Custom modules: custom settings
8 of 9 Pages
Access channel-specific settings directly
We recommend using the options pattern to follow .NET best practices, but if it does not fit your team’s code style, it is not necessary.
Earlier in this series, we created a module that allows users to define code snippets associated with a given channel. For this guide’s sample, let’s create a view component that retrieves the code snippets for the current channel and renders them to the layout page.
Enter the data
Once again we need to add some data, so that our code has something to work with.
In the admin UI, navigate to Project settings → Channel settings → Training guides pages → Channel snippets in the Xperience admin UI.
Add one of each type of snippet. If you don’t have specific tags you want to include, you can use:
- First snippet
- Label: Test meta
- Identifiers → Code name: TestMeta
- Type: Metadata
- Code:
HTML
<meta name="this is a test" content="12345">
- Second snippet
- Label: Test CSS
- Identifiers → Code name: TestCSS
- Type: CSS
- Code:
HTML
  <style>
      .newclass{
          display:inline;
      }
  </style>
- Third snippet
- Label: Test javascript
- Identifiers → Code name: TestJavascript
- Type: Javascript
- Code:
HTML<script> var toInsert = document.createElement("div"); toInsert.innerHTML = "This text was added through a javascript snippet in the <b>Project settings</b> application."; document.body.appendChild(toInsert); </script>
The CSS and JavaScript snippets do not need to be inline code, as in this example. They can link to other resources.
Add supporting files
Our example view component needs some additional foundational code:
First, create a CodeSnippets folder beneath the Features folder of the TrainingGuides.Web project.
Then add a CodeSnippetType enumeration that corresponds to the WebChannelSnippetType property that we defined in the class.
public enum CodeSnippetType
{
    Metadata,
    CSS,
    Javascript,
}
Finally, define a view model with properties for the code, type, and label of a code snippet.
using Microsoft.AspNetCore.Html;

namespace TrainingGuides.Web.Features.CodeSnippets;

public class CodeSnippetViewModel
{
    public HtmlString CodeSnippetHtml { get; set; } = new HtmlString(string.Empty);
    public string CodeSnippetType { get; set; } = string.Empty;
    public string CodeSnippetLabel { get; set; } = string.Empty;
}
Retrieve the values
In general, retrieving channel-specific module class values without the options pattern is the same approach you used in the options setup file. You can use an IWebsiteChannelContext object to get the current channel, and an IInfoProvider<TInfo> object or dedicated provider to access objects of your module class.
For our example, add an asynchronous view component to the CodeSnippets folder. Add parameters to InvokeAsync that specify which type of snippet should be retrieved, and whether the snippet should be labelled with an HTML comment.
using CMS.DataEngine;
using CMS.Websites.Routing;
using Microsoft.AspNetCore.Html;
using Microsoft.AspNetCore.Mvc;
using TrainingGuides.ProjectSettings;

namespace TrainingGuides.Web.Features.CodeSnippets;

public class CodeSnippetsViewComponent : ViewComponent
{
    private readonly IInfoProvider<WebChannelSnippetInfo> webChannelSnippetInfoProvider;
    private readonly IInfoProvider<WebChannelSettingsInfo> webChannelSettingsInfoProvider;
    private readonly IWebsiteChannelContext websiteChannelContext;

    public CodeSnippetsViewComponent(IInfoProvider<WebChannelSnippetInfo> webChannelSnippetInfoProvider, IInfoProvider<WebChannelSettingsInfo> webChannelSettingsInfoProvider, IWebsiteChannelContext websiteChannelContext)
    {
        this.webChannelSnippetInfoProvider = webChannelSnippetInfoProvider;
        this.webChannelSettingsInfoProvider = webChannelSettingsInfoProvider;
        this.websiteChannelContext = websiteChannelContext;
    }

    public async Task<IViewComponentResult> InvokeAsync(CodeSnippetType codeSnippetType, bool addLabelComments = false)
    {
        // Retrieve the current channel
        int currentChannelID = websiteChannelContext.WebsiteChannelID;

        // Use the channel to get the associated web channel settings
        var settings = webChannelSettingsInfoProvider
            .Get()
            .WhereEquals(nameof(WebChannelSettingsInfo.WebChannelSettingsChannelID), currentChannelID)
            .AsSingleColumn(nameof(WebChannelSettingsInfo.WebChannelSettingsID));

        // Aquire snippets associated with the web channel settings
        var snippets = await webChannelSnippetInfoProvider
            .Get()
            .WhereIn(nameof(WebChannelSnippetInfo.WebChannelSnippetWebChannelSettingsID), settings)
            .WhereEquals(nameof(WebChannelSnippetInfo.WebChannelSnippetType), codeSnippetType.ToString())
            .GetEnumerableTypedResultAsync();

        // Return an IEnumerable collection of CodeSnippetViewModel objects
        var model = snippets.Select(snippet => new CodeSnippetViewModel
        {
            CodeSnippetHtml = new HtmlString(snippet.WebChannelSnippetCode),
            CodeSnippetType = snippet.WebChannelSnippetType,
            // If the view component is configured to add comment labels, use the display name
            CodeSnippetLabel = addLabelComments
            ? snippet.WebChannelSnippetDisplayName
            : string.Empty
        });
        return View("~/Features/CodeSnippets/CodeSnippetsViewComponent.cshtml", model);
    }
}
Utilize the data
Now that you have your custom module data, you can put it into practice. For example, use it in your business logic, or to control how your application renders parts of the display.
In the case of our example, it means creating the view for our view component, and using it to render code snippets to the page.
Add a new view, matching the path and name specified in the view component. For each code snippet in the provided model, render it to the page.
@using TrainingGuides.Web.Features.CodeSnippets
@model IEnumerable<CodeSnippetViewModel>

@foreach (var codeSnippet in Model)
{
    if (!string.IsNullOrWhiteSpace(codeSnippet.CodeSnippetLabel))
    {
        <!-- code snippet for @codeSnippet.CodeSnippetLabel -->
    }
    @codeSnippet.CodeSnippetHtml
}
Finally, utilize this view component in the _Layout.cshtml view, found in the ~/Views/Shared folder of the TrainingGuides.Web project.
Place three instances of the view component into the view:
- one after the
metatags, withcode-snippet-typeset to@CodeSnippetType.Metadata - one after the stylesheet links in the header, with
code-snippet-typeset to@CodeSnippetType.CSS - one after the
scripttags at the bottom of the body, withcode-snippet-typeset to@CodeSnippetType.Javascript
Try setting add-label-comments to true on one of them, so you can compare the results.
...
<html>
<head>
...
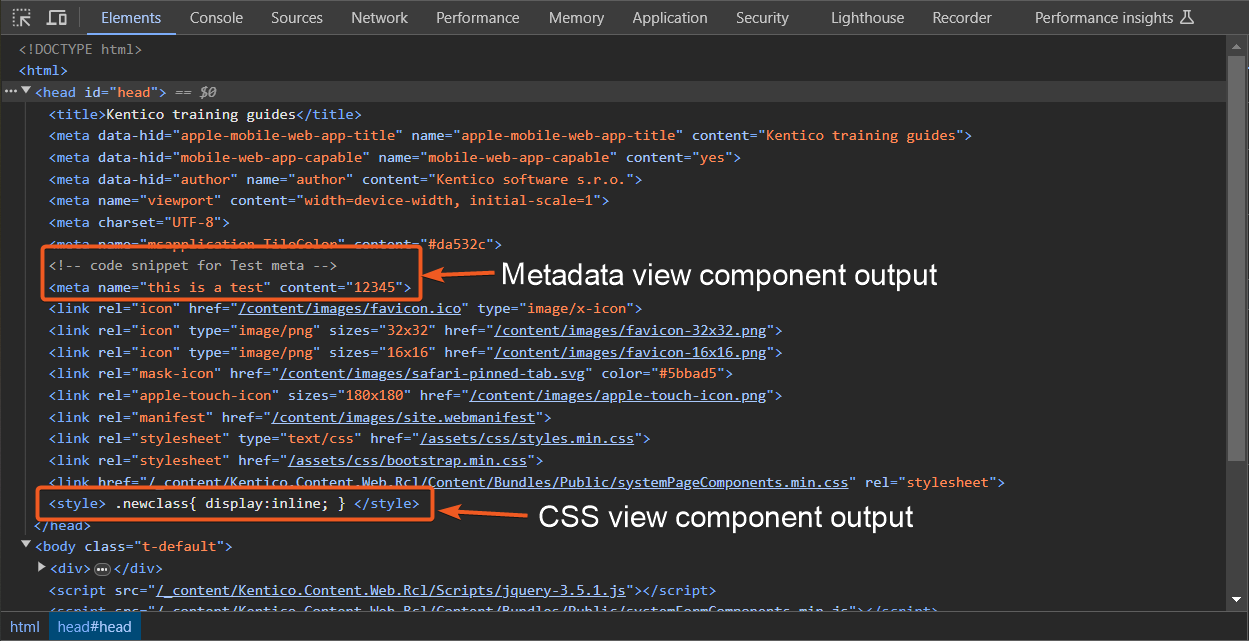
<vc:code-snippets code-snippet-type="@CodeSnippetType.Metadata" add-label-comments="true"/>
...
<vc:code-snippets code-snippet-type="@CodeSnippetType.CSS" />
</head>
<body>
...
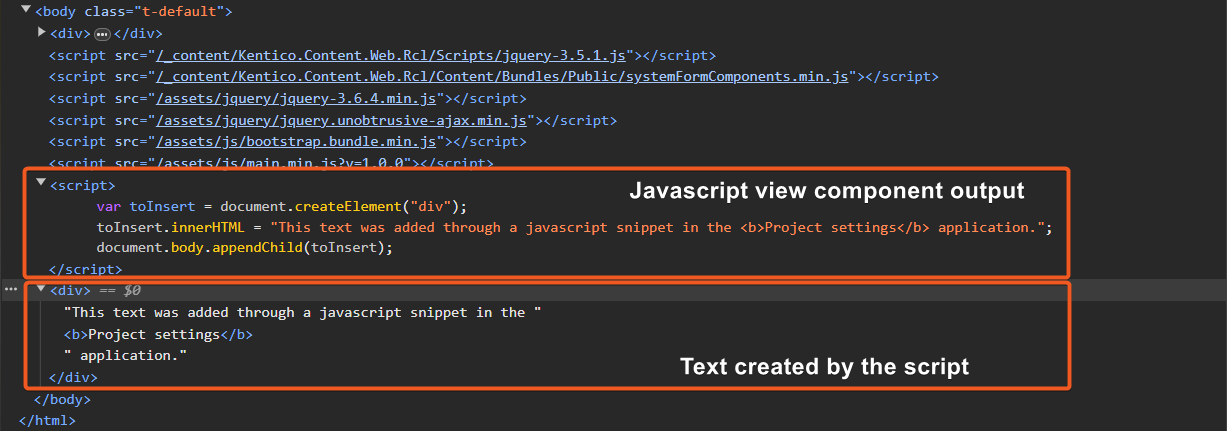
<vc:code-snippets code-snippet-type="@CodeSnippetType.Javascript" />
</body>
</html>
For reference, you can find the completed layout file in the finished branch of the Training guides repo.
Check the result
If you’ve followed the example, you should be able to find the tags in the source view of the page, and see the message rendered by the javascript at the very bottom.